How to Use Shop Design
02/10/2026
Summary
What is TikTok Shop Design and how can sellers use it to enhance their store pages?
- TikTok Shop Design is a free, user-friendly tool allowing sellers to customize their shop page with logos, banners, product collections, and layouts to create a branded shopping experience that boosts conversion rates (3.78% vs. 1.73%).
- Sellers can access it via Seller Center > Marketing > Shop Design, using drag-and-drop modules to organize products, add promotions, and preview changes in real time before publishing.
What are the key features and steps involved in creating or customizing a TikTok Shop page using Shop Design?
- Sellers can choose Auto-Generate Design (first-time users only) for a quick setup or Manual Customization for full control over layout, modules, header images, logos, and product collections.
- Key steps include uploading a high-quality header (780x720 px), adding product collections (auto-generated, templates, or manual), previewing the design, and publishing it live.
How do product collections work in TikTok Shop Design and why are they important for sellers?
- Product collections group themed products (e.g., New Arrivals, Best-Sellers) to reduce clutter, improve shopper navigation, and increase metrics like CTR, CVR, AOV, and GMV.
- Sellers can create collections via templates or manual selection, add branding and descriptions, preview effects, and sync collections across Shop Page and Customer Chat for multi-channel reach.
What tools and analytics does TikTok Shop Design provide to help sellers monitor and optimize their shop performance?
- The "This week’s highlight" section shows key metrics like page views, CTR, and conversion rate to track design impact.
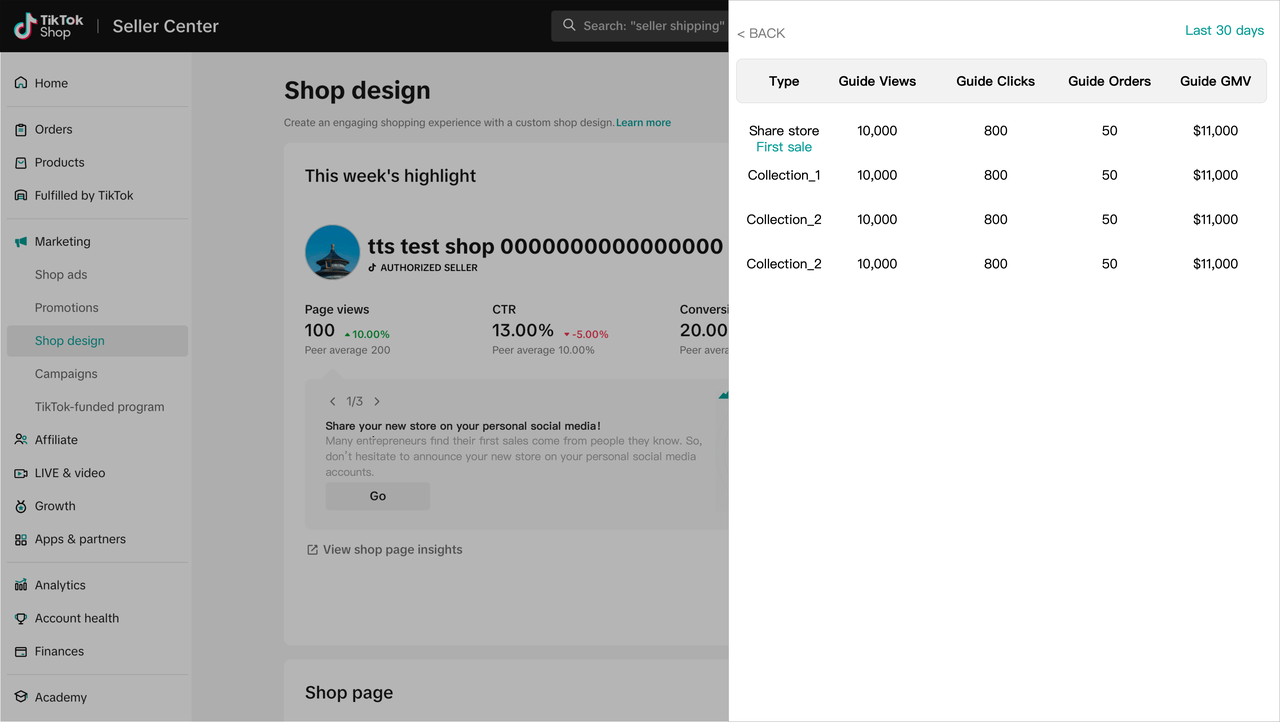
- Sellers can manage multiple shop page versions (live and drafts), share shop links/QR codes, and monitor product collection performance (UV, clicks, purchasers, GMV) to refine merchandising strategies.
What best practices and additional features should sellers consider when using TikTok Shop Design to maximize sales?
- Regularly update collections with seasonal or trending themes, use catchy titles and clear CTAs, and leverage ready-made templates for quick promotions.
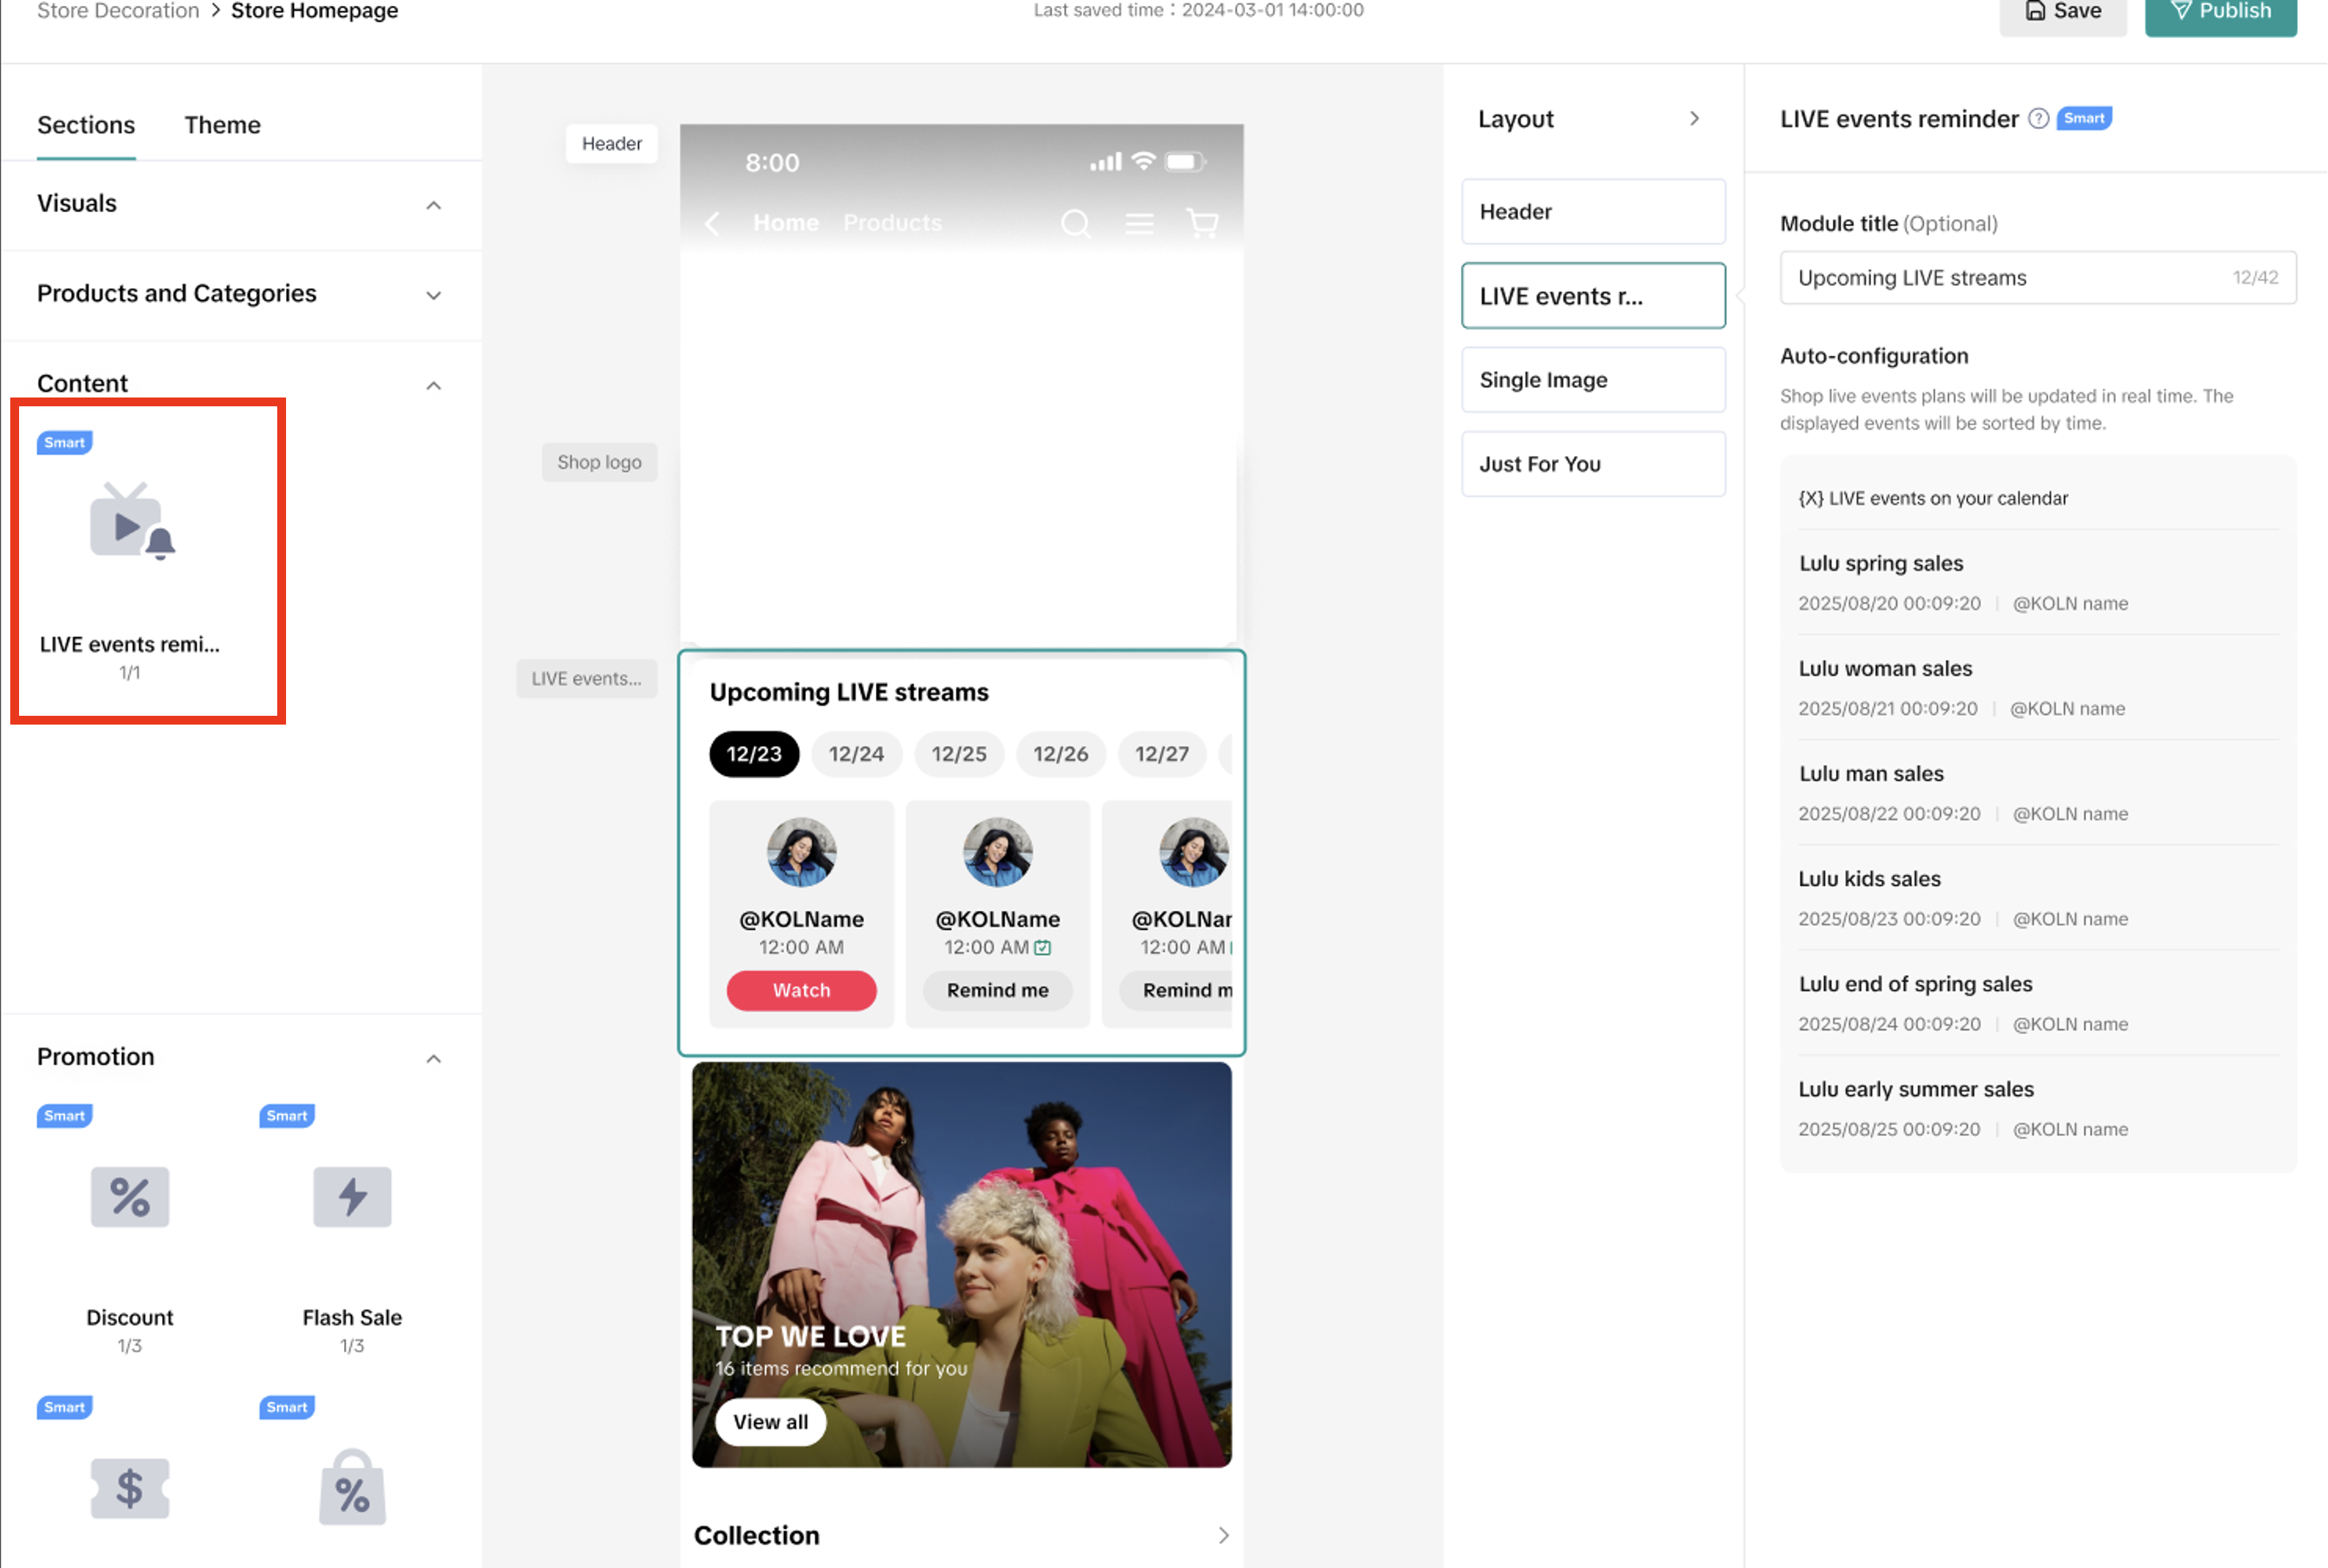
- Utilize the built-in image generator and editor for impactful visuals, set up LIVE reminders to engage shoppers, and share shop content widely to increase reach and conversions.
Feature Overview
Shop Design (formerly Shop Page) is a free, easy-to-use tool that lets you customize your TikTok Shop page—the main page shoppers see when they visit your store. You can add your logo, showcase key products, and design a layout that reflects your brand and makes it easier for shoppers to browse and buy your products.- Build a branded experience: Add your logo, banner, and layout to create a shop that feels unique and aligns with your brand.
- Organize your products your way: Use drag-and-drop modules to showcase collections, categories, and featured items.
- Increase sales: Shops using Shop Design convert at 3.78%, compared to 1.73% without.

How to Access This Feature
Accessing Shop Design:
- Log in to Seller Center.
- Go to Marketing on the left-hand menu.
- Click Shop design to start designing your shop.
What you'll see
| If you're a first time user: | If you've used Shop Design before: |
You'll see the Auto-Generate Design option and a prompt to get started with a prebuilt layout. 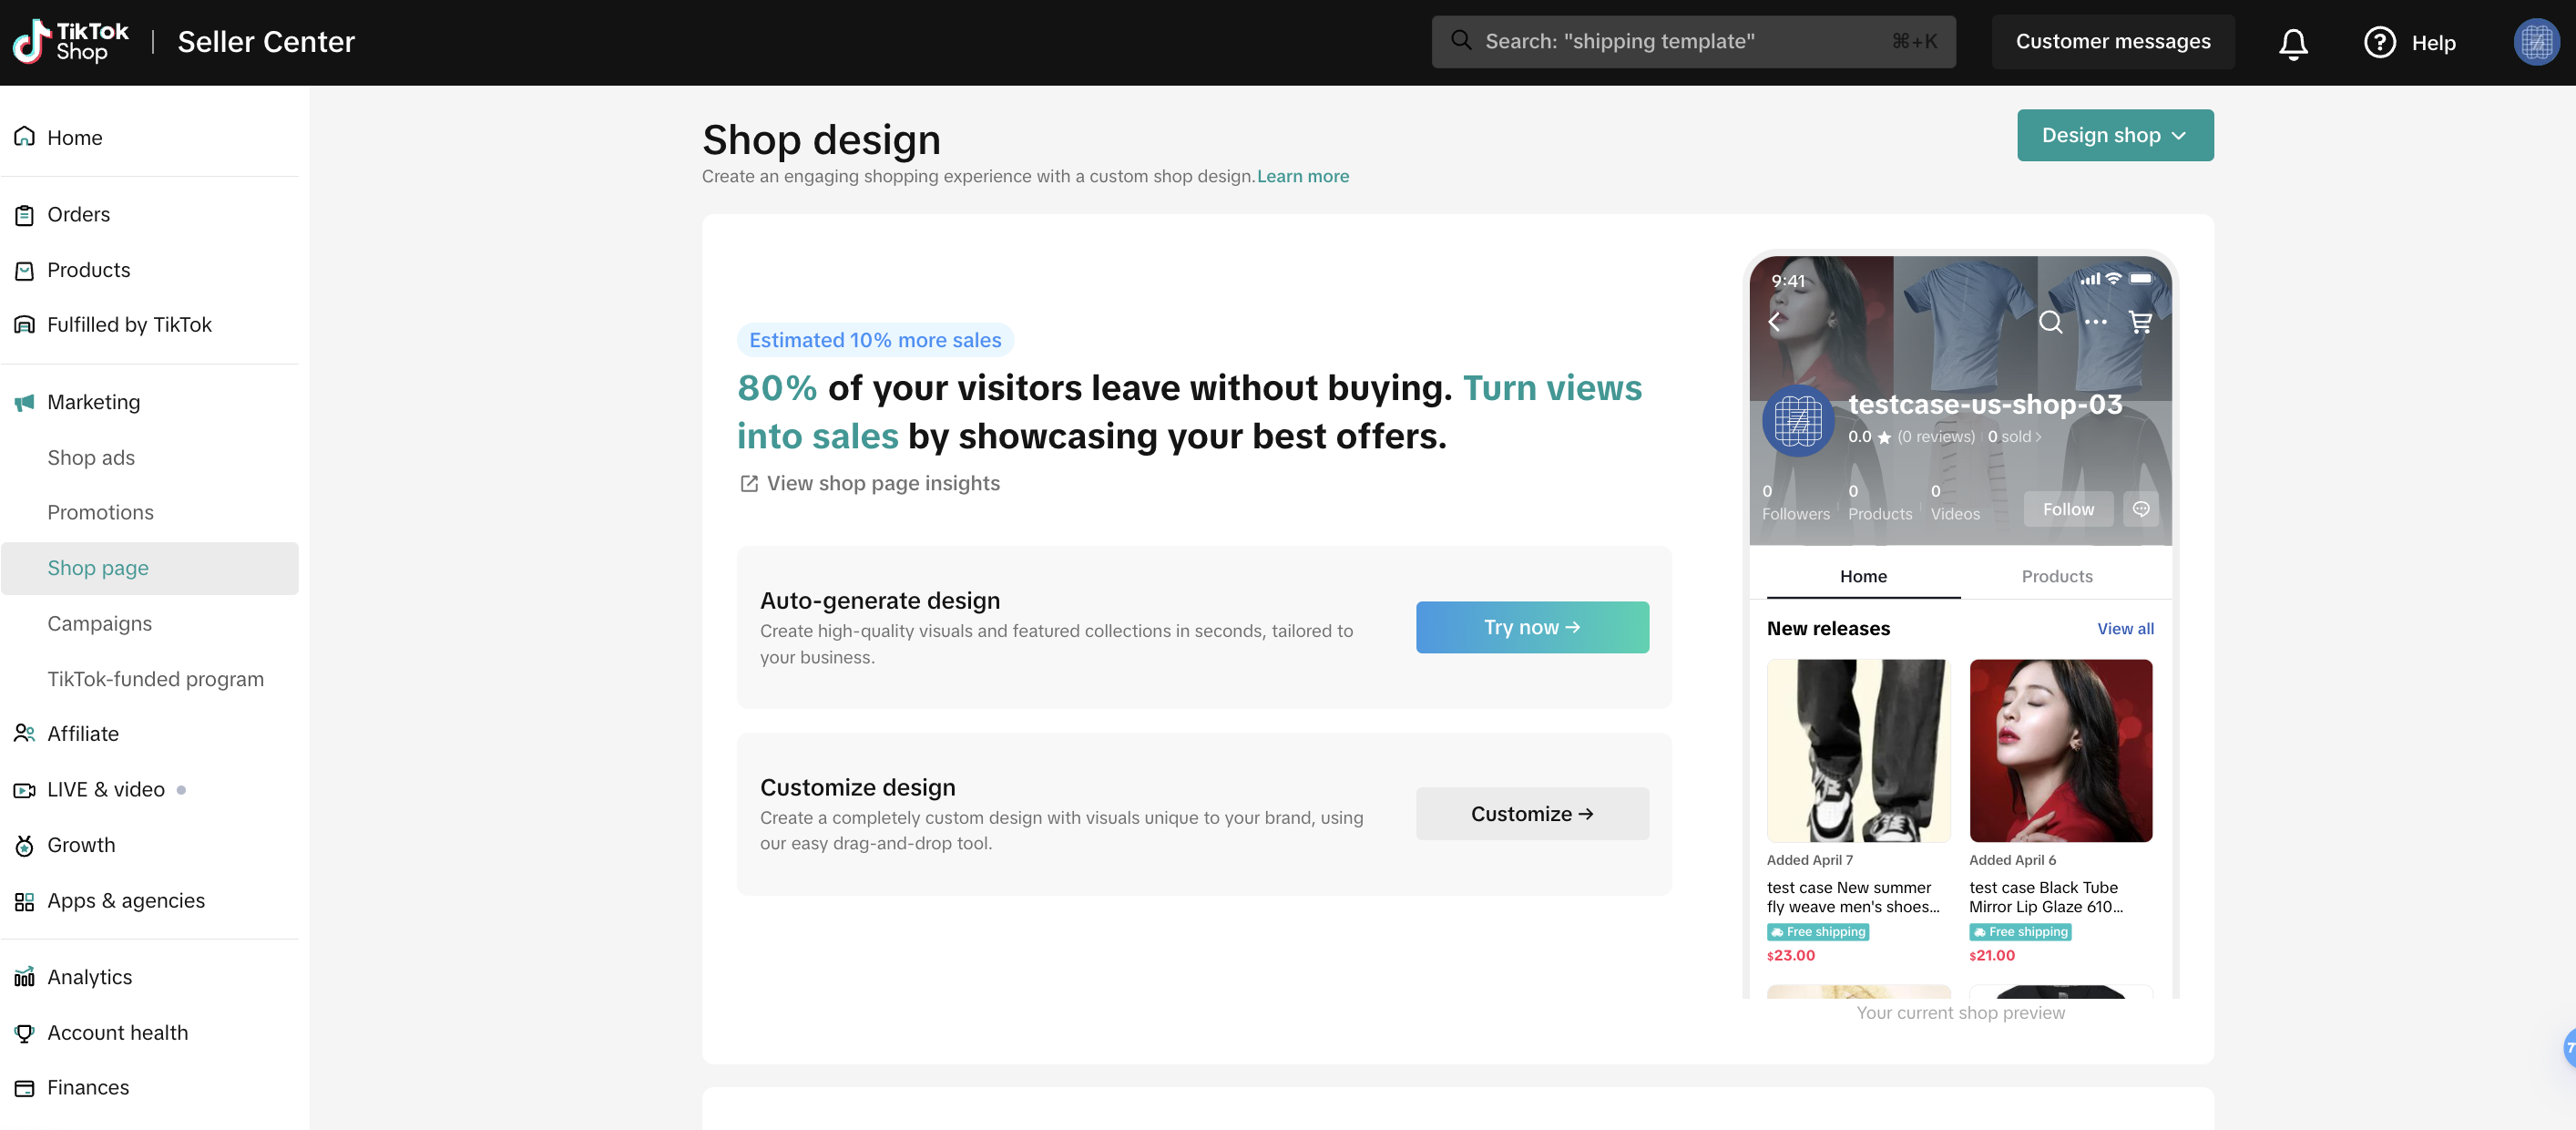 | You'll see your previously saved and published designs, including drafts and live versions.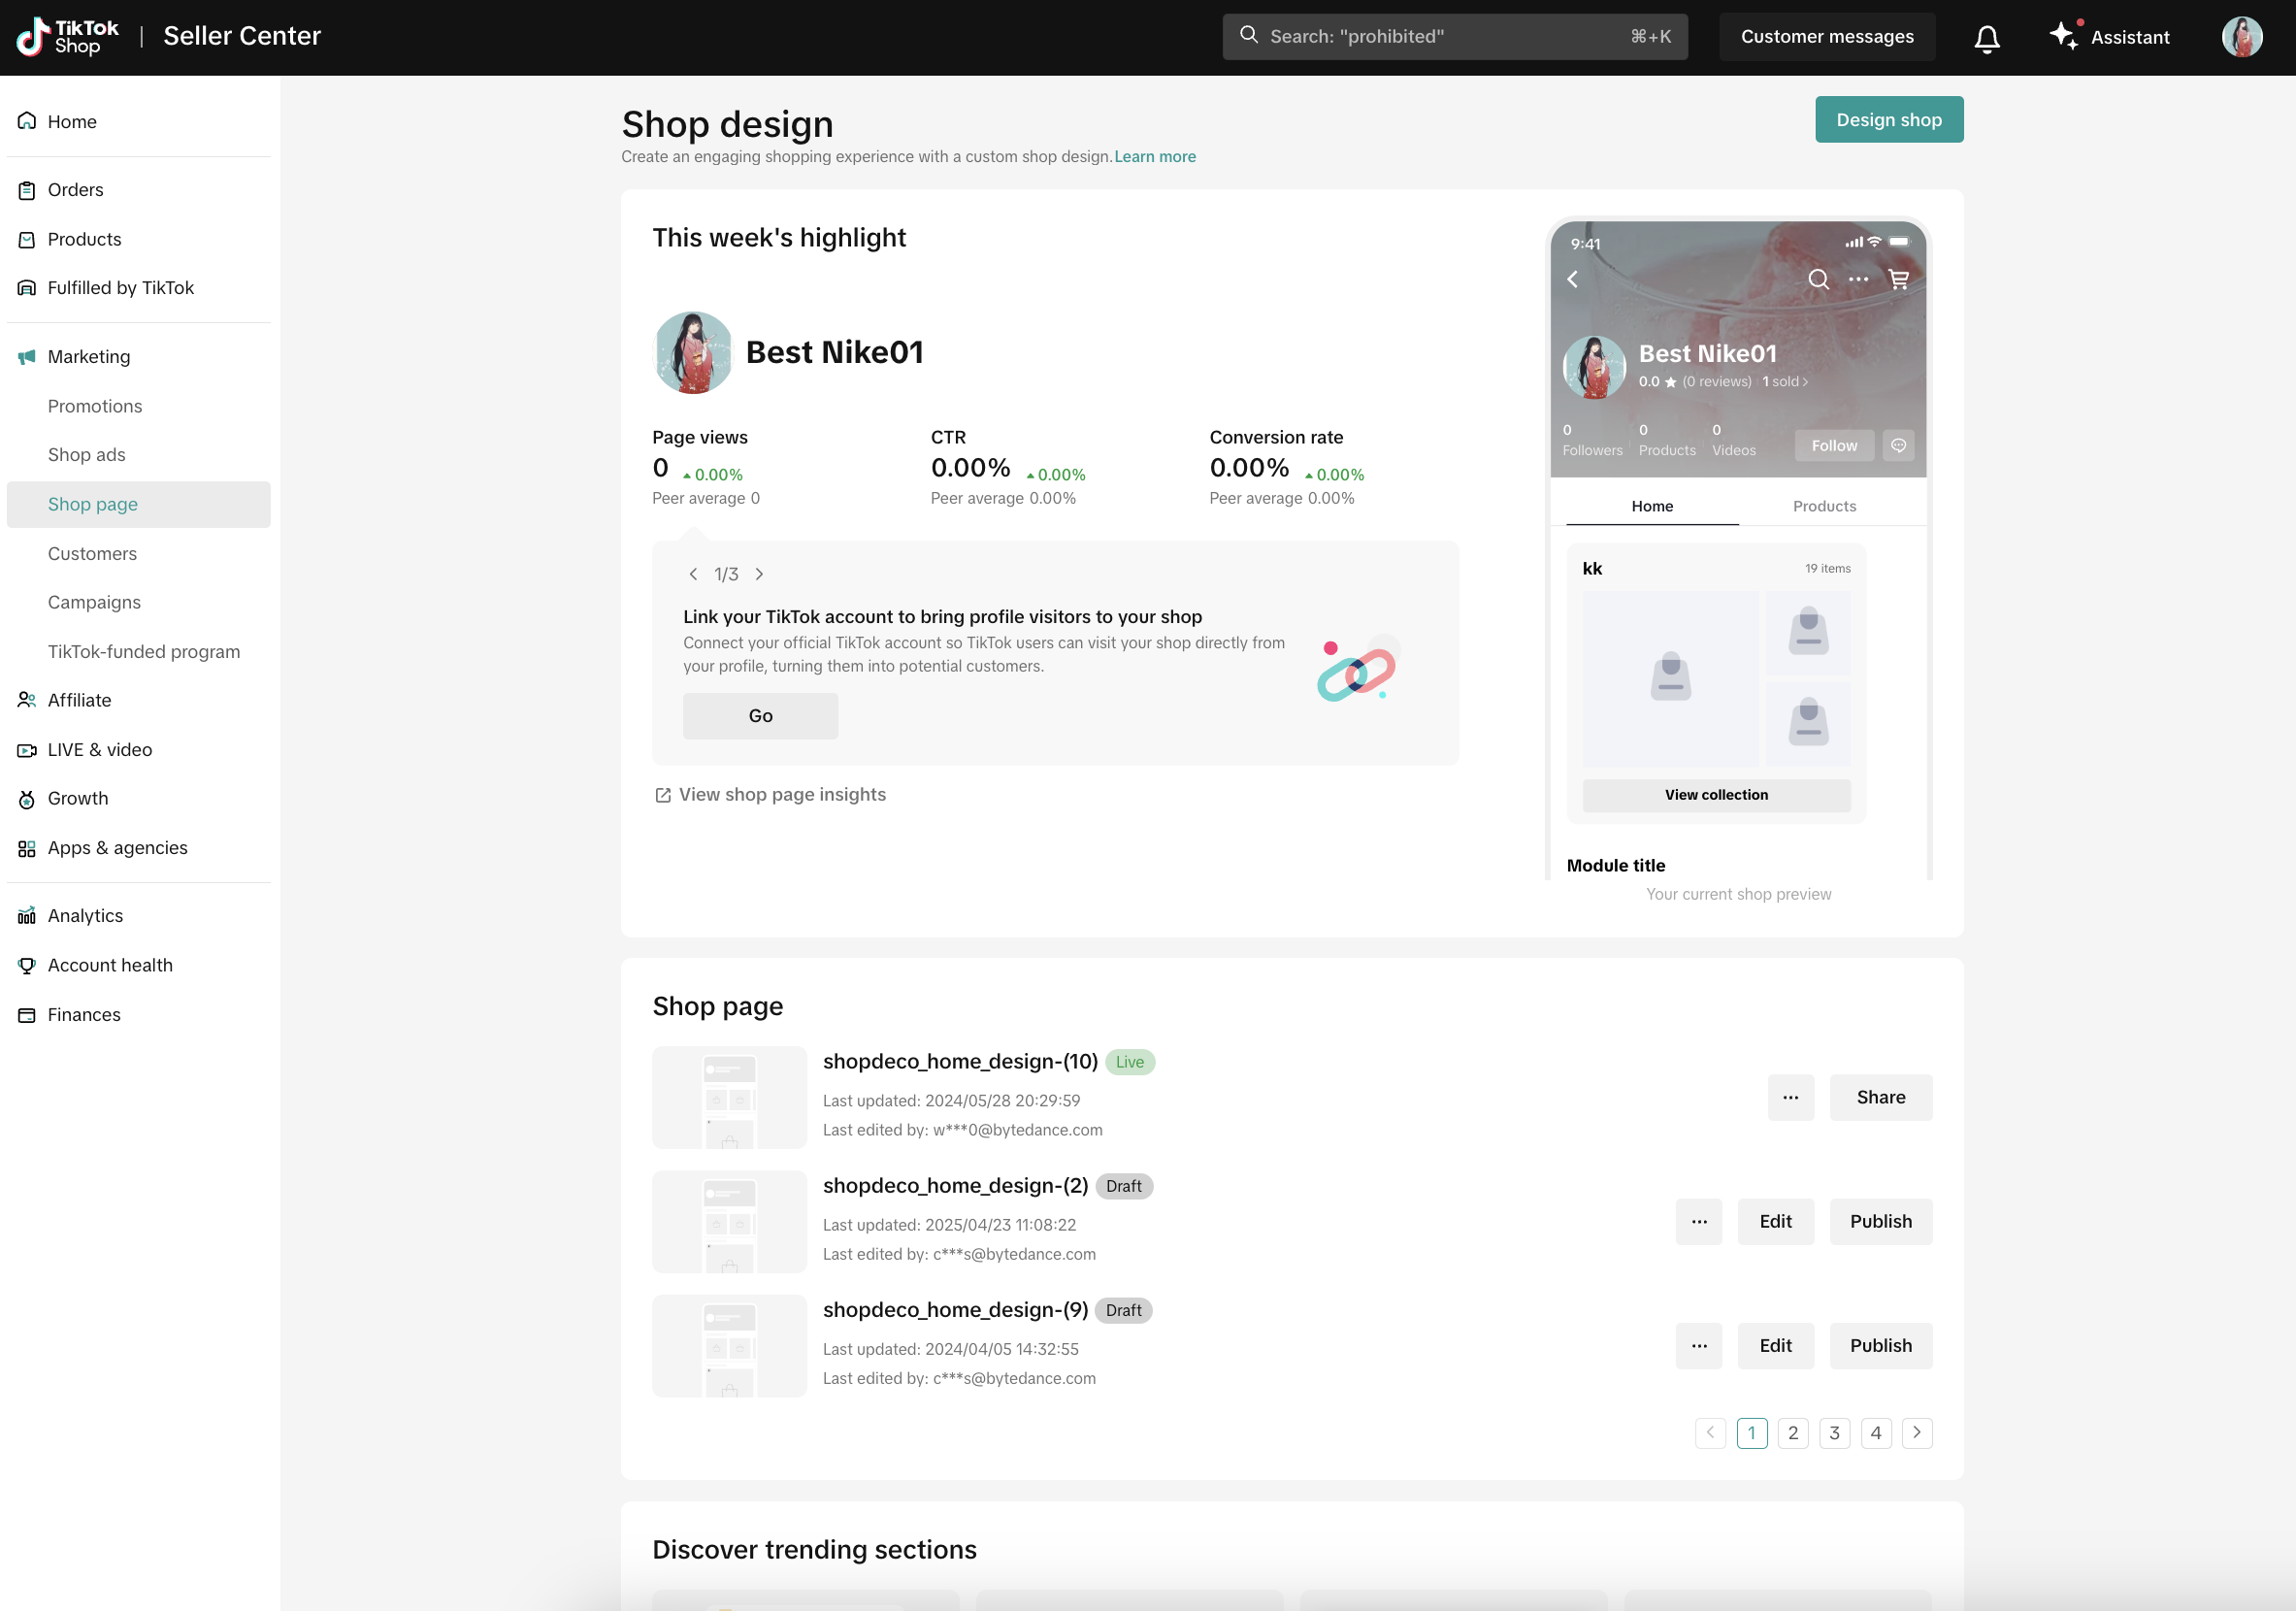 |

How it Works
You can design your shop in two ways: Auto-Generate Design and Manual Customization.Option 1: Auto-Generate Design (only available for first-time users)
This feature creates a simple shop layout for you, and is perfect if you're just getting started.- Step 1: Click Try now under Auto-generate design.
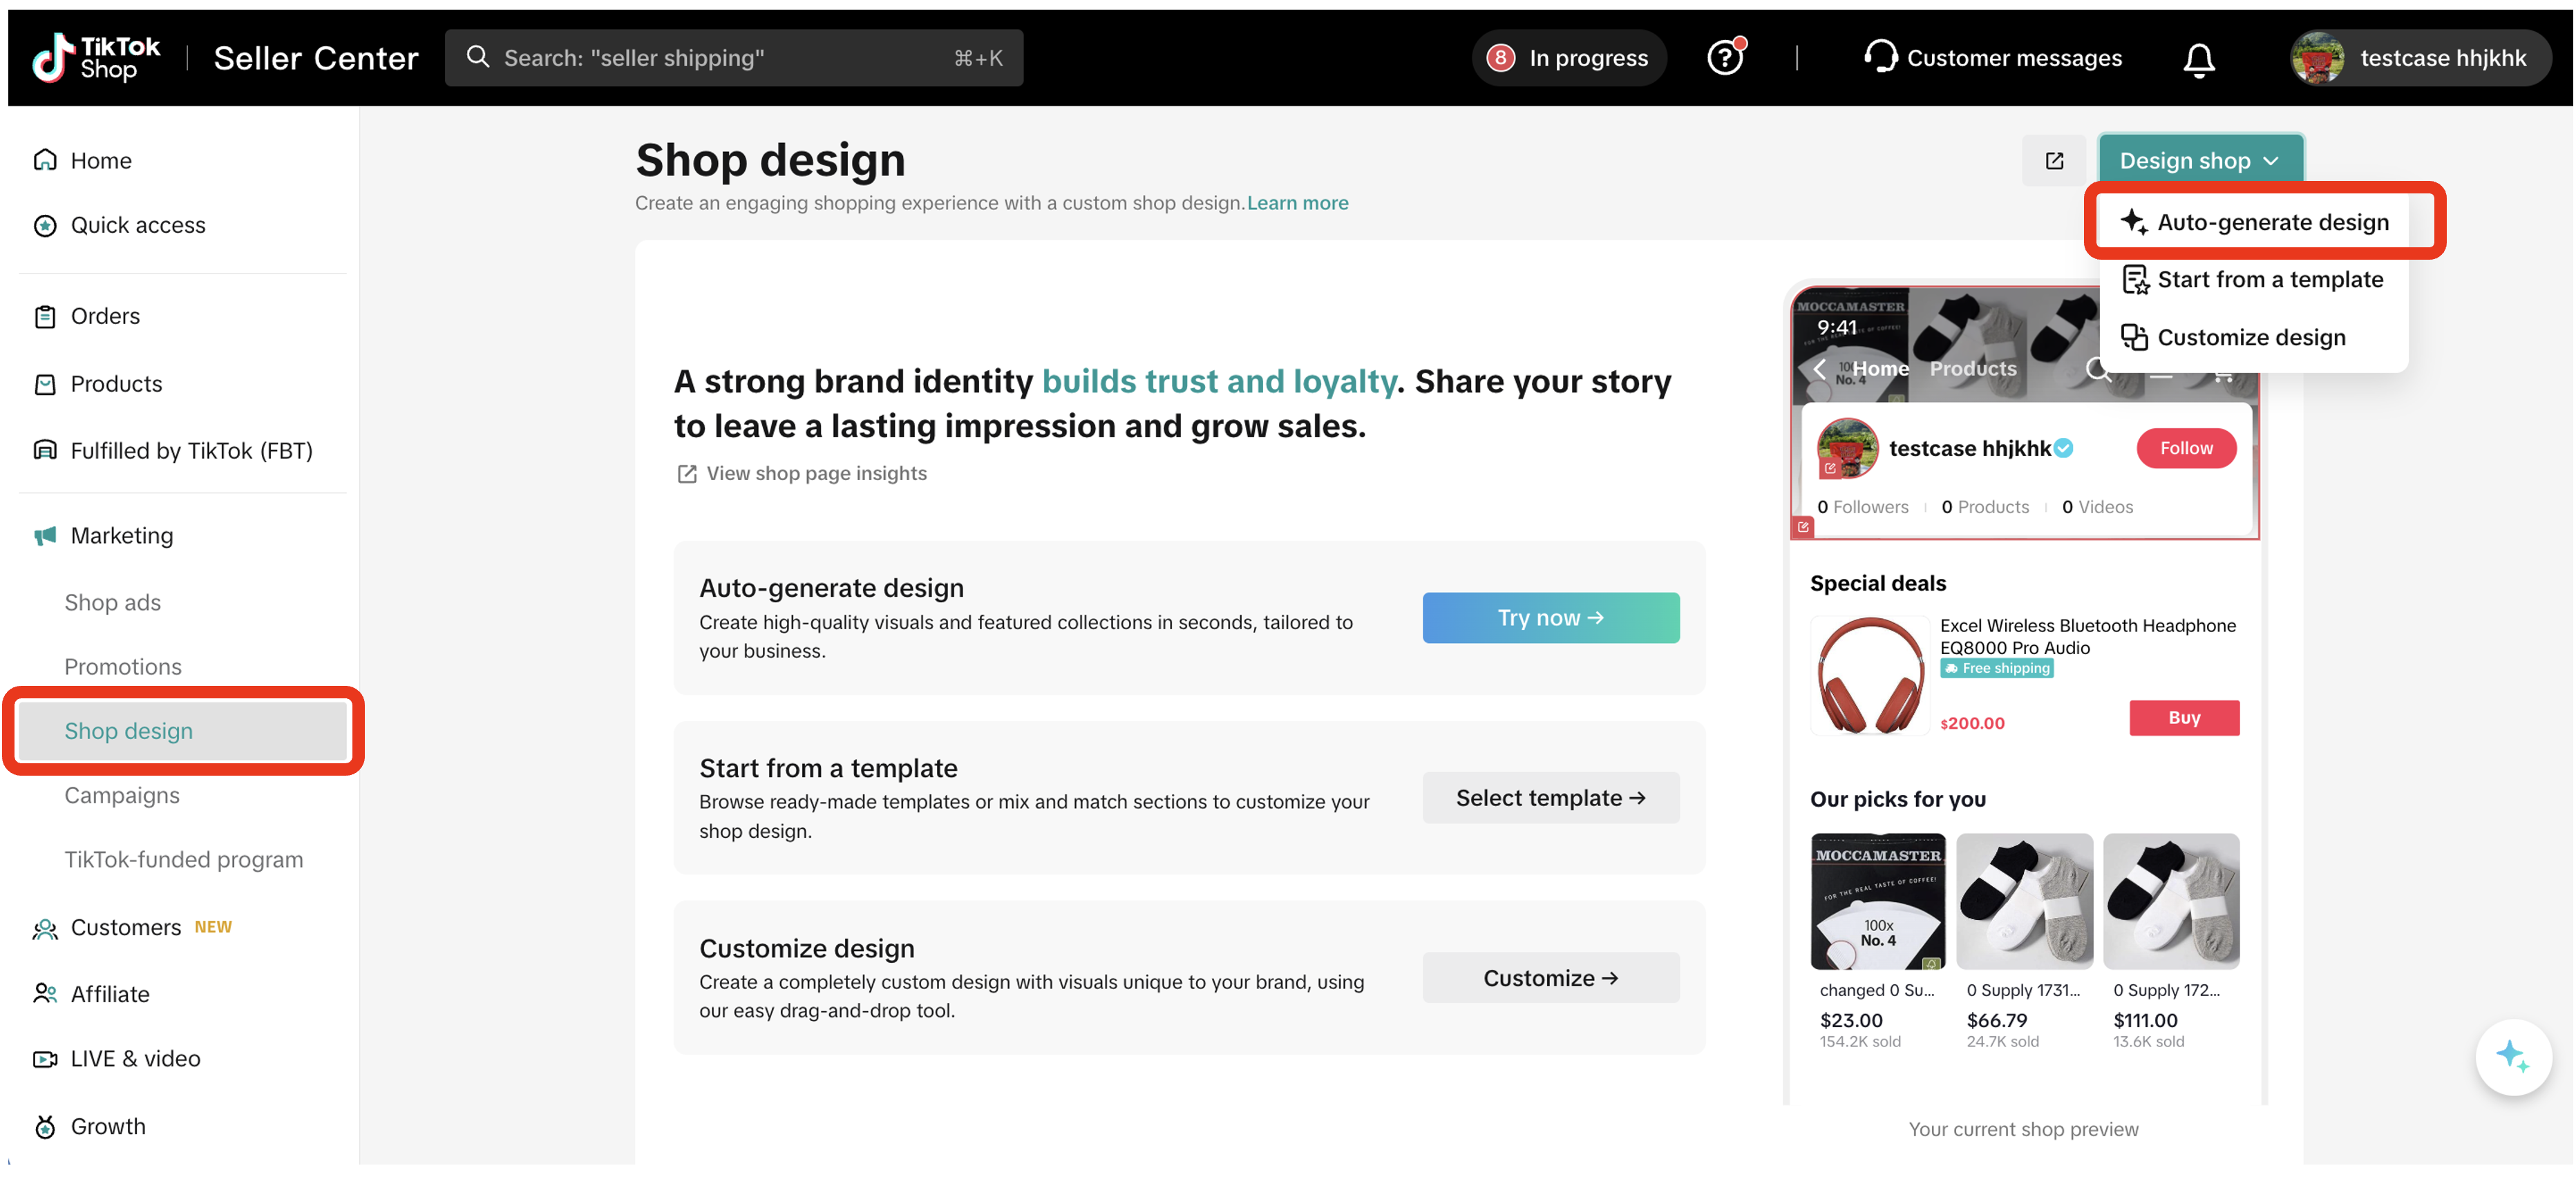
- Step 2: TikTok will add a default header image and product modules.
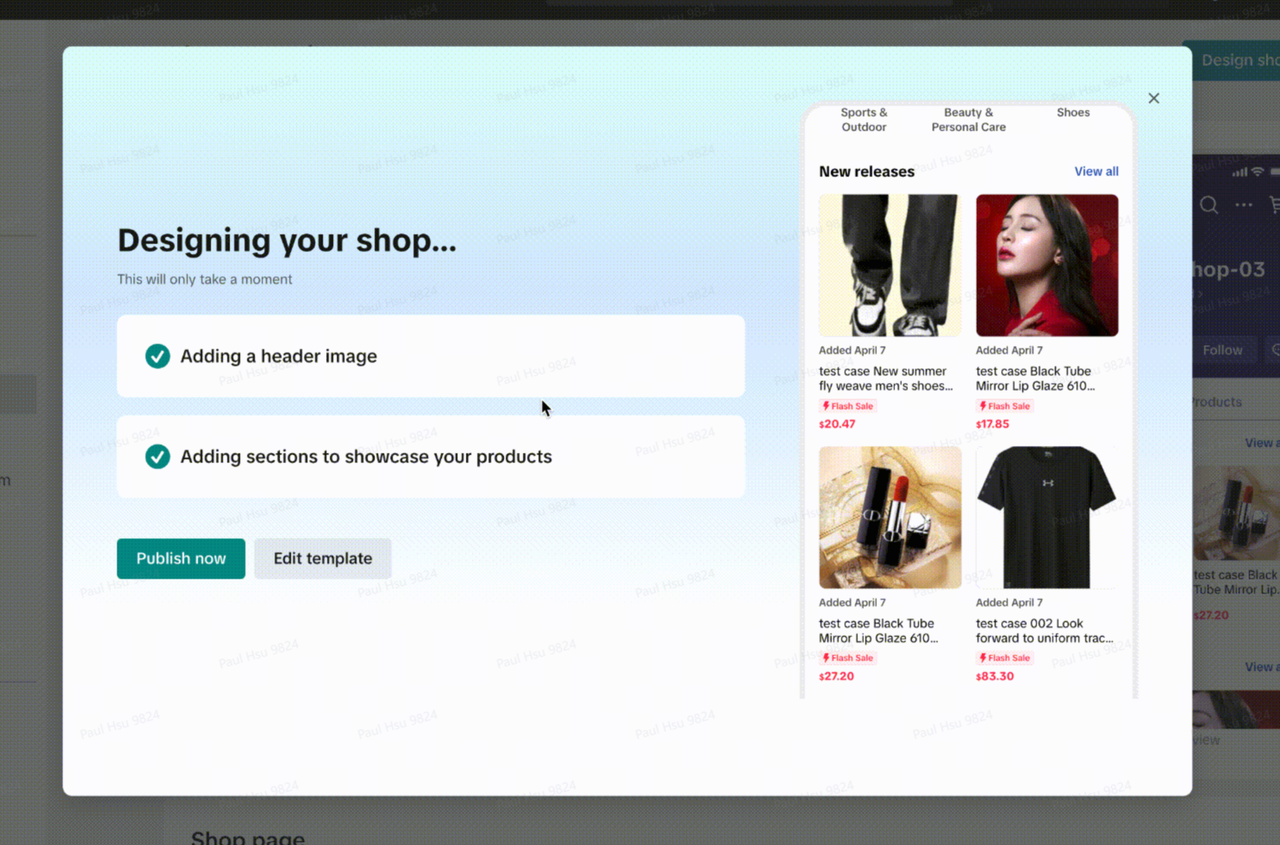
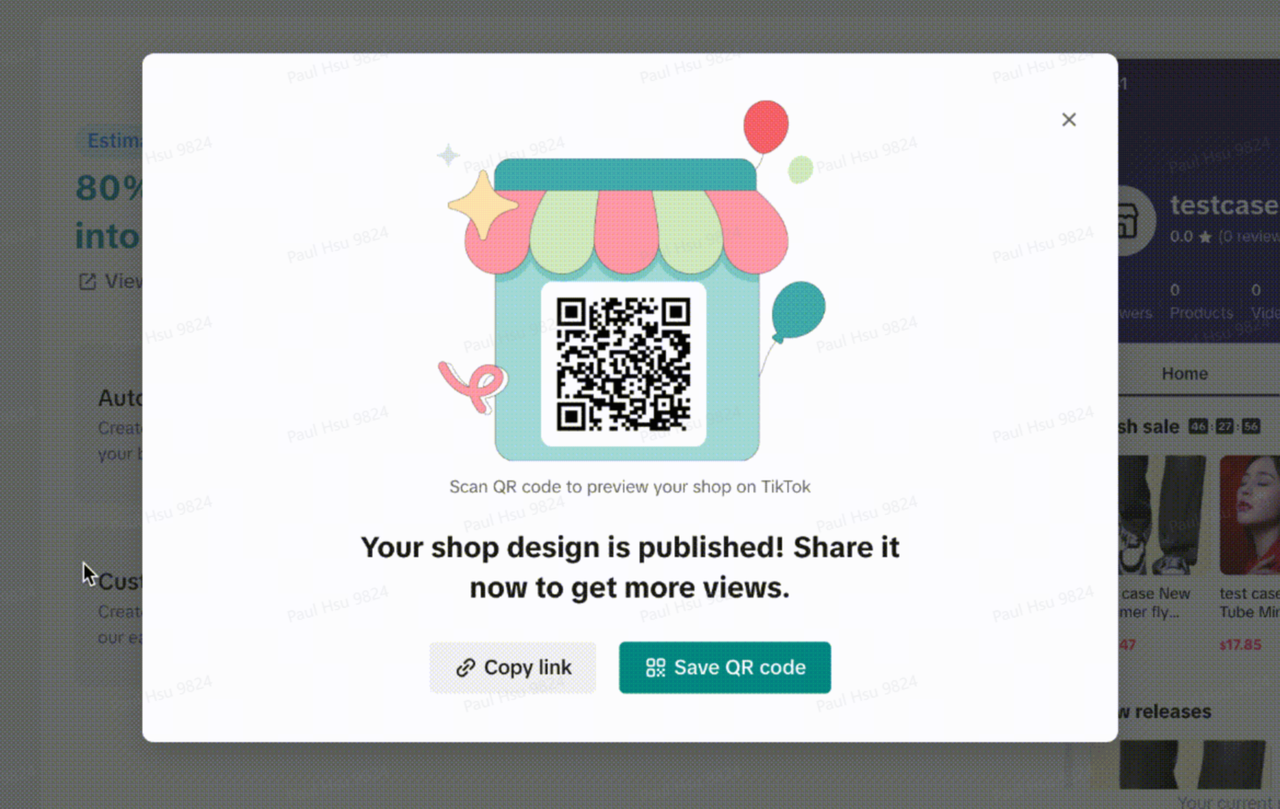
- Step 3: Click Publish now to go live.
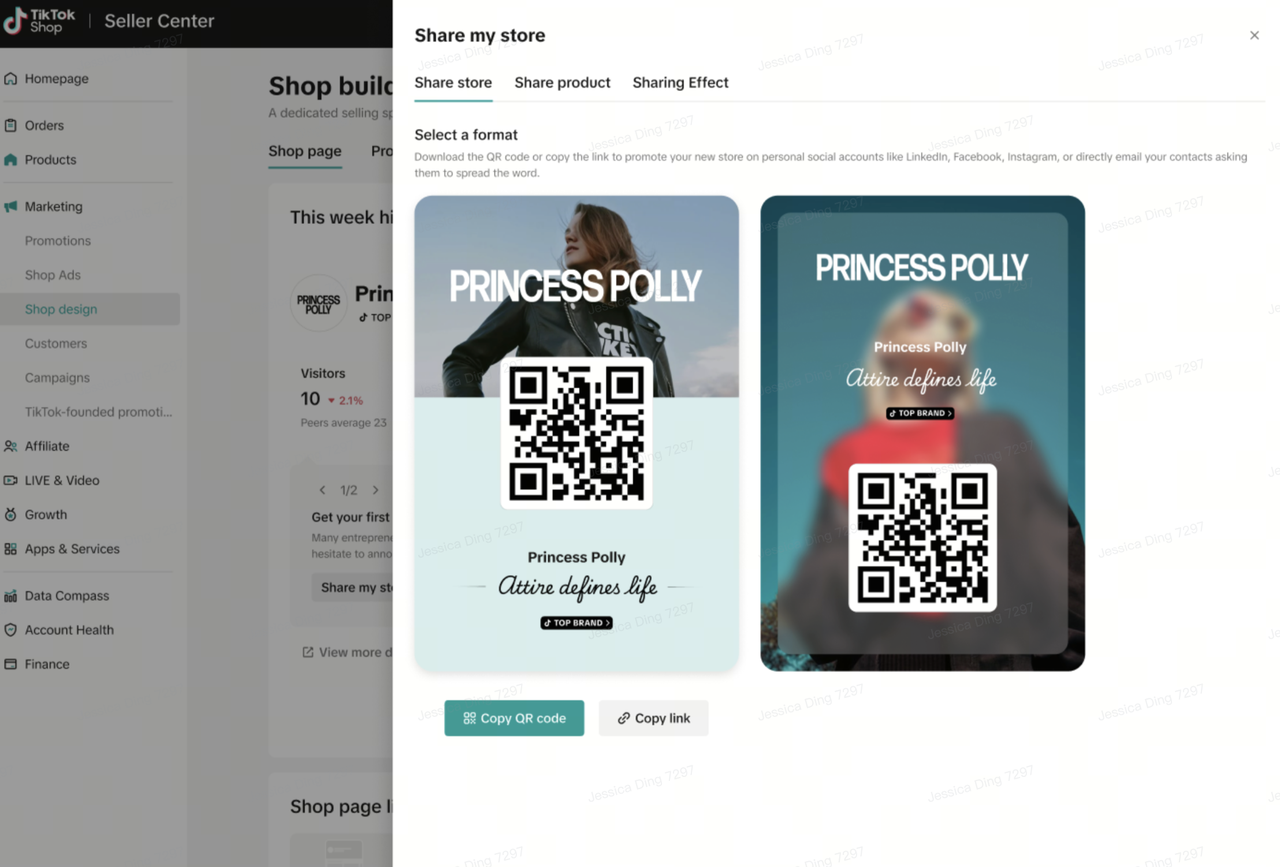
- Step 4: Share your shop with a link or QR code.
Option 2: Customize your shop
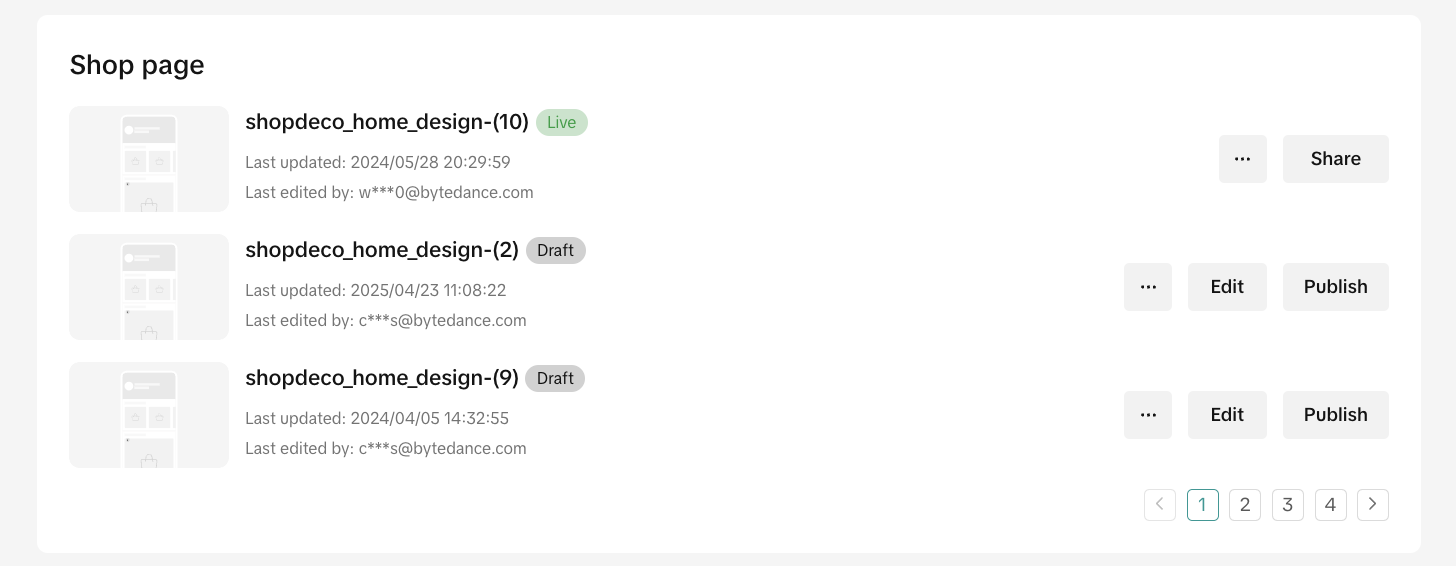
This allows you to fully control the look and feel of your shop, which products are shown, and how sections are arranged.- Step 1: Enter the shop editor.
- Click the green Design shop button in the top-right corner, or
- Click Edit next to any draft version.

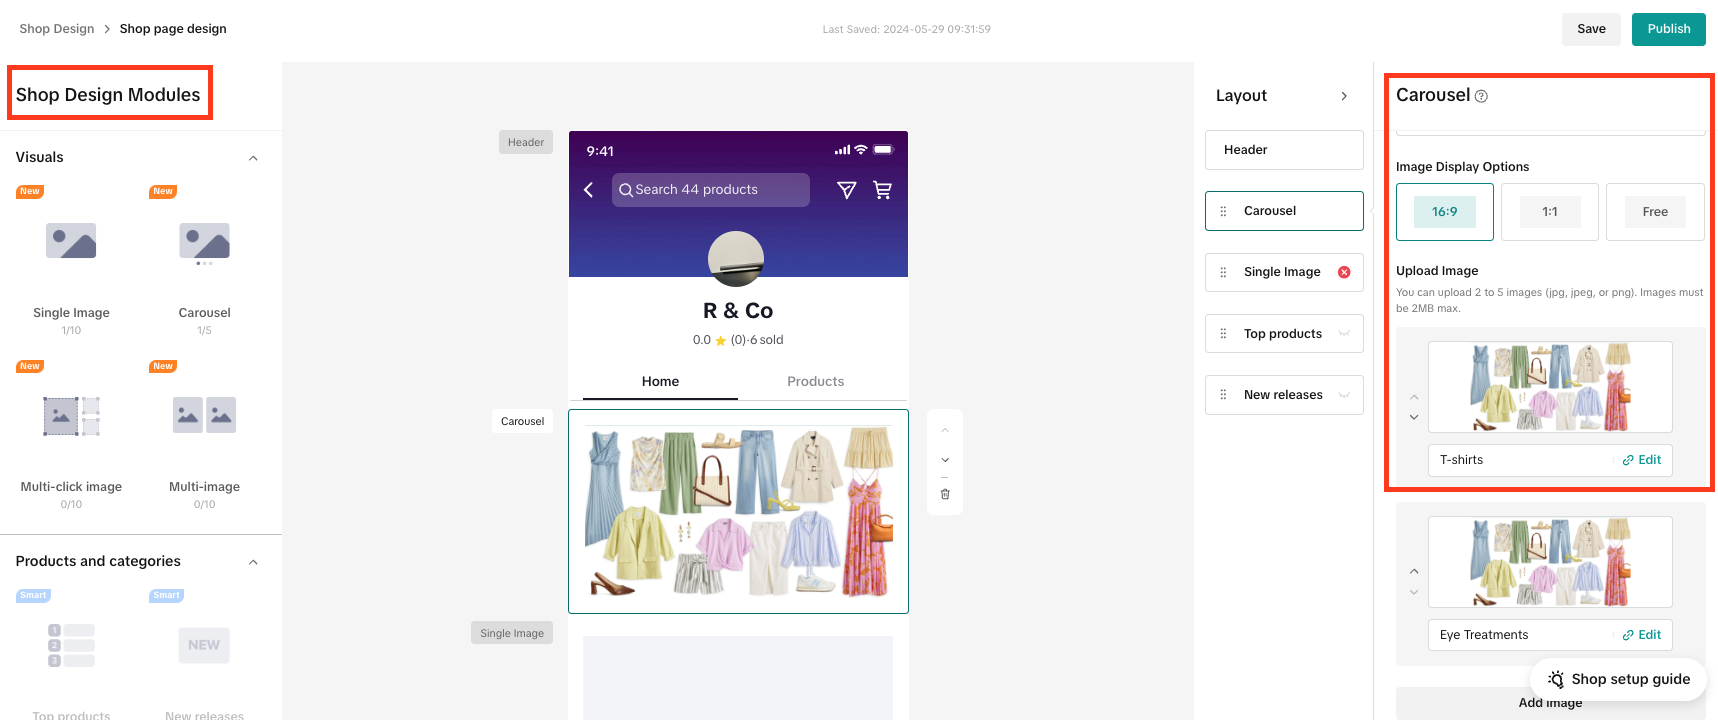
- Step 2: Understand the interface. The tool is divided into 3 main panels:
- Shop Design Modules (left panel): Choose what type of content to add, such as images, products, flash sales, etc.
- Shop Preview (middle panel): See a live view of how your shop will look on the app.
- Settings (right panel): Customize each module (images, text, layout settings, etc.)
- Step 3: Add modules to your shop page. Drag modules from the left panel into the center preview area.
- Visuals: Banners, logos, and product images
- Products and categories: This includes smart product collections, such as Top products, New releases, Our picks for you, and Categories. We'll auto-fill these sections with the right products based on what’s trending, what’s selling, or what’s newly listed. There's also custom product collections, including Featured Products, By category, and Collection, which you can build and arrange manually.
- Promotions: Flash sale/Special deals/Buy More Save More
- Step 4: Add a header image. Your header image is one of the first things shoppers will see on your shop page. A good-looking header can help increase visibility and improve trust with shoppers. The system automatically checks that your header image is clear and high quality. If not, it won't appear in your shop. If you're a verified seller, you'll have the option to add a header with your logo, brand name, or a high-quality image to showcase your brand. Here's how to upload and customize your header:
- Step 4.1: On the right-hand side of the page, find the Layout panel. Click on Header at the top of the module list to open header settings.
- Step 4.2: Click Upload Image under Background image.
- Recommended dimensions: 780 px (width) x 720 px (height)
- Max file size: 2 MB
- Supported formats: JPG, JPEG, PNG
- Step 4.3: Add your shop logo (optional but recommended)
- Under Logo, click Upload Image (or choose Text if you prefer)
- Use a clear logo with a transparent or white background
- Supported formats: PNG, WEBP
- Max file size: 2 MB
- Step 4.4: Your header will appear in the live preview (center panel). Make sure the text image are easy to see and not cut off.
- Step 5: Use product collections to drive conversions. Product collections are one of the best ways to organize your products and help shoppers discover more of what they want. With the latest layout updates, creating collections is easier than ever. You can create collections in 3 different ways:
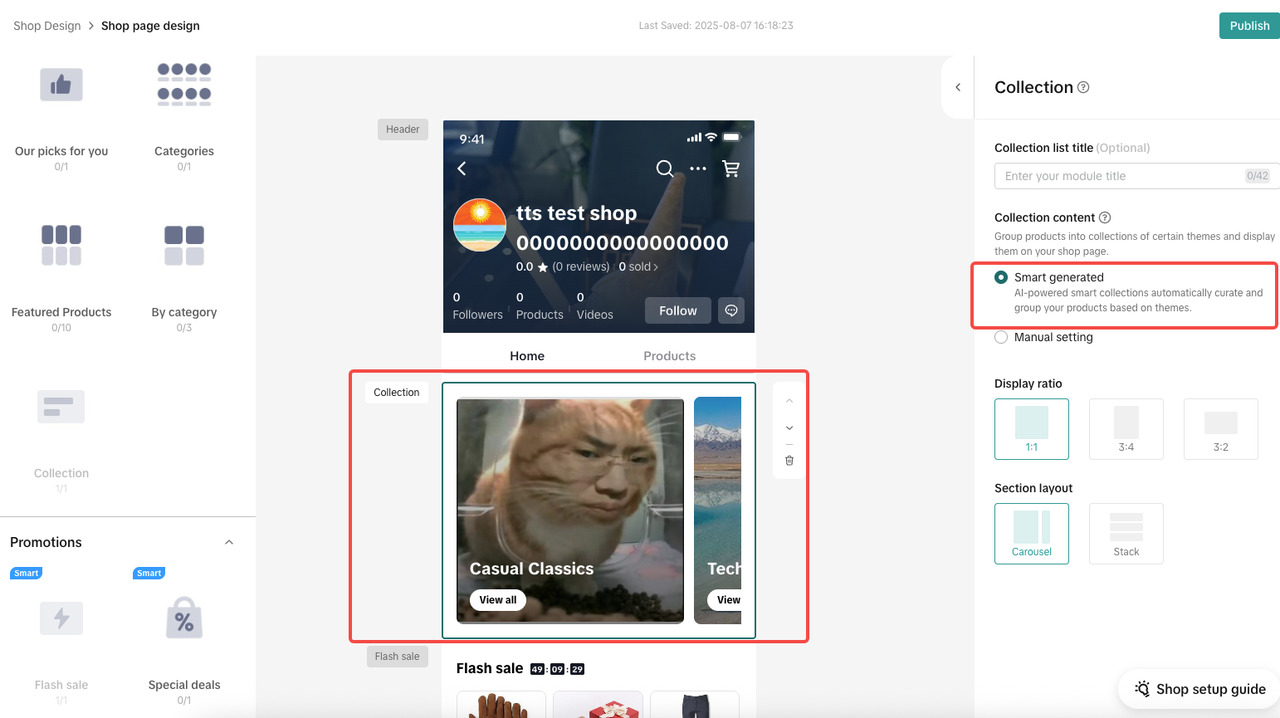
- Option 1: Auto-generate collections (recommended)
- This is the easiest way to get started. TikTok Shop will automatically suggest and build product collections for you. Auto-generated elements include:
- Collection title
- Product list
- You can still edit the layout (horizontal/vertical), product ratio, and more.
- This is the easiest way to get started. TikTok Shop will automatically suggest and build product collections for you. Auto-generated elements include:
- Option 1: Auto-generate collections (recommended)
- Option 2: Use a template
- Use pre-built templates for popular or high-performing collection types, such as:
- New Releases
- Promotions
- Top Sellers
- The system will automatically fill in your collection title, description, and product list. This is great for seasonal events or quick promotional setups.
- Use pre-built templates for popular or high-performing collection types, such as:
- Option 3: Create a collection manually
- For full control, build a custom collection rom scratch. Add your own:
- Collection name
- Description
- Cover image
- Product list
- This is great for unique bundles, limited drops, or themed product groups.
- For full control, build a custom collection rom scratch. Add your own:
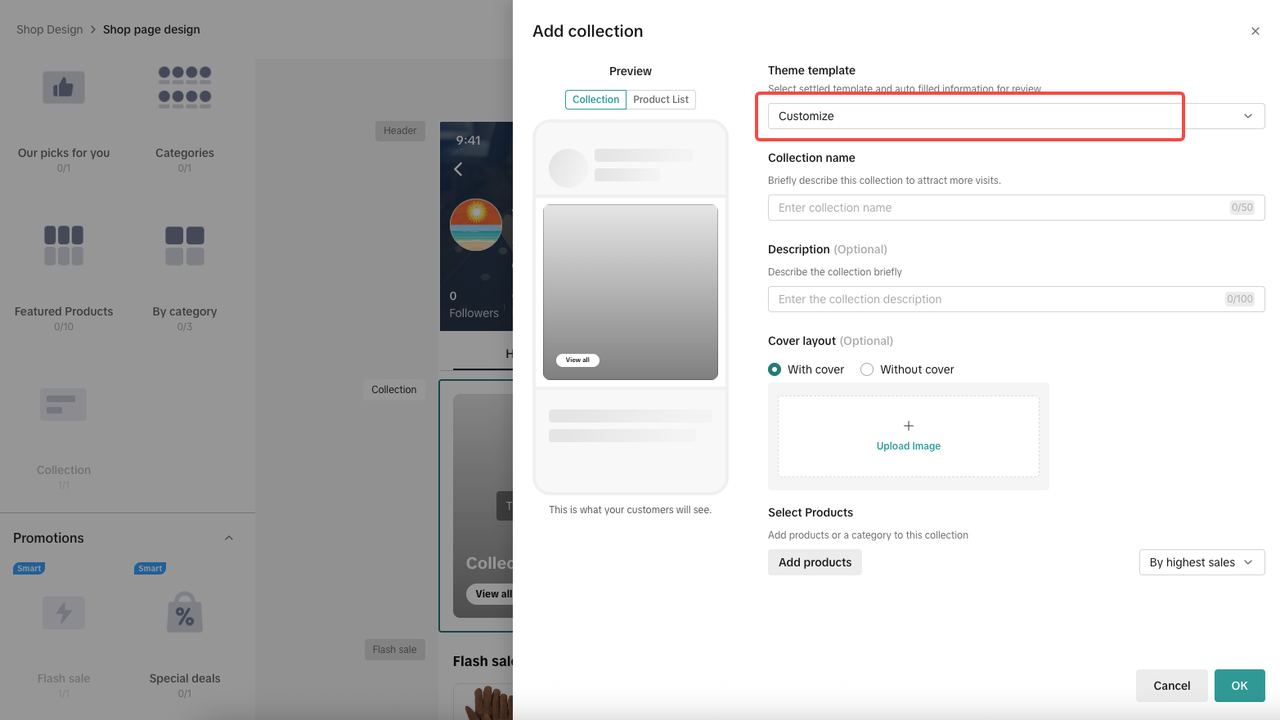 | 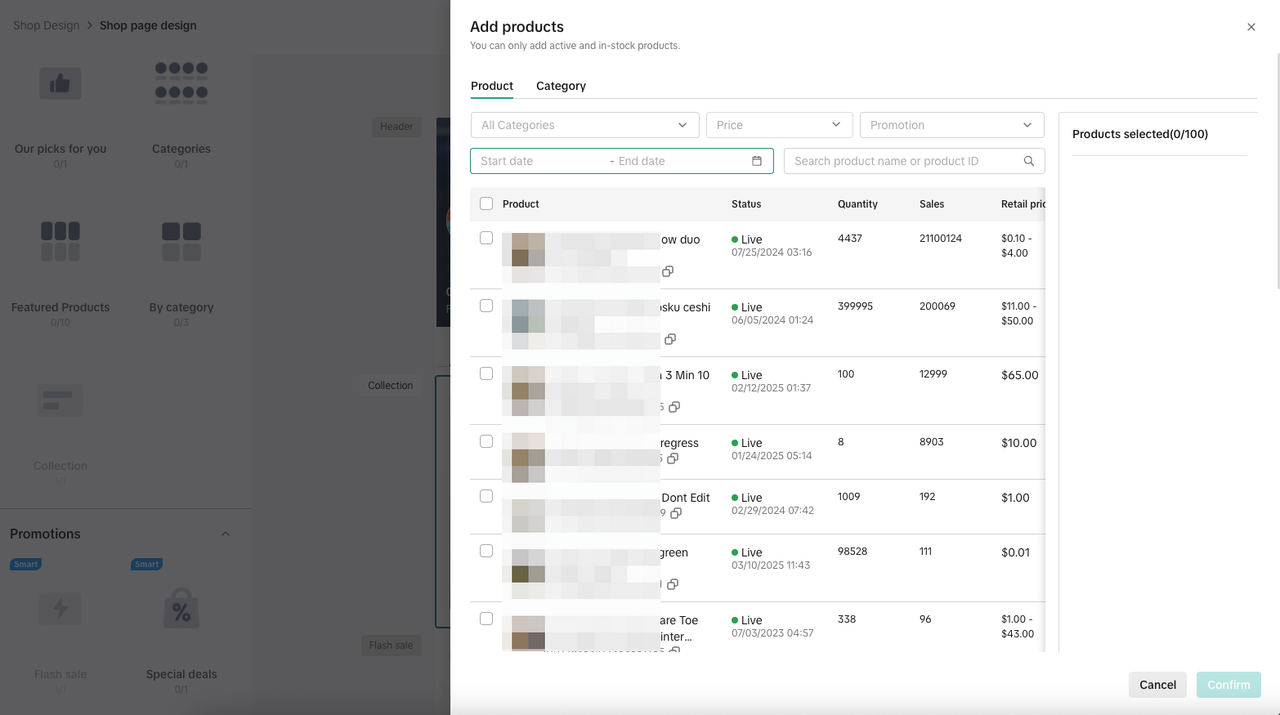 |
- Step 6: Preview and save your design. As you build, you'll see real-time updates in the center preview.
- Step 7: Once you're happy with the layout and content, click Publish in the top-right corner. Your new layout will go live immediately. You can always return and edit it later.
Other Features You Can Use
In addition to designing your shop layout, the Shop Design page includes other helpful tools and tips to help you improve your shop and learn from other sellers.See how your shop is performing
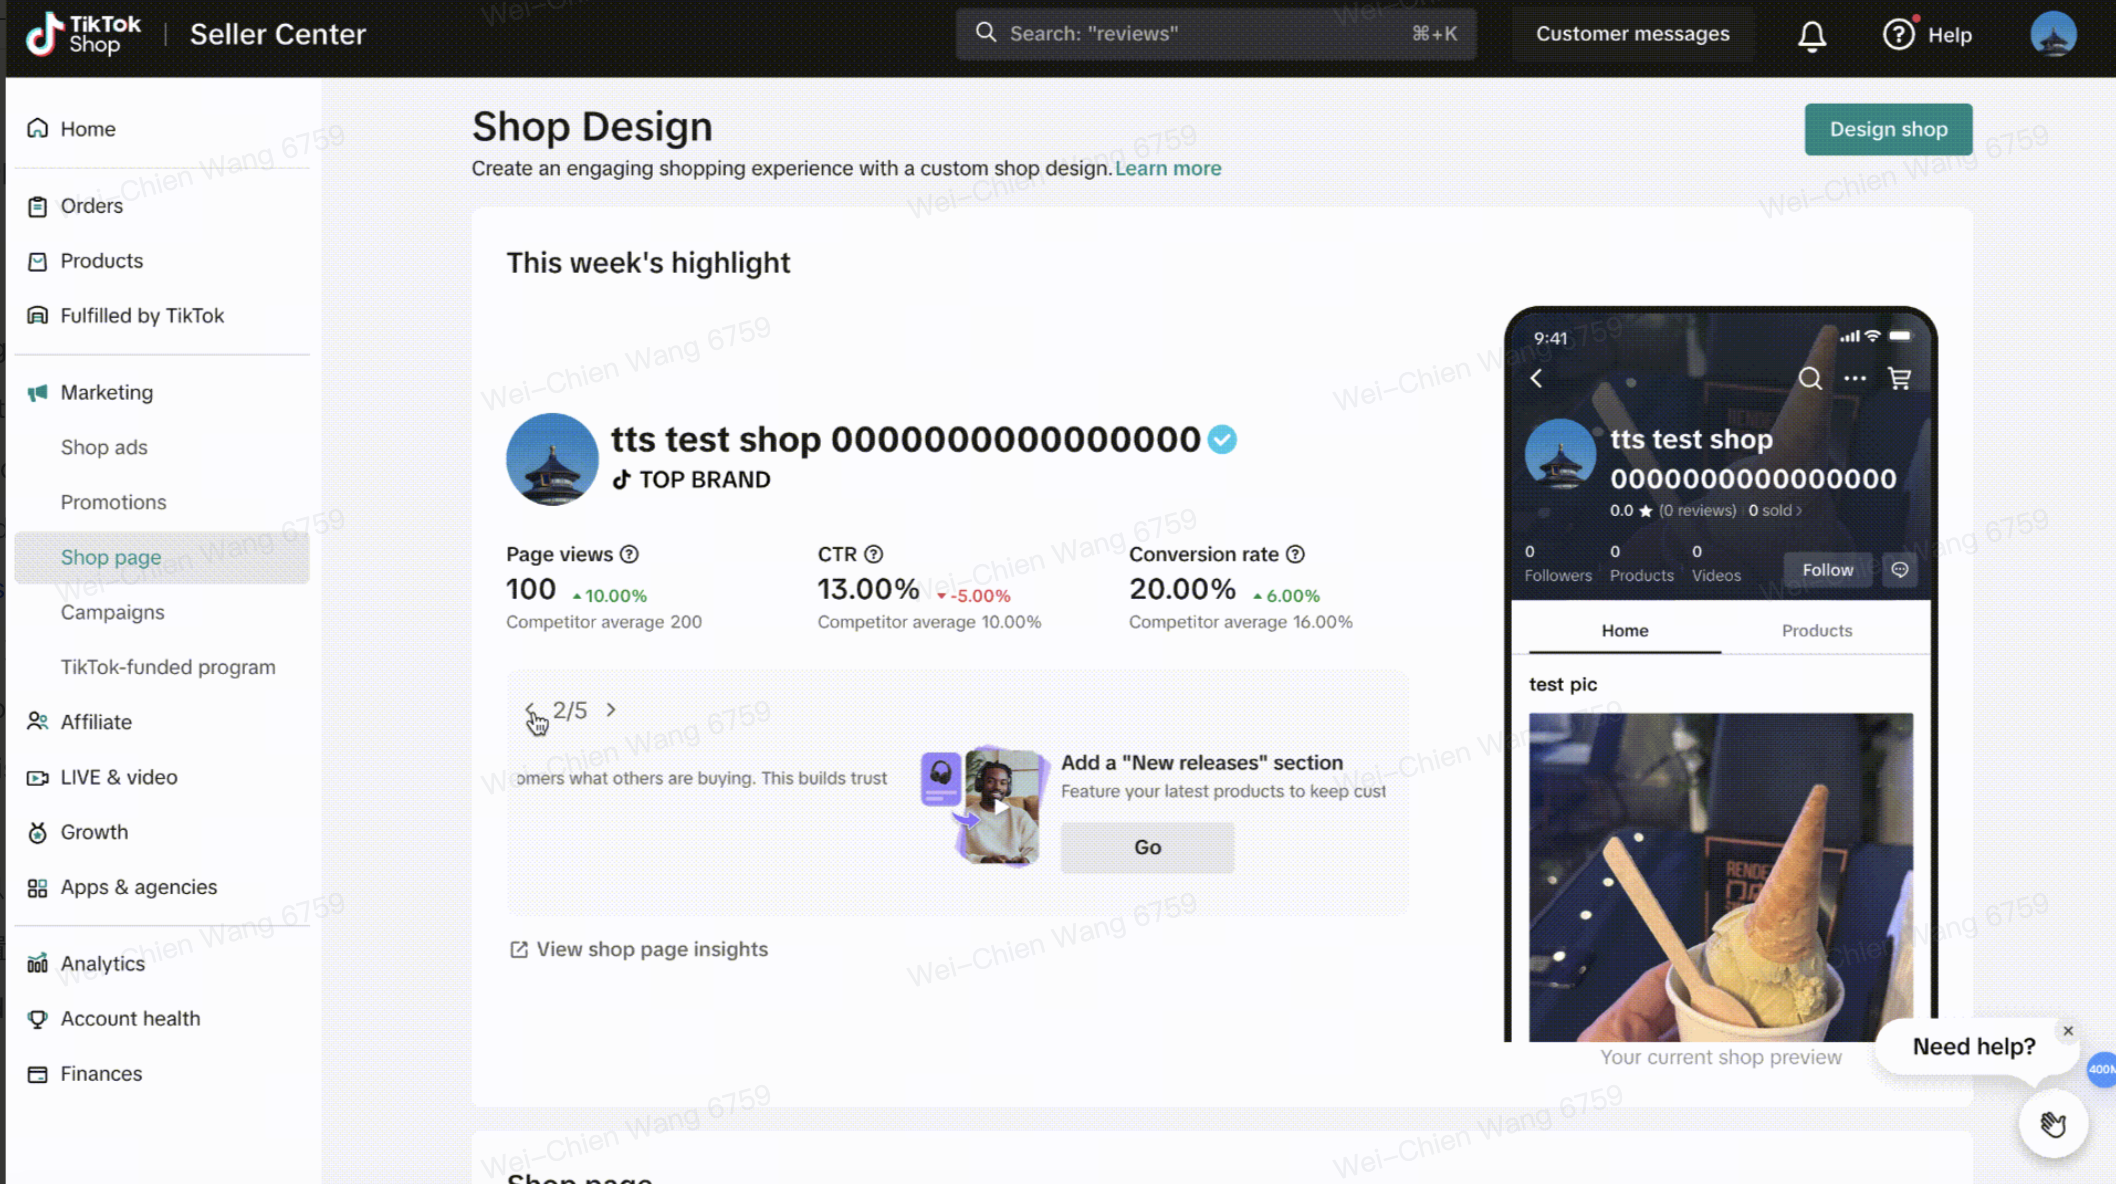
Manage your shop page versions
- The Live version is what shoppers see now.
- Drafts are layouts you're still working on.
- Click Edit to make changes.
- Click Publish to make it go live.
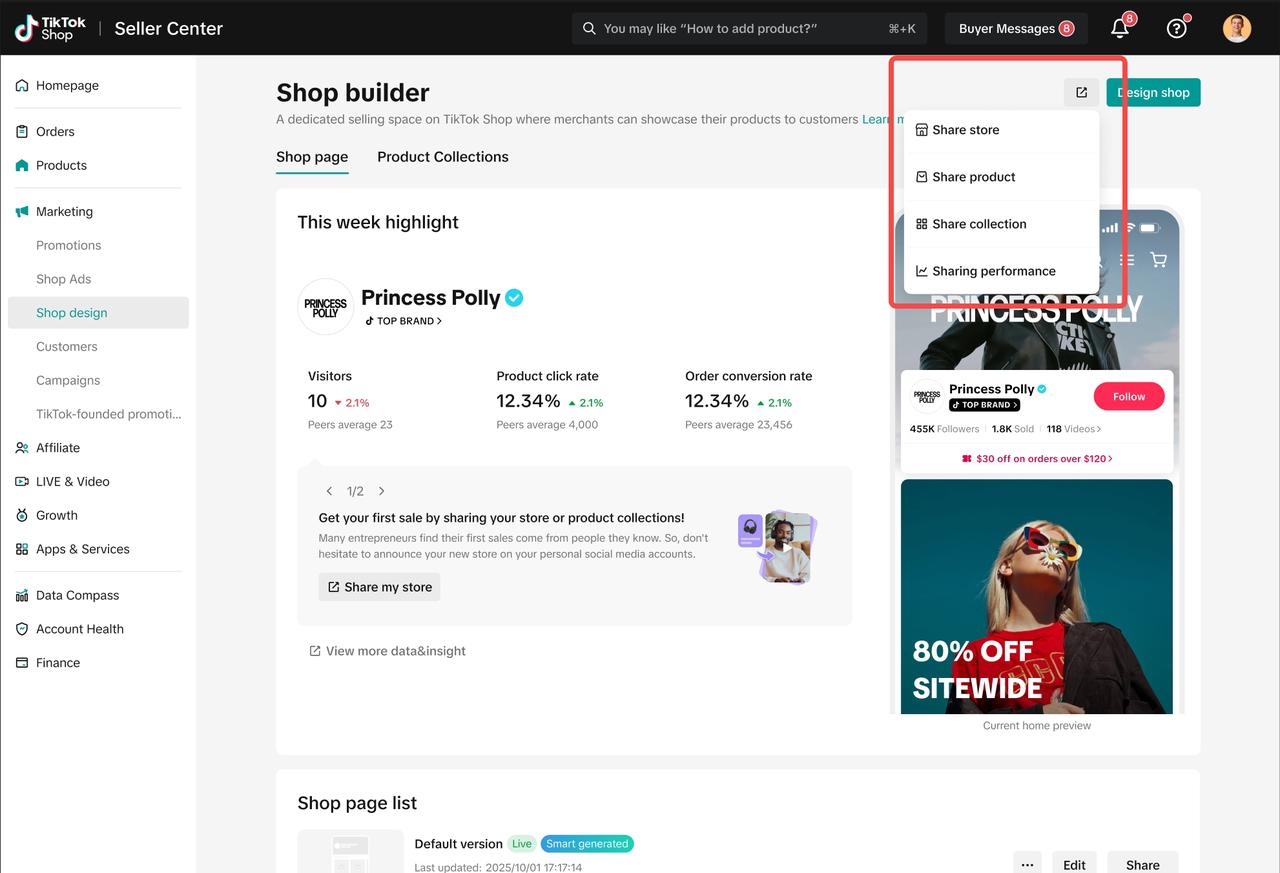
- Click Share to get a link or QR code.
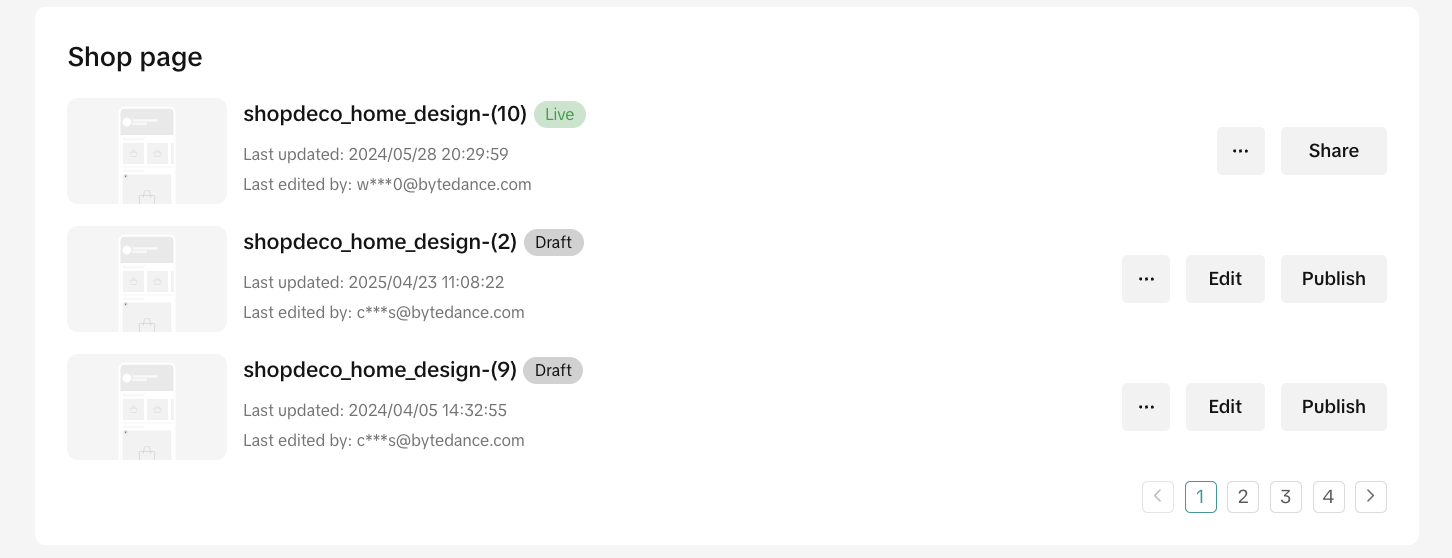
Add ready-made layout sections
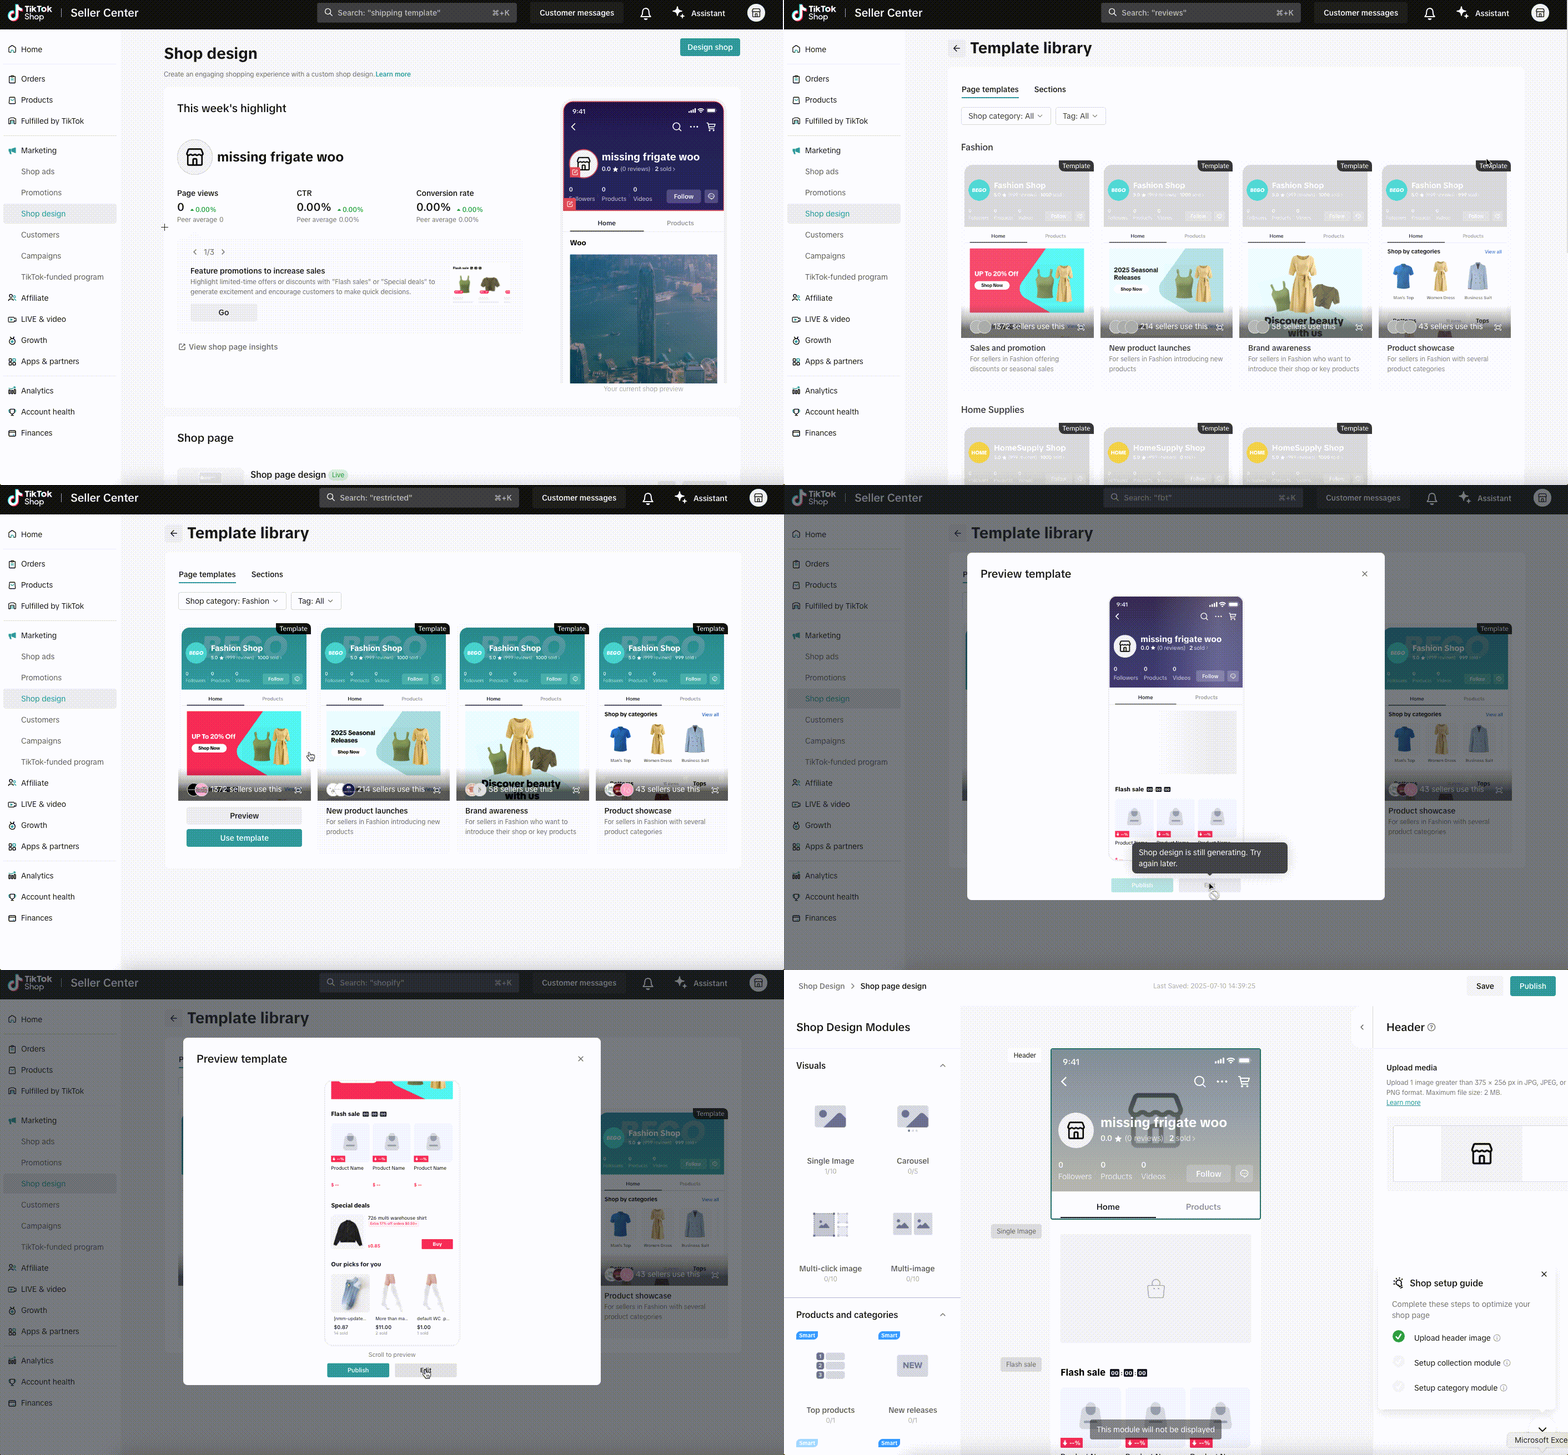
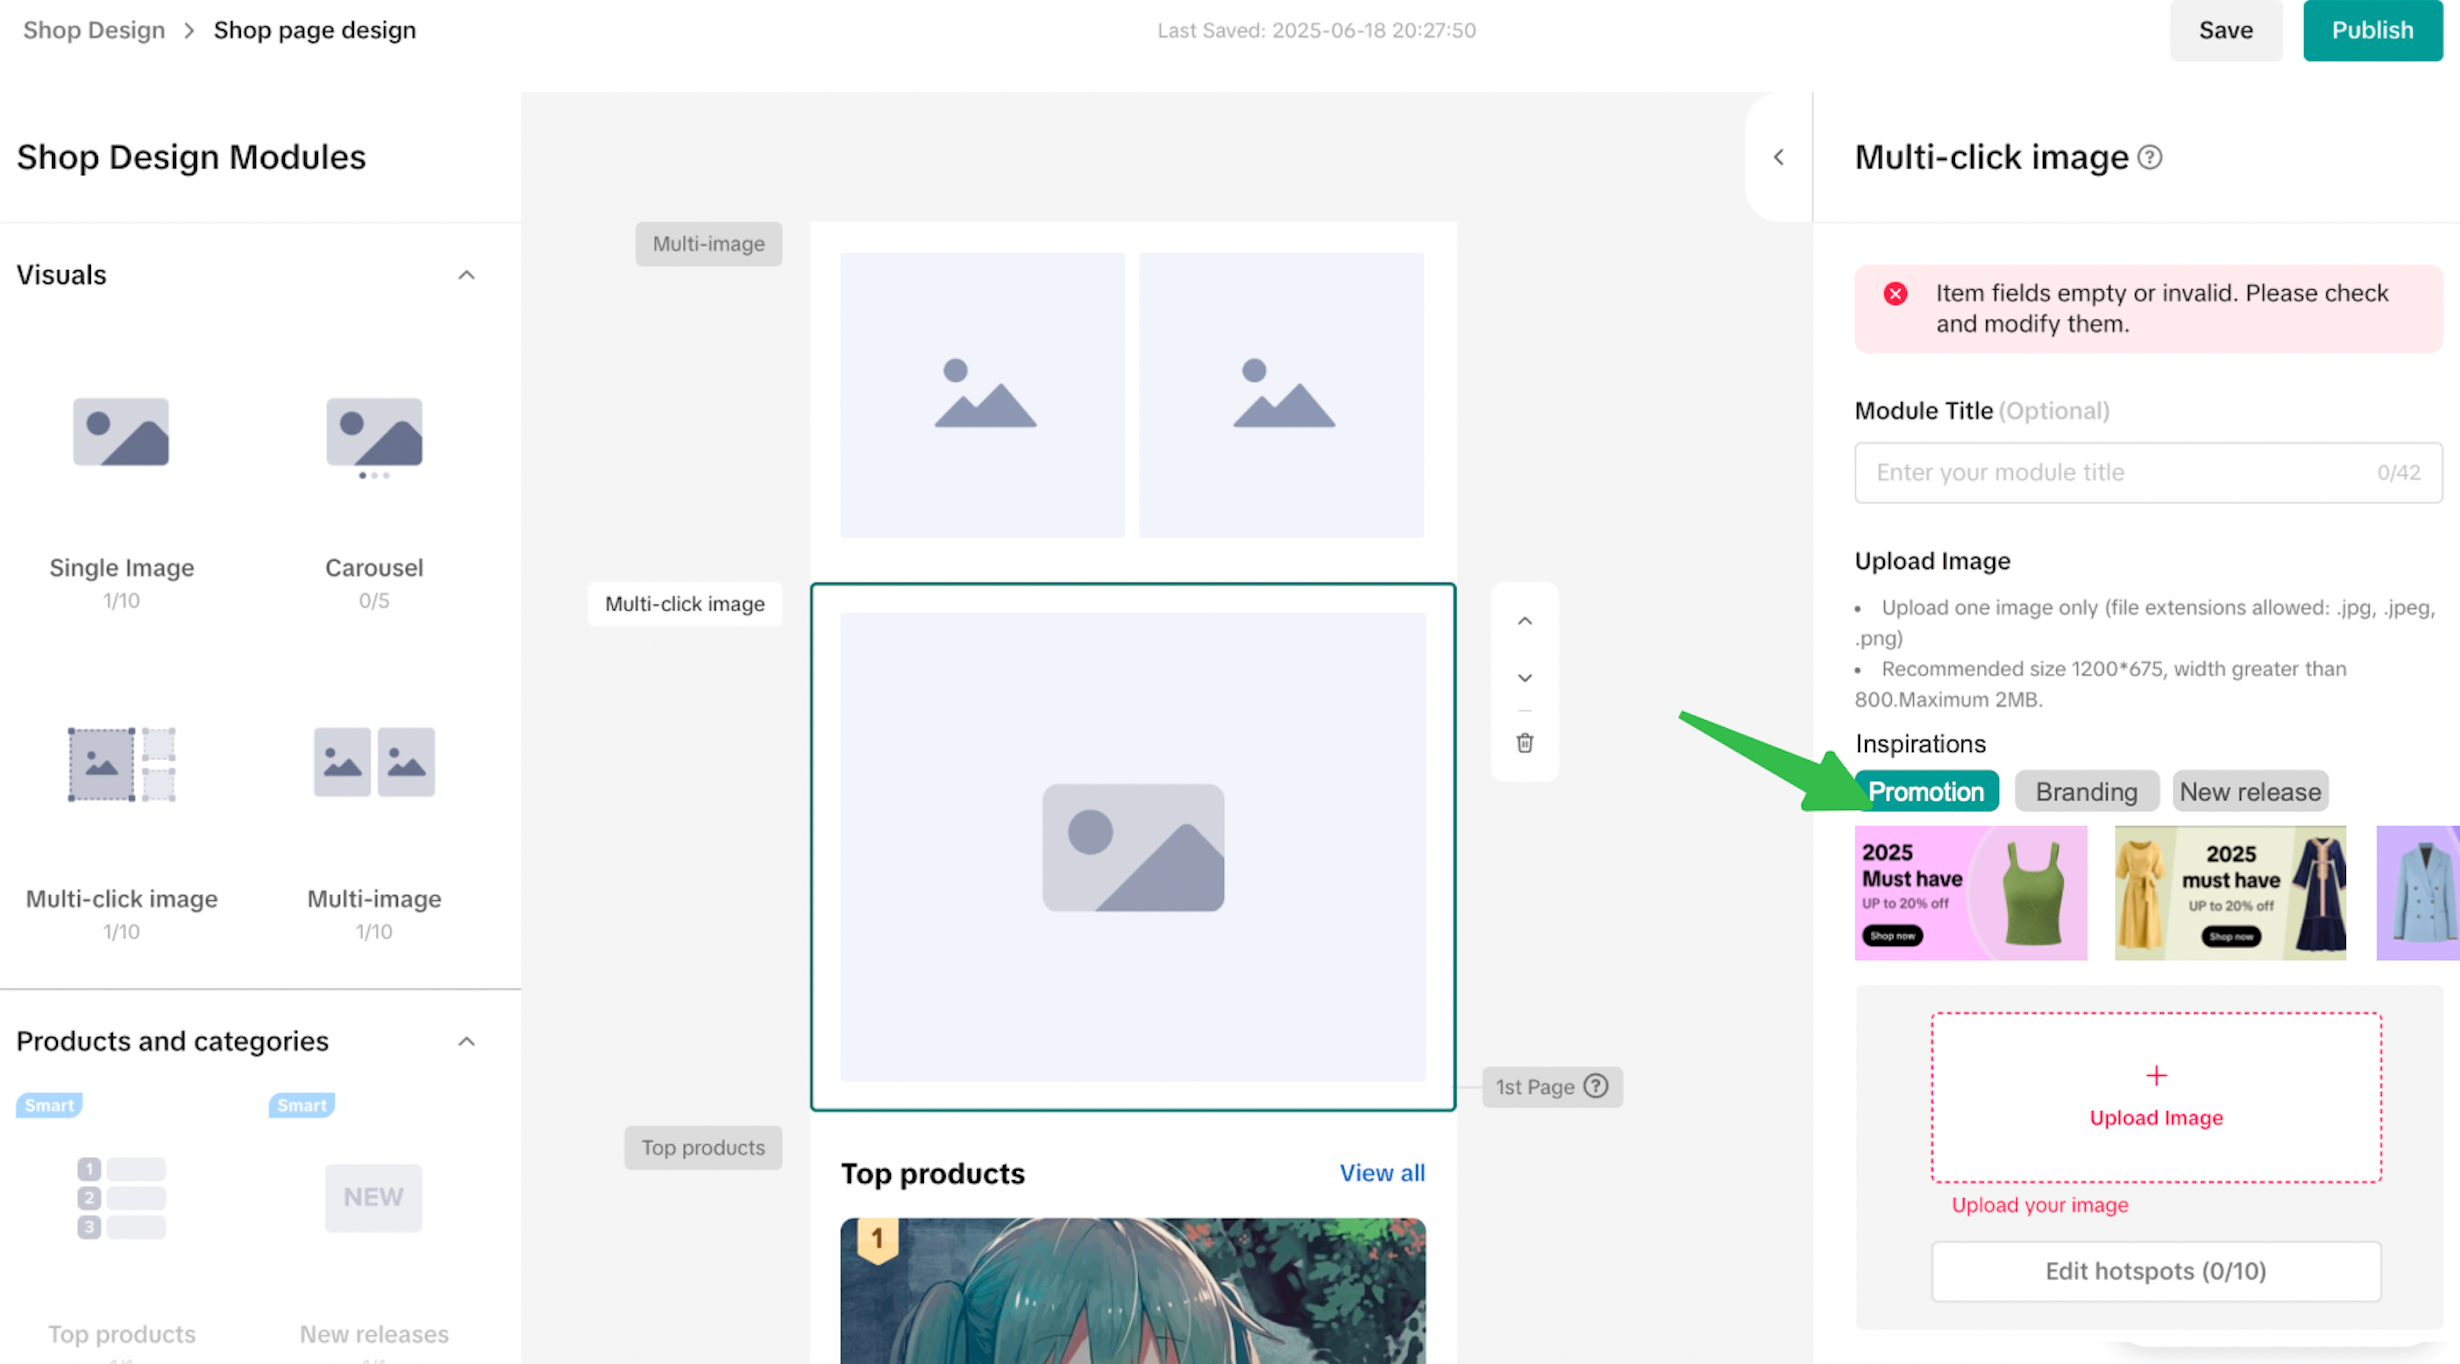
Create impactful visuals for your shop
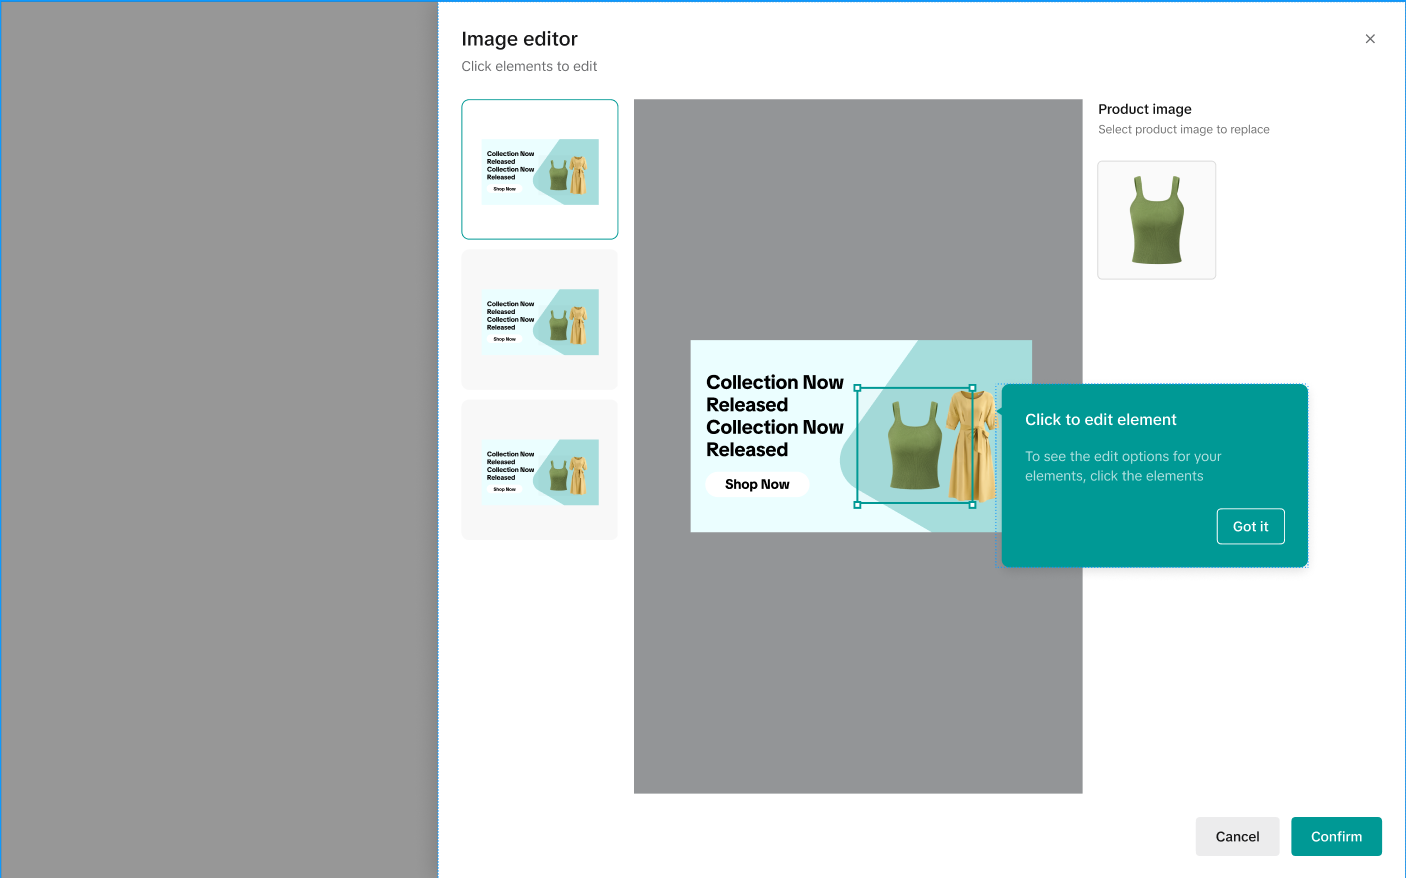
 Sellers can also edit the pictures using a built-in editor, easily edit text, colors and layout to fit your brand's style
LIVE and video
Create your own Product Collections
When creating a new collection, start by entering a collection name to help customers understand what the collection is about and encourage them to explore the product list. We also recommend adding a theme-related image to increase click-through rates. Finally, select the products that fit your collection—once done, your collection is ready to go.


Why Use Product Collections?
Merchandising themed collections helps solve the problem of store clutter and provides a smoother exploration experience for shoppers. Key benefits include:- Boosted Conversion: Effectively improves CTR, CVR, AOV, and GMV compared to sharing single products.
- Multi-Channel Reach: Sync your collections across your Shop Page and Customer Chat
- Data-Driven Insights: Use the analytics dashboard to track exactly which collections are driving sales and which need a refresh.
Synchronizing Your Collections
Once created, you can deploy your collections across multiple private domain channels:- Shop Decoration: Drag and drop your collection directly into your store's homepage editor.
- Customer Chat: Share entire collections during pre-sales consultations to help customers discover more products.


How to Create a Product Collection
You can manage and create collections by navigating to Seller Center > Marketing > Shop Design > Product Collections.Step 1: Choose Your Creation Method
There are two ways to build your collection:- Template Creation: Choose from "Smart Templates" or "Rule Templates" (e.g., New Arrivals, Popular Products, Low Price). The system will automatically suggest titles and products based on your shop's performance.
- Manual Creation: Build your list from scratch by selecting individual products and entering your own titles and descriptions.
Step 2: Customize Branding and Selling Details
Add visual and textual elements to guide your customers:- Branding: Upload a high-quality cover image and add a description that explains the value of the collection.
- Selling: Curate your product list. For high-SKU industries like Fashion, focus on seasonal themes or inventory turnover.
Step 3: Save and Preview
Before publishing, use the Effect Preview to see how the collection will appear as a cover or on the Product List Page (PLP).Managing and Tracking Performance
The Collection List provides a comprehensive overview of your existing merchandising sets.- Monitor Success: Track key metrics for each collection, including Exposed Users (UV), Click Count, Number of Purchasers, and GMV.
- Operational Safety: If you try to delete a collection currently referenced on your Shop Page or in a CRM plan, the system will provide a reminder. You must take the component offline or stop the plan before the collection can be permanently removed to protect the consumer experience.
Best Practices
- Focus on High-SKU Themes: Use collections for scenario bundling (e.g., "Sportswear") or clearance events.
- Update Regularly: Refresh your "New Arrivals" or "Best-Selling" series to keep your storefront dynamic.
- Clear CTA: Use catchy titles and descriptions to guide customers to the products they need faster.

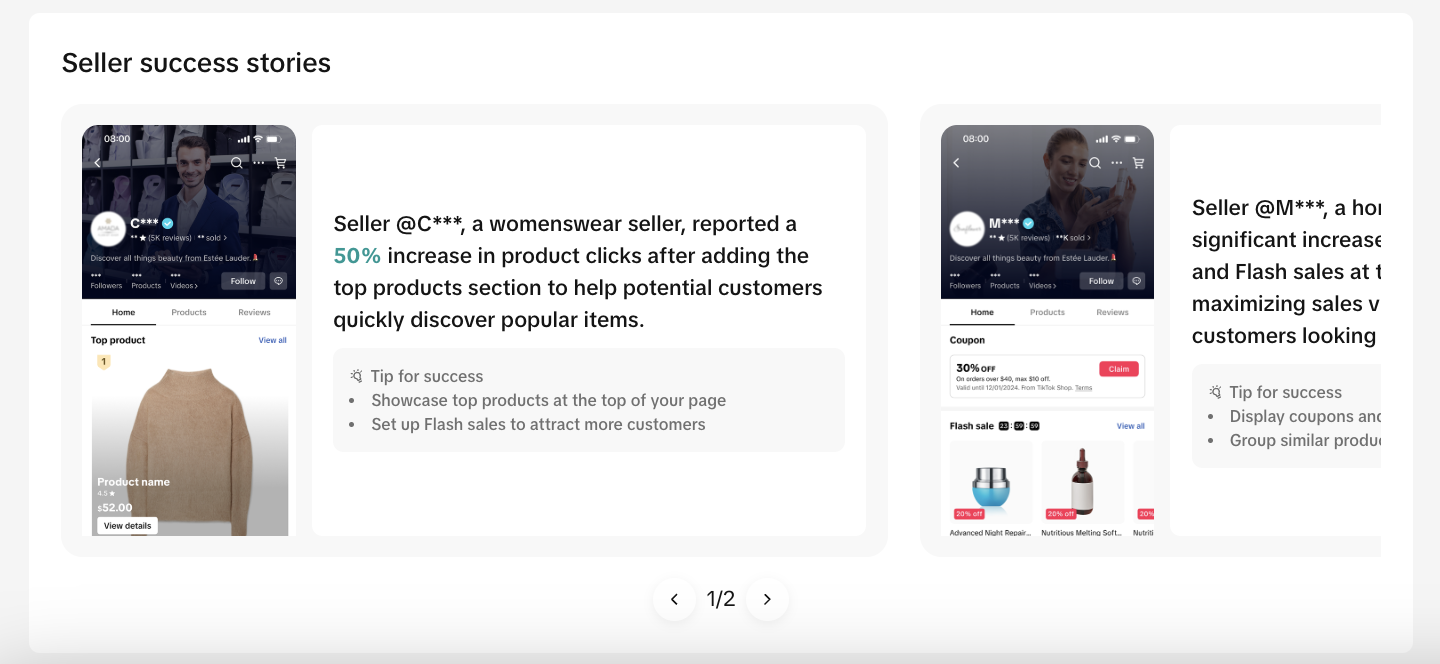
Get inspired by seller success stories
Share your TikTok Shop
 |  |  |

Frequently Asked Questions (FAQs)
| Question | Answer |
| Who can use Shop Design? | All TikTok Shop sellers have access to this tool. |
| Do I need design experience? | No, Shop Design is beginner-friendly with drag-and-drop tools and real-time previews. |
| Can I update my shop page later? | Yes, you can edit your design anytime. |
| What image formats and sizes are supported? |
|
| Why don't I see the Auto-Generate option anymore? | It's only available once. After your first design is published, the tool disappears. |
| Can I preview my design before publishing? | Yes, the center panel shows exactly how your shop will look in the app. |

Need Help?
- Contact your Account Manager: If you have an Account Manager, reach out to them directly for personalized support.
- No Account Manager? If you don't have an Account Manager, reach out to TikTok Shop support.
- TikTok Shop Support: https://seller-us.tiktok.com/contact-us
- Email: support@us.tiktok.com

You may also be interested in
How to resolve SKU errors
If you need to edit your product's retail prices or add, delete, or edit a SKU while it is registere…

LIVE Price Match Guarantee using Co-funded LIVE Flash Sale
Introduction: What is LIVE Price Match Guarantee? During Deal for You Days from July 7 - July 19, 20…

Marketing benefits package
Product Overview Marketing Benefits Packages are a collection of placements and promotions on TikTok…

Campaign FAQs
Key Points: Your shop is eligible to enroll in campaigns if you meet the minimum criteria, includin…

How to Register for Content Campaigns in the TikTok App
How to Register for Content Campaigns in the TikTok App Content campaigns on TikTok Shop allow creat…

How to register for content campaigns
Product Overview Content campaigns on TikTok Shop are special events that give you a chance to boost…

How to use Campaign Dashboard
Campaign Dashboard Overview Campaigns are key opportunities for sellers to boost sales and acquire n…

Co-Funded Program
Currently, there are two types of co-funded programs on the platform. * TypeDescriptionSeller acad…

How to register for auto-approved free samples campaigns
Product overview The auto-approved free samples campaign lets you provide free samples to creators t…

Campaign registration with GMV max
Product Overview GMV Max is now integrated directly into campaign registration and is a requirement…