

TikTok for SFCC: Product and catalog listing V2
Summary
1. How do sellers connect and onboard their Salesforce Commerce Cloud (SFCC) store with TikTok Shop using the SFCC Catalog Widget V2?
- Sellers must meet system prerequisites, update the social_channel_integrations cartridge, configure OCAPI API permissions, and launch TikTok Shop from Salesforce Business Manager by inputting credentials and linking their TikTok Shop account.
- After connection, sellers work with their Customer Success Manager (CSM) to enable the shop backend, add warehouse info, enable the Catalog Widget, and sync products to make them live on TikTok Shop.
2. What are Category Templates in TikTok Shop SFCC integration, and how do they help sellers manage products?
- Category Templates allow sellers to batch update vital product details and map multiple products to TikTok categories, simplifying synchronization and product management between SFCC and TikTok Shop.
- Sellers can create, edit, or delete templates, assign products uniquely, and update attributes like brand, shipping dimensions, and certifications either via templates or individually per product.
3. How do synchronization settings for product info, inventory, and price work between SFCC and TikTok Shop, and what flexibility do sellers have?
- By default, changes in product info, inventory, and price on SFCC sync automatically to TikTok Shop, ensuring consistency across platforms.
- Sellers can toggle each sync setting off to maintain different product details, inventory, or prices on TikTok Shop, useful for exclusive promotions or reserved inventory during sales events.
4. What are the key steps for sellers to manage fulfillment, including warehouse and carrier mappings, in the SFCC TikTok Shop integration?
- Sellers add or edit warehouse details and map SFCC shipping providers to TikTok Shop carriers within the Shop Settings > Fulfillment tab to ensure accurate order fulfillment.
- Carrier mapping links SFCC carriers to TikTok Shop shipping provider IDs, enabling correct logistics handling when fulfilling orders through the integration.
5. What must sellers do regarding shipping templates when using "Seller Shipping" as their logistics service in TikTok Shop?
- Sellers must complete and upload shipping fee templates before listing products to avoid reminders or errors during product upload.
- Properly configured shipping templates ensure accurate shipping fee calculation and smooth order processing on TikTok Shop.
Overview of TikTok Shop for SFCC V2 Integration
This guide walks you through the process of connecting and onboarding Salesforce Commerce Cloud (SFCC) with TikTok Shop through SFCC Catalog Widget V2 admin. You can sync your products, shop settings and grow your business on TikTok without switching between platforms.This page serves as your starting point for all TikTok for SFCC guides and resources. Find step-by-step instructions for setup, product management, shop settings and growing your business on TikTok Shop.
Note: This solution is currently available in the US and UK regions only.
TTS x SFCC High Level Architecture
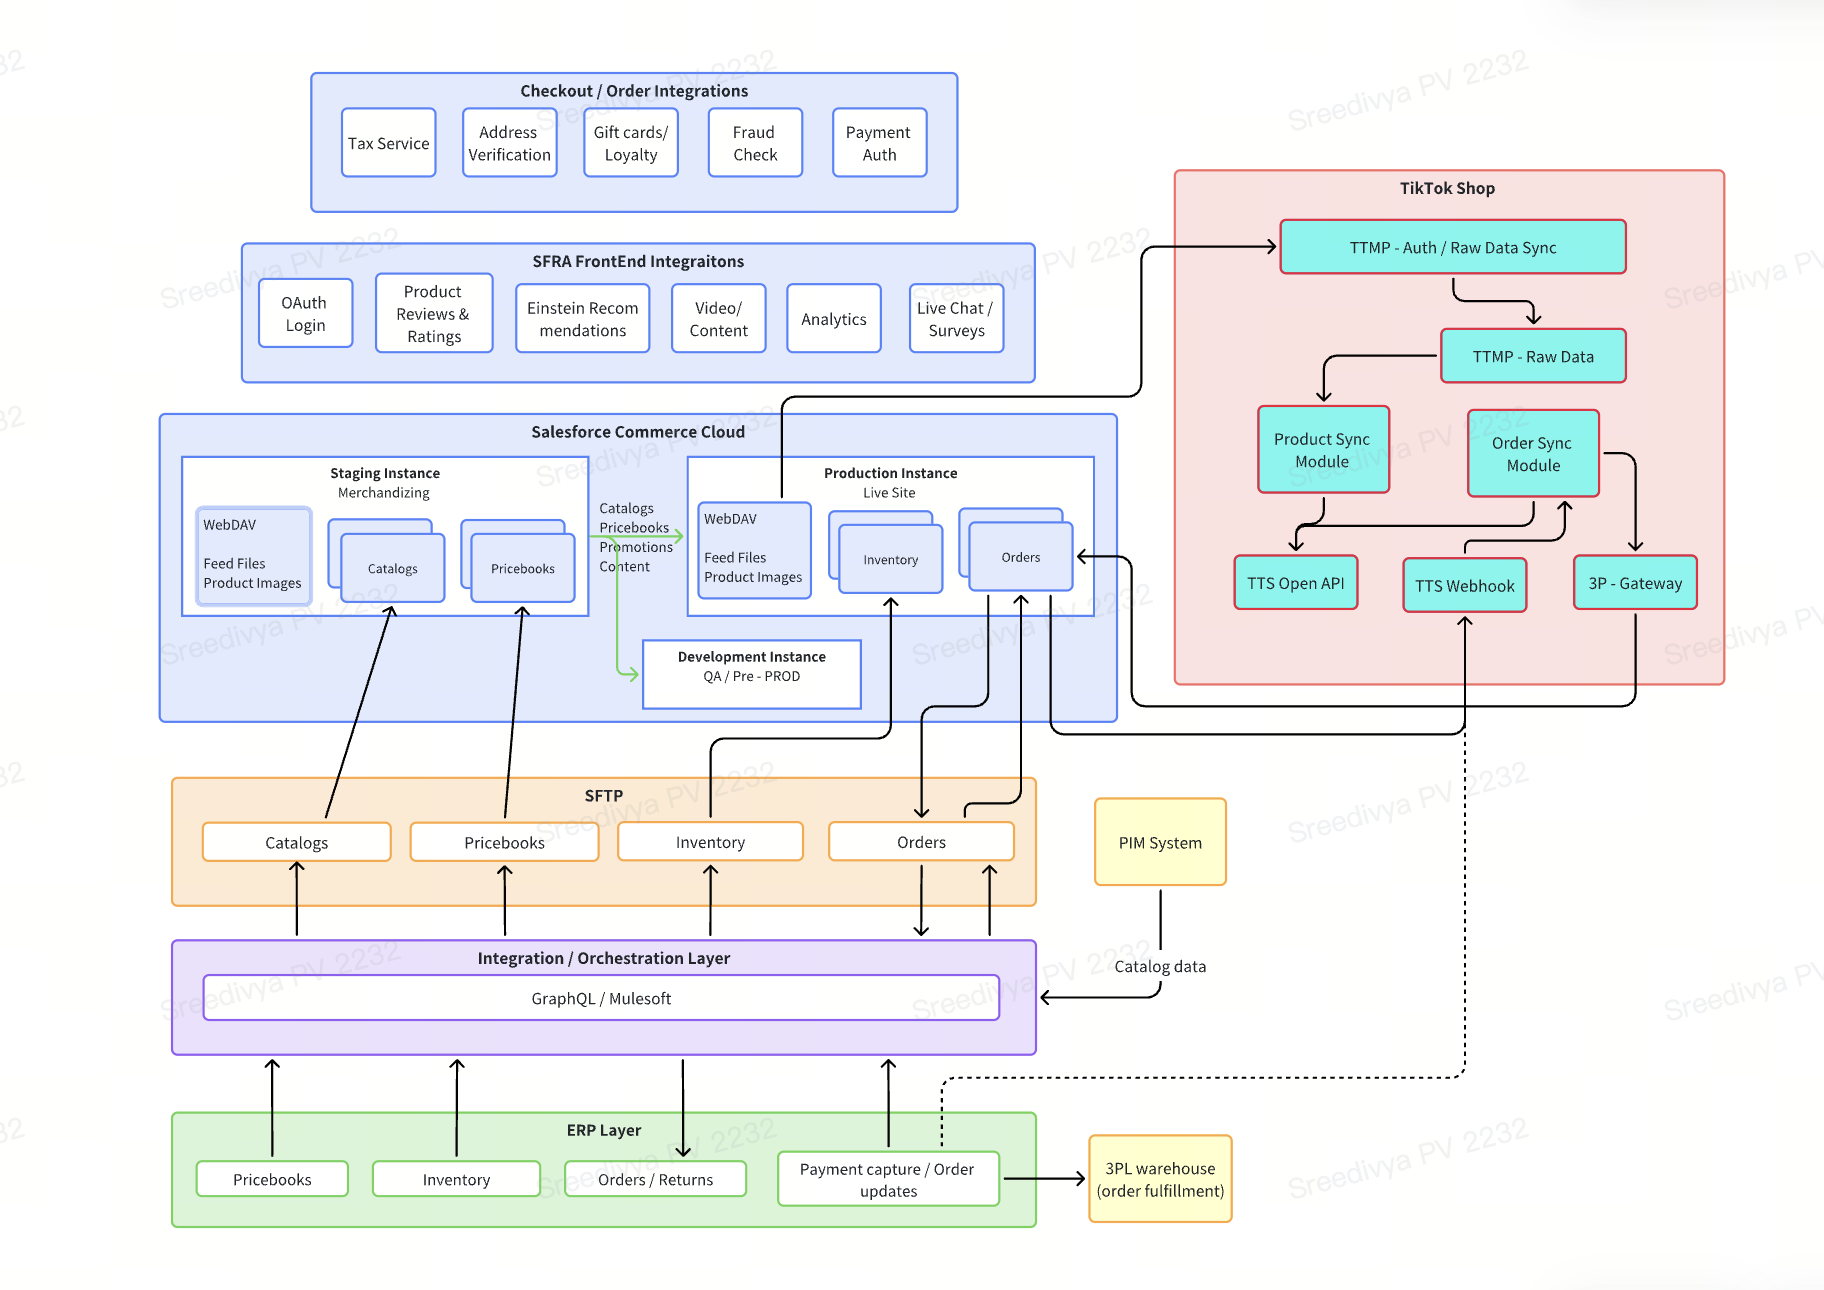
TTS x SFCC 1P Integration
Prerequisites
- System Requirements: List of required versions of Salesforce Commerce Cloud, TikTok Shop APIs, and any middleware components.
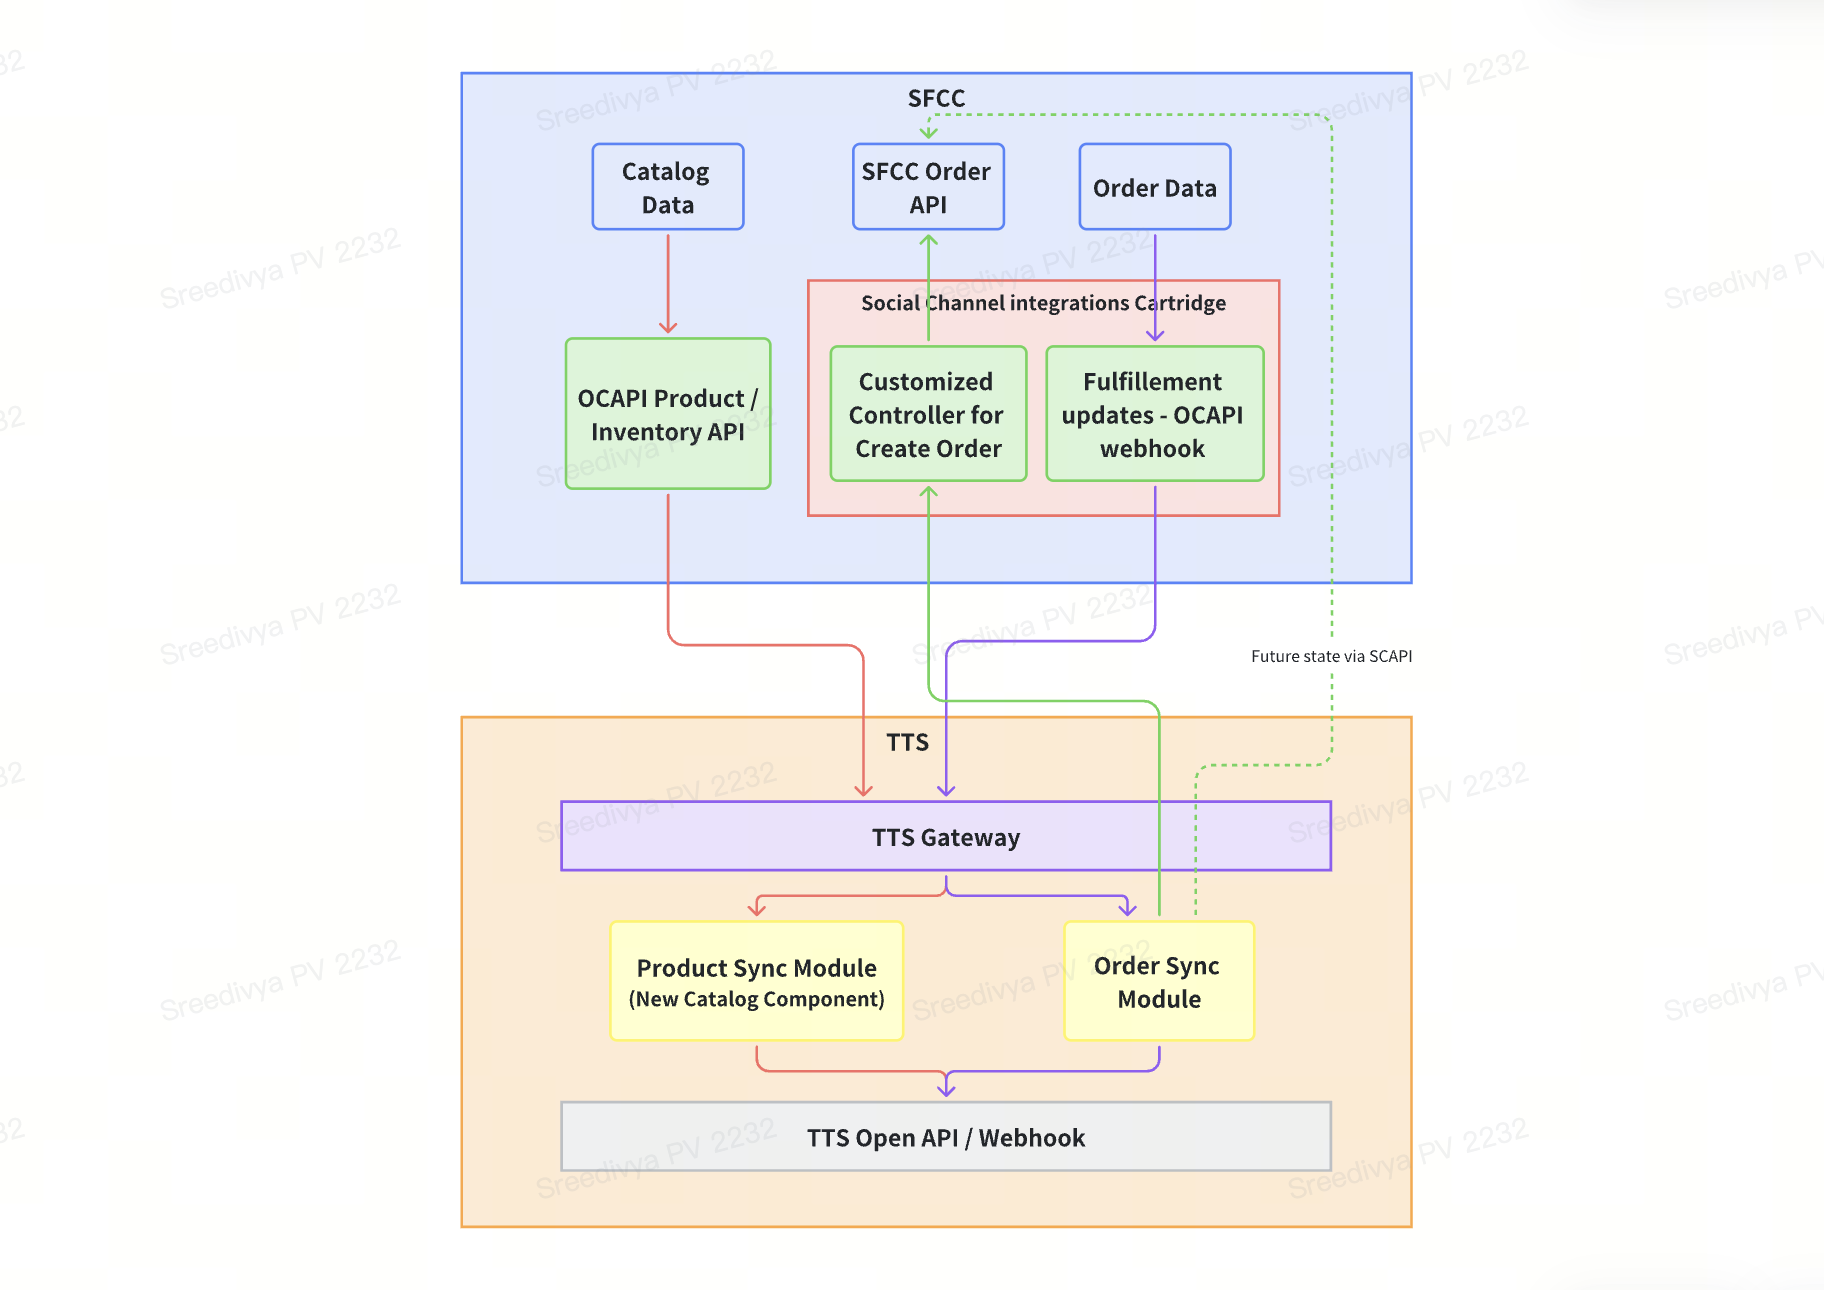
- Social Channel Integrations Cartridge:
- We recommend upgrading to the latest version of the social_channel_integrations cartridge (preferably released on or after March 10, 2025).
- If upgrading is not feasible, work with your TTS CSM / SA, the new features should still be accessible without the latest version.
- Cartridge repository: Salesforce Commerce Cloud Social Channel Integrations.
- SFCC Configuration:
- To activate API-driven flows and the new Catalog Widget, please gather the following information and share it with your CSM.
- Social Channel Integrations Cartridge:
| Field | SFCC BM Source |
| External Business ID | Merchant Tools --> Custom Objects --> Find (Social Channels) --> tiktok-settings - General |
| Organization ID | Administration --> Site Development --> Salesforce Commerce API Settings |
| Catalog ID | Select a single Catalog ID from Merchant Tools --> Products and Catalogs --> Catalogs |
| Category ID(s) (one or more) | Merchant Tool --> Products and Catalogs --> Catalogs --> Category Search (tab)Assign only the relevant products and their variants to the category (or categories) that need to be published on TTS (this category can be different from the one on your eCommerce site). Doing so ensures TTS can retrieve the complete product data accurately. |
| Inventory list ID (if NOT using OCI) | Merchant Tools --> Products and Catalogs --> Inventory |
| Tenant Group ID (if using OCI) | Get the tenant group ID and the base URL, which includes the short code, from the Omnichannel Inventory admin settings page. In your Salesforce org, from Setup, in the Quick Find box, enter Omnichannel Inventory, and then select Omnichannel Inventory |
| Short code (if using OCI) | Administration > Site Development > Salesforce Commerce API Settings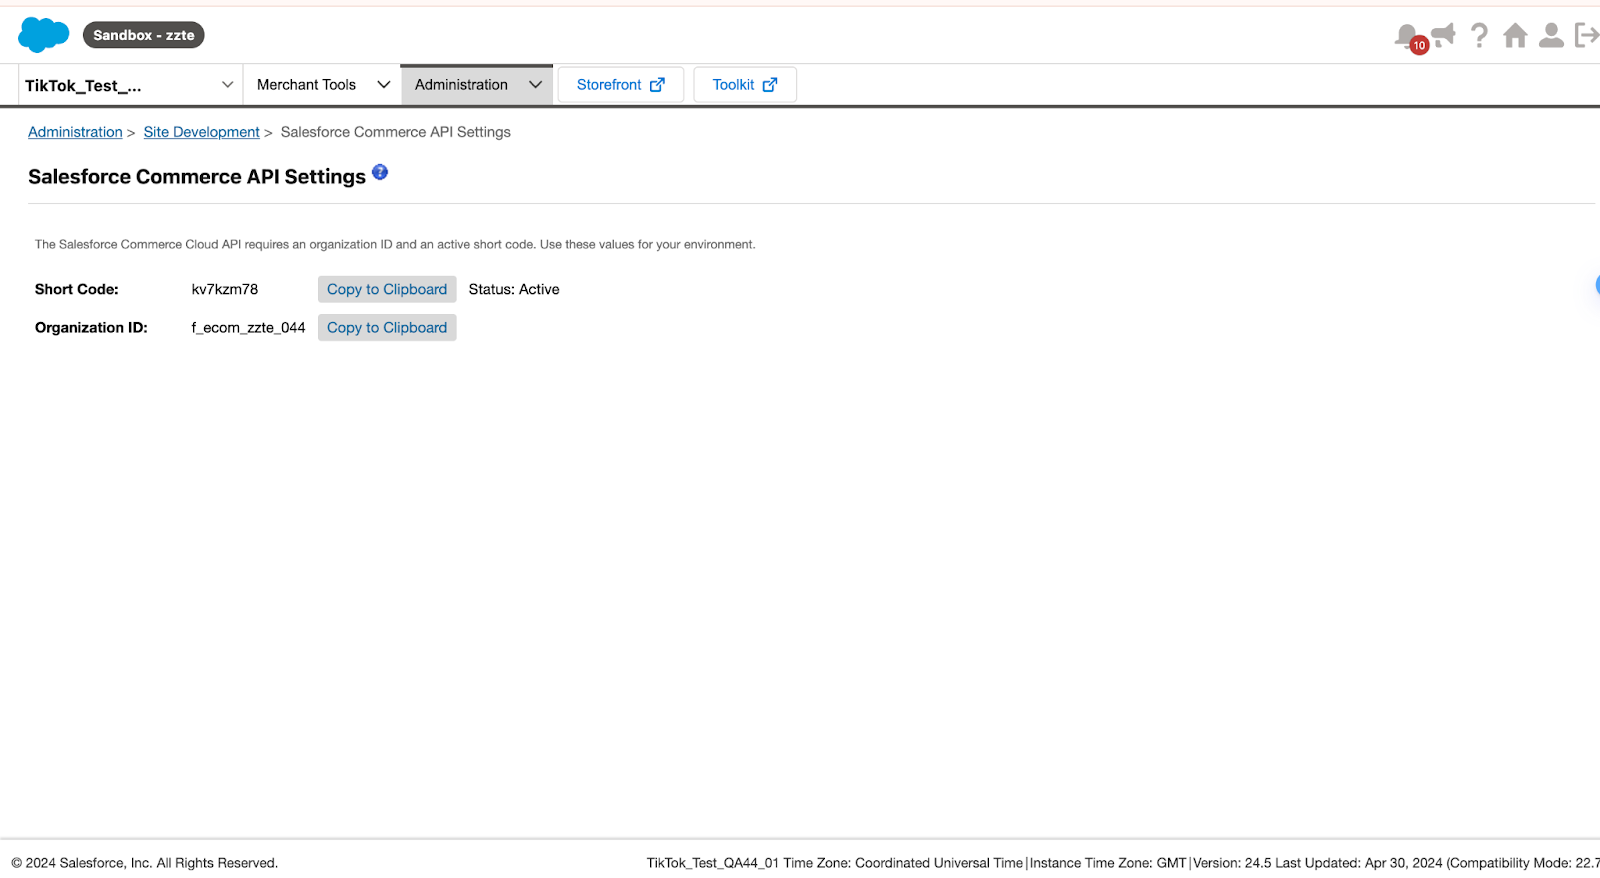 |
| Currency | USD or local currency |
- OCAPI Configuration:
- Under OCAPI API settings ( Administration > Site Development > Open Commerce API Settings ), add/modify the following API permissions under the Client ID shared with TTS to communicate with SFCC through APIs.
Shop API Permission Settings
"_v": "21.3",
"clients": [
{
"client_id": "[-------OCAPI Account Manager Client ID-------]",
"resources": [
{
"resource_id": "/orders/*",
"methods": [
"get",
"patch",
"put"
],
"read_attributes": "(**)",
"write_attributes": "(**)"
},
{
"resource_id": "/products/*/availability",
"methods": [
"get"
],
"read_attributes": "(**)",
"write_attributes": "(**)"
},
{
"resource_id": "/products/*",
"methods": [
"get"
],
"read_attributes": "(**)",
"write_attributes": "(**)"
}
]
}
]
}
Data API Permission Settings
"_v": "21.3",
"clients": [
{
"client_id": "[-------OCAPI Account Manager Client ID-------]",
"resources": [
{
"resource_id": "/user_search",
"methods": [
"post"
],
"read_attributes": "(**)",
"write_attributes": "(**)"
},
{
"resource_id": "/product_search",
"methods": [
"post"
],
"read_attributes": "(**)",
"write_attributes": "(**)"
},
{
"resource_id": "/catalogs/**",
"methods": [
"get",
"post"
],
"read_attributes": "(**)",
"write_attributes": "(**)"
},
{
"resource_id": "/catalogs/*/categories/*/category_product_assignment_search",
"methods": [
"post"
],
"read_attributes": "(**)"
},
{
"resource_id": "/inventory_lists/**",
"methods": [
"get",
"post"
],
"read_attributes": "(**)",
"write_attributes": "(**)"
},
{
"resource_id": "/products/*",
"methods": [
"get"
],
"read_attributes": "(**)",
"write_attributes": "(**)"
},
{
"resource_id": "/inventory_lists/*/product_inventory_records/*",
"methods": [
"get"
],
"read_attributes": "(**)",
"write_attributes": "(**)"
}
]
}
]
}
Launch TTS from SFCC
Updated Plugin JS URL
If you are using a previous version of social_integrations cartridge, ensure you updated the Plugin JS Version to this URL - https://sf-ttmp.ttcdn-row.com/obj/ttastatic-sg/tiktok-business-plugin/tbp_external_platform-v2.3.11.jsNavigate to Merchant Tools --> Site Preferences --> Custom Site Preference Groups --> TikTok Settings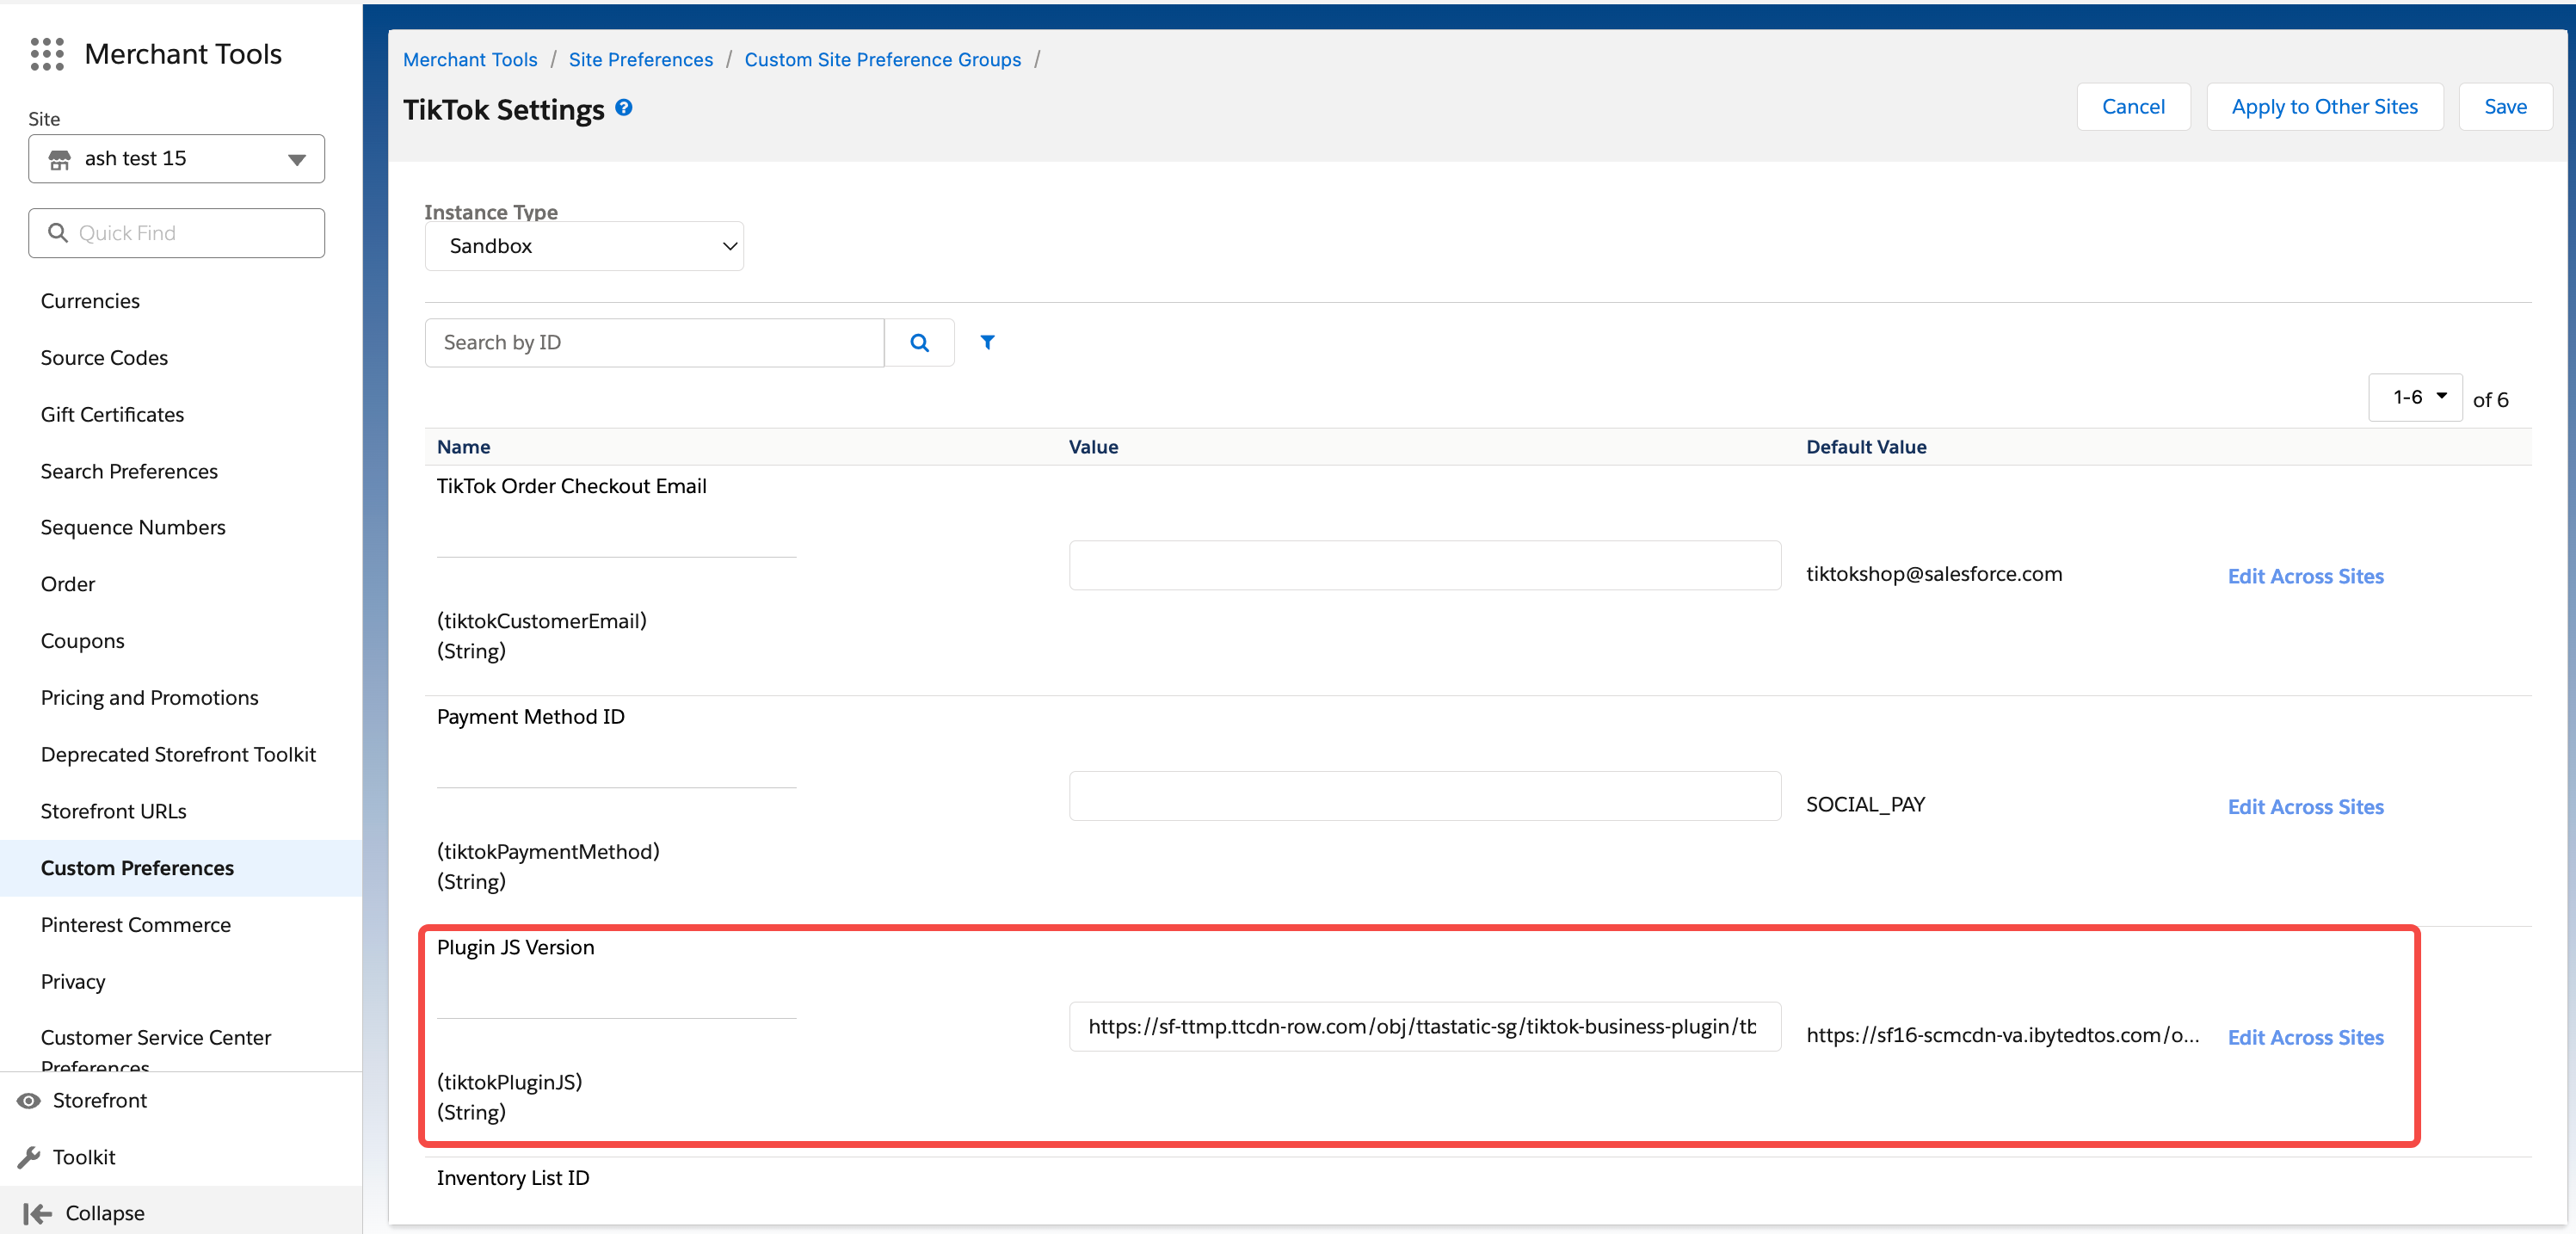
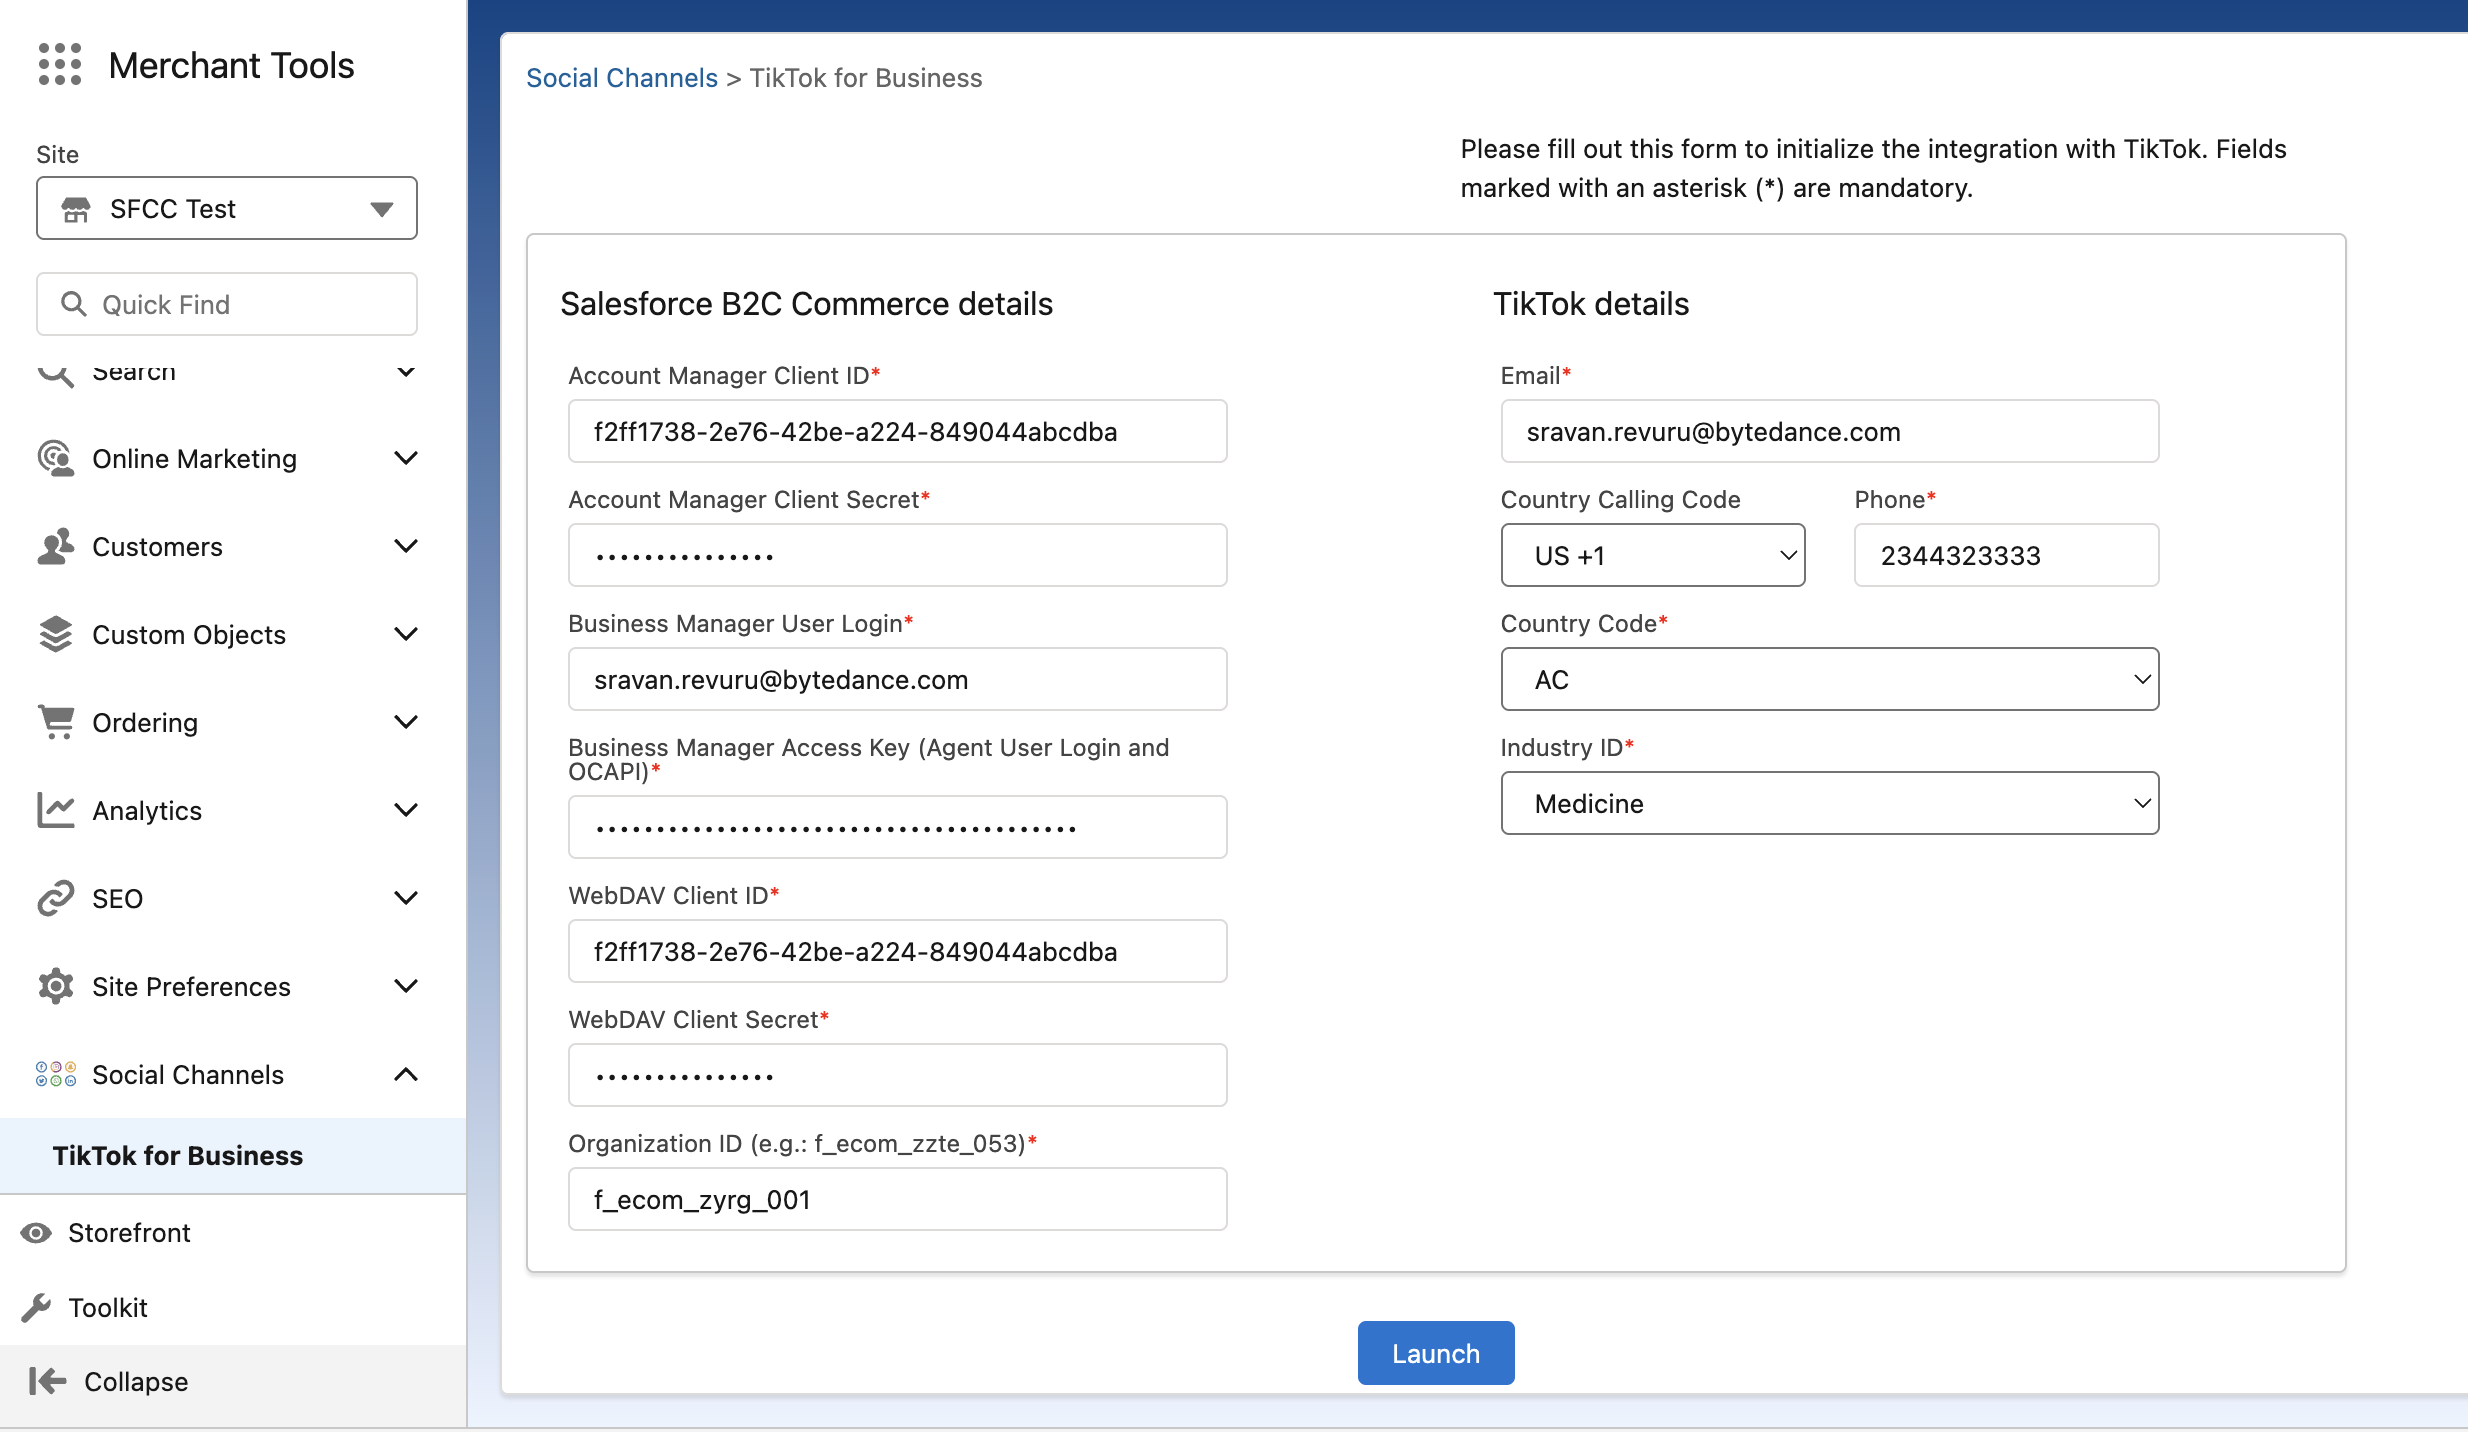
Access "TikTok for Business" from Salesforce Business Manager
- Navigate to Salesforce BM → Merchant Tools → Select the Site to connect with TTS → Social Channels → TikTok for Business.
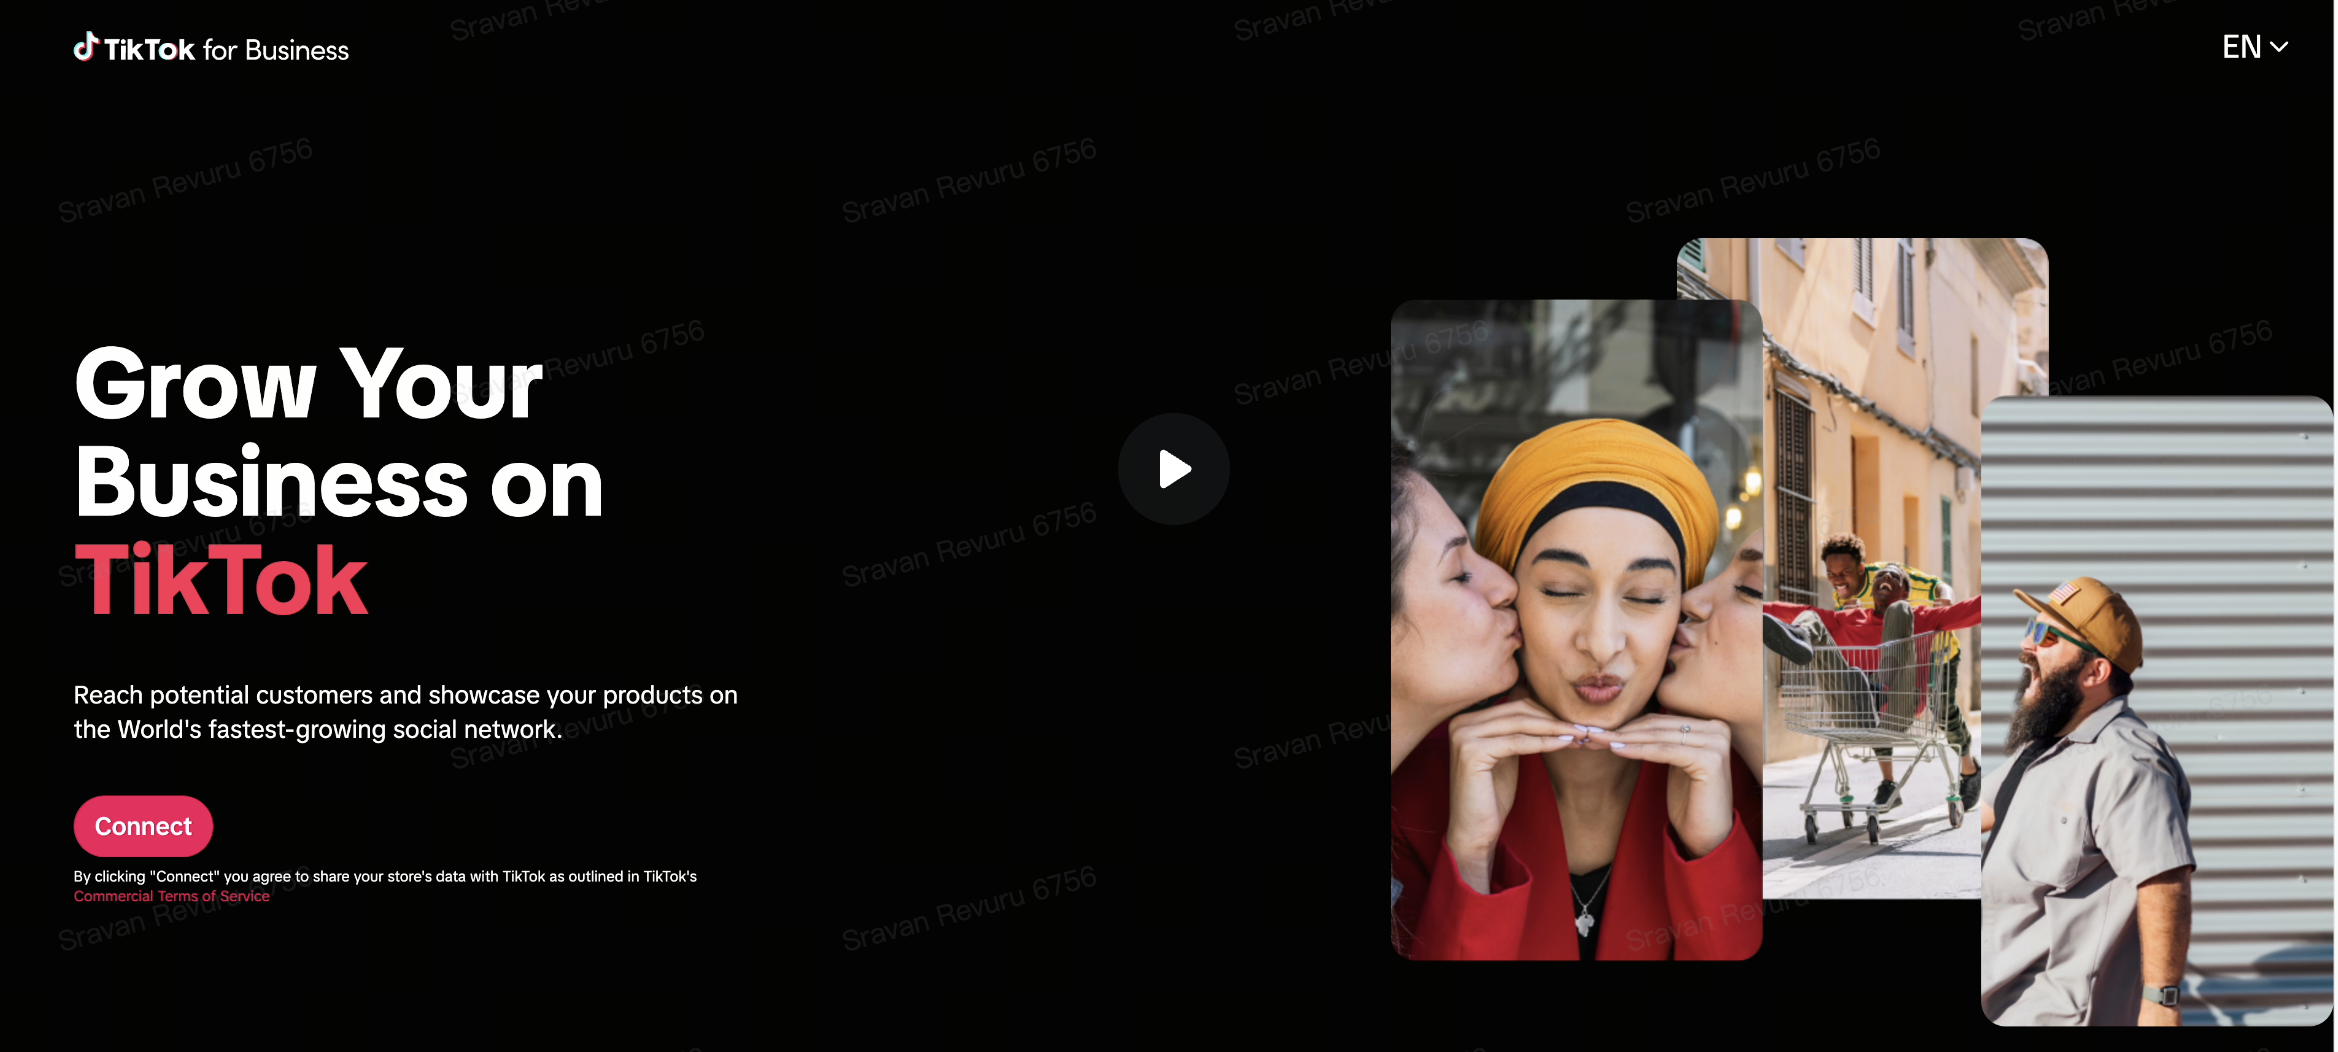
- Input the OCAPI credentials and the connection details and click Launch.
- You will be redirected to the TikTok for Business launch page. Click on "Connect" button
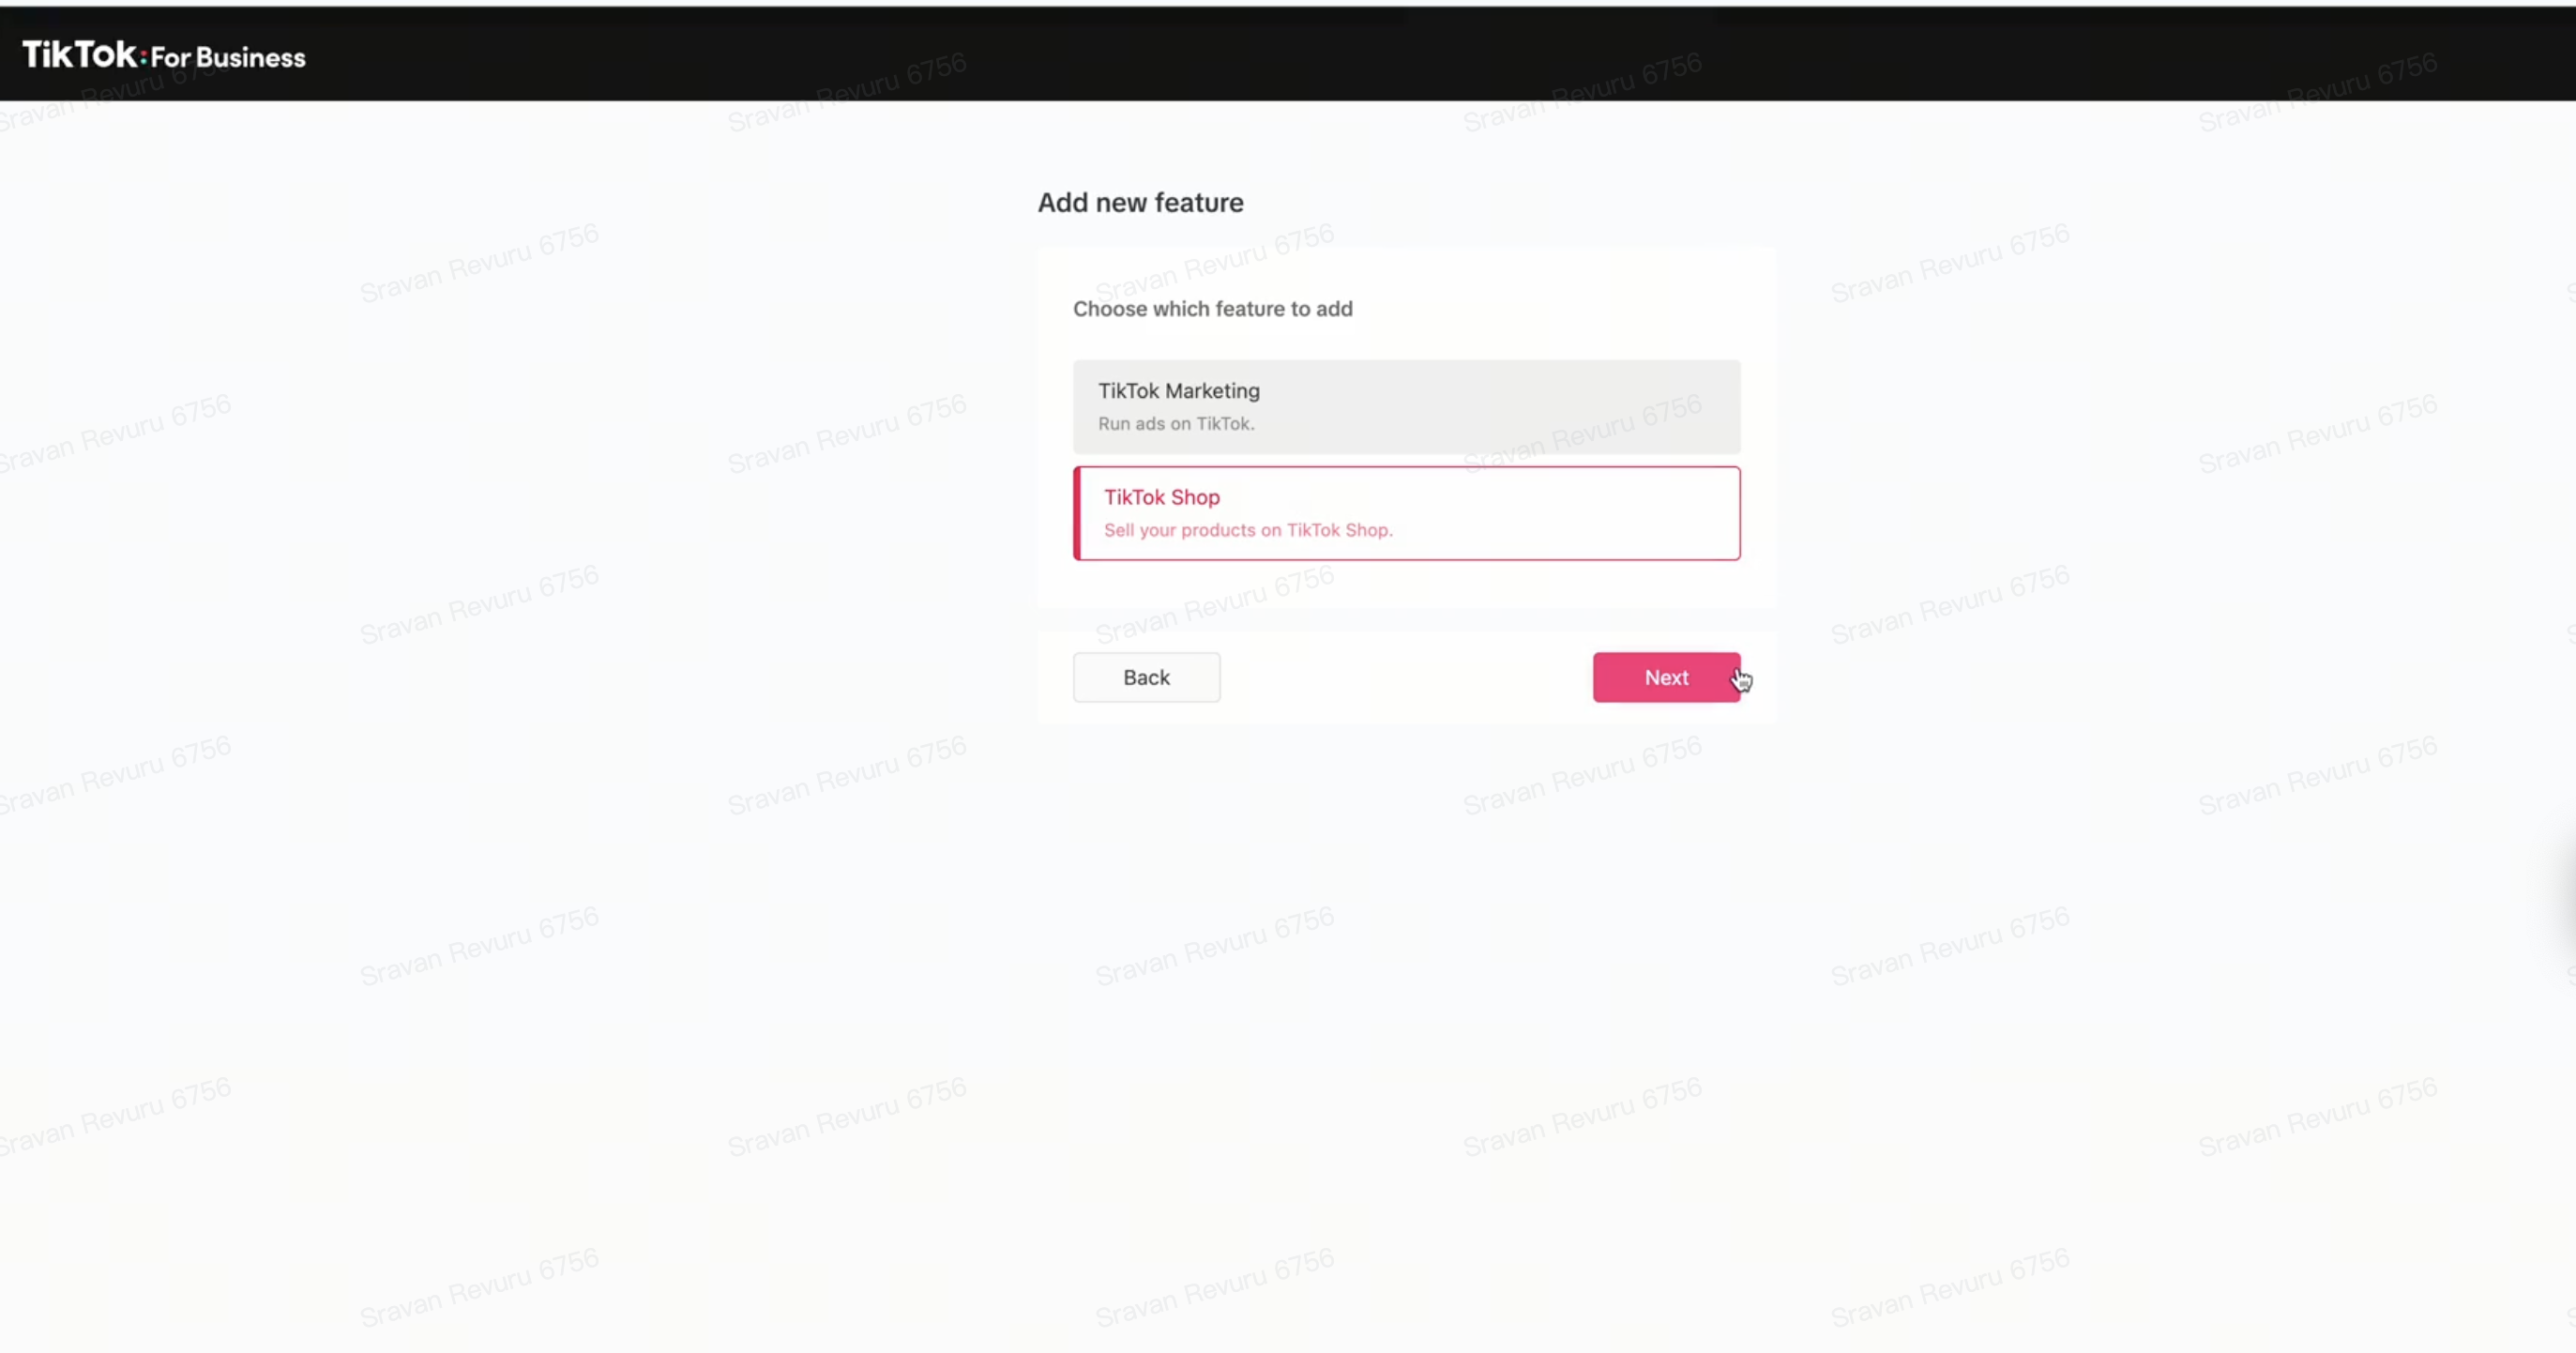
- You will be redirected to TikTok for Business with the below options. Choose "TikTok Shop" and click "Next"
Connect to your TikTok Shop:
- Click Connect Account.
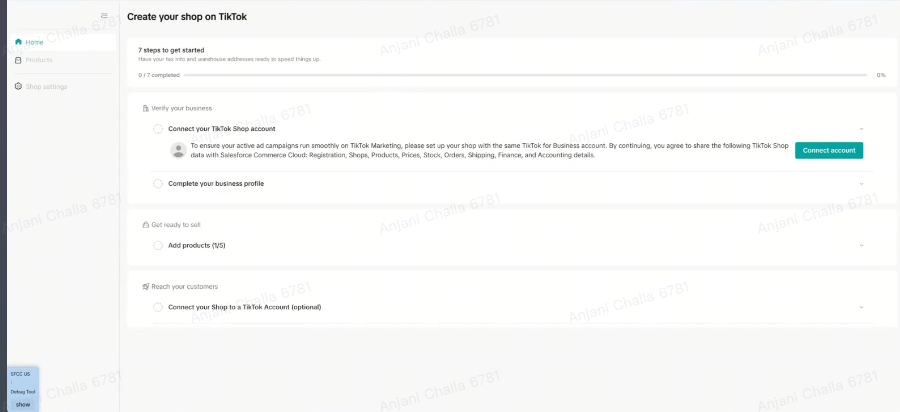
- Log in with your seller credentials and click Login.
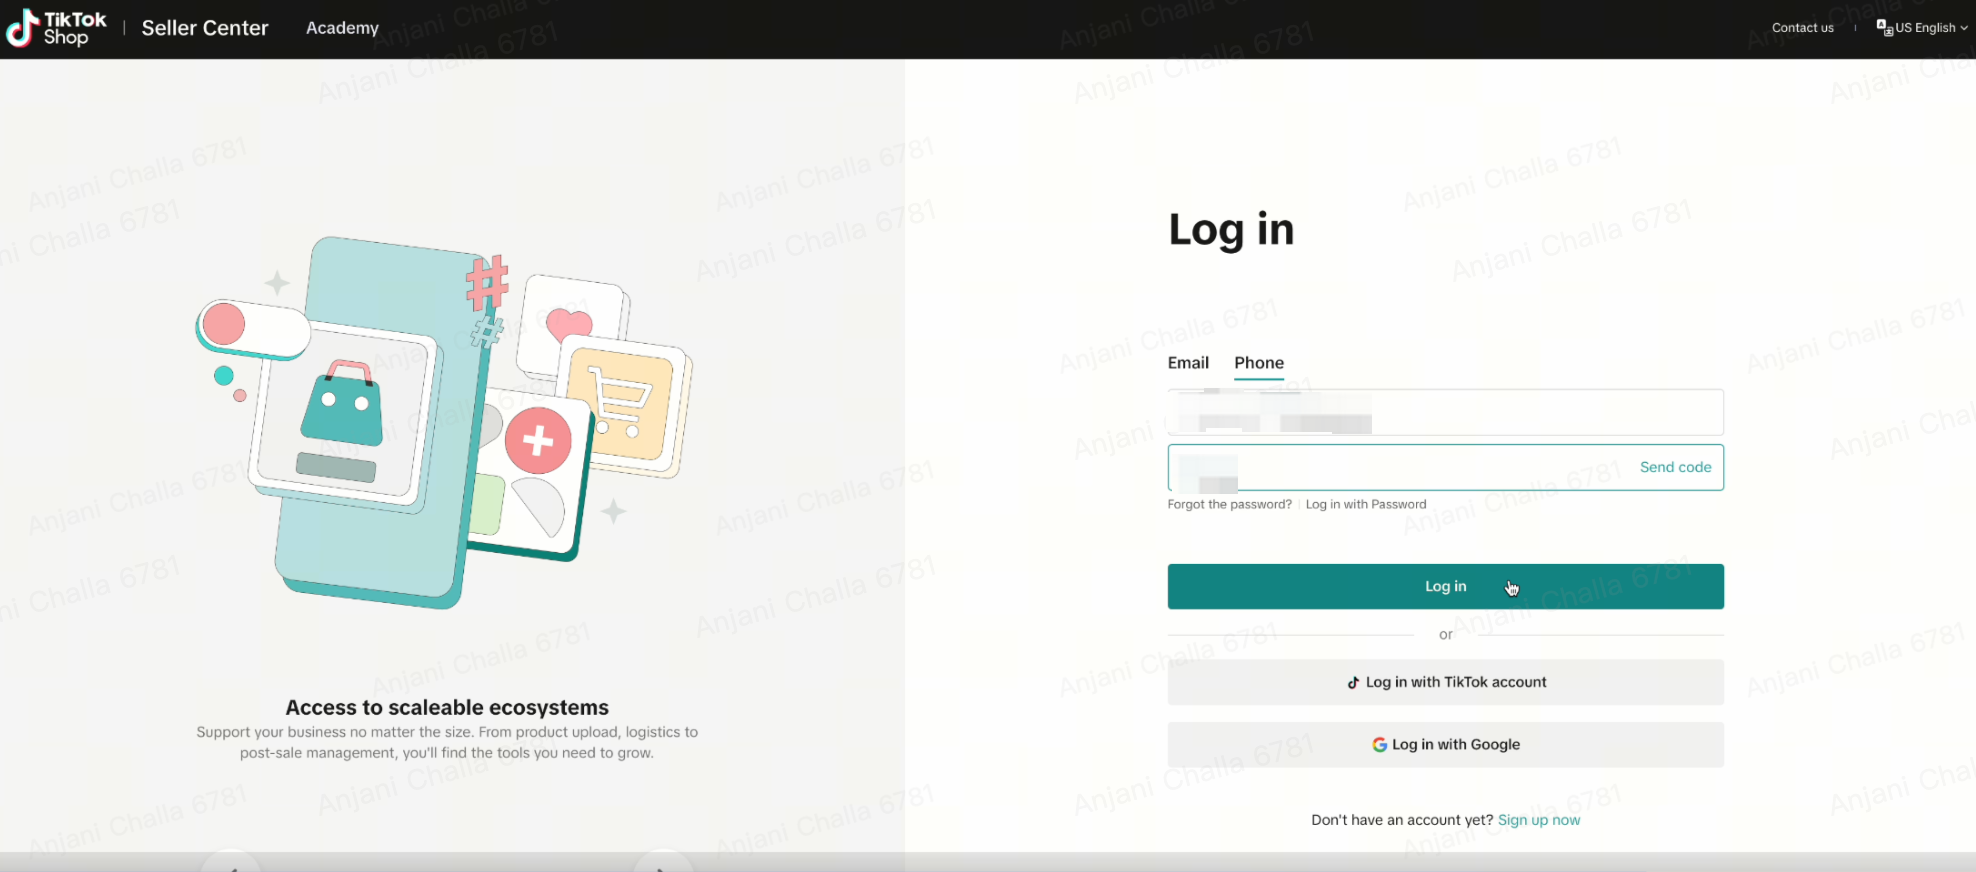
- Once connected, you will see a confirmation that your shop is successfully linked
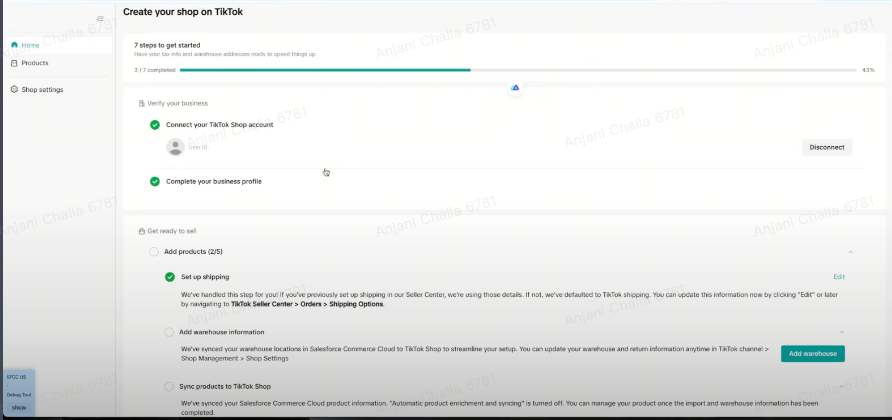
Enable the Shop in TTS backend
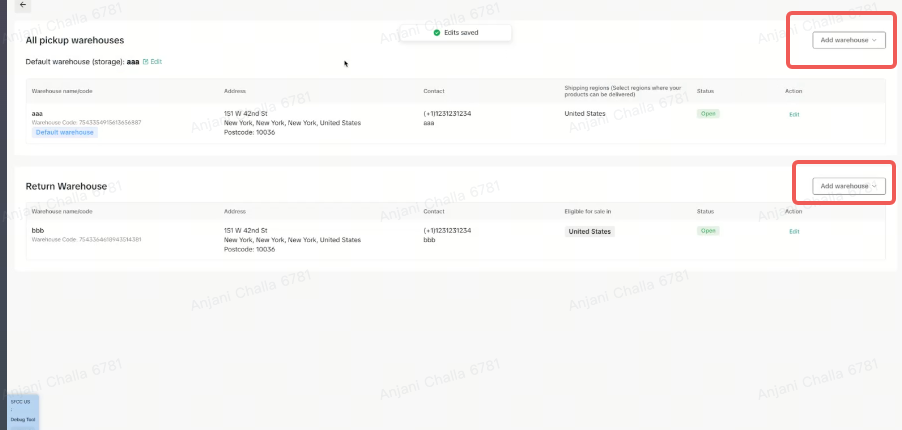
Work with your CSM to enable the Shop in the backend (This requires your AM/CSM to work with TT support team). Once the Shop is enabled, you can continue with the steps below.Add Warehouse information:
- Add all the Pickup and Return warehouse details.
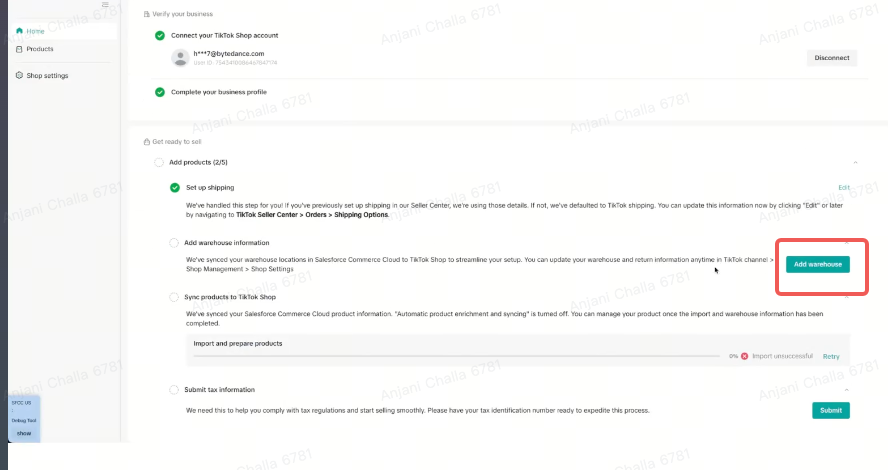
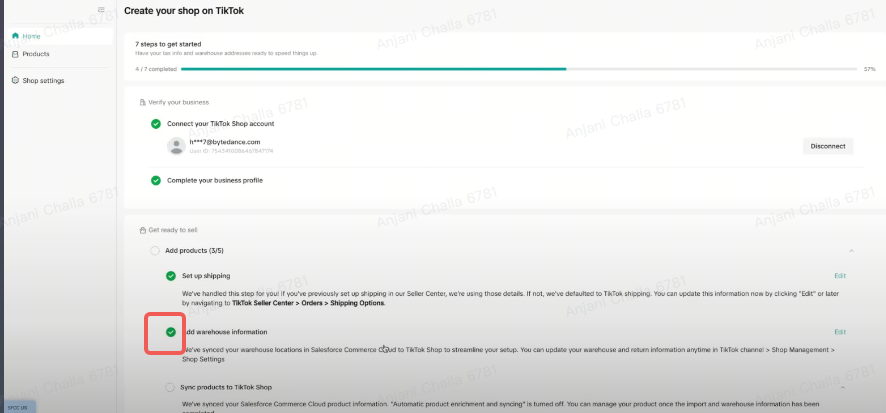
Enable Catalog Widget in the Backend
Reach out to your CSM to perform this step to enable and push the products into catalog widgetInitiate Product Listing on TTS
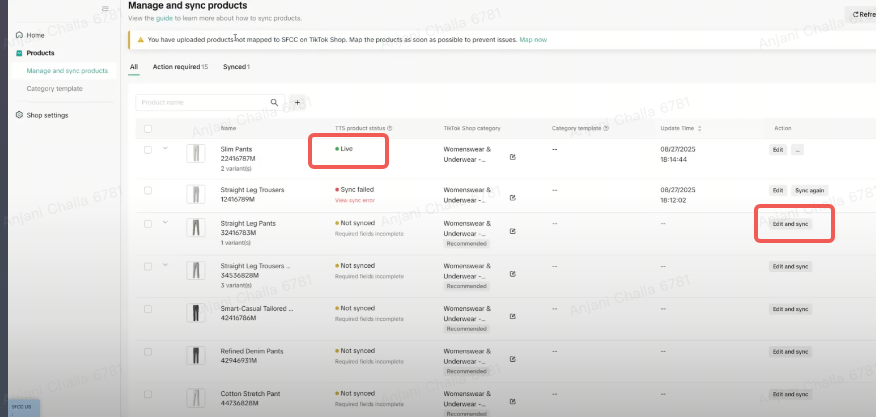
Refresh the page and click manage and sync products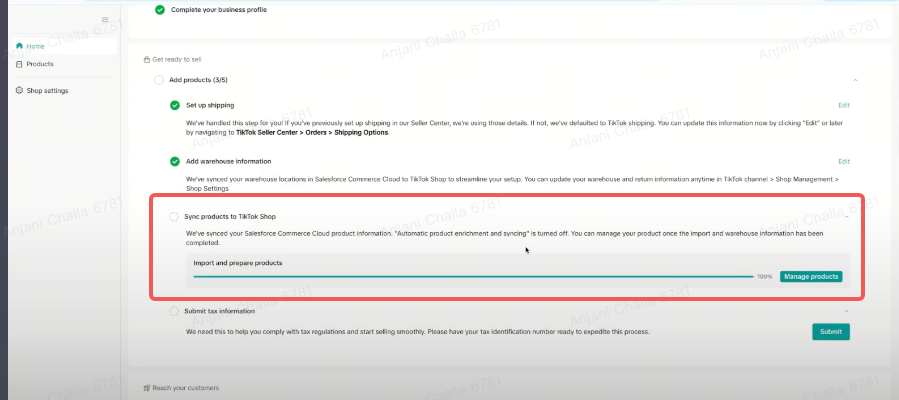
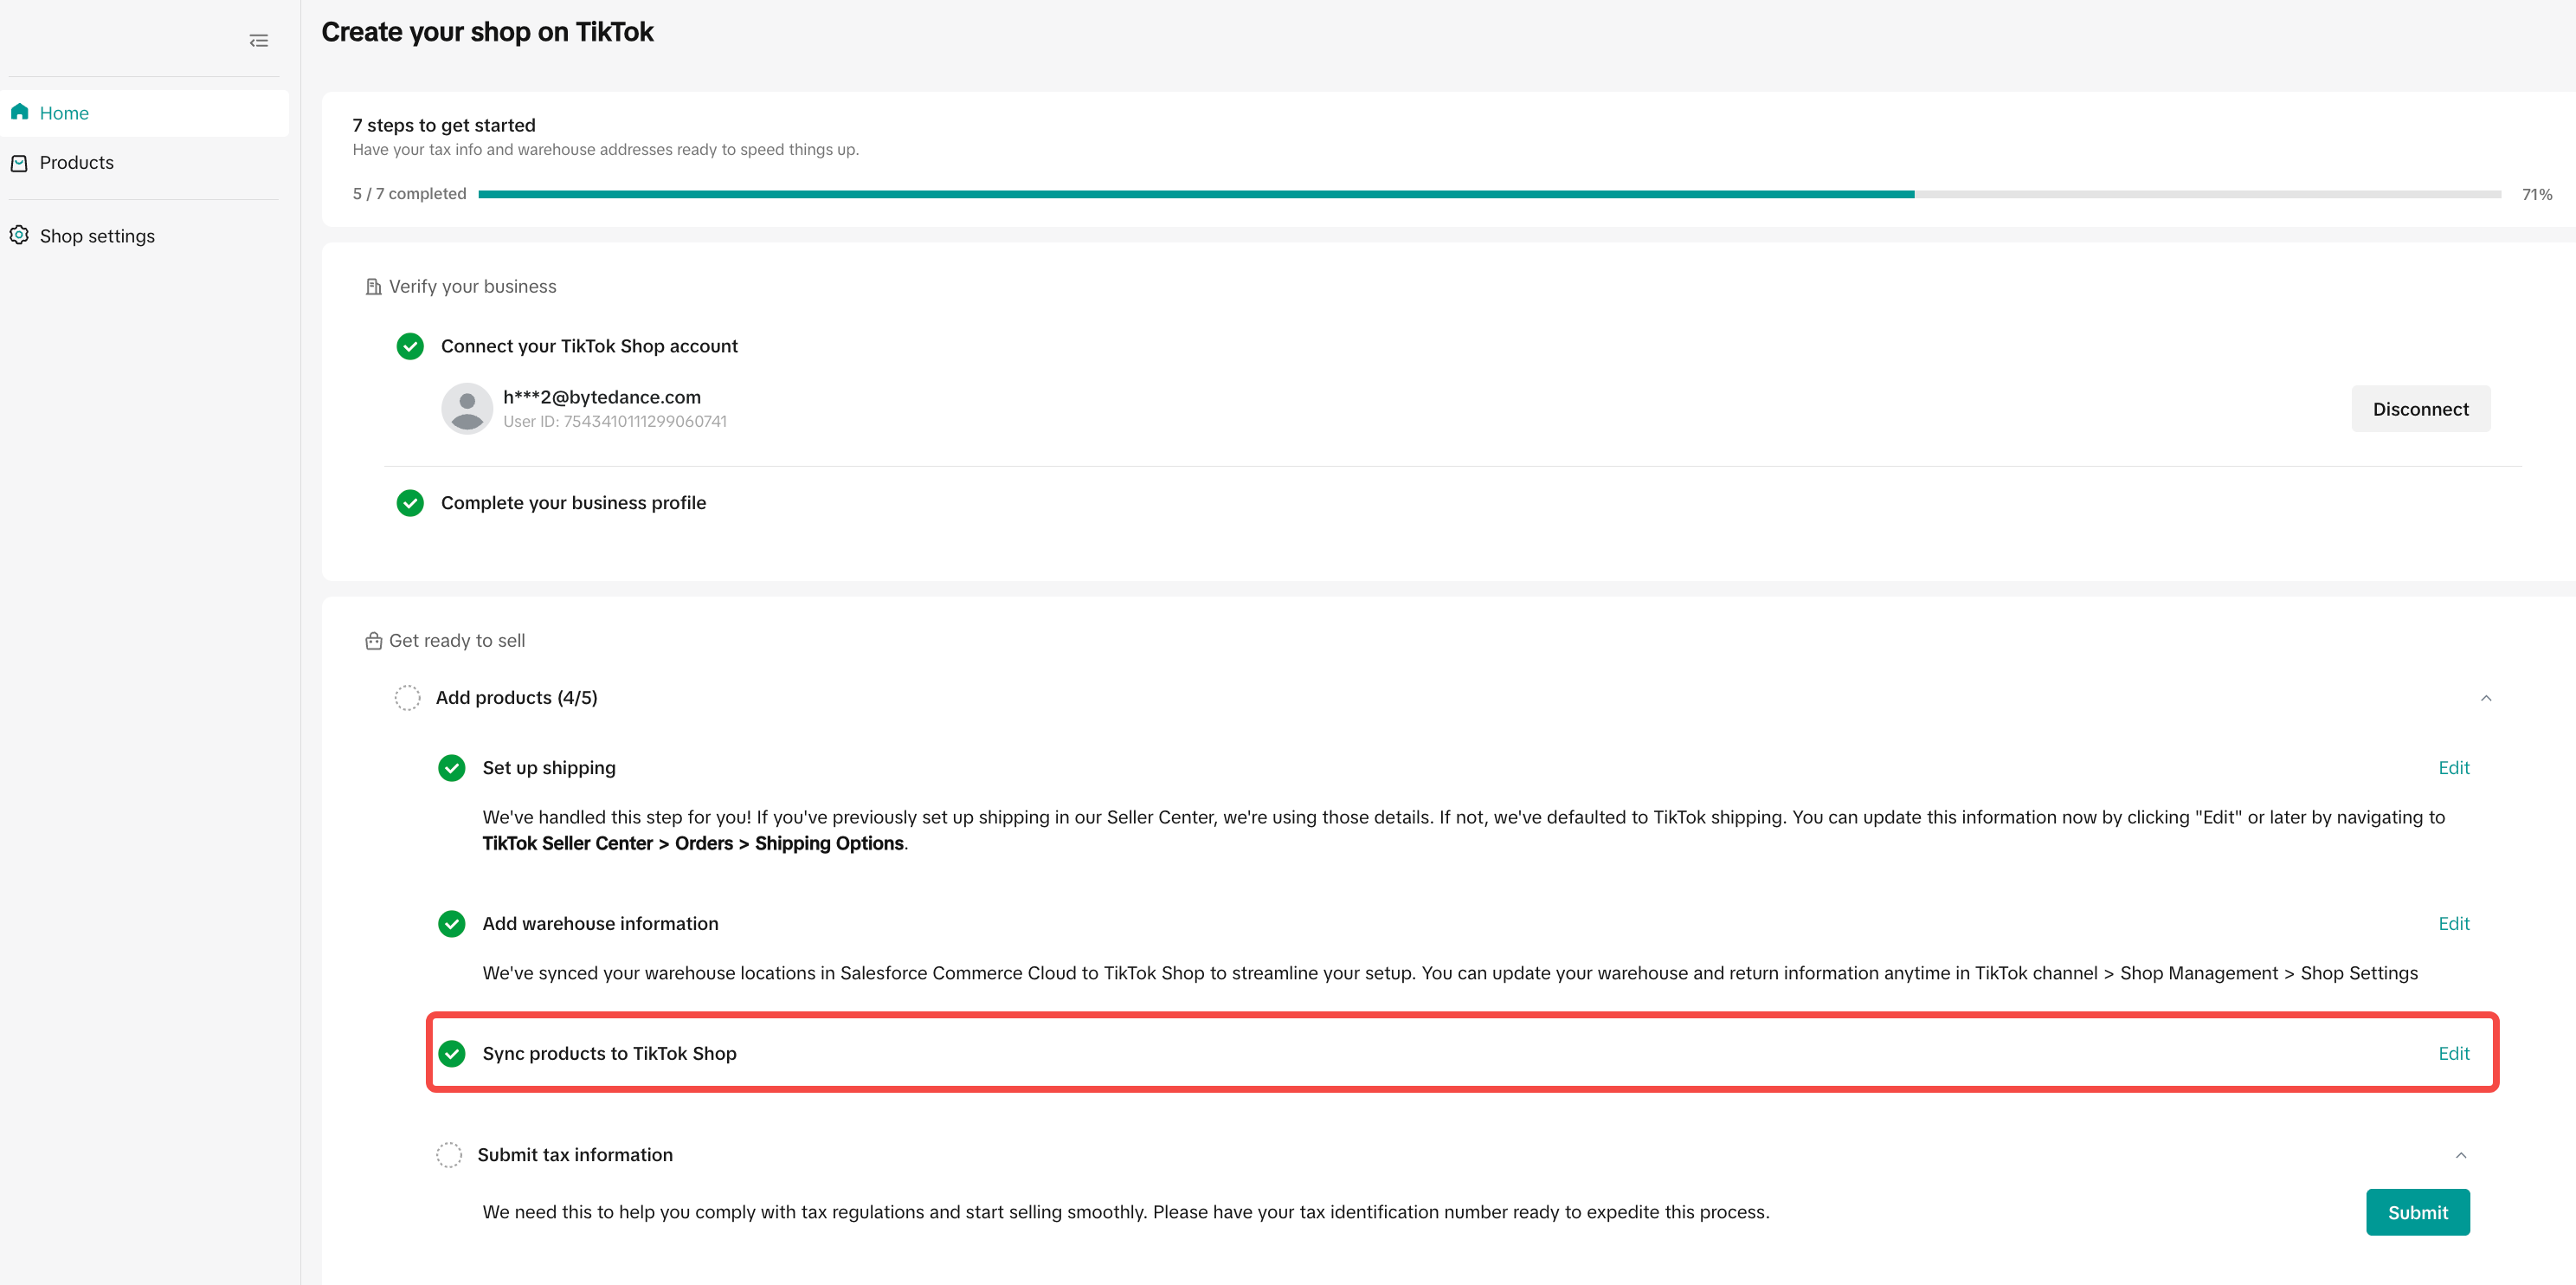
Manage and sync products:
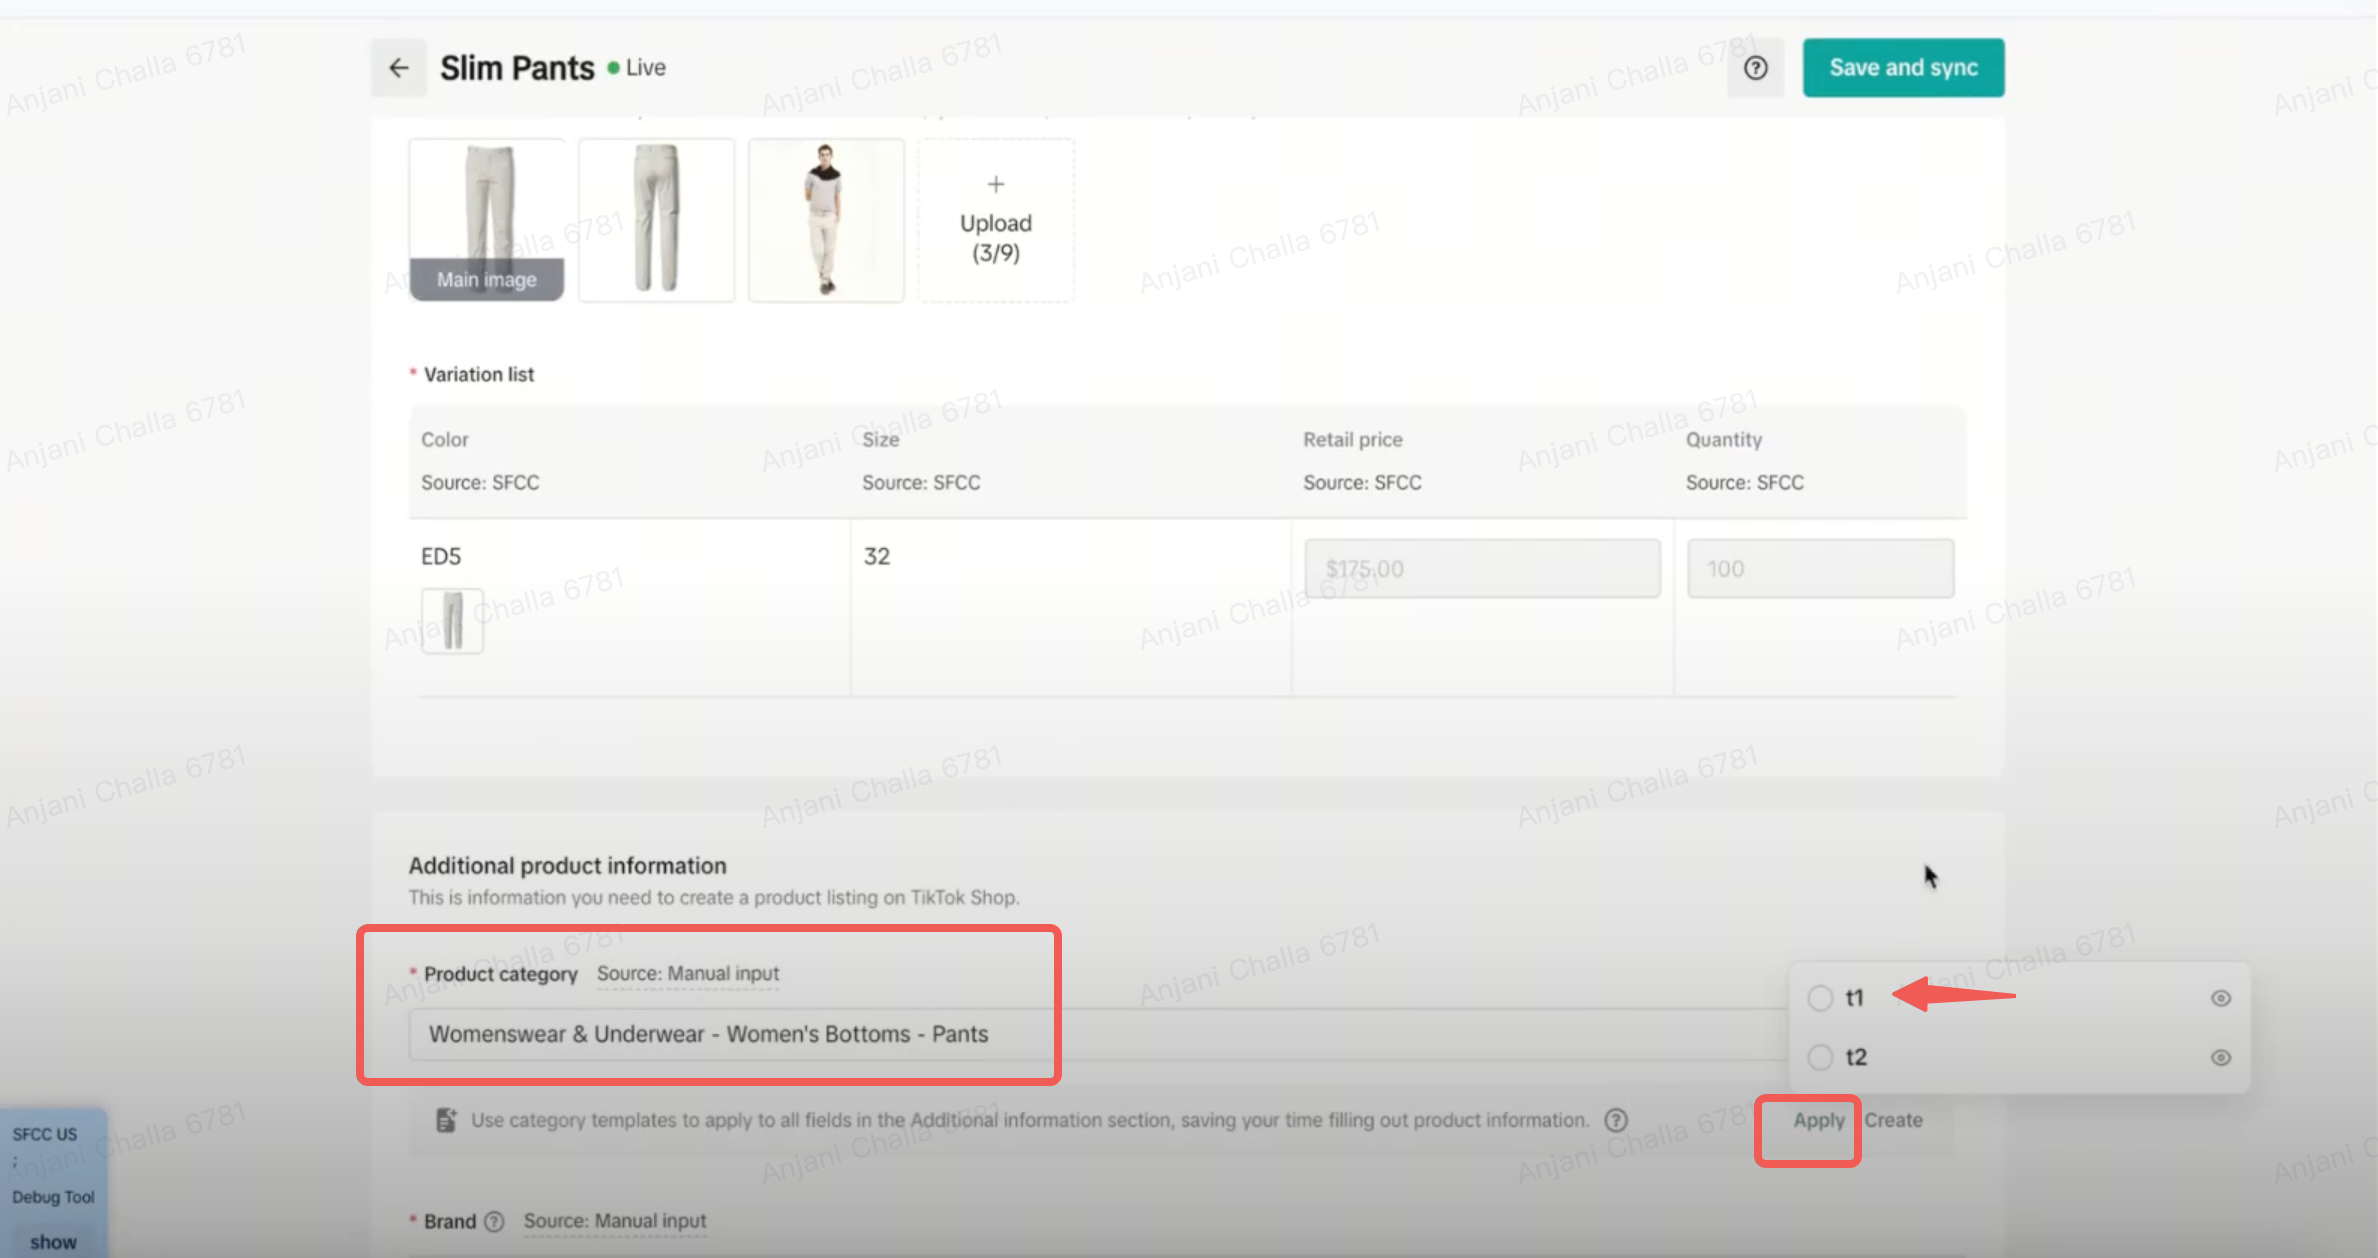
SFCC V2 Catalog Widget-->Products --> Manage and Sync Products. Click Edit and Sync option and edit the products you would like to sync to TT. Once all the required fields are filled in click "save and sync".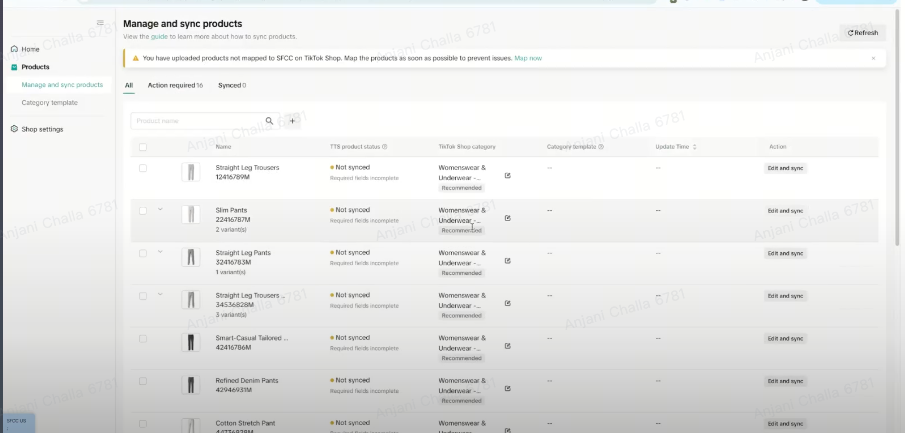
Category Template:
Category templates are essential tools for efficient product management within TikTok Shop. Category templates enable you to collectively update vital product details for products in batch, that are required by TikTok Shop, simplifying the synchronization process between your SFCC store and TikTok. By linking a group of products to a single category template, you're making both the preparation and sync tasks quicker and smoother.What are Category Templates and why use them?
Category templates are essential tools for efficient product management within the TikTok Shop. These templates enable you to collectively update vital product details, simplifying the synchronization process between your SFCC store and TikTok. By linking a group of products to a single category template, you're making both the preparation and sync tasks quicker and smoother.Now, let's look at your options for working with these templates:
Category Template Features
The Category Template feature aims to simplify the seller experience. Here's what it allows you to do:- Assign each product to a unique category template, ensuring a one-to-one relationship between products and templates.
- Associate multiple templates with a single TikTok category, providing flexibility in product management.
- Set a "default" template within a TikTok category to which new eCommerce products are automatically mapped.
- Instantly create a category template using your SFCC product choices . Manual selection becomes necessary only if this automated process fails.
- Update and manage your templates via the 'Category Templates' tab. This includes renaming, recategorizing, and even deleting templates.
- Change product category for a product through the template
Managing Product Information in Category Template
We support a range of product attributes that you can maintain within the app:- TikTok Category
- Brand Name
- Product Features
- Shipping Dimensions (Weight, Length, Width, Height)
- Size Chart
- Certifications
Managing Product Information without Category Template
We offer two ways to update the required product details:- Template-Level: You can link multiple products to a category template and edit their attributes in bulk.
- Product-Level: Alternatively, go to the 'Product List' to update individual product details.
- Each product must be associated with a category template.
- If a template doesn't cover your specific product details, go to the individual product page and select "I want to set product information individually."
- The hierarchy for syncing data is as follows: existing eCommerce data > product-specific data > template data.
- You can check the individually set template from the category tabs
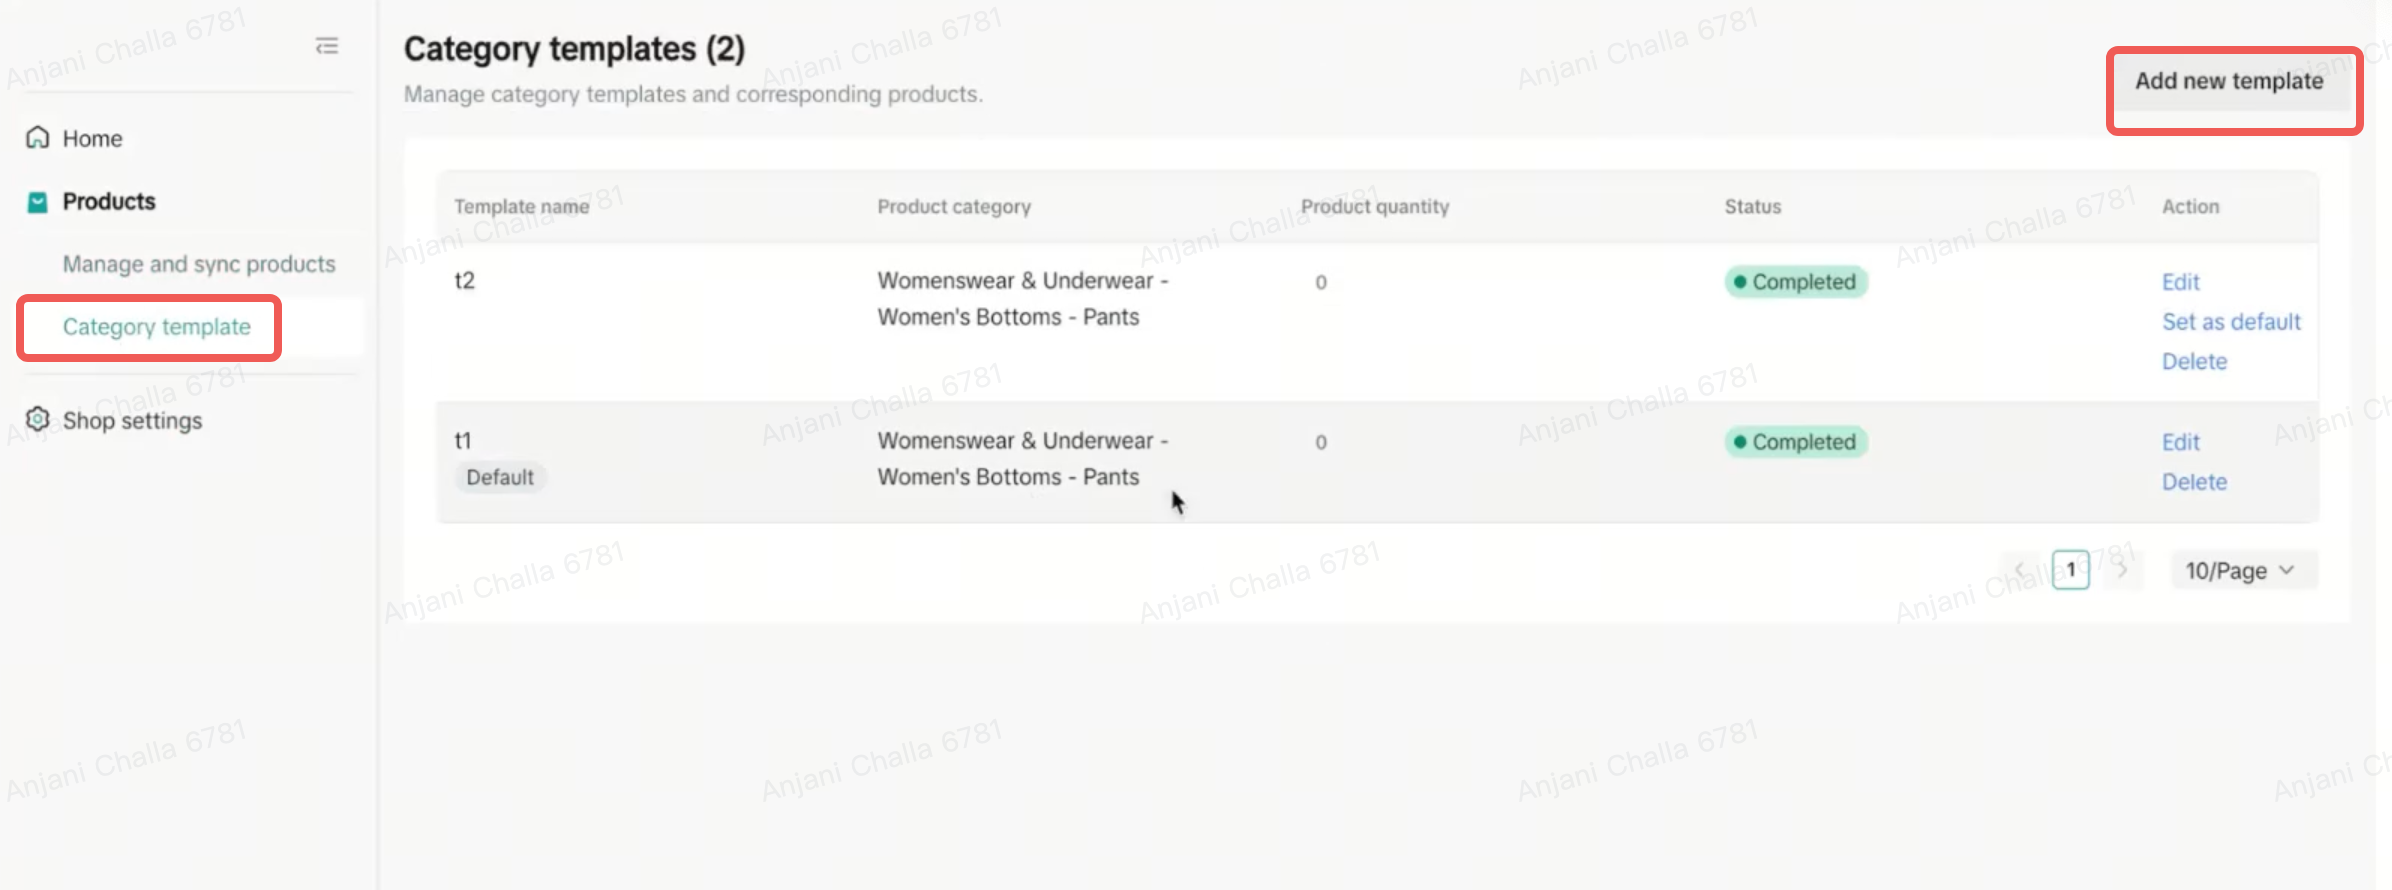
Creating a New Category Template
- If the auto-suggested TikTok category isn't what you need, or if mapping fails, you can create a new template.
- Go to the "Category List Tab."
- Click "Add New Template."
- Fill in all required information for the new template and save
- Associate the new template with your desired products for quick sync.
Shop Settings
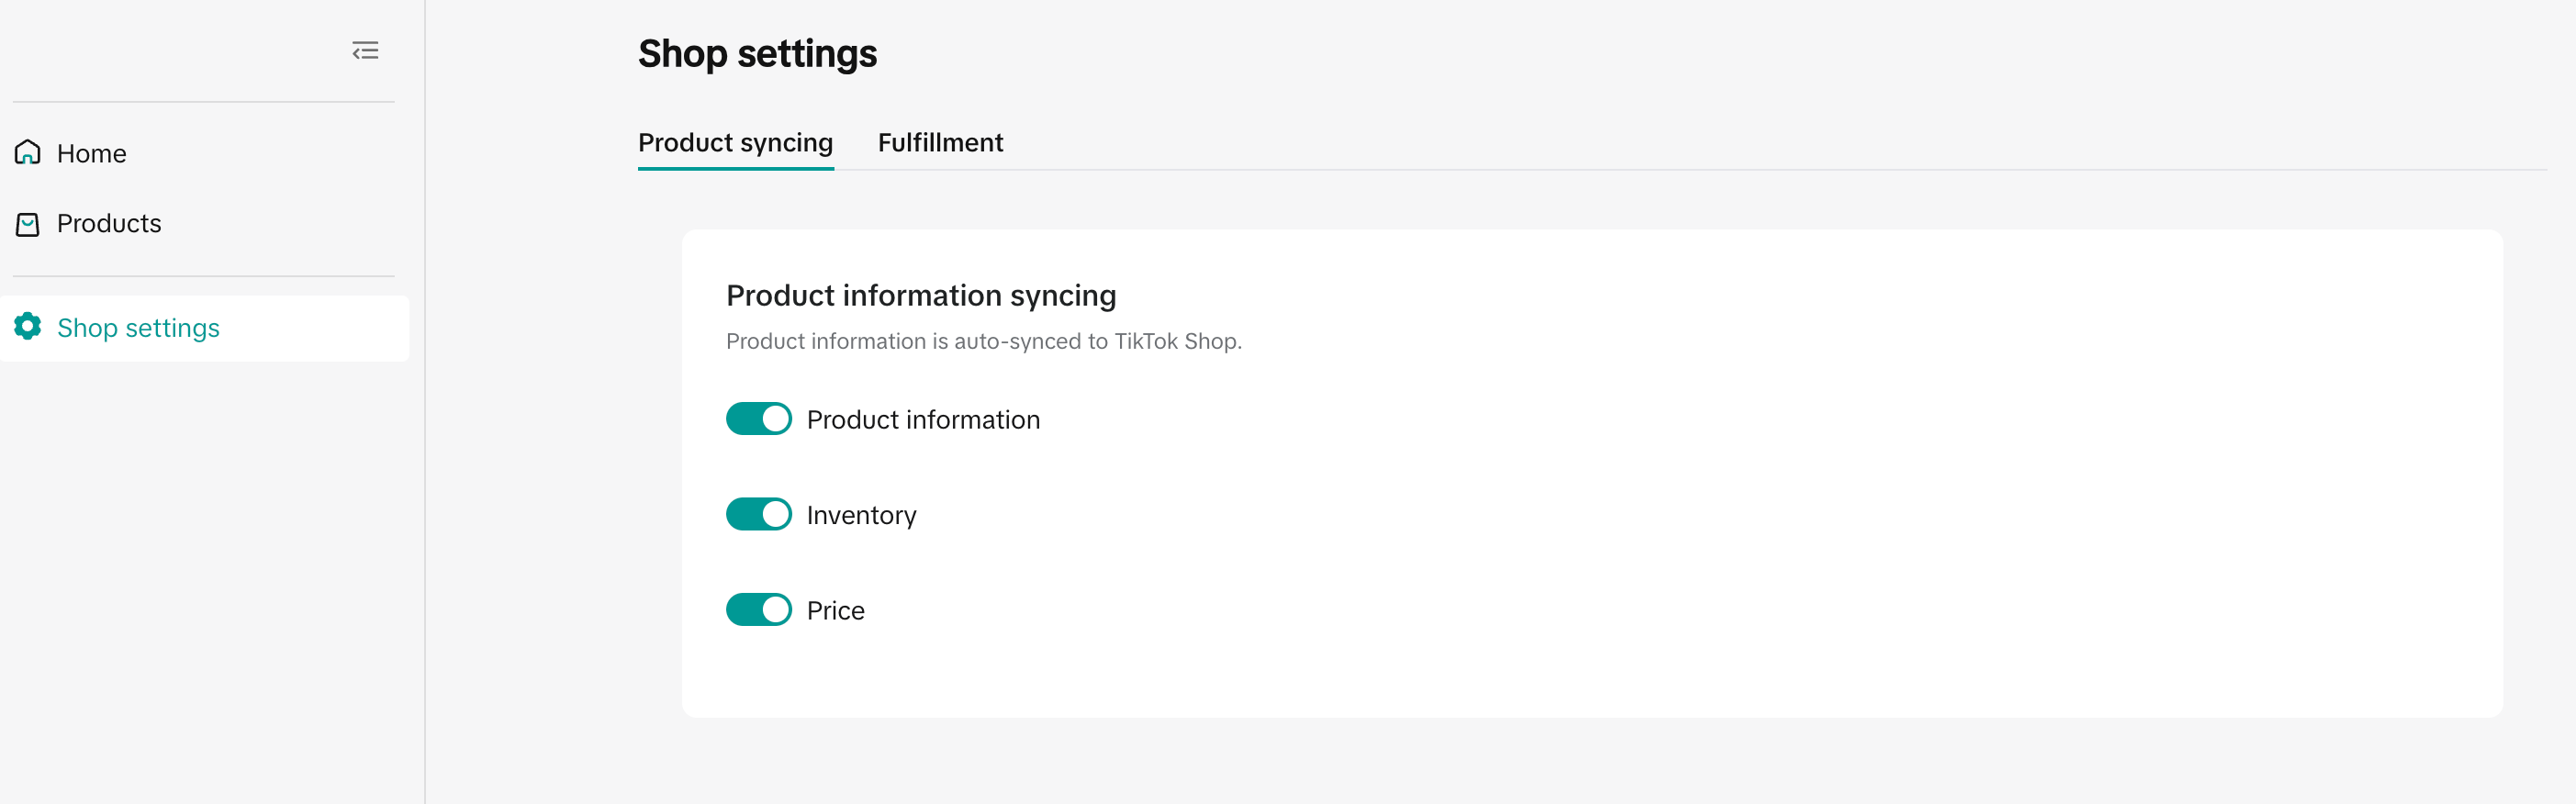
Product syncing:
- Product Info: Synchronize changes in Product information such as title, description, images, skus etc.
- Inventory: Synchronize changes in product Inventory
- Price: Synchronize changes in product price
Synchronization settings are active or switched on
- Product Info: Any changes made to products on SFCC to product description, title, images etc. are synched over to the corresponding product's title and description etc. on TikTok Shop Seller Center
- Inventory: Any changes made to inventory for products or SKUs on SFCC are synched over to the corresponding product's or SKU's inventory on TikTok Shop Seller Center
- Price: Any changes made to price for products or SKUs on SFCC are synched over to the corresponding product's or SKU's inventory on TikTok Shop Seller Center
Synchronization settings are not active or switched off
- Product Info: Any changes made to products on SFCC to product description, title, images etc. are NOT synched over to the corresponding product's title and description etc. on TikTok Shop Seller Center
- Inventory: Any changes made to inventory for products or SKUs on SFCC are NOT synched over to the corresponding product's or SKU's inventory on TikTok Shop Seller Center
- Price: Any changes made to price for products or SKUs on SFCC are NOT synched over to the corresponding product's or SKU's inventory on TikTok Shop Seller Center
- Synchronization settings for Product Information, Inventory, and Price can all be individually controlled and set
- Synchronization settings also affect all products and can't be switched on/off for a selected list of products
- If synchronization settings are switched off, all individual product inventory and price syncs will fail as well as a result. Please make sure synchronization settings for Inventory and Price are switched on to make the individual syncs work as shown below
If you would like to manage the product data (title, description etc) separate from Salesforce, ensure the toggle is turned off.
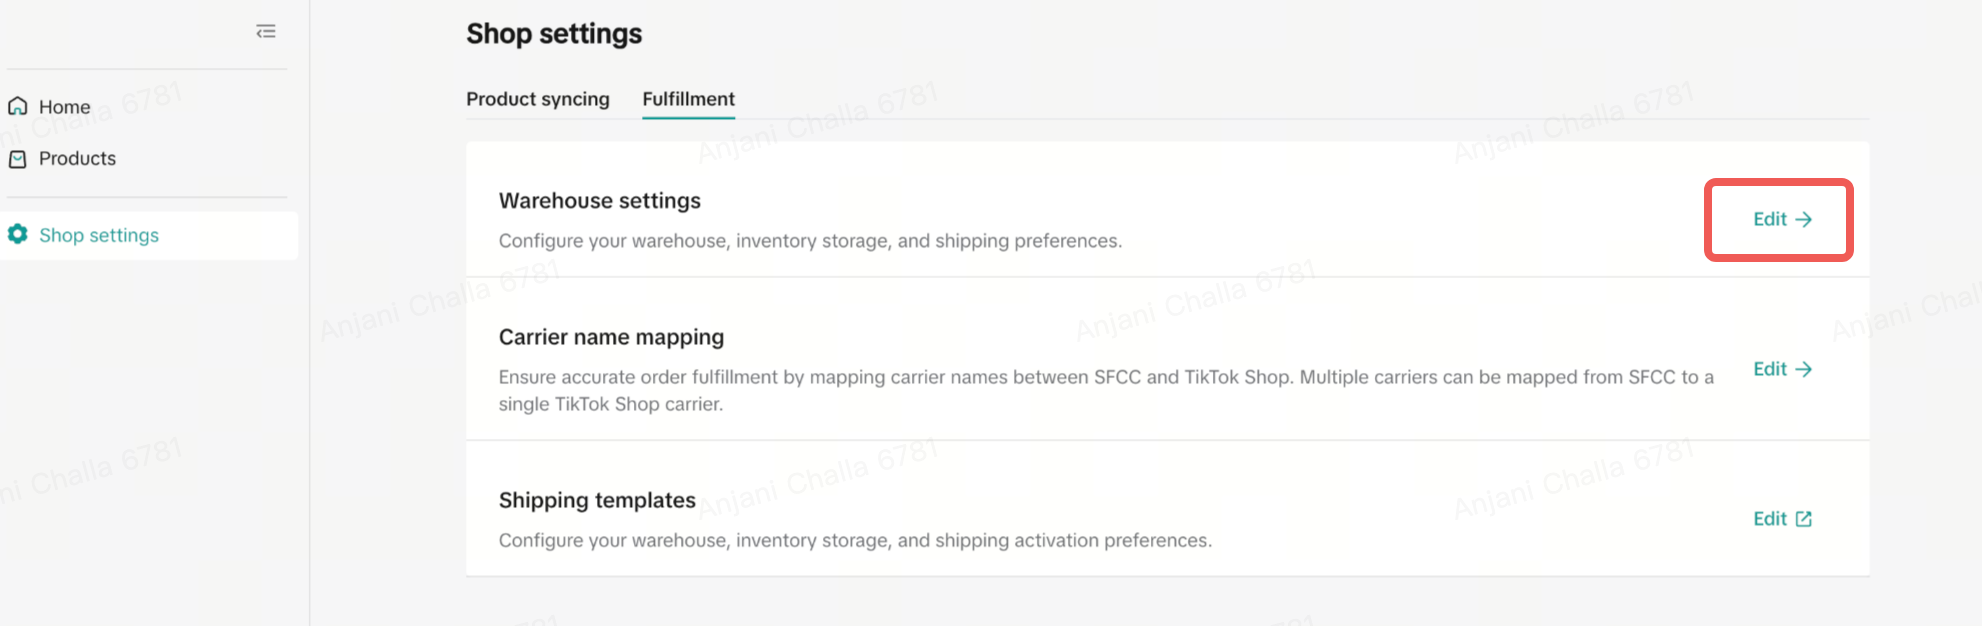
Fulfillment:
Seller should go to SFCC Catalog Widget V2 --> Shop Settings-->Fulfillment to map Warehouse information, Carrier mapping and Shipping templates.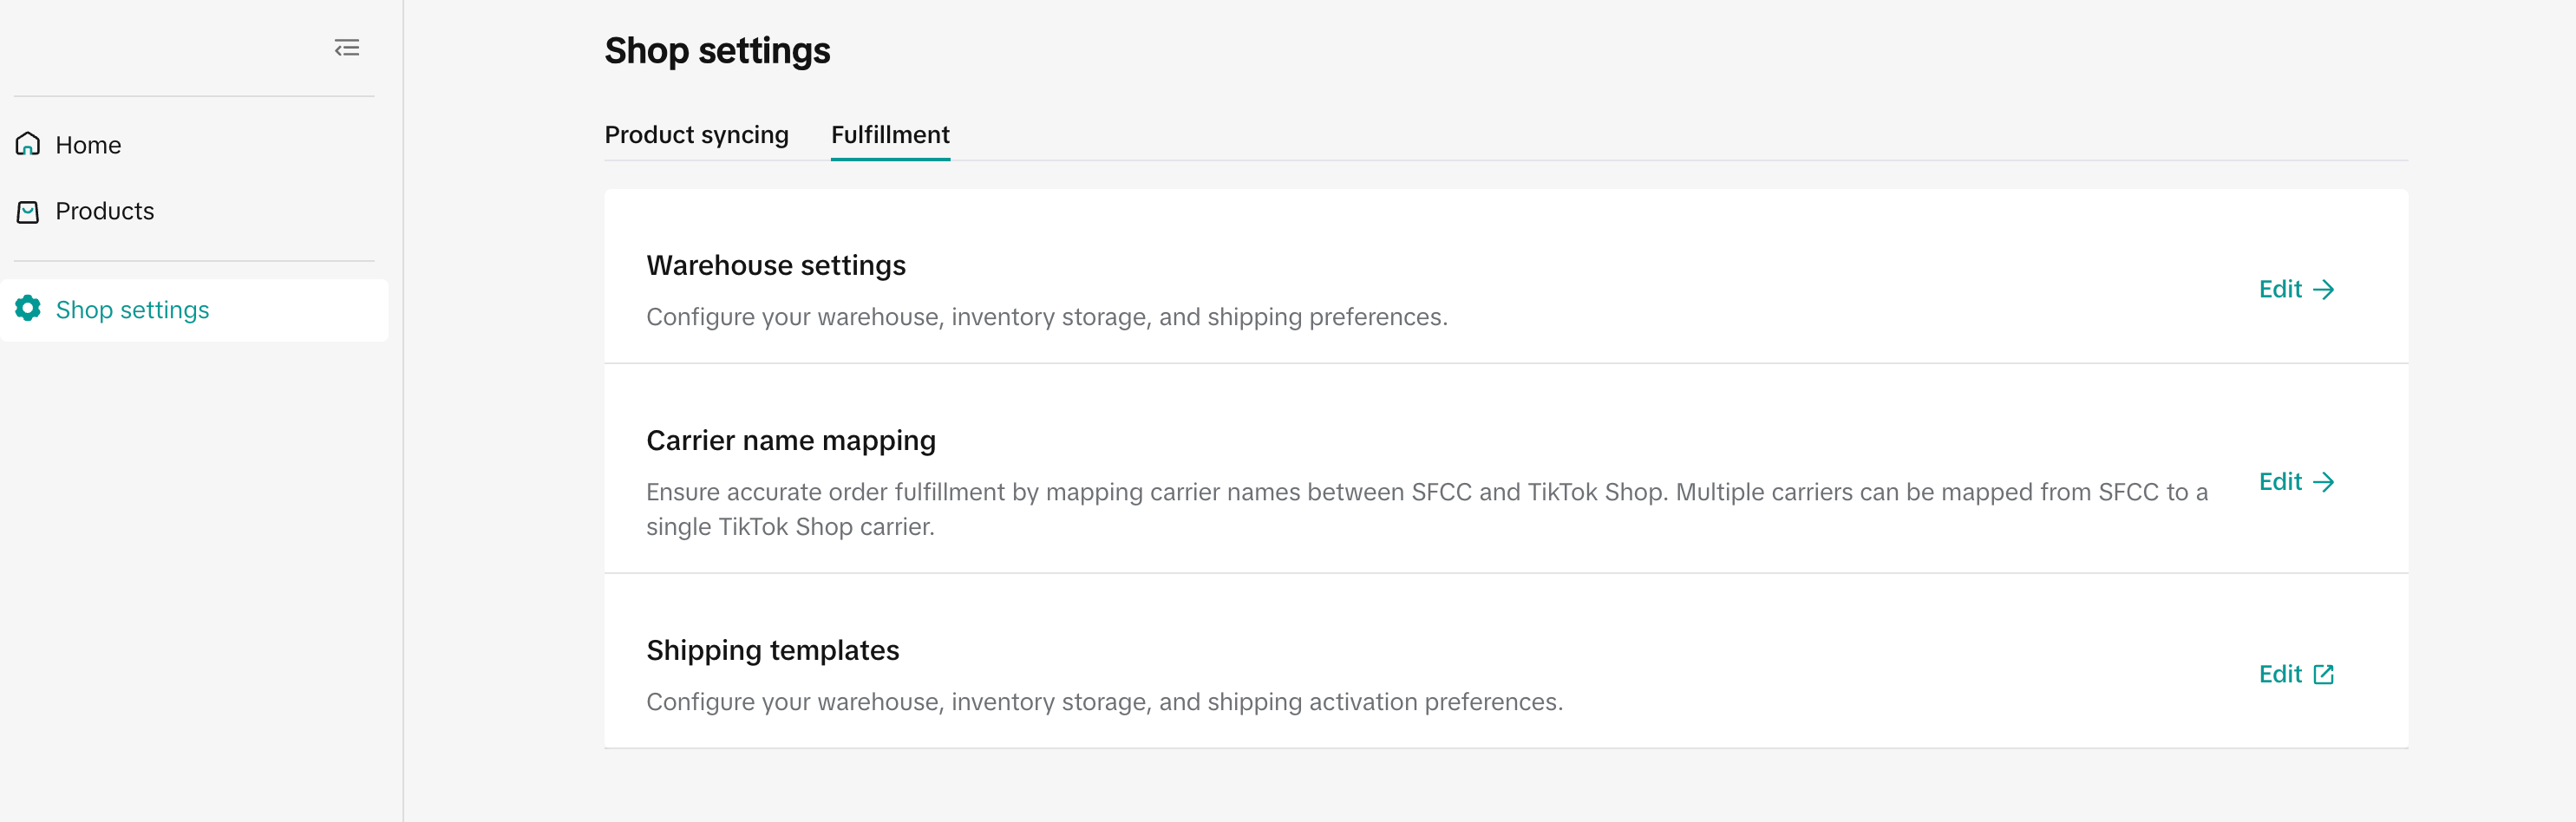
Warehouse Settings:
Sellers can add new warehouse mapping relationships by- Clicking the 'Fulfillment' tab from "Shop Settings" tab --> Warehouse name mapping
- Click on "Edit" option to add/modify new warehouse

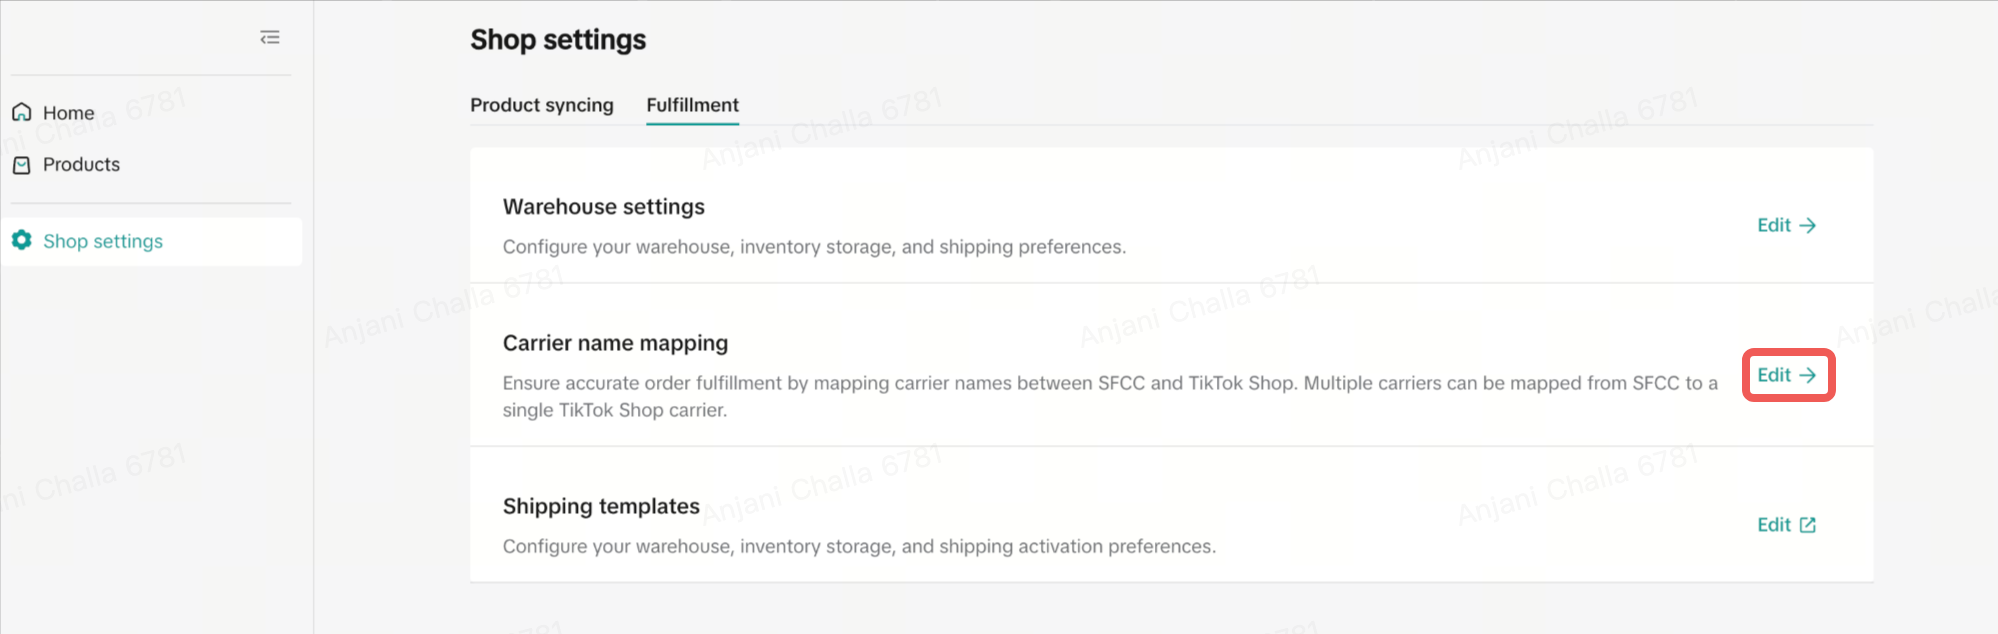
Carrier name mapping:
The shipping provider mapping function will be apart of the 'Shop settings' section in SFCC 1P & will allow sellers to map their SFCC shipping providers to a corresponding shipping provider on TikTok Shop. The mapping function will be done at the shop level. When sellers fulfill an order, the 1P app will use the corresponding TikTok Shop Shipping provider ID that the seller has mapped.Sellers can add new mapping relationships by
- Clicking the 'Fulfillment' tab from "Shop Settings" tab --> Carrier name mapping
- Click on "Edit" option
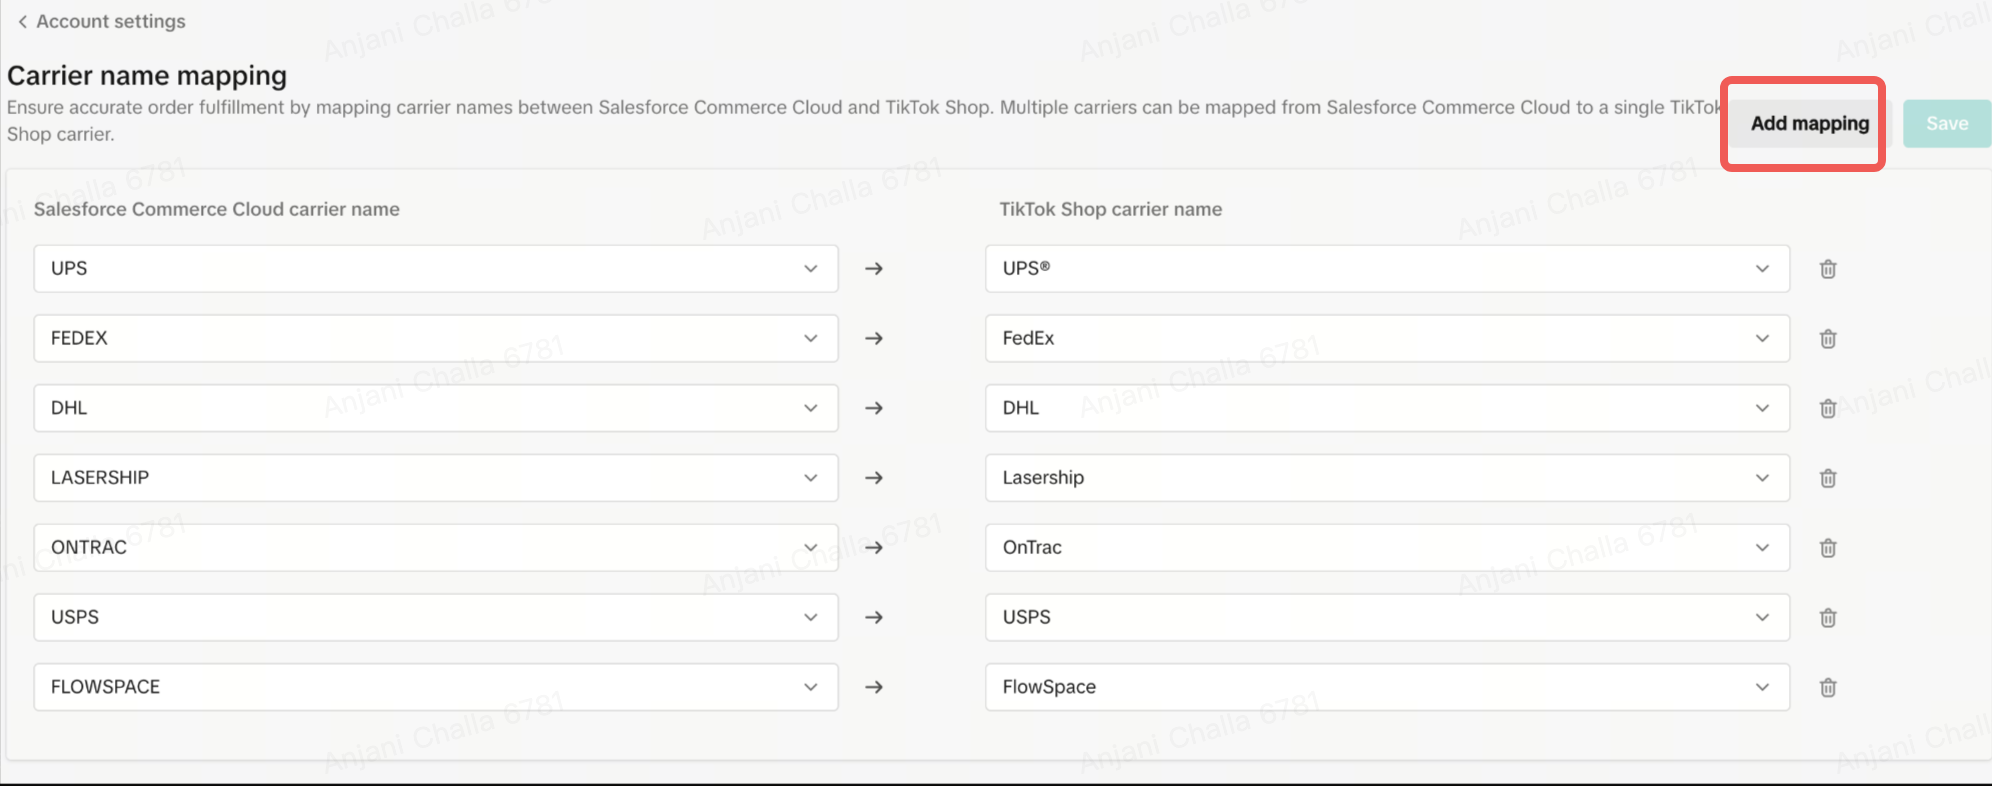
- Click on 'Add mapping' button
- Click on "Add new carrier" and type in the carrier name you wish to map to corresponding TTS carrier
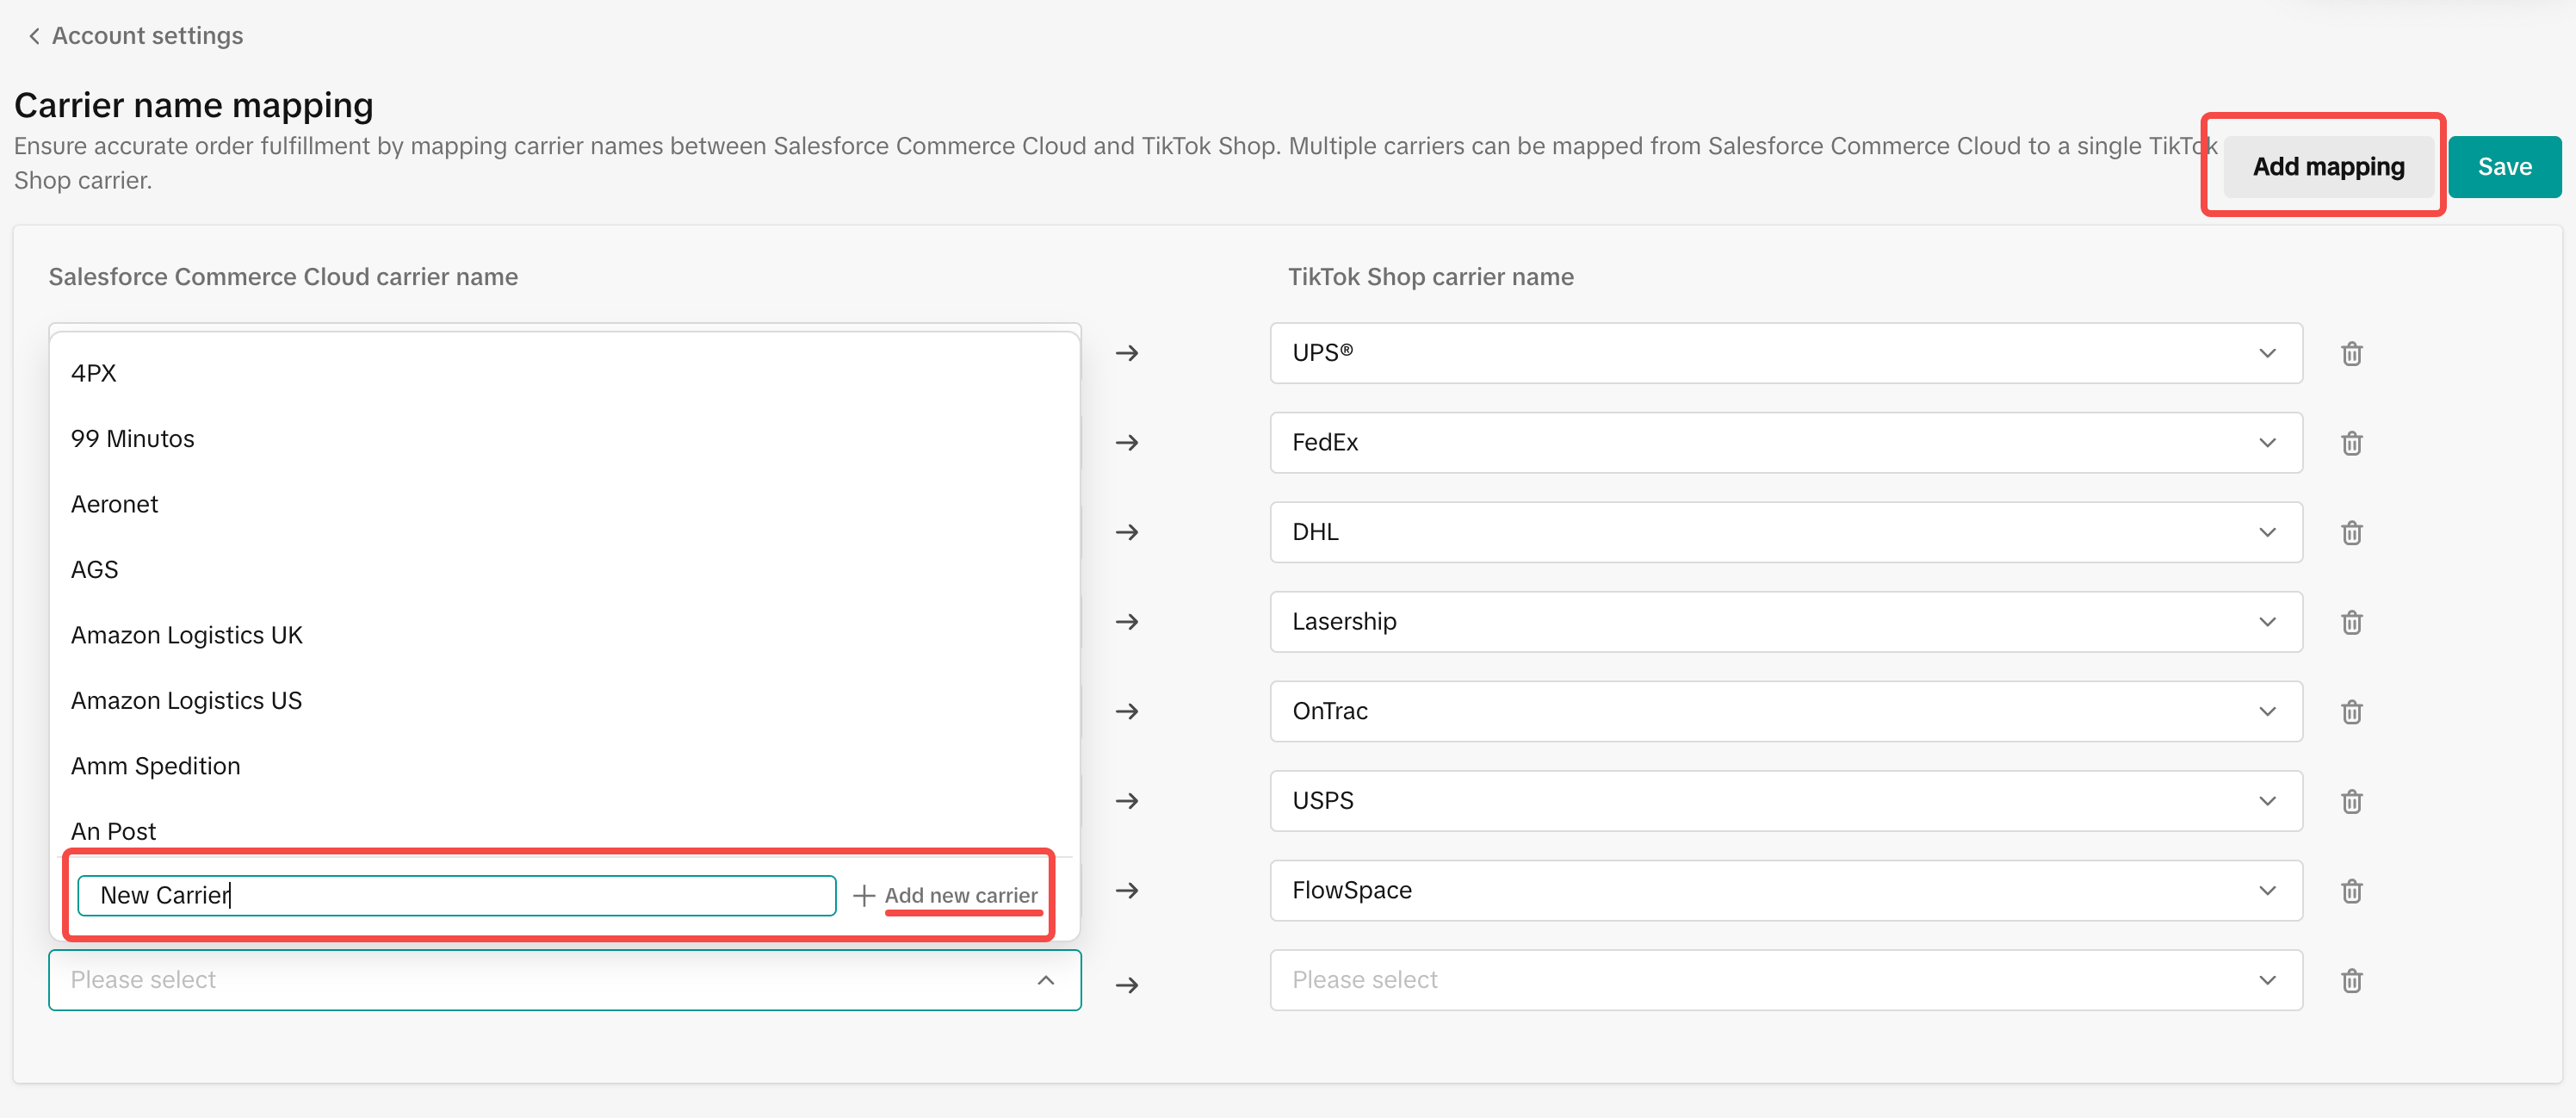
- Click on 'Save'
Shipping templates:
If you set "Seller Shipping" as the preferred logistics service , you need to complete the shipping fees template before uploading products
, otherwise, there will be a reminder when uploading the product.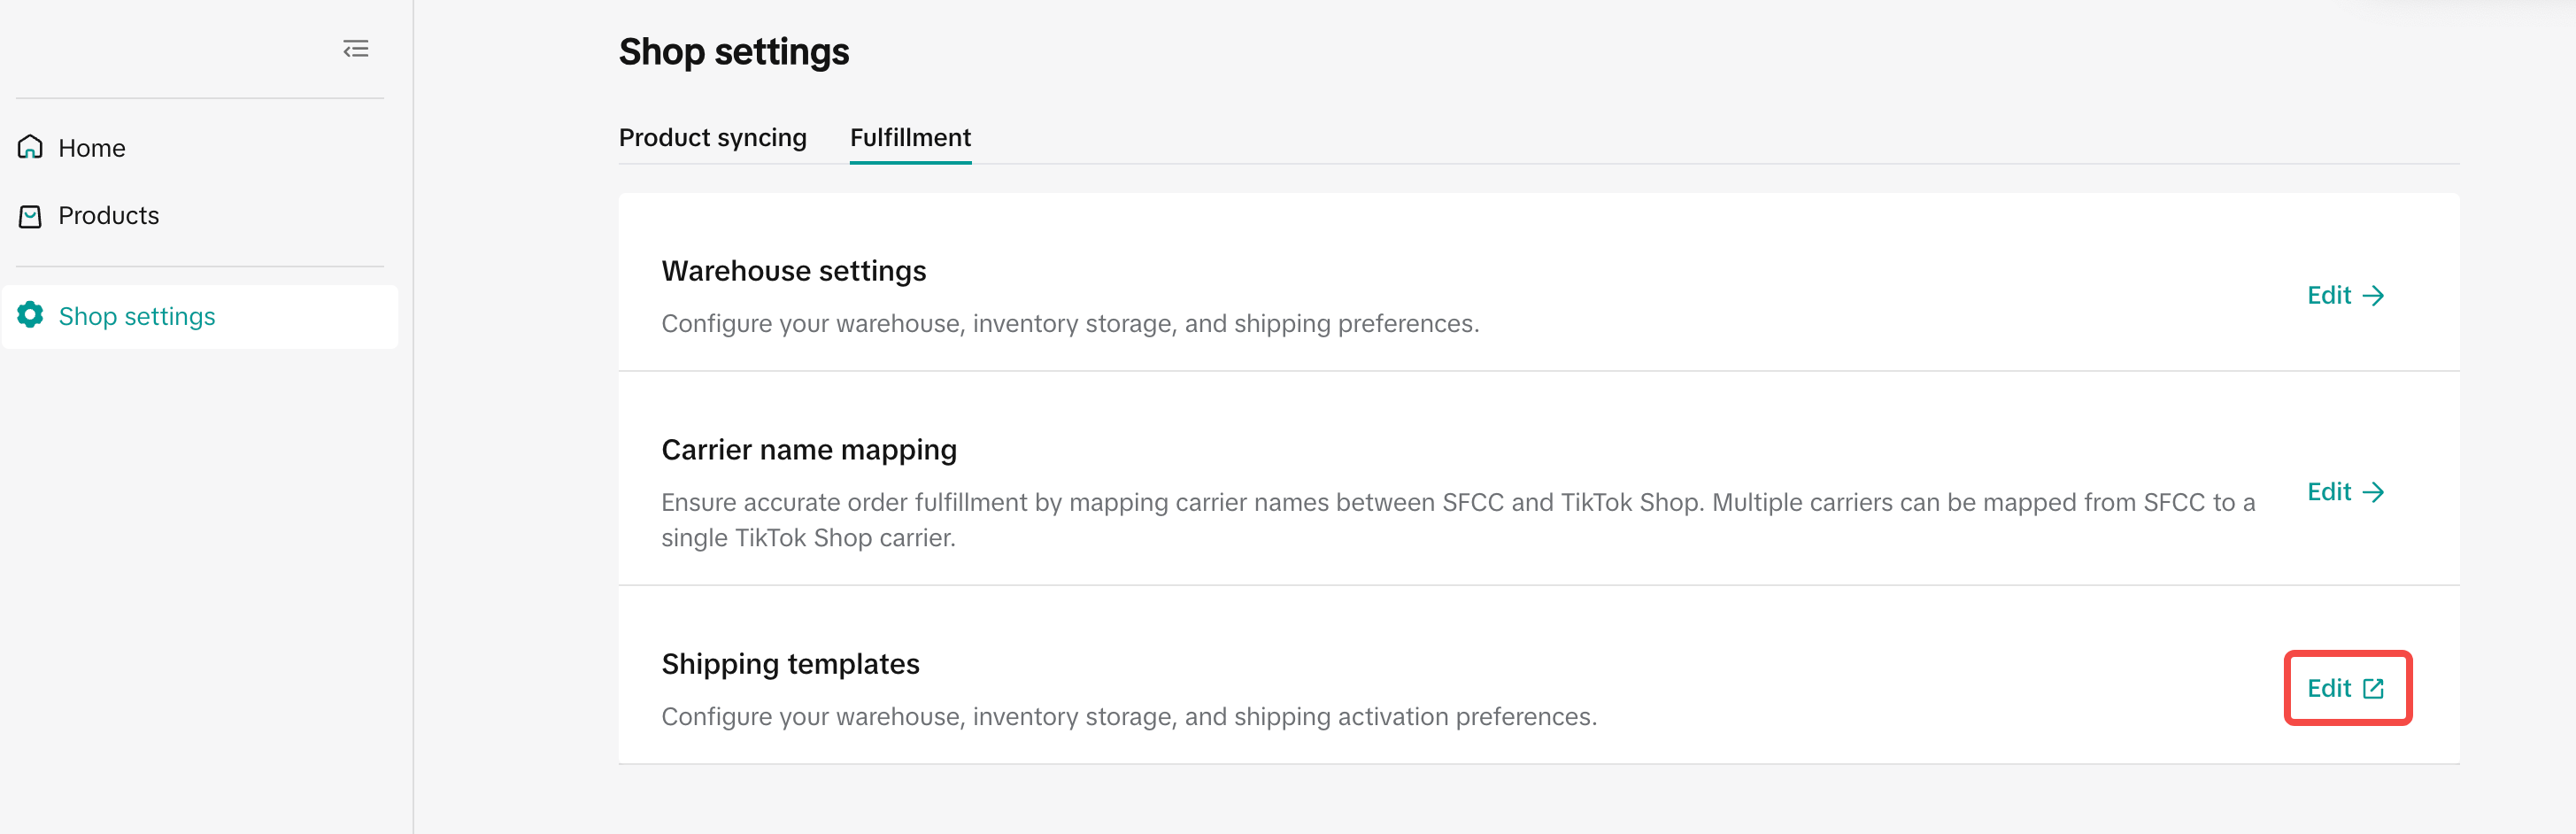
You may also be interested in

List with a URL
Note: This feature is currently in beta to a limited set of pre-selected sellers. Introduction: Wh…

Made-to-Order (MTO)
Introduction: What is Made-to-Order (MTO)? Made-to-order is a new listing option available for eligi…

Applying for Category Permission
Introduction Some product categories on TikTok Shop are restricted and require sellers to apply for…

TikTok for Shopify - Product Listing Upgrade
Overview: With this new listing update, sellers will have the same product listing experience whethe…

How to Use Size Chart Tool & Guidance
Introduction to our Size Chart Tool With the Size Chart tool, you can now update key sizing informat…

Edit products in your shop
Introduction to editing products in your shop Maintaining accurate and appealing product listings is…

Luxury Resale Products and Uploading Certificates of Authent…
What are Luxury Resale Products? Luxury Resale products are luxury items, including pre-owned luxury…

TikTok for Shopify: Promotions Sync
*Overview: Shopify sellers can sync Promotions/Discounts except Free Shipping on Shopify directly to…

How to List Dangerous Goods
Overview When creating a new product listing, TikTok Shop may identify your product as a potential D…

Fill in the scale weight information in the SKU level
Feature Summary Feature Name: SKU-level Dimensions & Weight (Package Size and Weight) Input Core Cha…