

Edit products in your shop


AI Summary
Edit products in Seller Center one by one or in bulk from Manage Products; bulk updates use downloadable templates and can cover sale info, warehouses, and qualification files. Save changes as a draft if you are not ready to publish, or submit for review when ready. Qualification uploads currently support JPEG/JPG/PNG only; PDF is not supported. Edited listings usually stay live until the new version is approved, with review typically within 24 hours and up to 48 hours during campaigns.
Introduction to editing products in your shop
Maintaining accurate and appealing product listings is crucial for your TikTok Shop's success. Whether you need to update prices, refresh descriptions, or add new images, TikTok Shop provides straightforward ways to edit your existing products.How to Edit Products
You can generally edit products individually or in bulk, primarily through the Seller Center.1. Editing Individual Products (Desktop or Seller Center App):
- Navigate to Manage Products: In your Seller Center (desktop or app), go to Products > Manage Products.
- Locate the Product: Find the specific product you wish to edit. You can often search by product name, Seller SKU, or filter by category/status.
- Click "Edit": There will be an "Edit" option next to each product.
- Make Your Changes: You can modify various sections, including:
- Basic Information: Product name, category, brand, attributes (like color, size).
- Media: Update product images and videos. You can also use the built-in image editor to remove backgrounds, change colors, or adjust ratios.
- Product Details: Edit descriptions, selling points, and add auxiliary images.
- Sales Information: Adjust retail price, quantity, and SKU variants.
- Shipping: Update parcel weight and dimensions.
- Submit/Update: Once changes are made, click "Update" or "Submit for Review" to save and apply them.
 For efficiency, TikTok Shop allows you to edit multiple product details at once using the bulk edit function.
- Navigate to Bulk Action: Go to Products > Manage Products > Bulk Action (or sometimes "Batch Tool" / "Bulk Edit Products").

- Select Products: Filter and select the products you want to modify. You can select individual products or all products that meet your filter conditions (up to a certain limit, e.g., 50,000 products).

- Download Template: Choose a relevant template, which will vary based on the type of information you want to edit (e.g., "Sale information" for price/quantity/SKU).

- Fill in Template: Carefully fill in the template with your updated information.
- Upload Template: Attach your completed spreadsheet.

- Review and Confirm: The system will process your upload. If errors occur, an online editor may appear for corrections, or you can download a "fail report" to address issues and re-upload.
- Publish/Update: Once confirmed, your changes will be applied.
Key Bulk Settings
Bulk Add Warehouses to Products
Add multiple warehouses to a product |  |  |
 Step 2: Fill in the warehouse-related columns in the spreadsheet.
Step 3: The column labeled "Quantity in [Warehouse Name]" represents warehouses already linked to the product — click "+" to expand. The column labeled "Quantity in [Warehouse Name] (Add New)" represents warehouses you wish to add — click "+" to expand; entering a value adds the warehouse, leaving it blank means no change.
 ❎ Removing warehouses via Excel is not supported
❎ Adding warehouses that have not been activated is not supported
Step 4: Import the spreadsheet.
Batch Edit Qualification Information
Before you start: Open Bulk Actions (Products > Manage Products > Bulk Actions > Edit Products)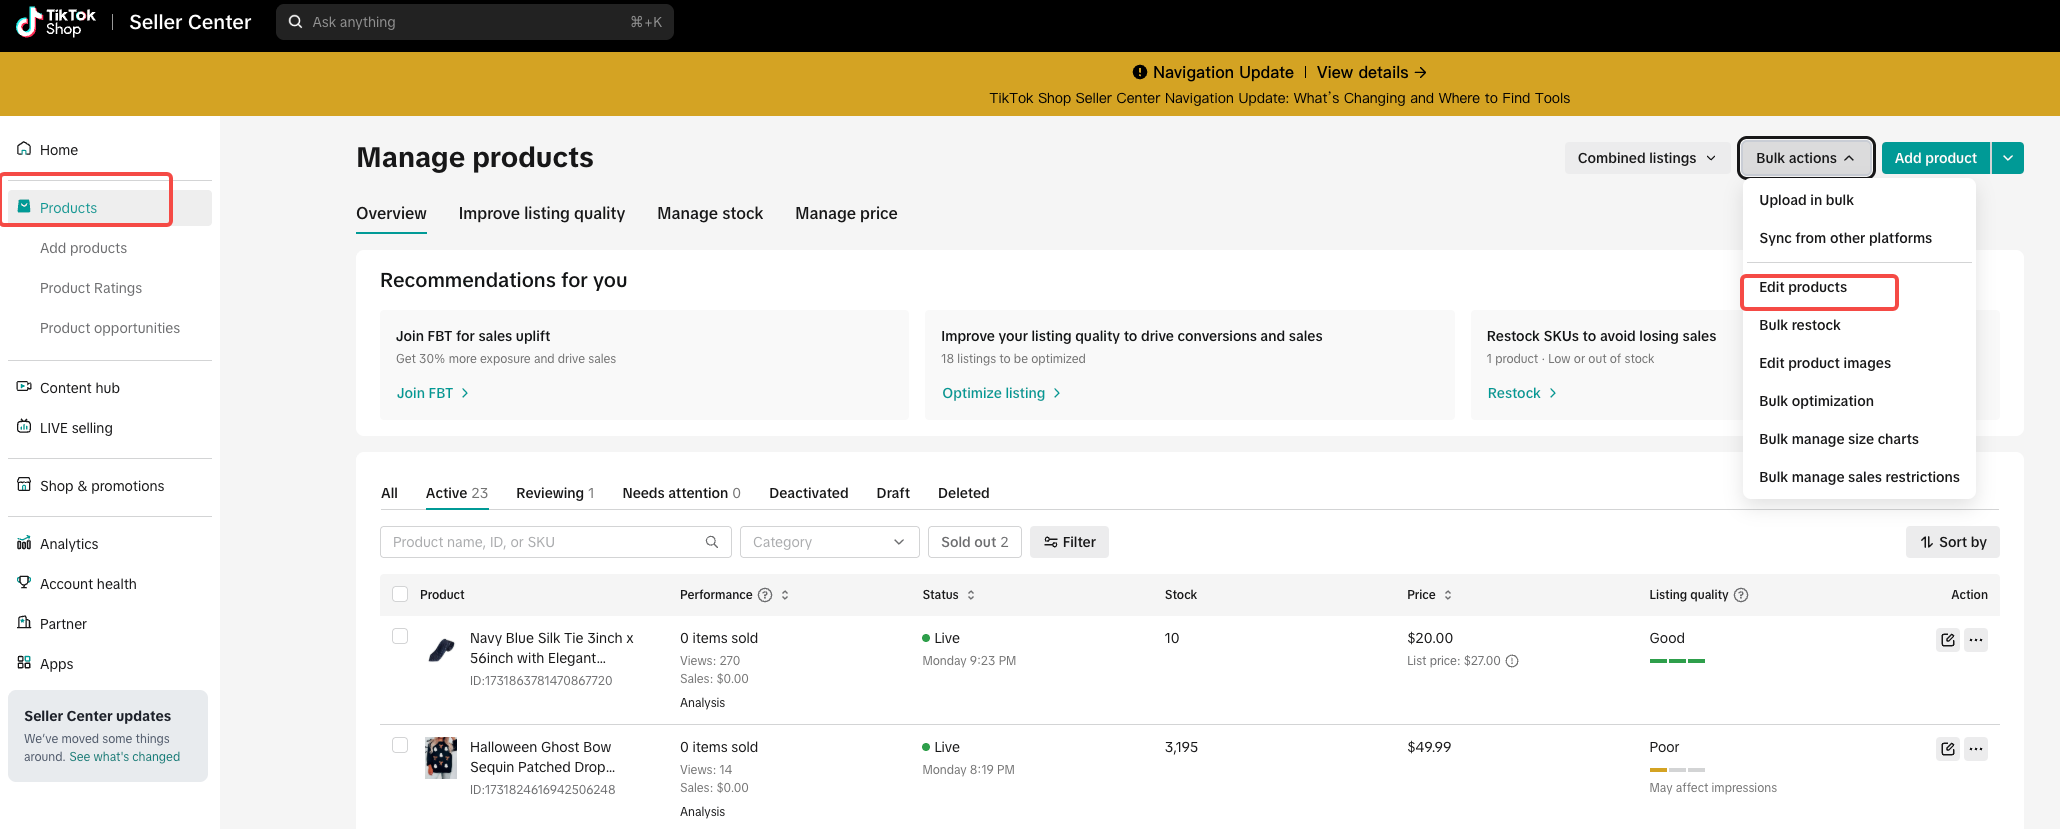 Step 1: Select products


 Step 3: Extract and edit the template fileNote: The template is grouped by category; each file only contains PIDs from one category.


Go to Media Centre (Products - Add Products - Media Centre. )to upload the qualification file and copy the file URL. After the upload is complete, follow the screenshots to copy the link and paste it into the template in the required format.
Note: Currently, only qualification files in image formats (JPEG, JPG, PNG) are supported for upload. PDF format qualification files are not supported at this time.


Step 5: Paste the URL into the template
Replace the example URL with your file URL in the applicable template row: Step 6: Upload the completed template
Return to the bulk edit upload page. Use Products - Manage Products - Bulk Actions - Edit Product - Upload, then select and upload the completed template file with the qualification URLs filled in.

Save a draft of your product listing edits:
We understand that managing your product listings requires flexibility and precision, so thankfully you have the ability to save draft edits for your existing products.Now, you can make changes to your live product listings without the pressure of publishing them immediately. Simply select Save as a draft when editing an existing product listing. When you click edit on that product listing again in the future, you will automatically open the most recent draft of that product by default. From there, you can continue editing and save the draft again or choose to Submit for review.
Whether you're refining descriptions, updating images, or adjusting prices, you can save your progress as a draft and return to it whenever you're ready to publish. This functionality gives you greater control over your product updates, ensuring your listings are perfect before they go live to shoppers.
Helpful Tips:
- Policy Compliance: All edits must comply with TikTok Shop's Prohibited and Restricted Products Guidelines.
- Review Process: Edited listings, especially significant changes, often go through a review process. The old version typically remains live until the edited version is approved.
- Processing Time: Edits are generally reviewed within 24 hours, but during campaigns, this might extend to 48 hours.
- Accuracy: Always review all information in your product listing before publishing to ensure accuracy.
- Minimizing Edits: While editing is supported, it's best to prepare accurate and complete listings from the start to reduce the need for frequent edits, as each submission goes through policy checks.