

Campaign auto-registration
Summary
What is Campaign Auto-Registration on TikTok Shop and how does it benefit sellers?
- Campaign Auto-Registration automatically enrolls selected products into relevant TikTok Shop campaigns, saving time and effort by eliminating manual registration.
- It boosts product visibility and sales by exposing products to millions of shoppers and allows sellers to manage pricing and campaign participation easily.
How do sellers set up and manage Campaign Auto-Registration effectively?
- Sellers access the feature via Seller Center > Campaigns > Auto-Registration, then select products manually or via bulk Excel upload, set pricing strategies, and choose campaign types for auto-enrollment.
- The dashboard provides insights into campaign participation, success rates, product statuses, and allows easy management including withdrawing products or manual registration of failed enrollments.
What pricing strategies and campaign types can sellers use with Campaign Auto-Registration?
- Sellers can set a lowest approved price (minimum acceptable price) or customize prices per campaign tier (SS, S, A, B) to maximize auto-registration success.
- Campaign types include major promotional events and everyday category campaigns, with options to participate in campaigns requiring only sales price discounts or those with additional seller funding (e.g., co-funded coupons).
What should sellers do if some products fail to auto-register for campaigns?
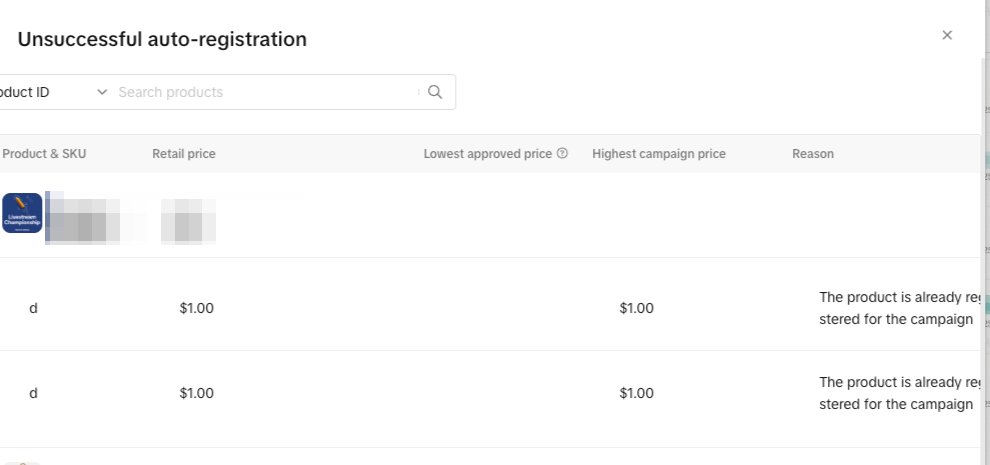
- Sellers can view unsuccessful auto-registrations with reasons such as pricing issues or prior manual registrations, then manually register eligible products directly from the failure report page.
- Adjusting prices to meet campaign requirements or removing conflicting manual registrations can improve auto-registration success.
What are the limitations and important considerations when using Campaign Auto-Registration?
- The feature only works for product campaigns without reserved stock and does not apply to content campaigns.
- Disabling auto-registration stops future automatic enrollments but does not remove products already registered in campaigns.
Product Overview
Campaign Auto-Registration is a powerful feature designed to help you maximize your participation in TikTok Shop campaigns with minimal effort. It automatically registers your selected products into relevant campaigns based on your preferences, ensuring you never miss an opportunity to boost visibility and drive sales.Key Benefits
Time Savings & Reduced Effort: Eliminate the manual work of constantly checking for new campaigns and registering products one by oneIncreased Visibility & Sales: By automatically enrolling your products into campaigns, you gain more exposure to millions of shoppers, helping to drive higher sales volumes.
Manage Campaigns Easily: Tailor your prices to different campaign tiers, or easily turn auto-registration off as needed.
How It Works
Step 1: Setting Up Campaign Auto-Registration
Access the Campaign Auto Registration Page:- Navigate to Seller Center and under the "Campaigns" section.
- Click on the "Auto-Registration" button
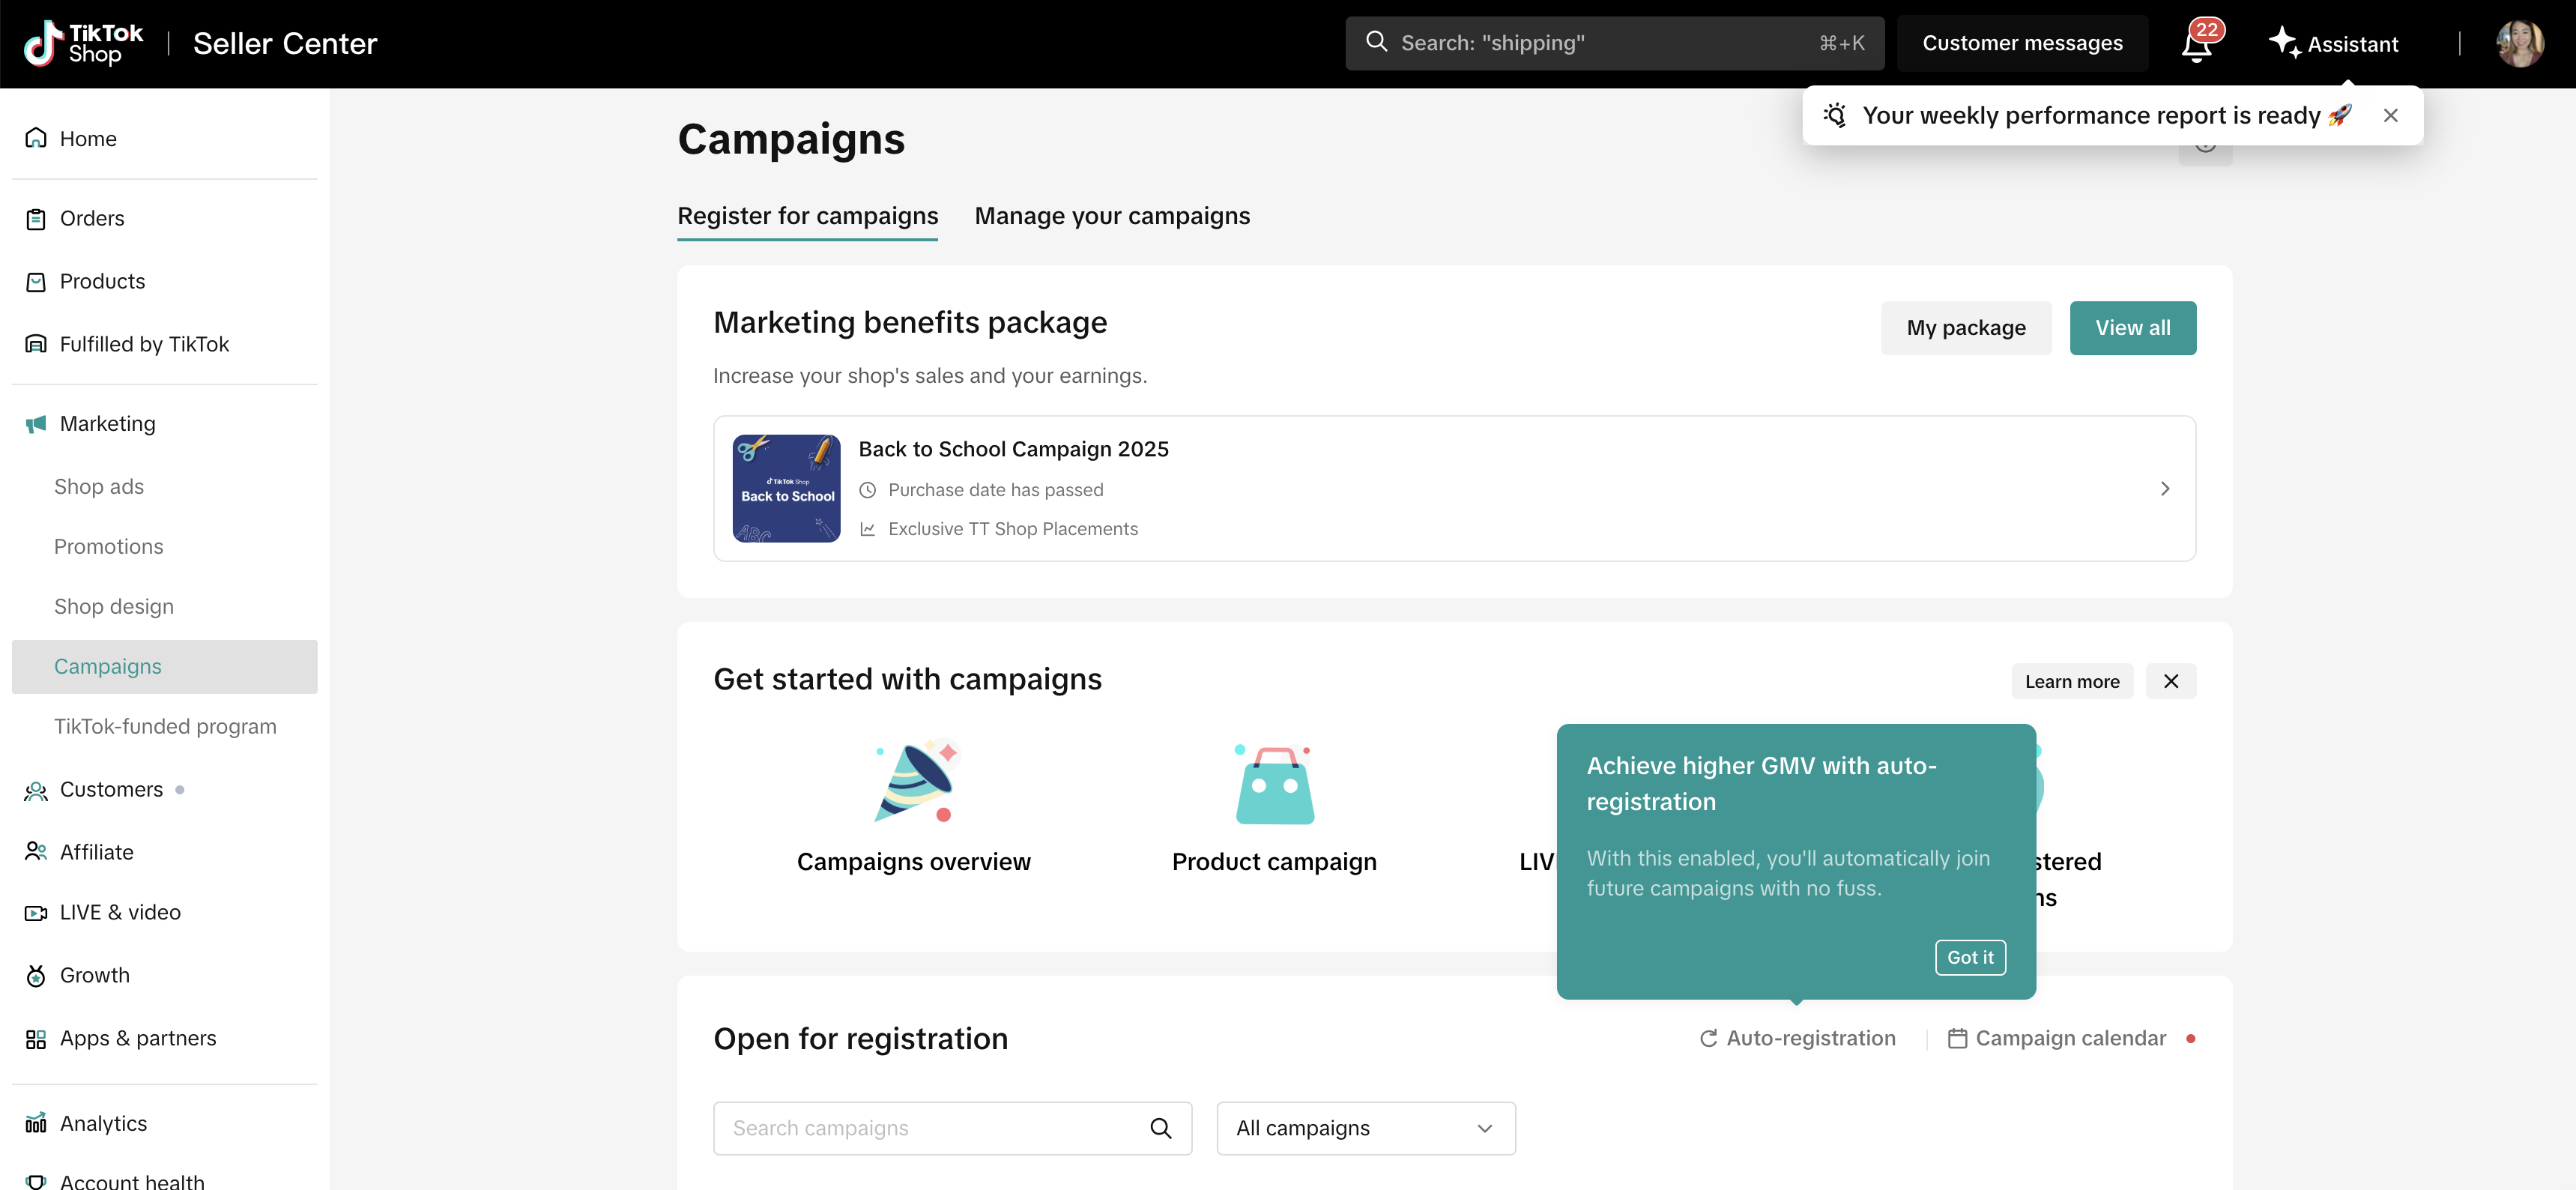
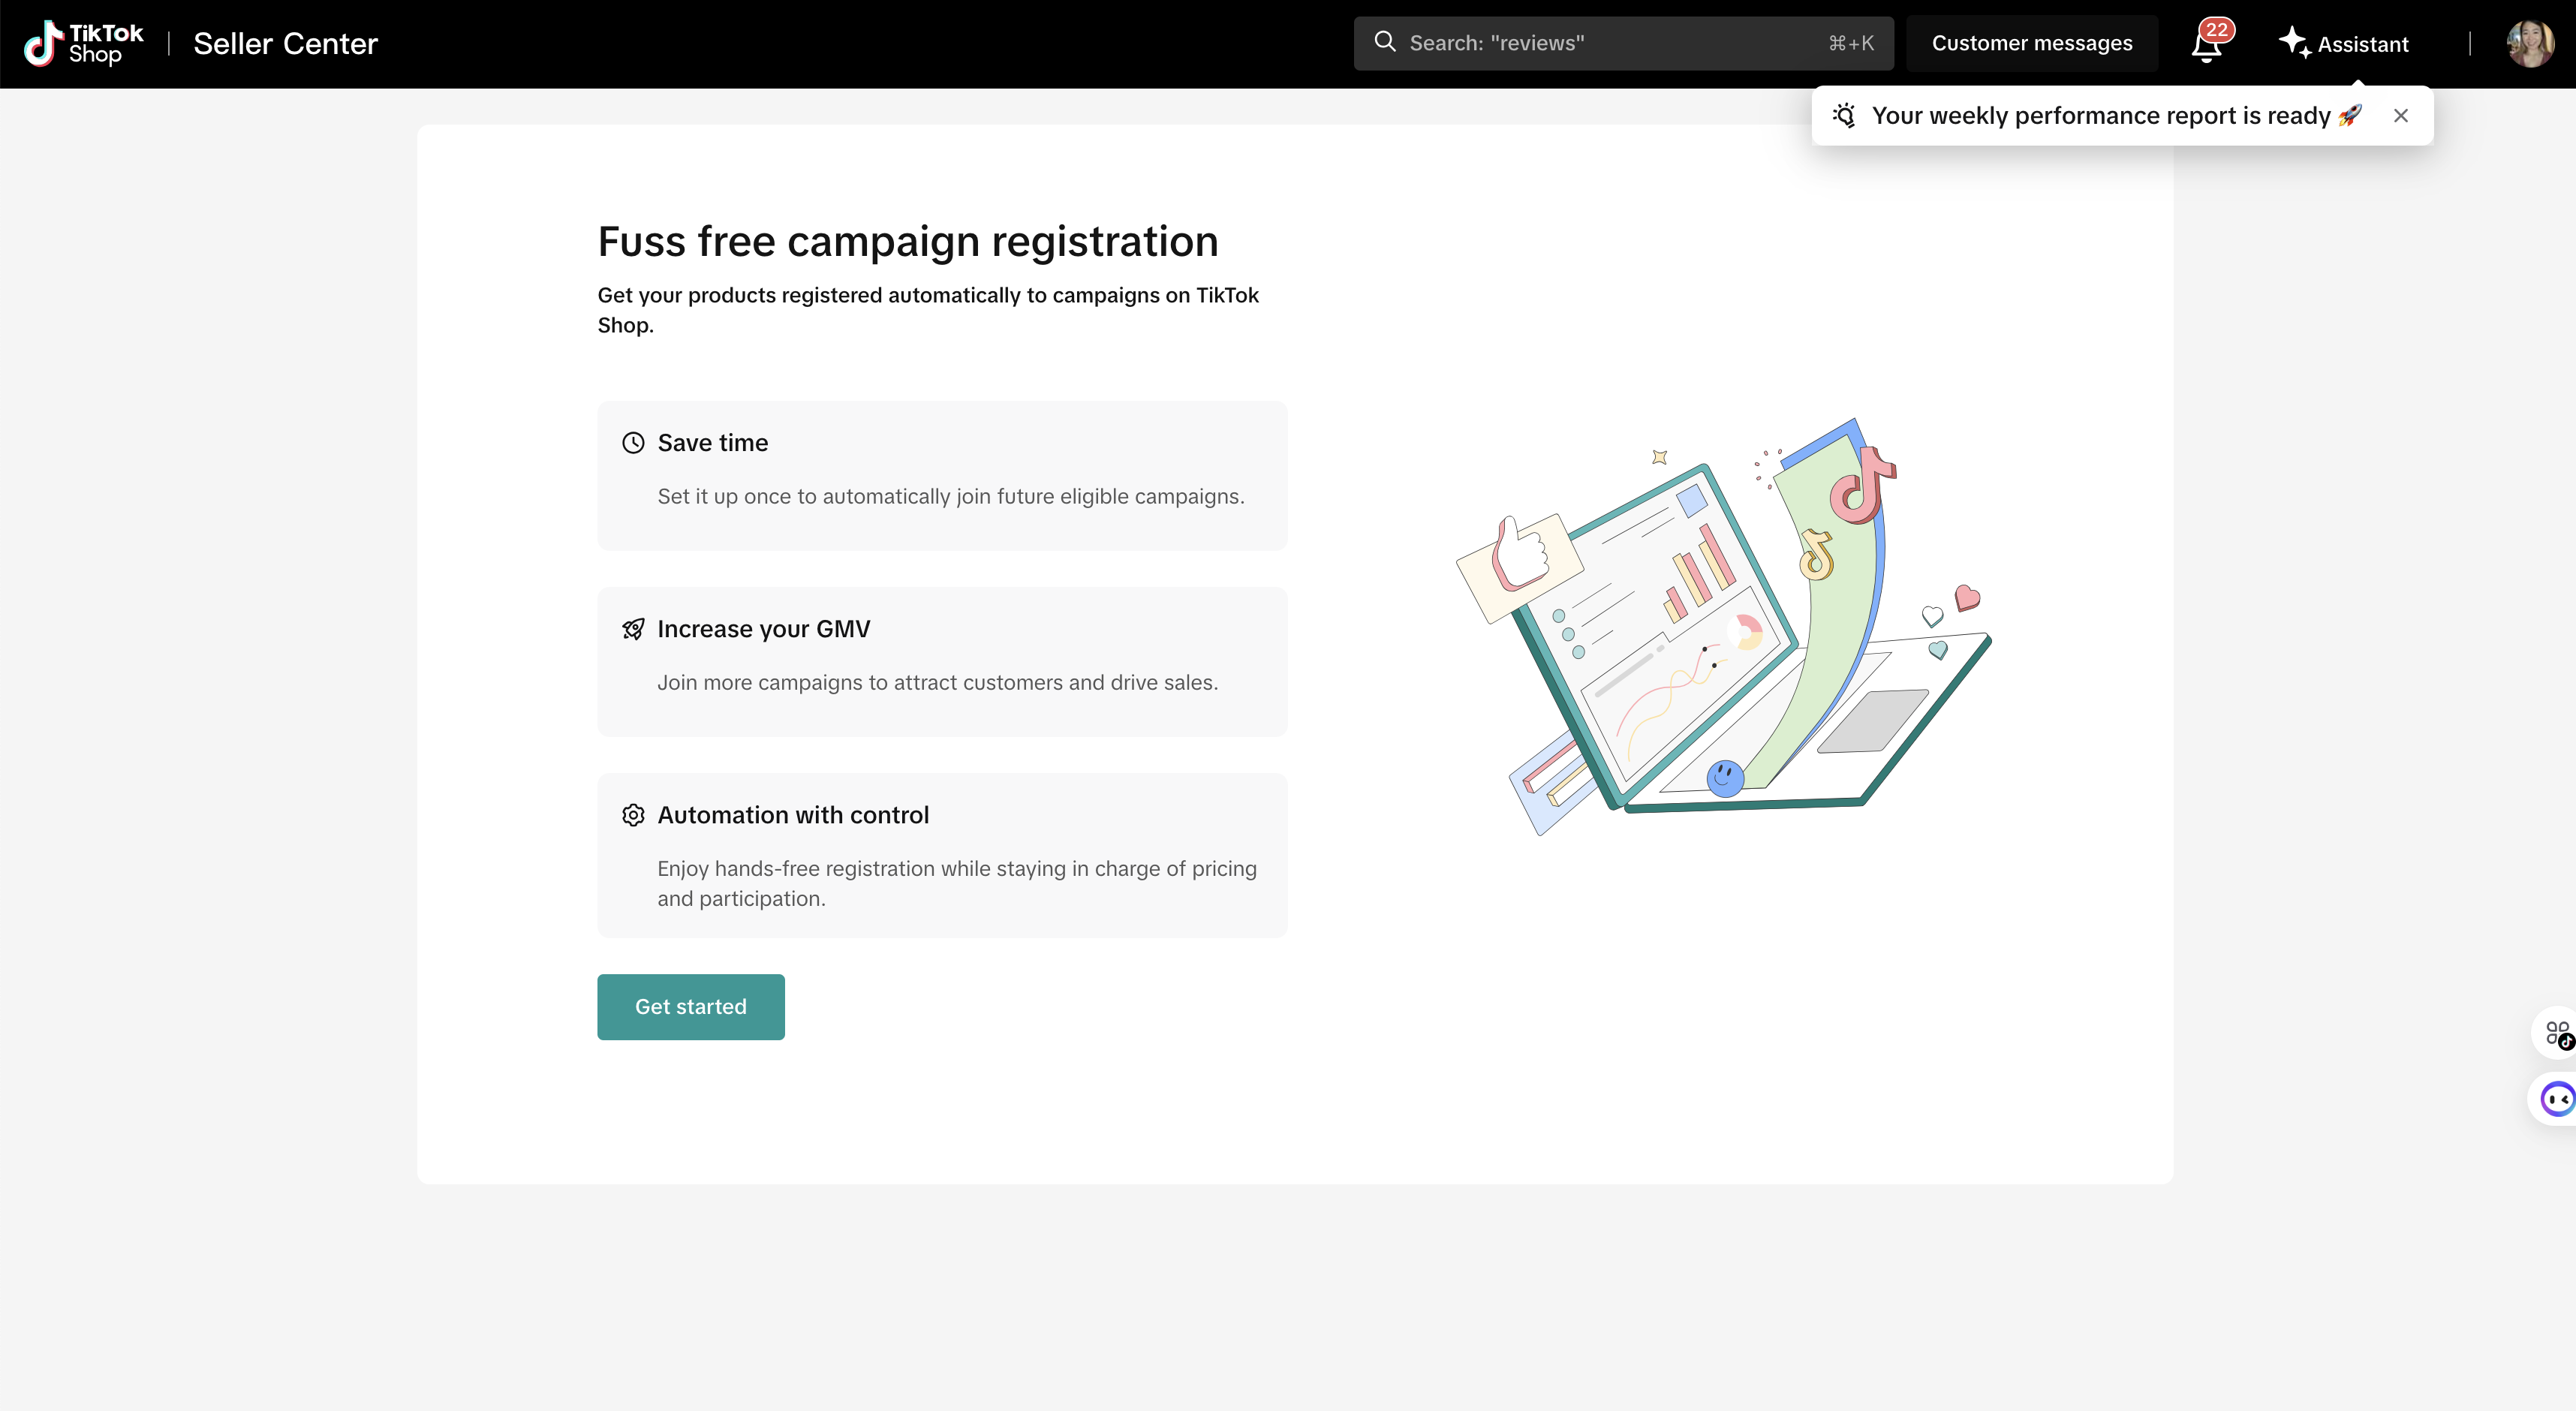
- If you're a first-time user, you'll see a landing page outlining the benefits to help you get started.
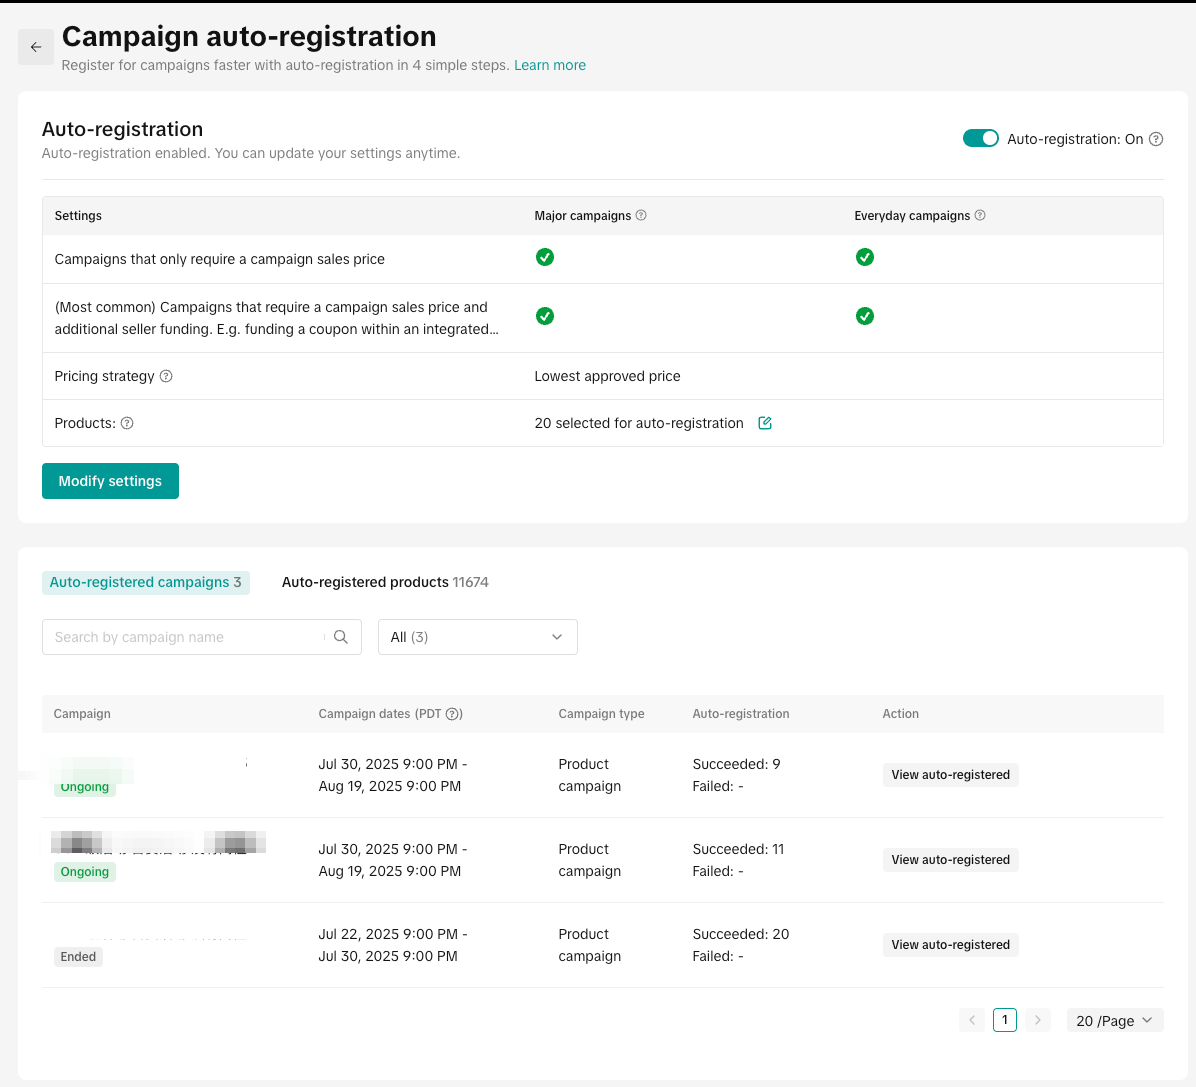
- If you've already auto registered, your personalized dashboard will display your settings and a comprehensive overview of all the campaigns your products have been automatically registered for since you enabled the feature
Step 2 : Add Products for Campaign Auto-registration
- Step 1: Select Your Pricing Strategy
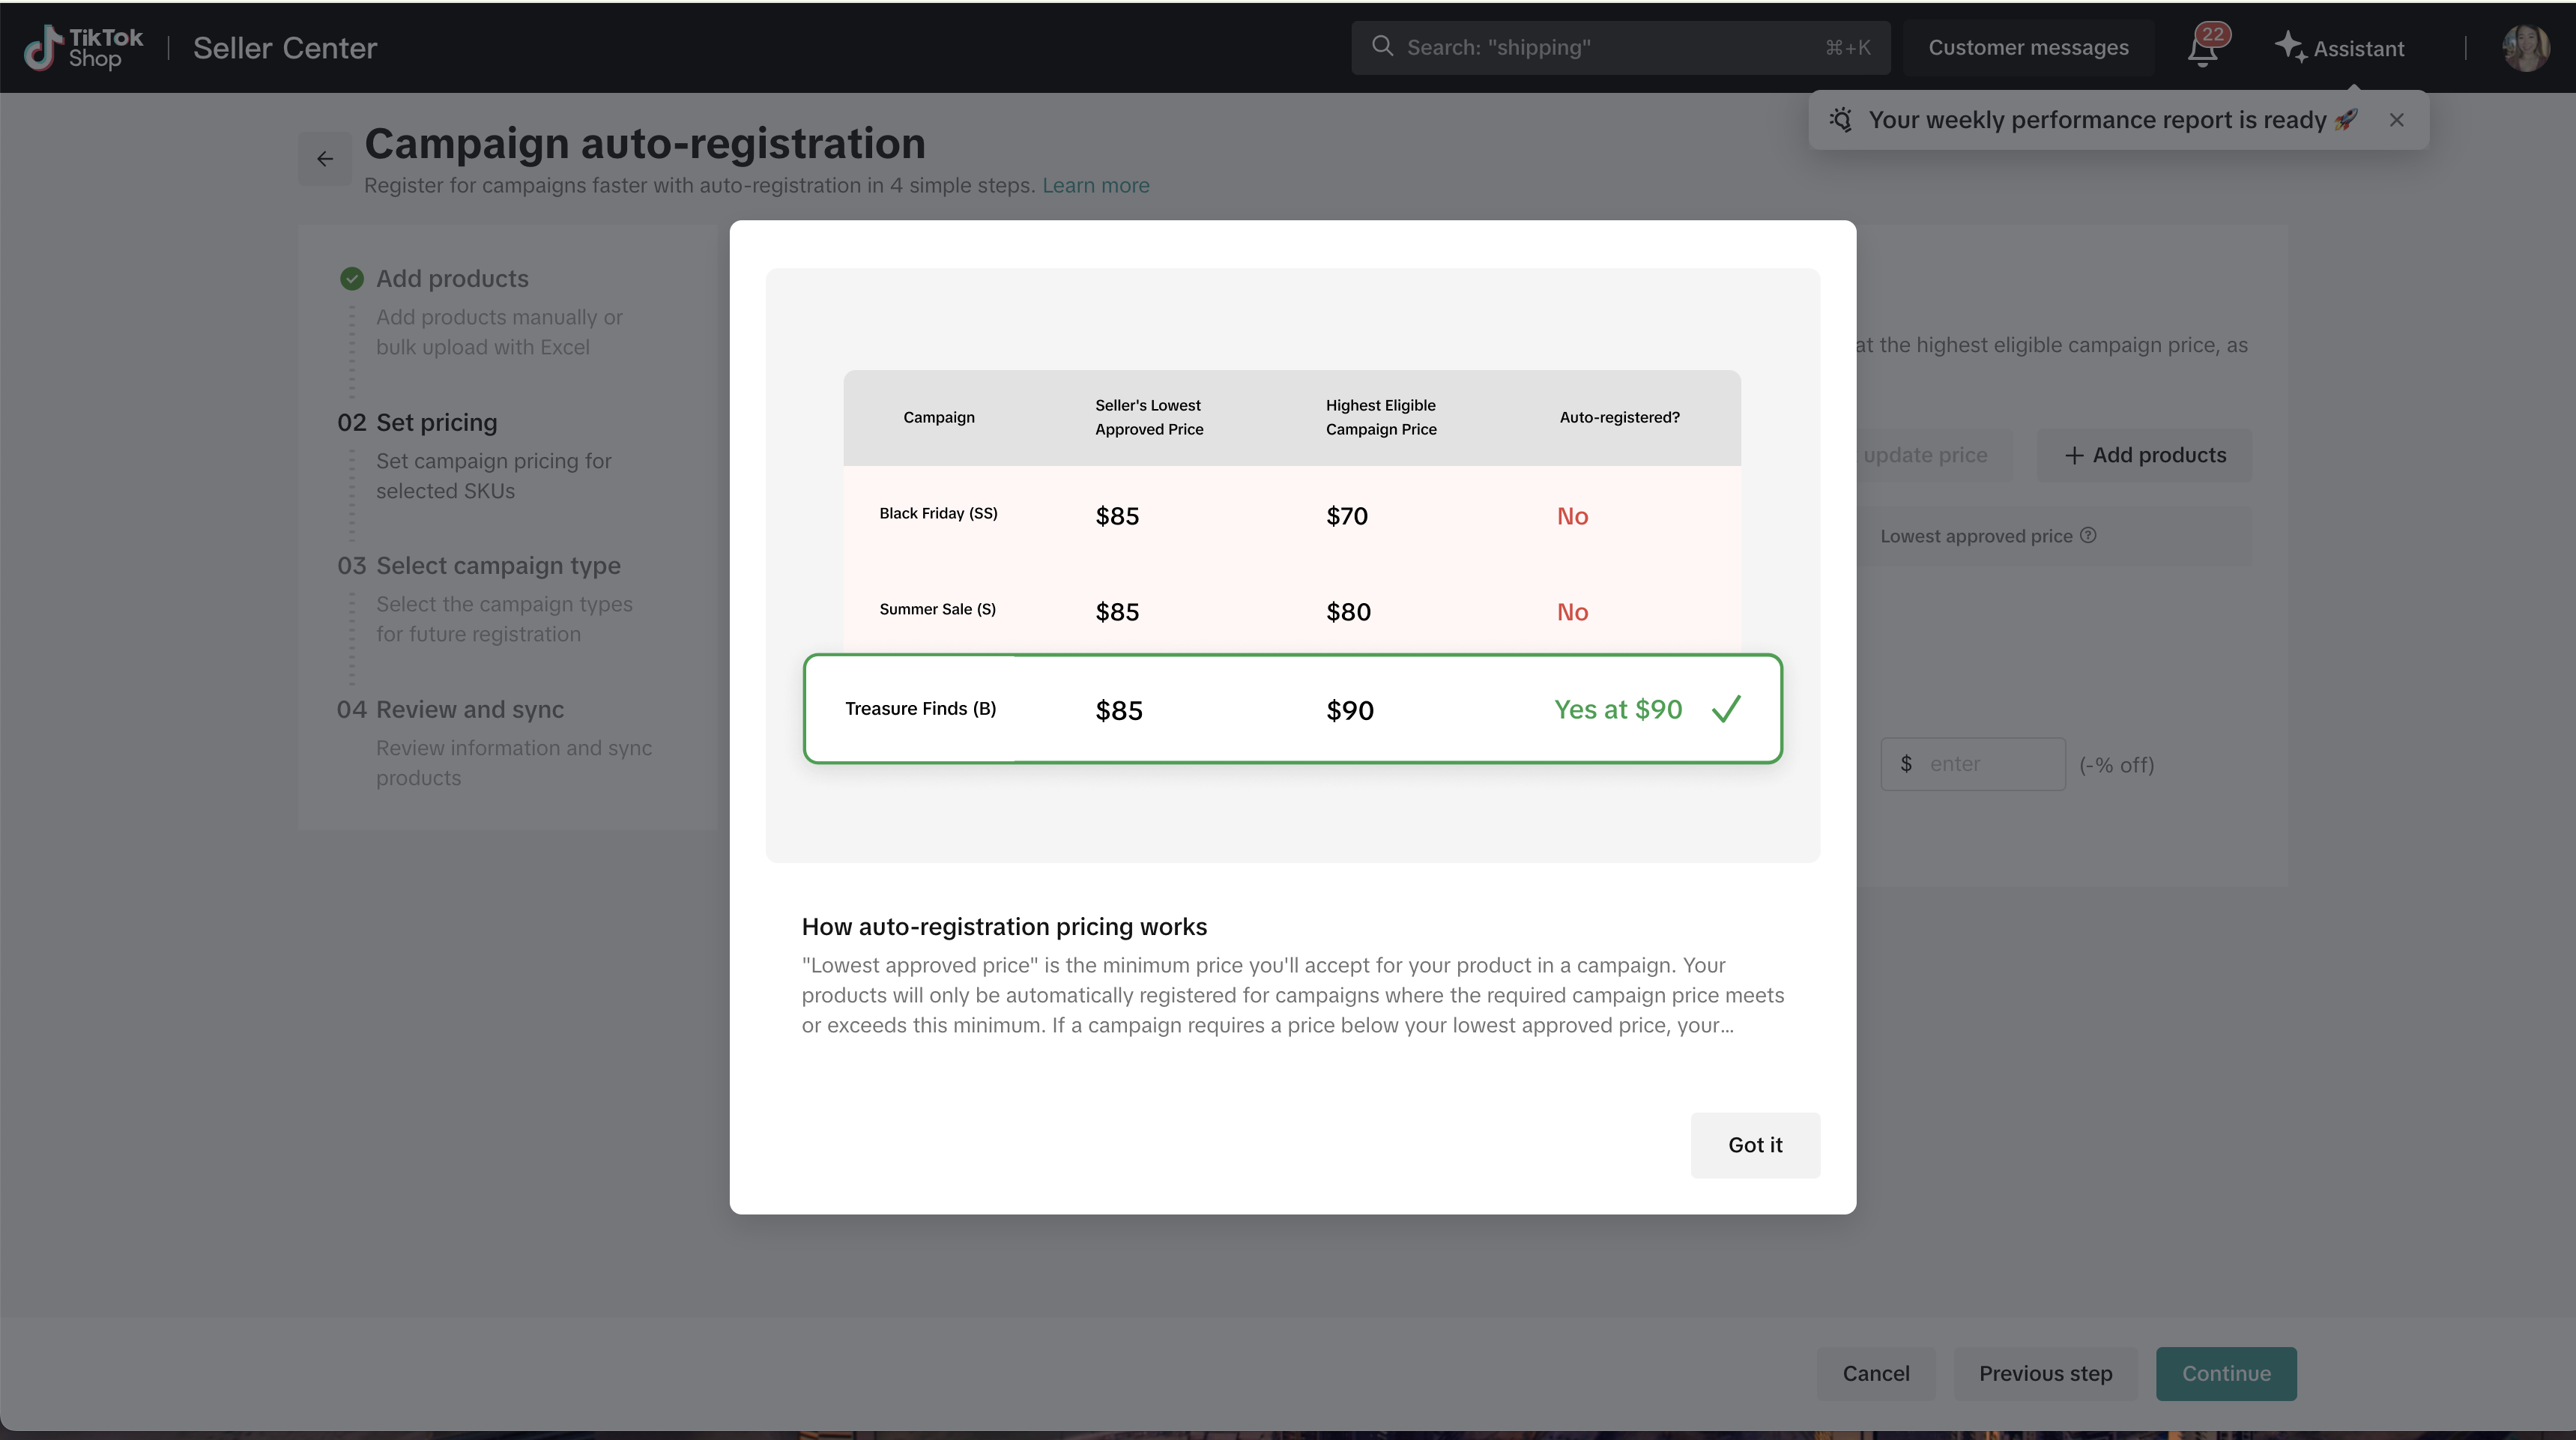
- Set the lowest approved price (Easiest): With this strategy, TikTok Shop will automatically register your products at the highest eligible campaign price. The lowest approved price you set is the minimum price you're willing to accept for your product within a campaign. If a campaign's required price is lower than your set minimum, your product will not be enrolled.
- Customize campaign prices based on different campaign types and tiers (Most Flexible): This option allows you to set unique prices for products across different campaign tiers (SS, S, A, B).
- Set the lowest approved price (Easiest): With this strategy, TikTok Shop will automatically register your products at the highest eligible campaign price. The lowest approved price you set is the minimum price you're willing to accept for your product within a campaign. If a campaign's required price is lower than your set minimum, your product will not be enrolled.
- Add Products Manually: Ideal for selecting a few specific items. You can now also bulk set prices (e.g., a fixed amount off or a percentage off) for multiple selected SKUs.
- Bulk Upload with Excel: This method is perfect for sellers with large product catalogs, allowing you to quickly register many products for campaigns using an excel template.
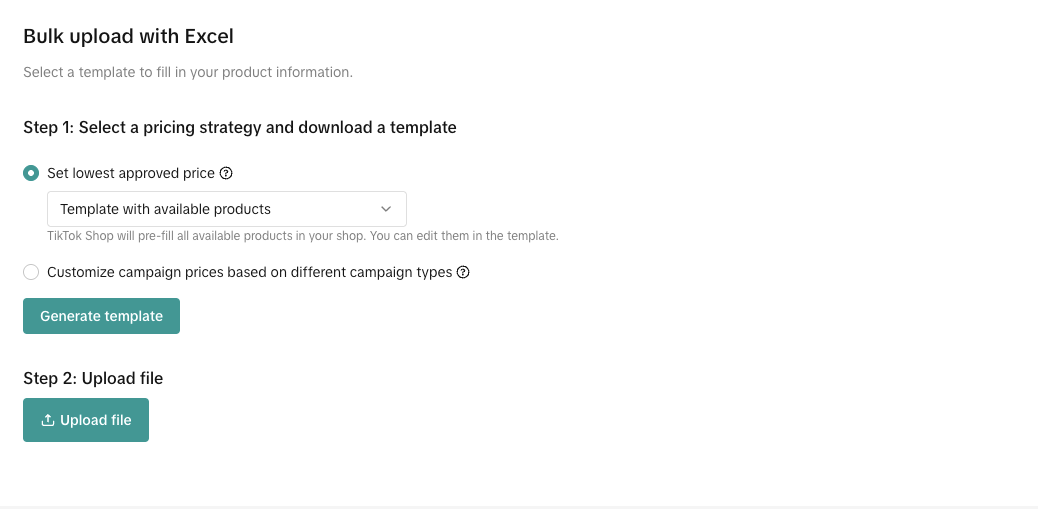
- Step 2: Generate and Download Your Template
- Template with available products (Recommended): TikTok Shop will pre-fill all available products from your shop into the template. You can then easily edit them.
- Empty Template: You will manually enter all product details. You can find Product and SKU IDs on your Manage Products page.
- Click Generate Template. Once the Excel template is successfully generated and pre-filled, click Download.
- Step 3: Fill Out Your Excel Template
- Important Tip for Pre-filled Templates: Campaign prices for each SKU are pre-filled based on campaign tiers (SS, S, A, B) using historical lowest prices (e.g., 180, 90, 60, 30 days respectively). You can manually adjust these prices as needed.
- Understanding Campaign Tiers: TikTok Shop Campaigns are divided into four tiers, each with different eligibility and discount requirements:
- SS level campaign: Our highest campaign tier (e.g., Black Friday).
- S level campaign: The second highest tier (e.g., Summer Sale, Fall Sale).
- A level campaign: The third highest tier (e.g., Valentine's Day, Mother's Day).
- B level campaign: The lowest campaign tier (e.g., category-specific campaigns).
- Understanding Campaign Tiers: TikTok Shop Campaigns are divided into four tiers, each with different eligibility and discount requirements:
- Price Competitiveness: To increase the number of products successfully auto-registered, always aim to set a competitive lowest campaign price. If your price doesn't meet the campaign requirements, it won't be successfully registered.
- Important Tip for Pre-filled Templates: Campaign prices for each SKU are pre-filled based on campaign tiers (SS, S, A, B) using historical lowest prices (e.g., 180, 90, 60, 30 days respectively). You can manually adjust these prices as needed.
- Step 4: Upload Your Completed Template
- After filling out the excel sheet, upload it back to complete your product registration.
Step 3: Set Your Pricing Strategy:
Step 4: Select Campaign Type
- Major Campaigns: Our biggest promotional events (e.g., Black Friday).
- Everyday Campaigns: Category-specific campaigns (e.g. Fashion Week)
- Selecting this option is highly recommended, as it allows you to participate in these very common co-funded coupon campaigns where TikTok and the seller split the cost of a coupon. This partnership helps maximize the impact of the discount on buyers while sharing the cost.
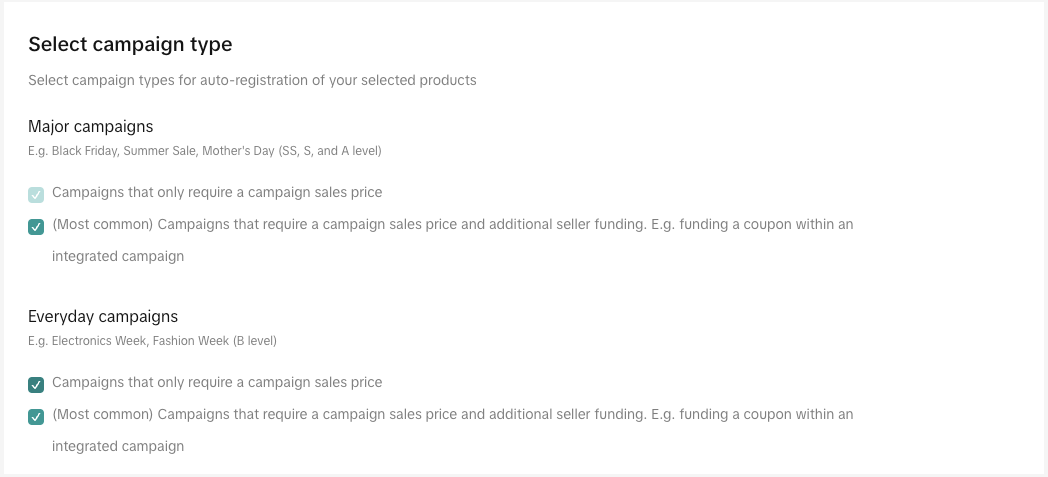
- Campaigns that only require a campaign sales price: These are product campaigns that do not require any extra seller cost beyond the campaign sales price. Think of these as campaigns where your discount is purely based on the product's sale price.
- Campaigns that require a campaign sales price and additional seller funding: These are product campaigns that require an extra seller cost. A common example is funding a coupon with an integrated campaign
Step 5: Review and Sync
Step 6: Monitoring & Managing Auto-Registered Products
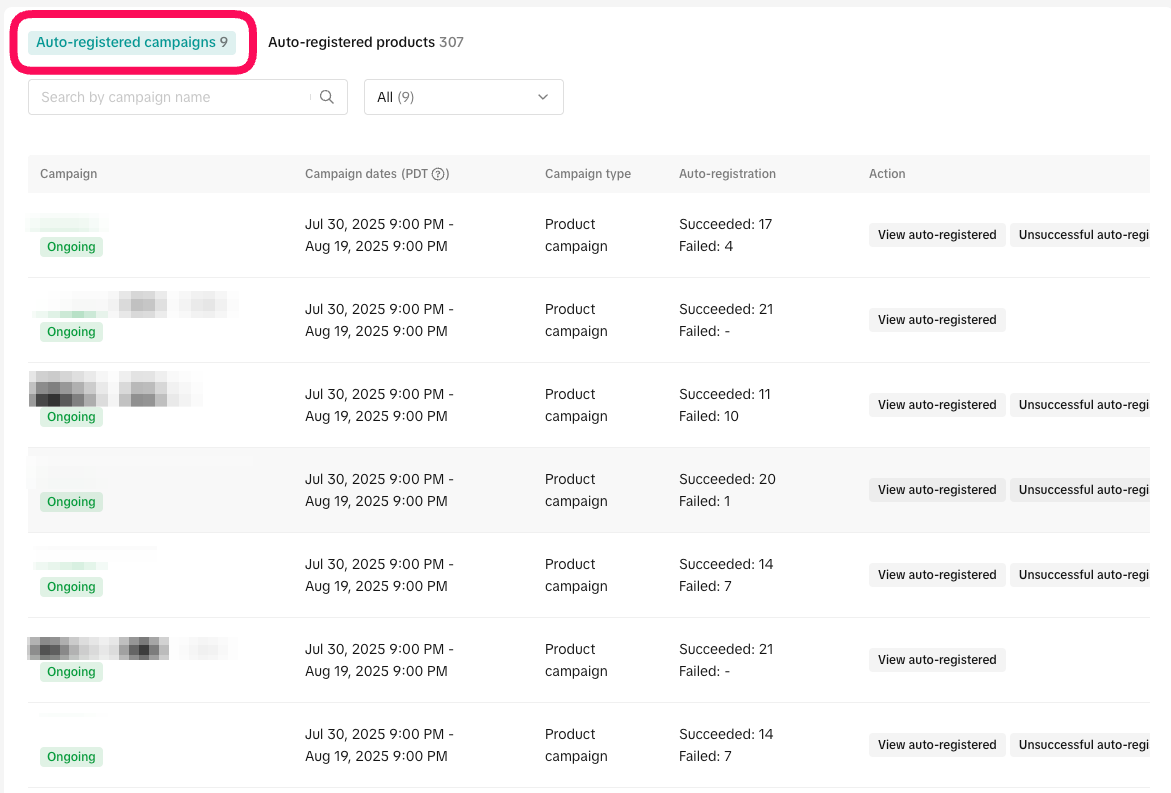
- Campaign View: You can see a comprehensive list of all campaigns your products have been auto-registered for. This view allows you to monitor the success rate of your auto-registrations, showing how many products were successfully enrolled versus those that failed. By clicking "View auto registered," you'll be directed to the specific campaign's detail page, automatically filtered to display only your auto-registered products. Here, you can easily monitor each product's status (approved, under review, rejected) and verify the campaign sale price at which it was registered.
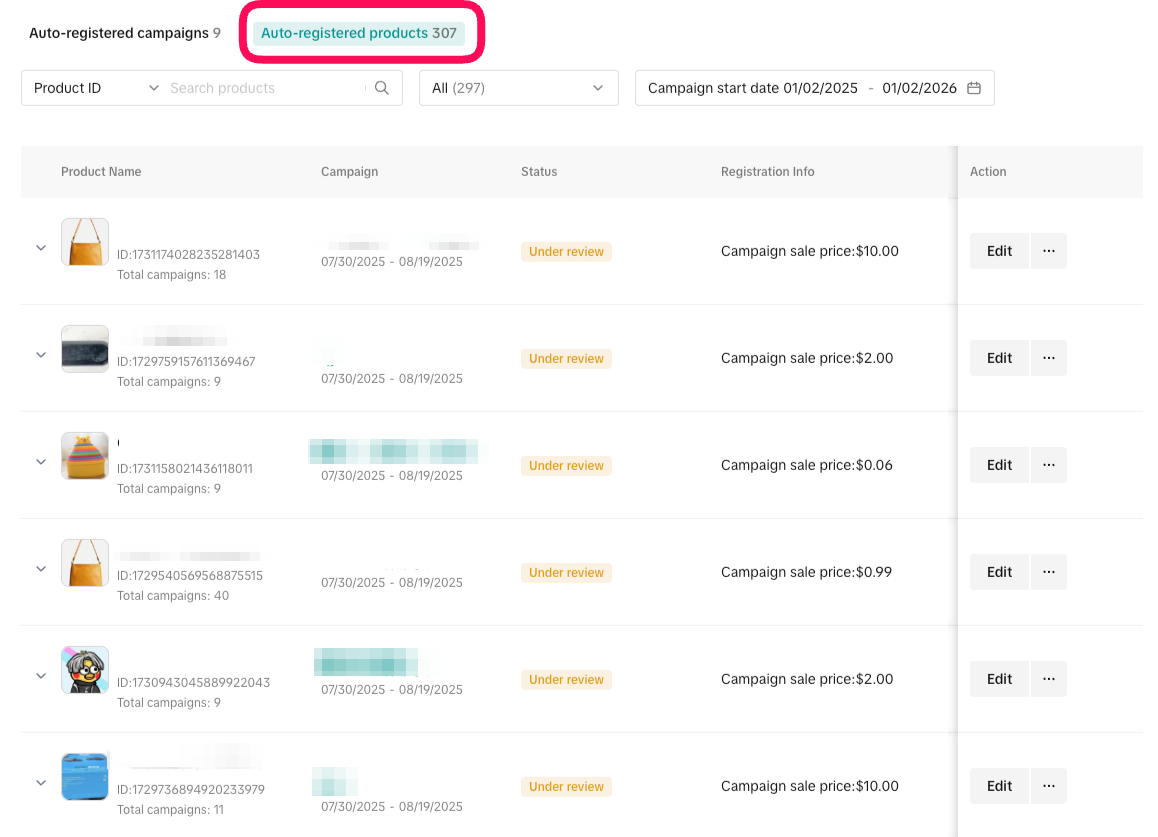
- Product View, you can access a product-level overview to see which specific campaigns each of your selected products has been registered for. You can view the campaign sale price for each product in every campaign it's enrolled in. This centralized view also allows you to perform actions directly from this page, such as viewing more details or withdrawing a product from a campaign, eliminating the need to navigate to individual campaign pages.
Step 7: Managing Unsuccessful Auto-Registrations:
Step 8: Enable/ disable Auto Registration:
- On the auto-registration page, you'll find a clear toggle to easily turn the feature on or off.
 Important: Disabling auto-registration will prevent future auto-enrollments, but products already registered will remain in their campaigns.FAQs:
 - Does it work for all campaign types?
- Only product campaigns that don’t require campaign reserved stock. It does not work for content campaigns.
- What if my auto-registration failed?
- Click “View unsuccessful auto-registrations” and register those products manually.
- If I disable auto-registration, what happens?
- Future auto-registration will be paused, but registered products will not be affected.
You may also be interested in

The Seller Guide to Shop Tab Success
*What is Shop Tab? Shop Tab is another way for shoppers to discover your products on TikTok Shop. As…

How to resolve SKU errors
If you need to edit your product's retail prices or add, delete, or edit a SKU while it is registere…

LIVE Price Match Guarantee using Co-funded LIVE Flash Sale
Introduction: What is LIVE Price Match Guarantee? During Deal for You Days from July 7 - July 19, 20…

Marketing benefits package
Product Overview Marketing Benefits Packages are a collection of placements and promotions on TikTok…

Campaign FAQs
Key Points: Your shop is eligible to enroll in campaigns if you meet the minimum criteria, includin…

How to Register for Content Campaigns in the TikTok App
How to Register for Content Campaigns in the TikTok App Content campaigns on TikTok Shop allow creat…

How to register for standard / advanced registration?
What is Standard Registration? Standard Registration allows you to register products that meet speci…

How to register for flash sale campaigns
What is a TikTok Shop Flash Sale Campaign? A Flash Sale campaign is a limited-time promotion that le…

How to register for content campaigns
Product Overview Content campaigns on TikTok Shop are special events that give you a chance to boost…

TikTok for Shopify: Promotions Sync
*Overview: Shopify sellers can sync Promotions/Discounts except Free Shipping on Shopify directly to…