

LIVE Events
Summary
What are the key steps to plan and execute a successful TikTok Shop LIVE Event?
- Schedule your LIVE Event with details like date, time, and description; promote it on and off TikTok to build awareness. Prepare product sets, schedule LIVE Giveaways, and assign moderators to engage viewers effectively.
- Use TikTok’s Practice mode to familiarize yourself with live features; during the event, pin products, launch giveaways and flash sales, and use LIVE Billboards to highlight promotions.
How can sellers and creators effectively prepare and manage products and giveaways for their LIVE Events?
- Create LIVE product sets in advance (up to 100 products) via TikTok Shop Creator Center or LIVE Console to streamline product showcasing during the event.
- Schedule LIVE Giveaways by selecting prizes, setting winner numbers, and participation rules (e.g., commenting), either before or during the LIVE to boost engagement and viewer interaction.
What tools and features does TikTok provide to enhance audience engagement and sales during a LIVE Event?
- LIVE Giveaways encourage comments and participation, Flash Sales offer limited-time deals to drive urgency, and LIVE Billboards display key messages and promotions throughout the stream.
- Moderators can be added (up to 20 on mobile, 30 on desktop) to manage chat and maintain a positive environment, while Activity Feed and LIVE Diagnosis provide real-time insights and suggestions.
How can sellers and creators analyze and improve their LIVE Event performance post-session?
- Use TikTok Shop Creator Center and LIVE Console dashboards to review metrics like GMV, views, orders, and engagement trends, with options for basic or advanced analytics including traffic, conversion, and ad impact.
- Create and post LIVE highlights from top moments to promote future events, and analyze viewer comments for sentiment to refine content and engagement strategies.
What advantages does using the desktop LIVE Console offer compared to mobile for managing TikTok Shop LIVE Events?
- LIVE Console allows scheduling with more flexibility (including immediate LIVE), managing multiple sessions within one event, and easier product, giveaway, and Billboard setup.
- It supports larger teams with up to 30 moderators, offers detailed real-time monitoring, and provides a comprehensive interface for managing all event aspects beyond mobile limitations.
When you think of LIVE as for more than just spur-of-the-moment events, you can plan ahead of time and unlock the full potential of a successful live shopping session. With TikTok LIVE Events, creating a plan for your upcoming LIVE shopping events has never been easier!
With a scheduled LIVE Event, you can plan, promote, and manage all aspects of your TikTok Shop LIVE sessions ahead of time to drive viewership, audience engagement, and sales. You can select products to feature, prepare promotional moments like LIVE Giveaways, and build confidence before your session with the knowledge that you have a gameplan.
There are a number of benefits when you create a TikTok LIVE Event, including:
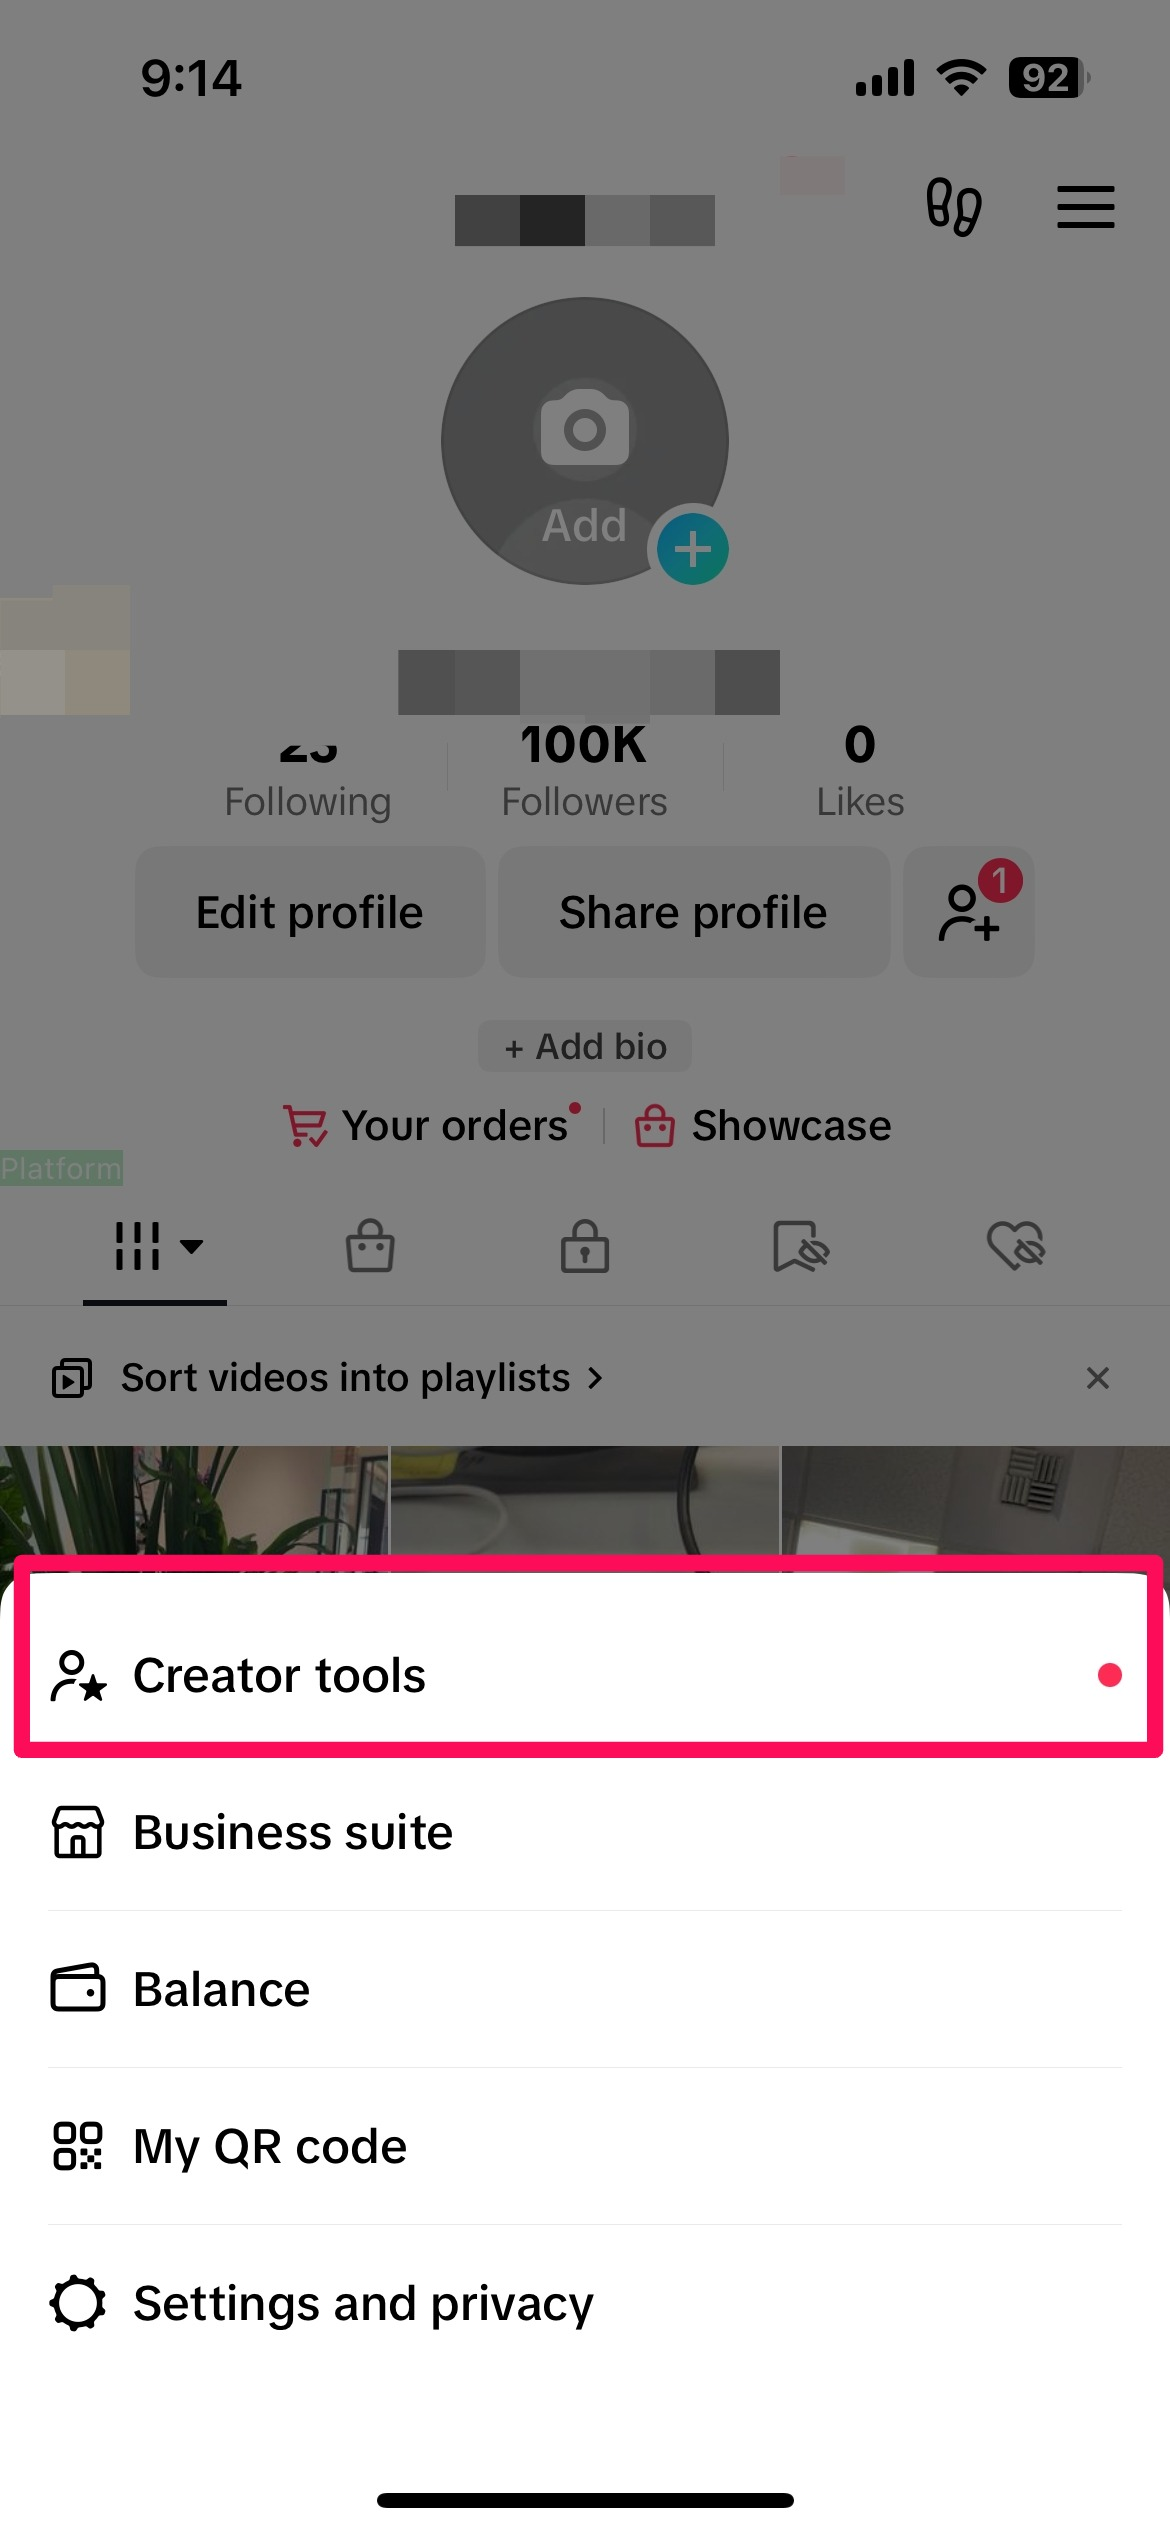
Enter from creator tools
Enter from device camera
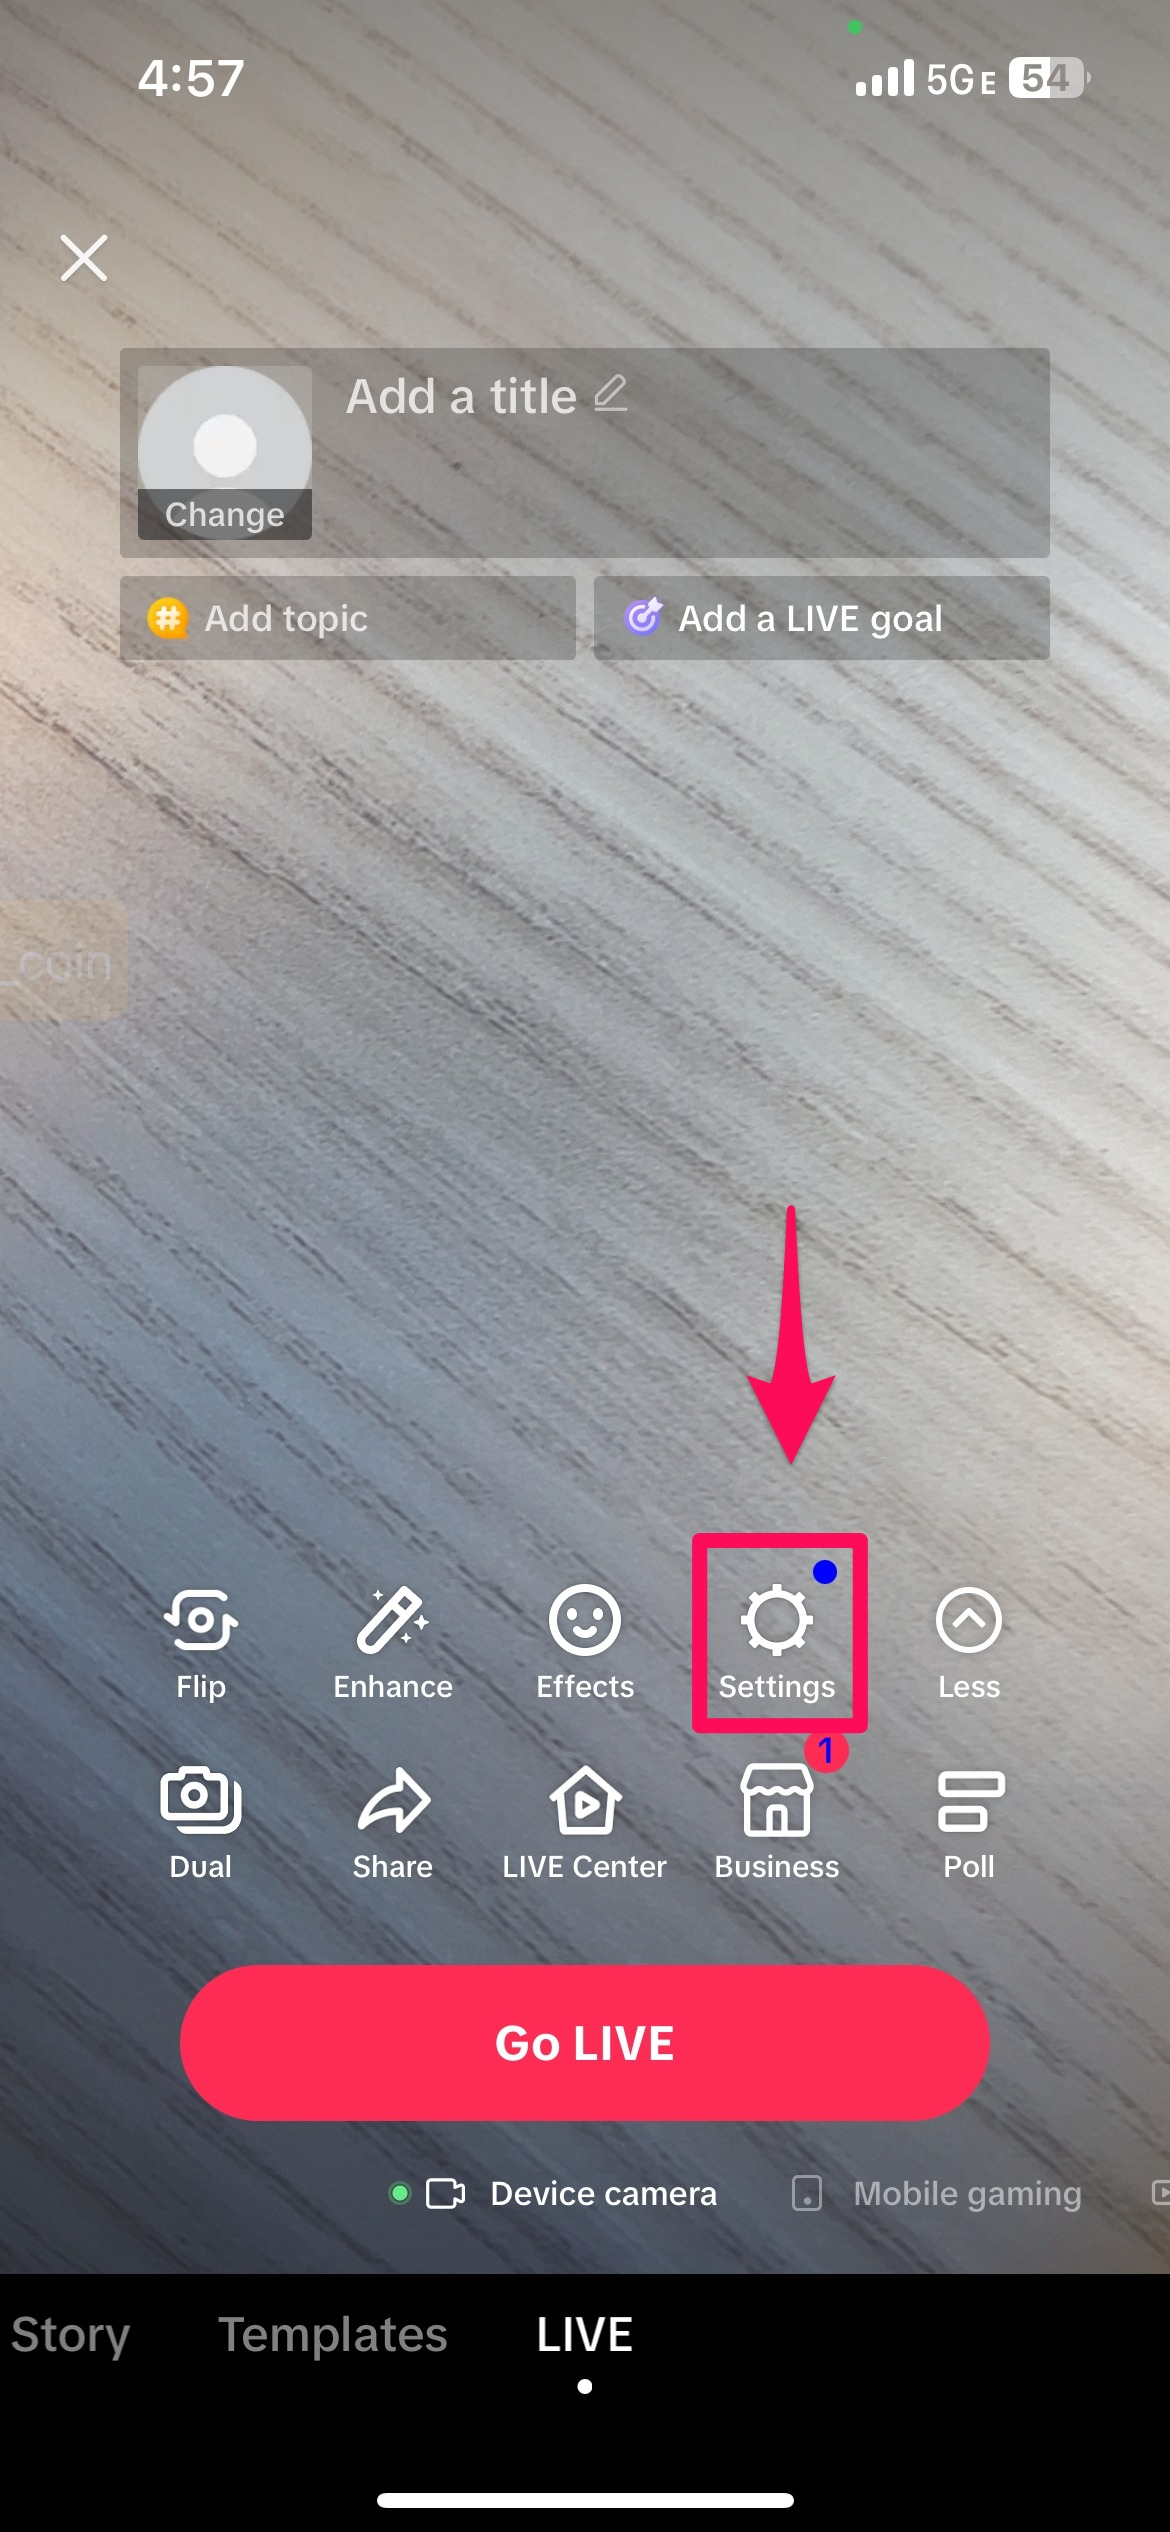
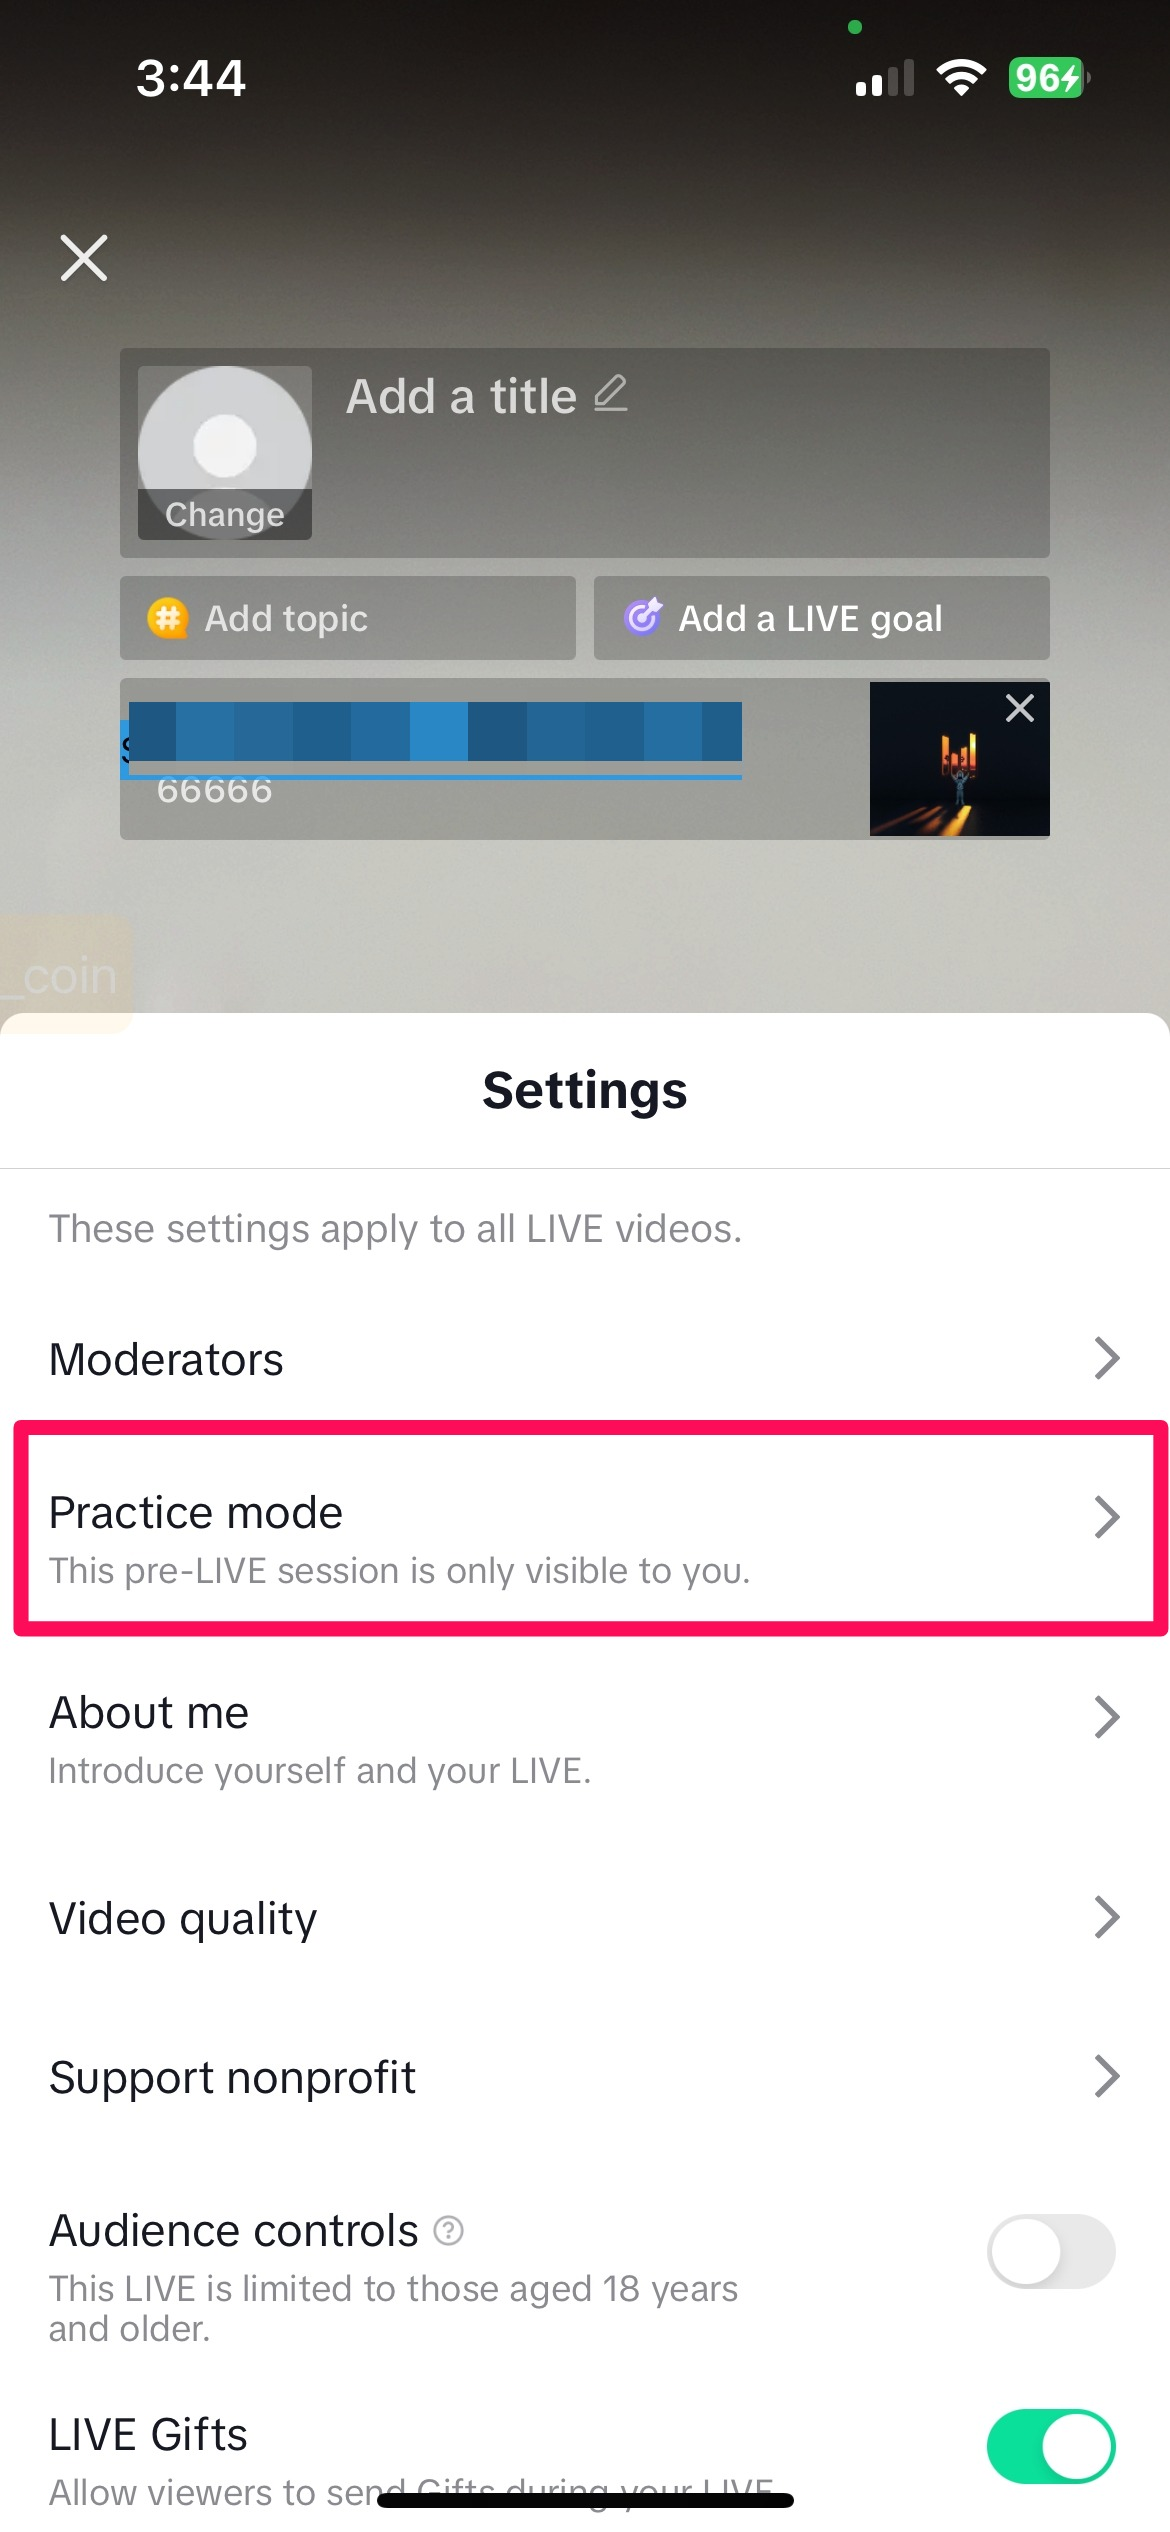
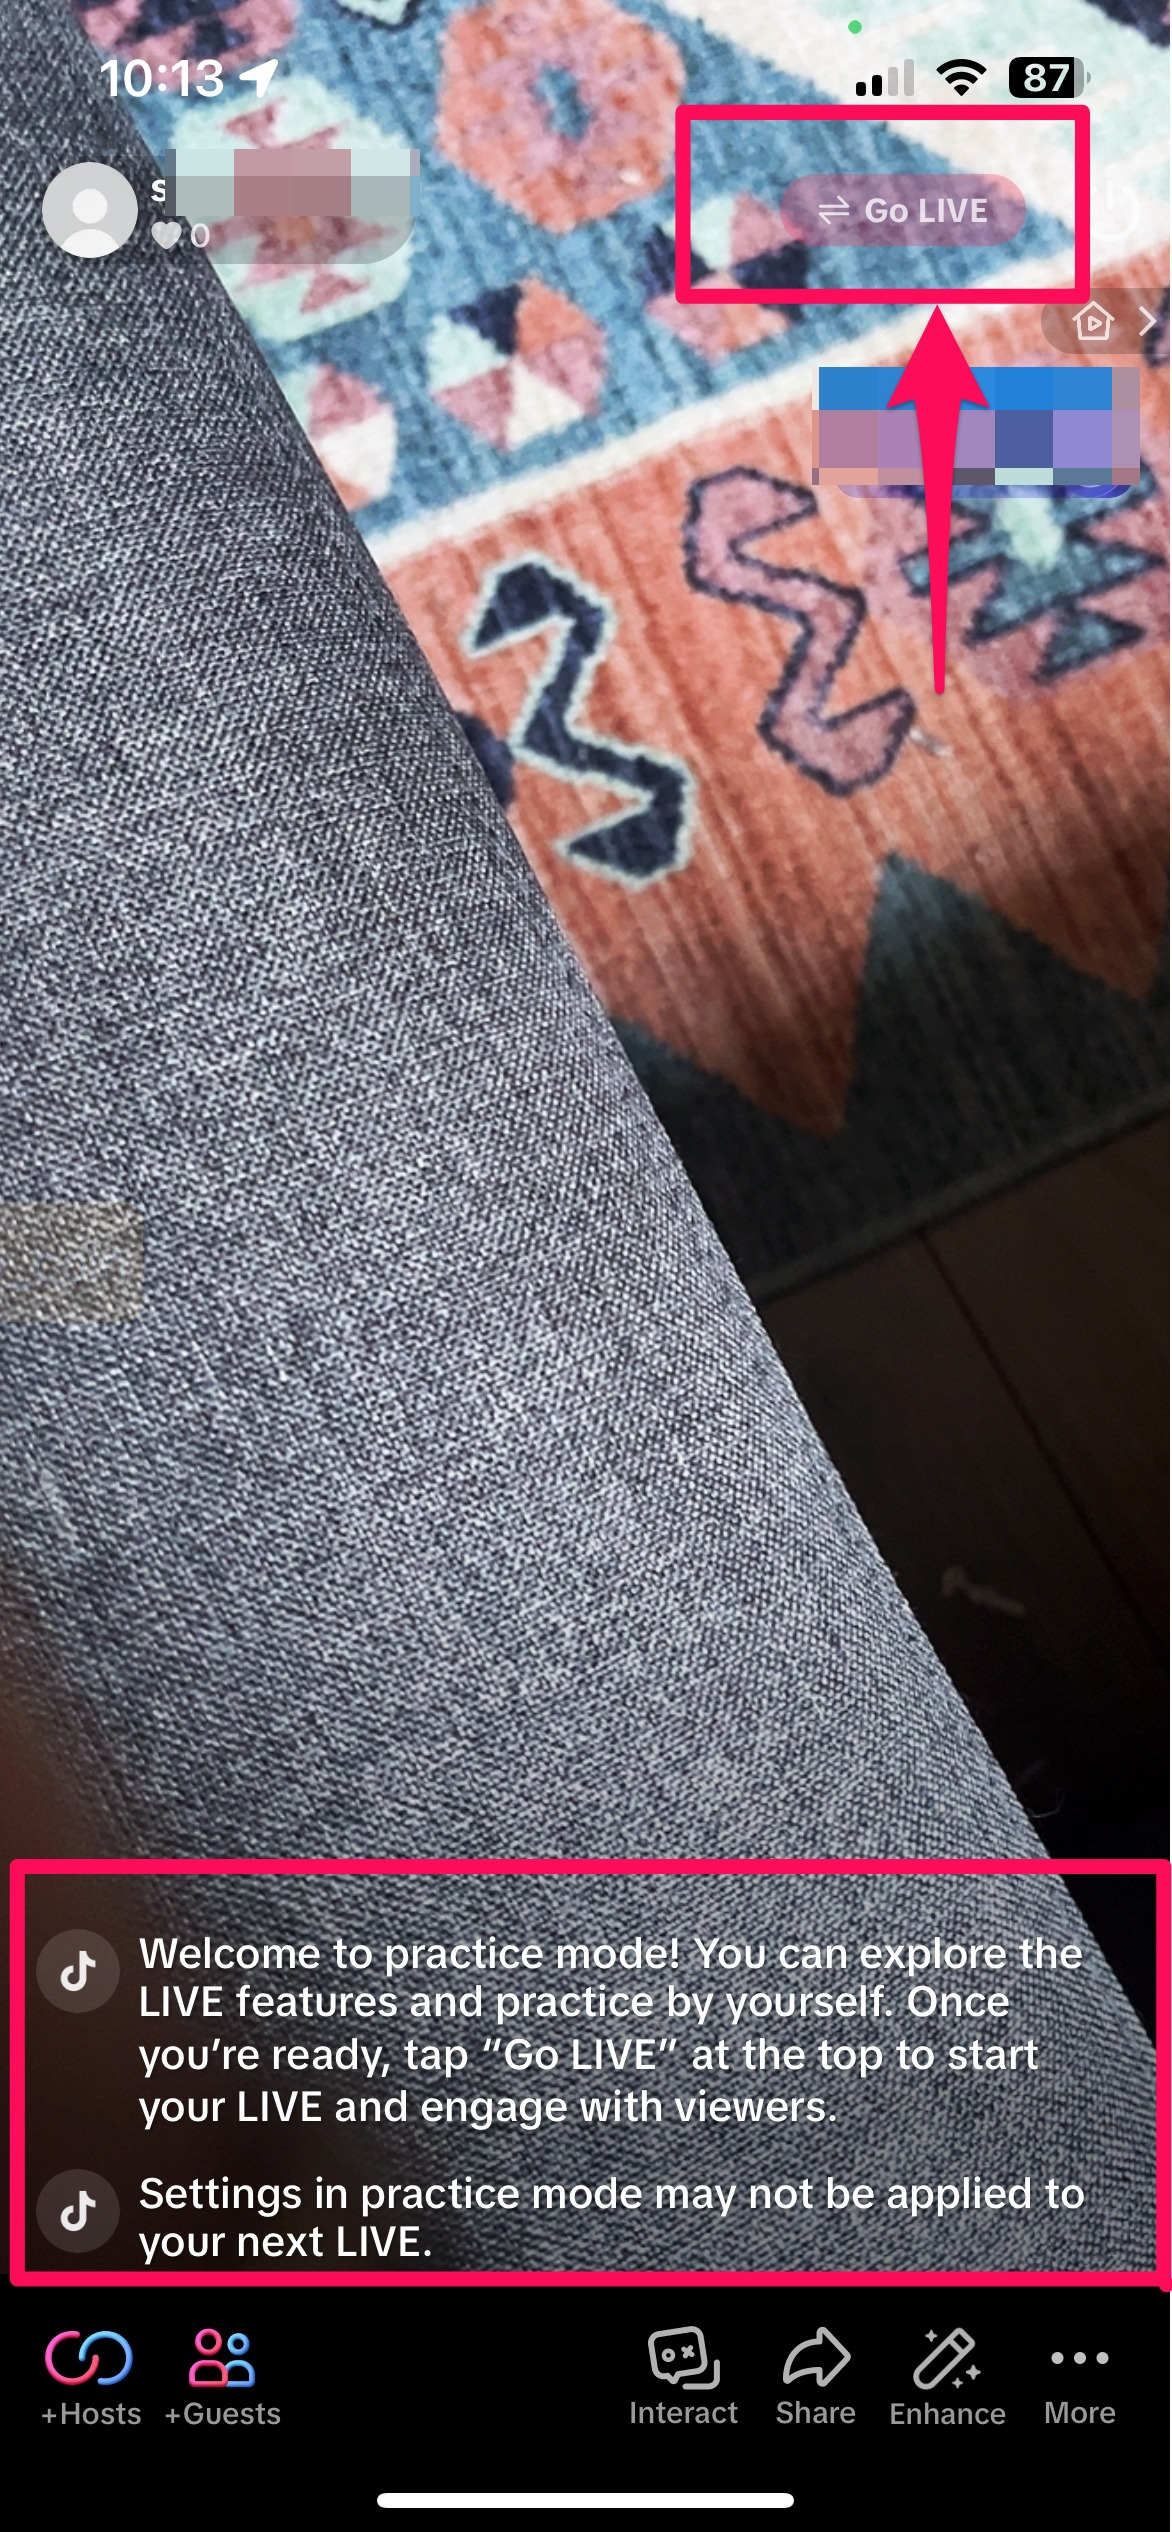
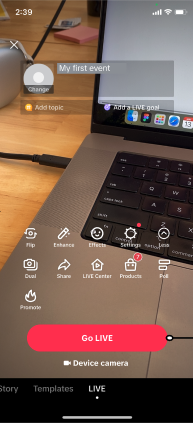
Tip: To get a sense of what going LIVE will look and feel like, head to Settings to access Practice mode. Practice mode simulates the experience of going live on mobile, but the session will only be visible to you. You can explore different features and practice speaking in a livestream setting — if you feel like switching to an actual LIVE, you can tap Go LIVE in the top right corner.
Note that LIVE shopping tools won't be available in practice mode.
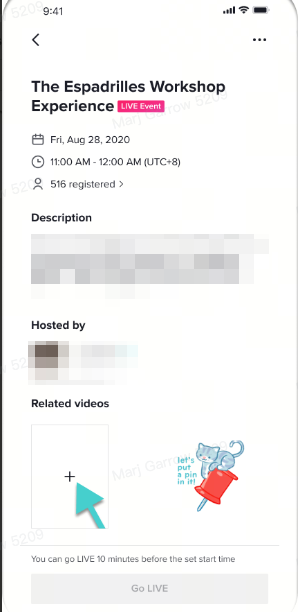
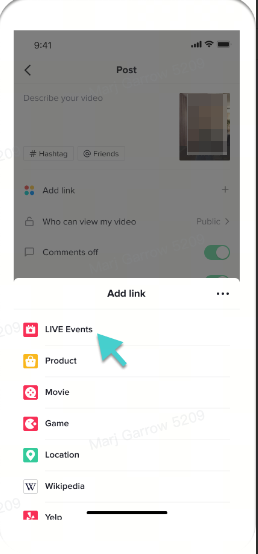
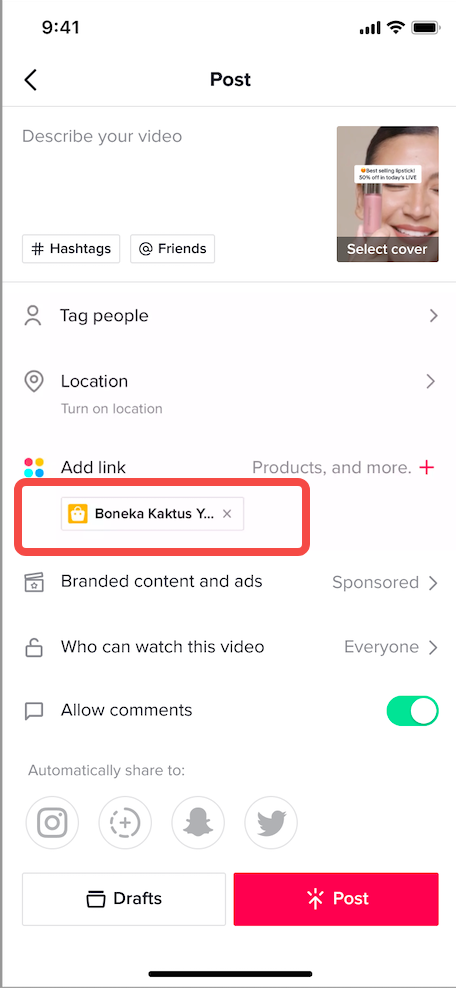
To create a video to promote your LIVE Event, tap the + icon under Related videos on the LIVE Event page. After recording your video, select Next and then tap Add link to choose the LIVE Event you want to promote. The LIVE Event link will be added to your video. You can then press Done and Post to publish.
Tip: 2-3 days before your LIVE Event, you can Promote your short video to drive awareness ahead of the event.
Step 2: Add products from various channels
 Step 3: From your LIVE product set page, you can:

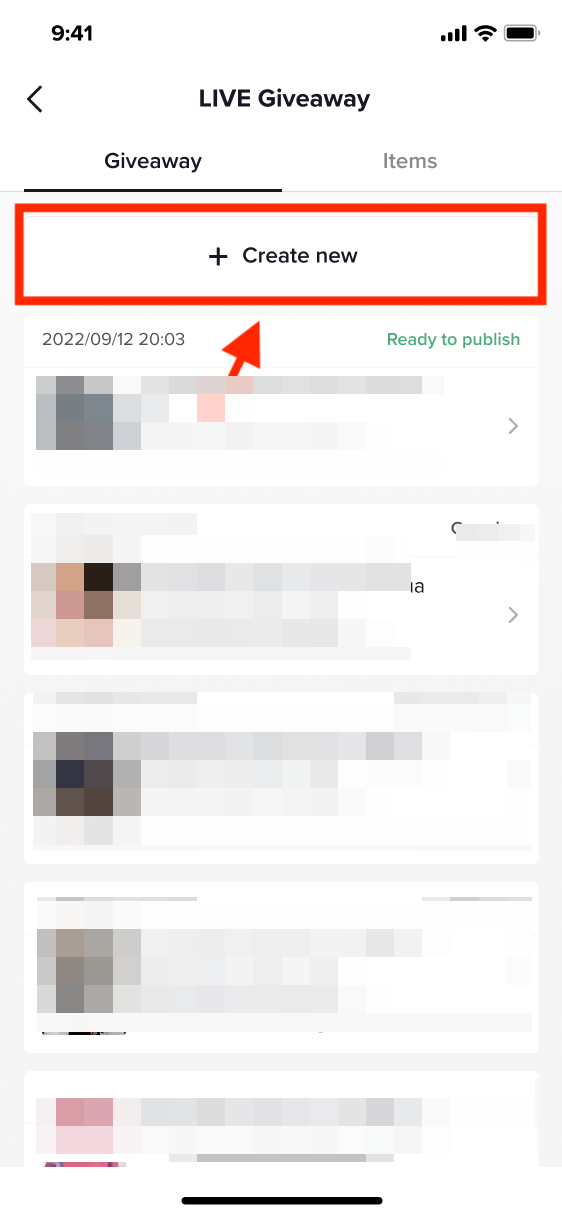
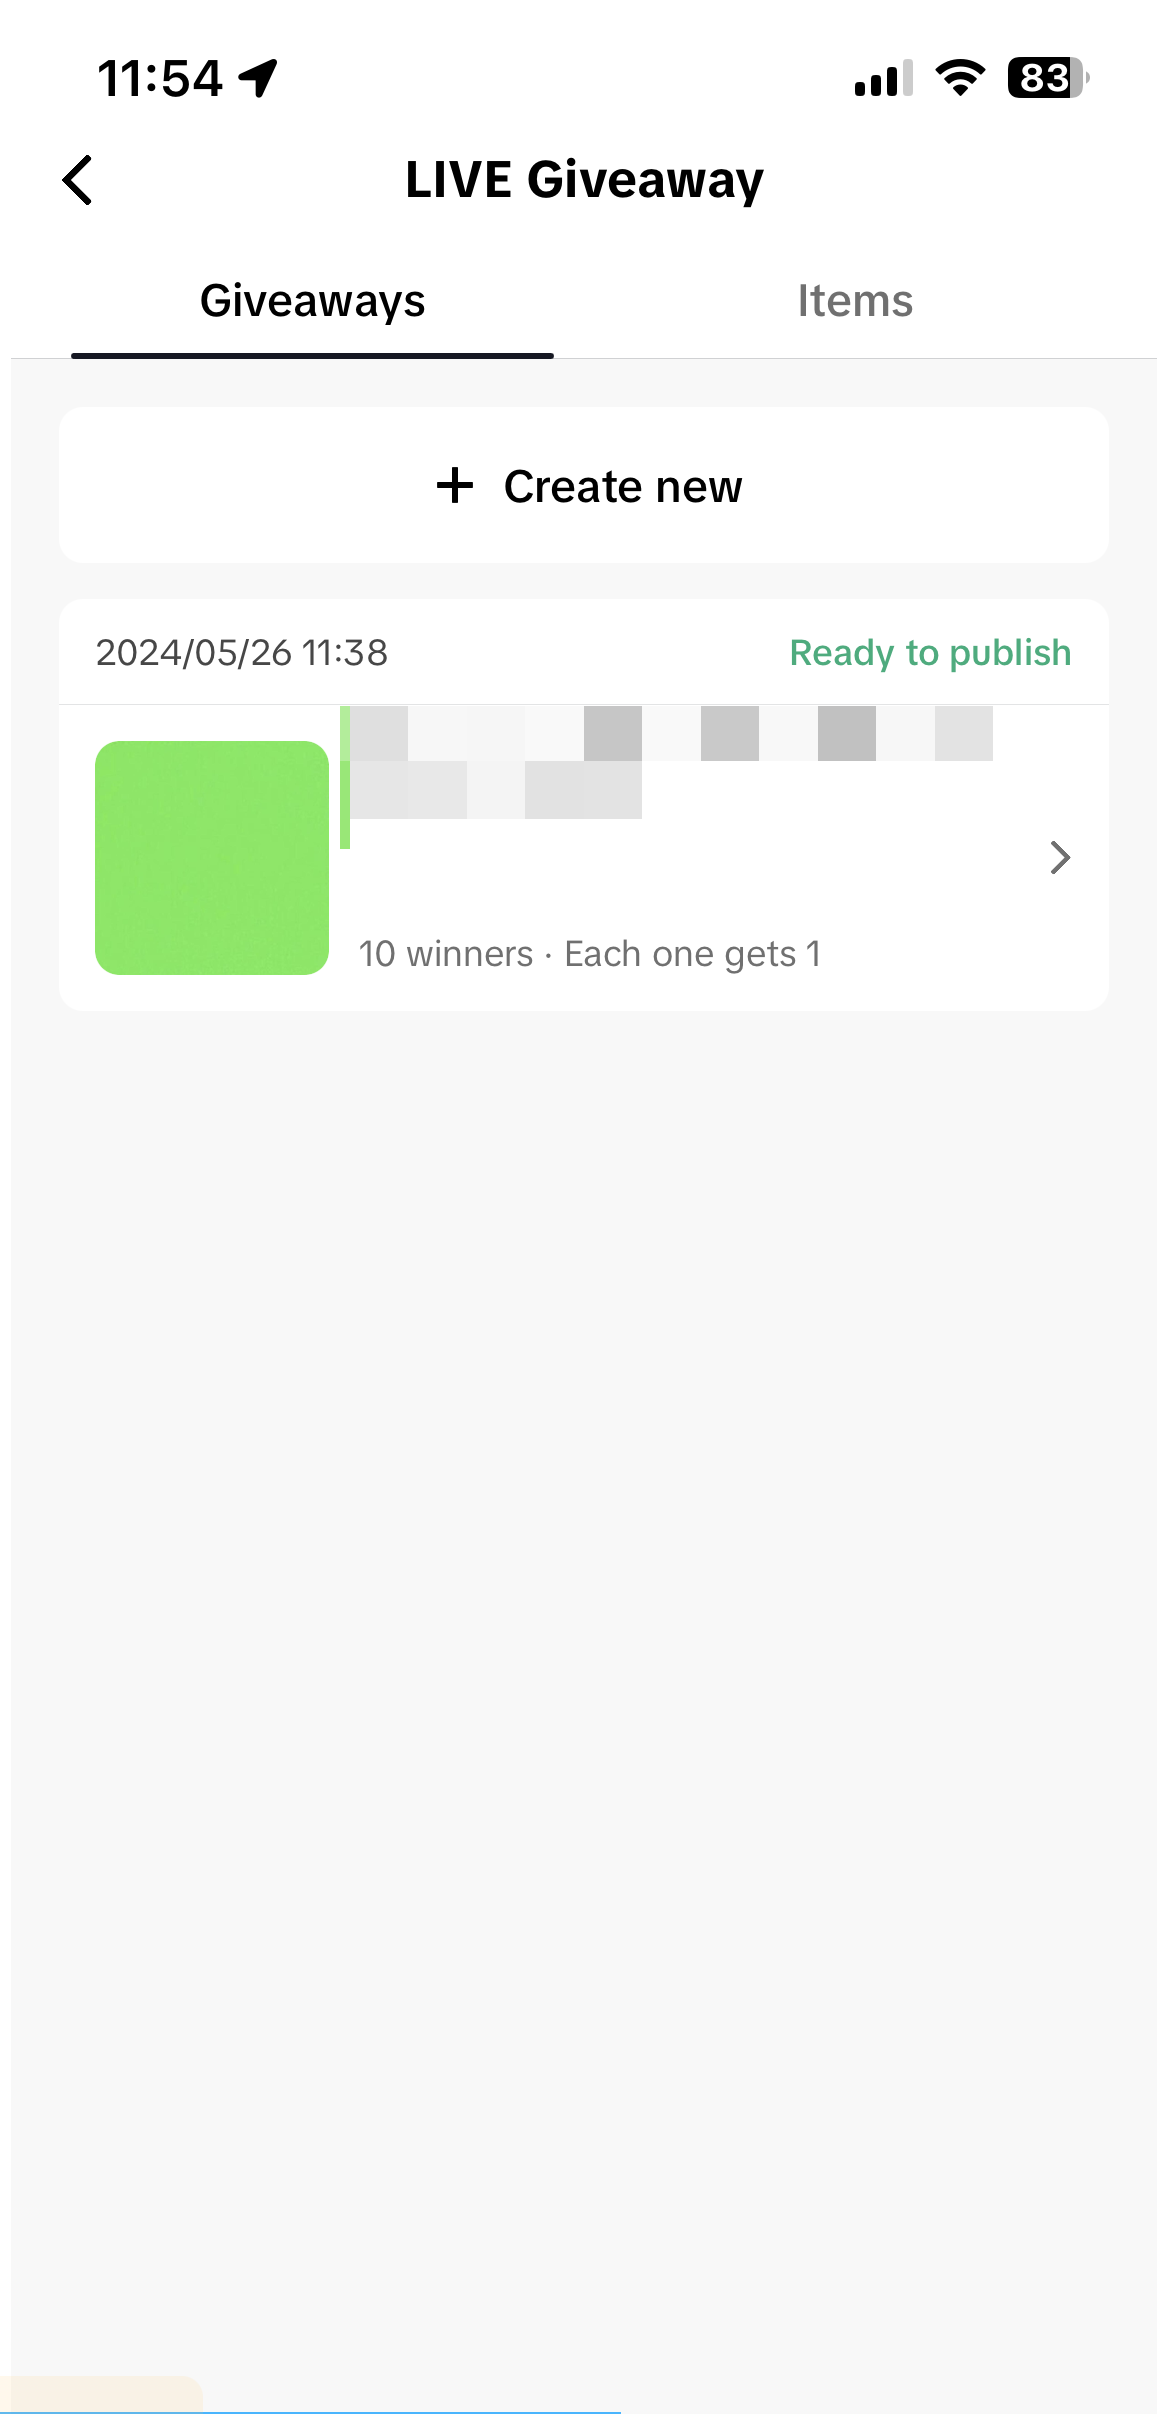
 Step 2: On the LIVE Giveaway page, click on the Create new button to create a new LIVE Giveaway. Select prizes for your LIVE Giveaway.
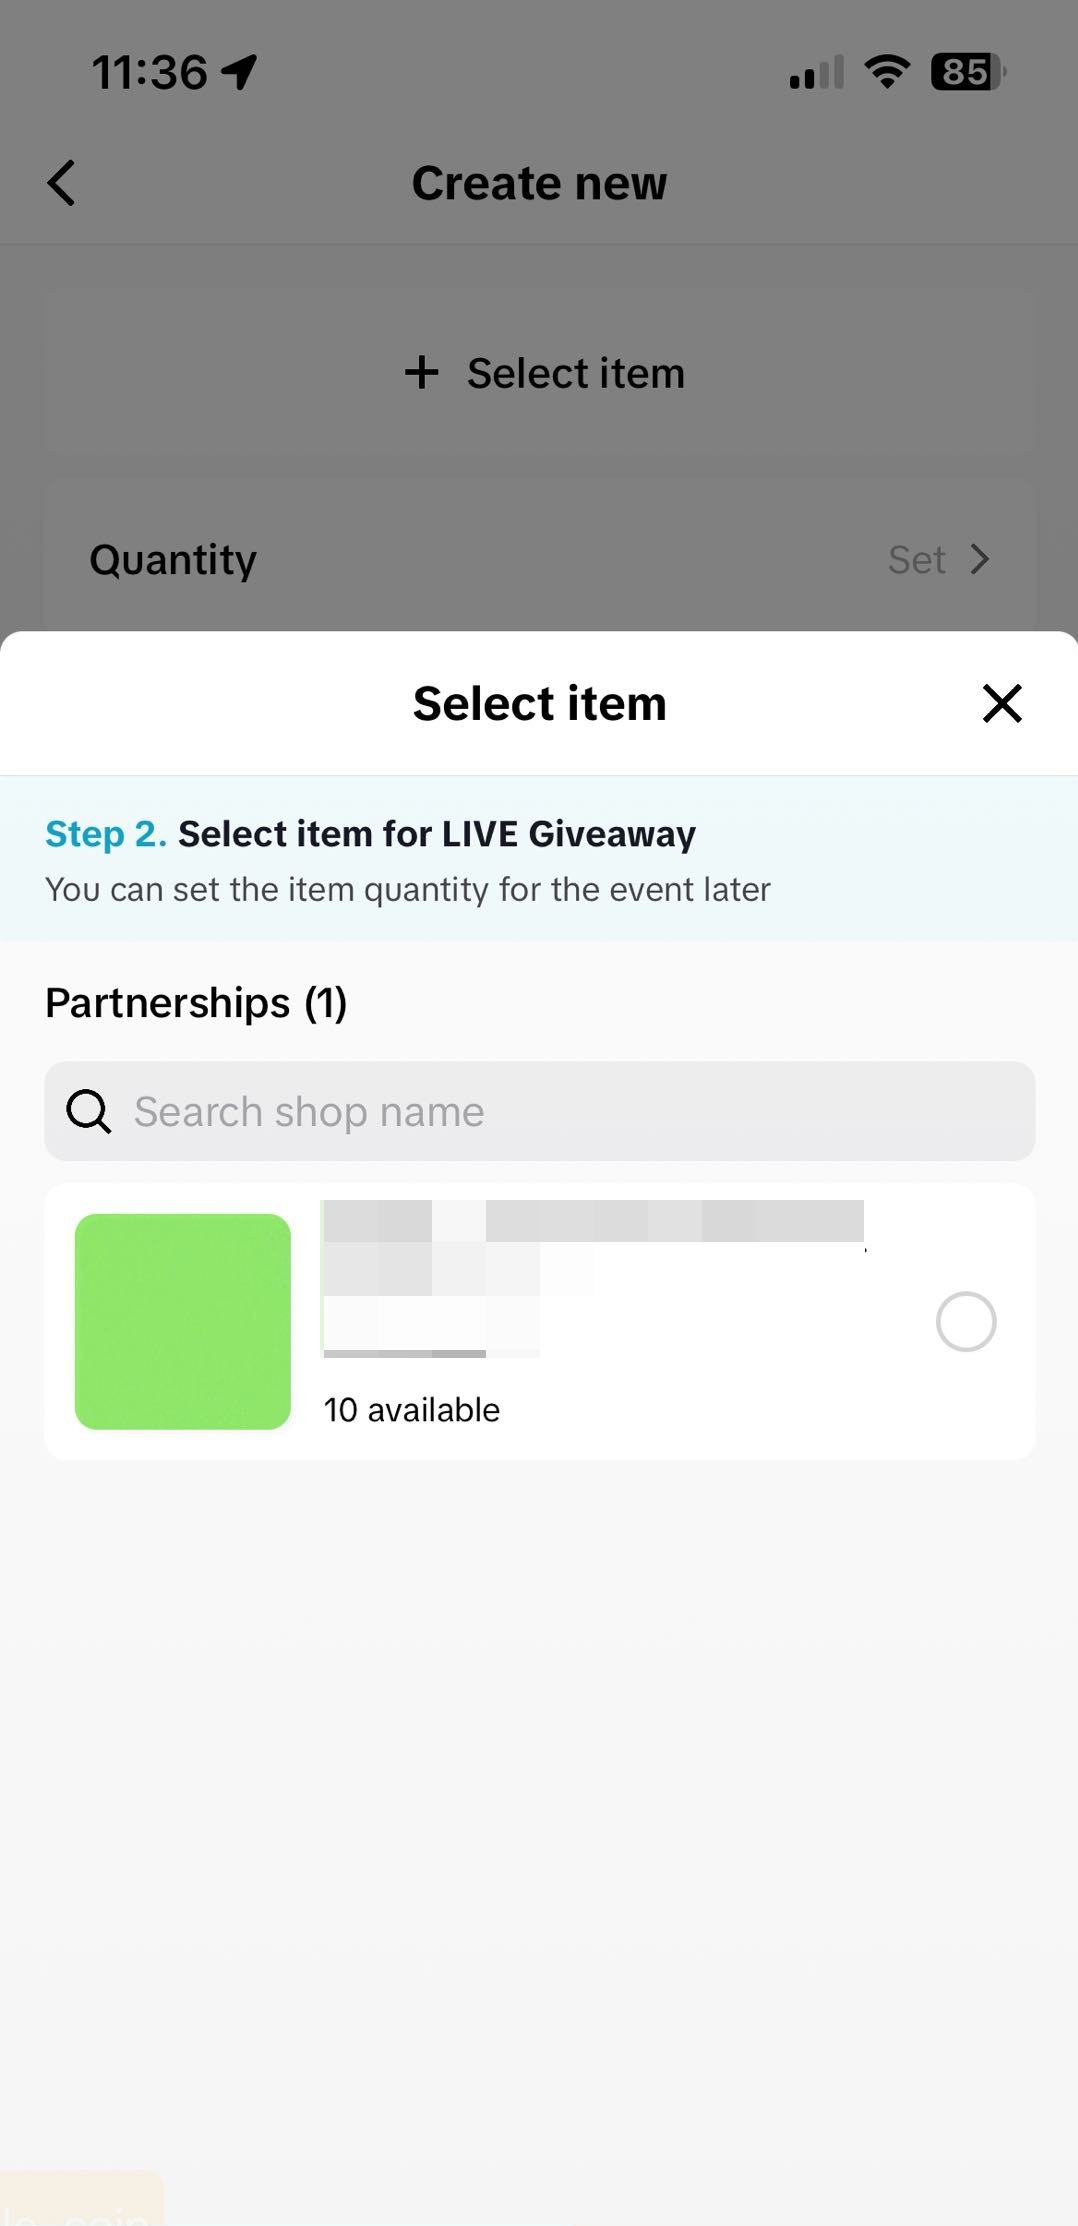
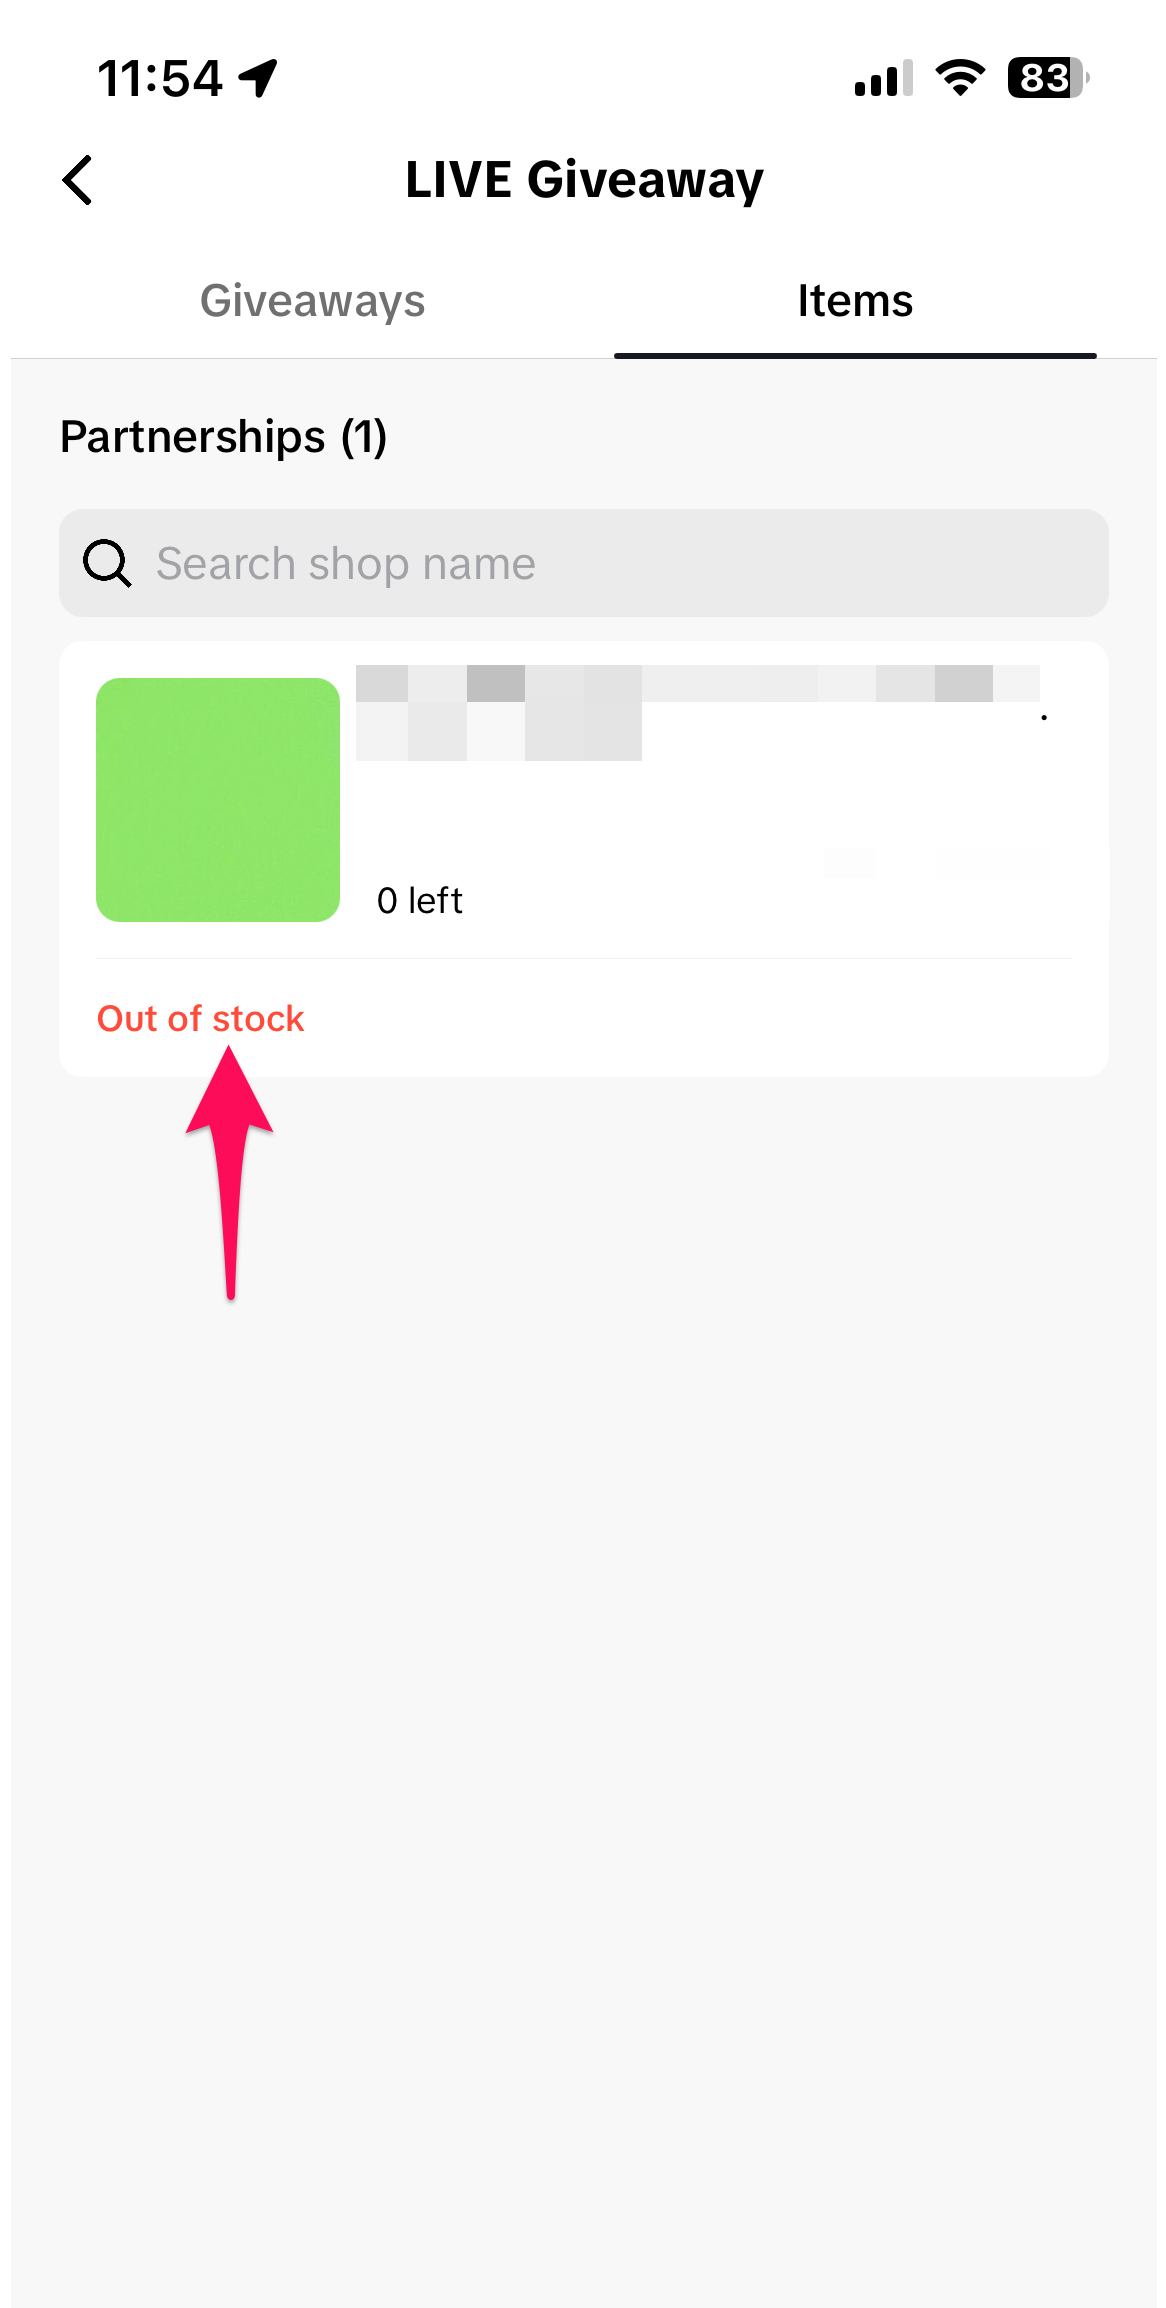
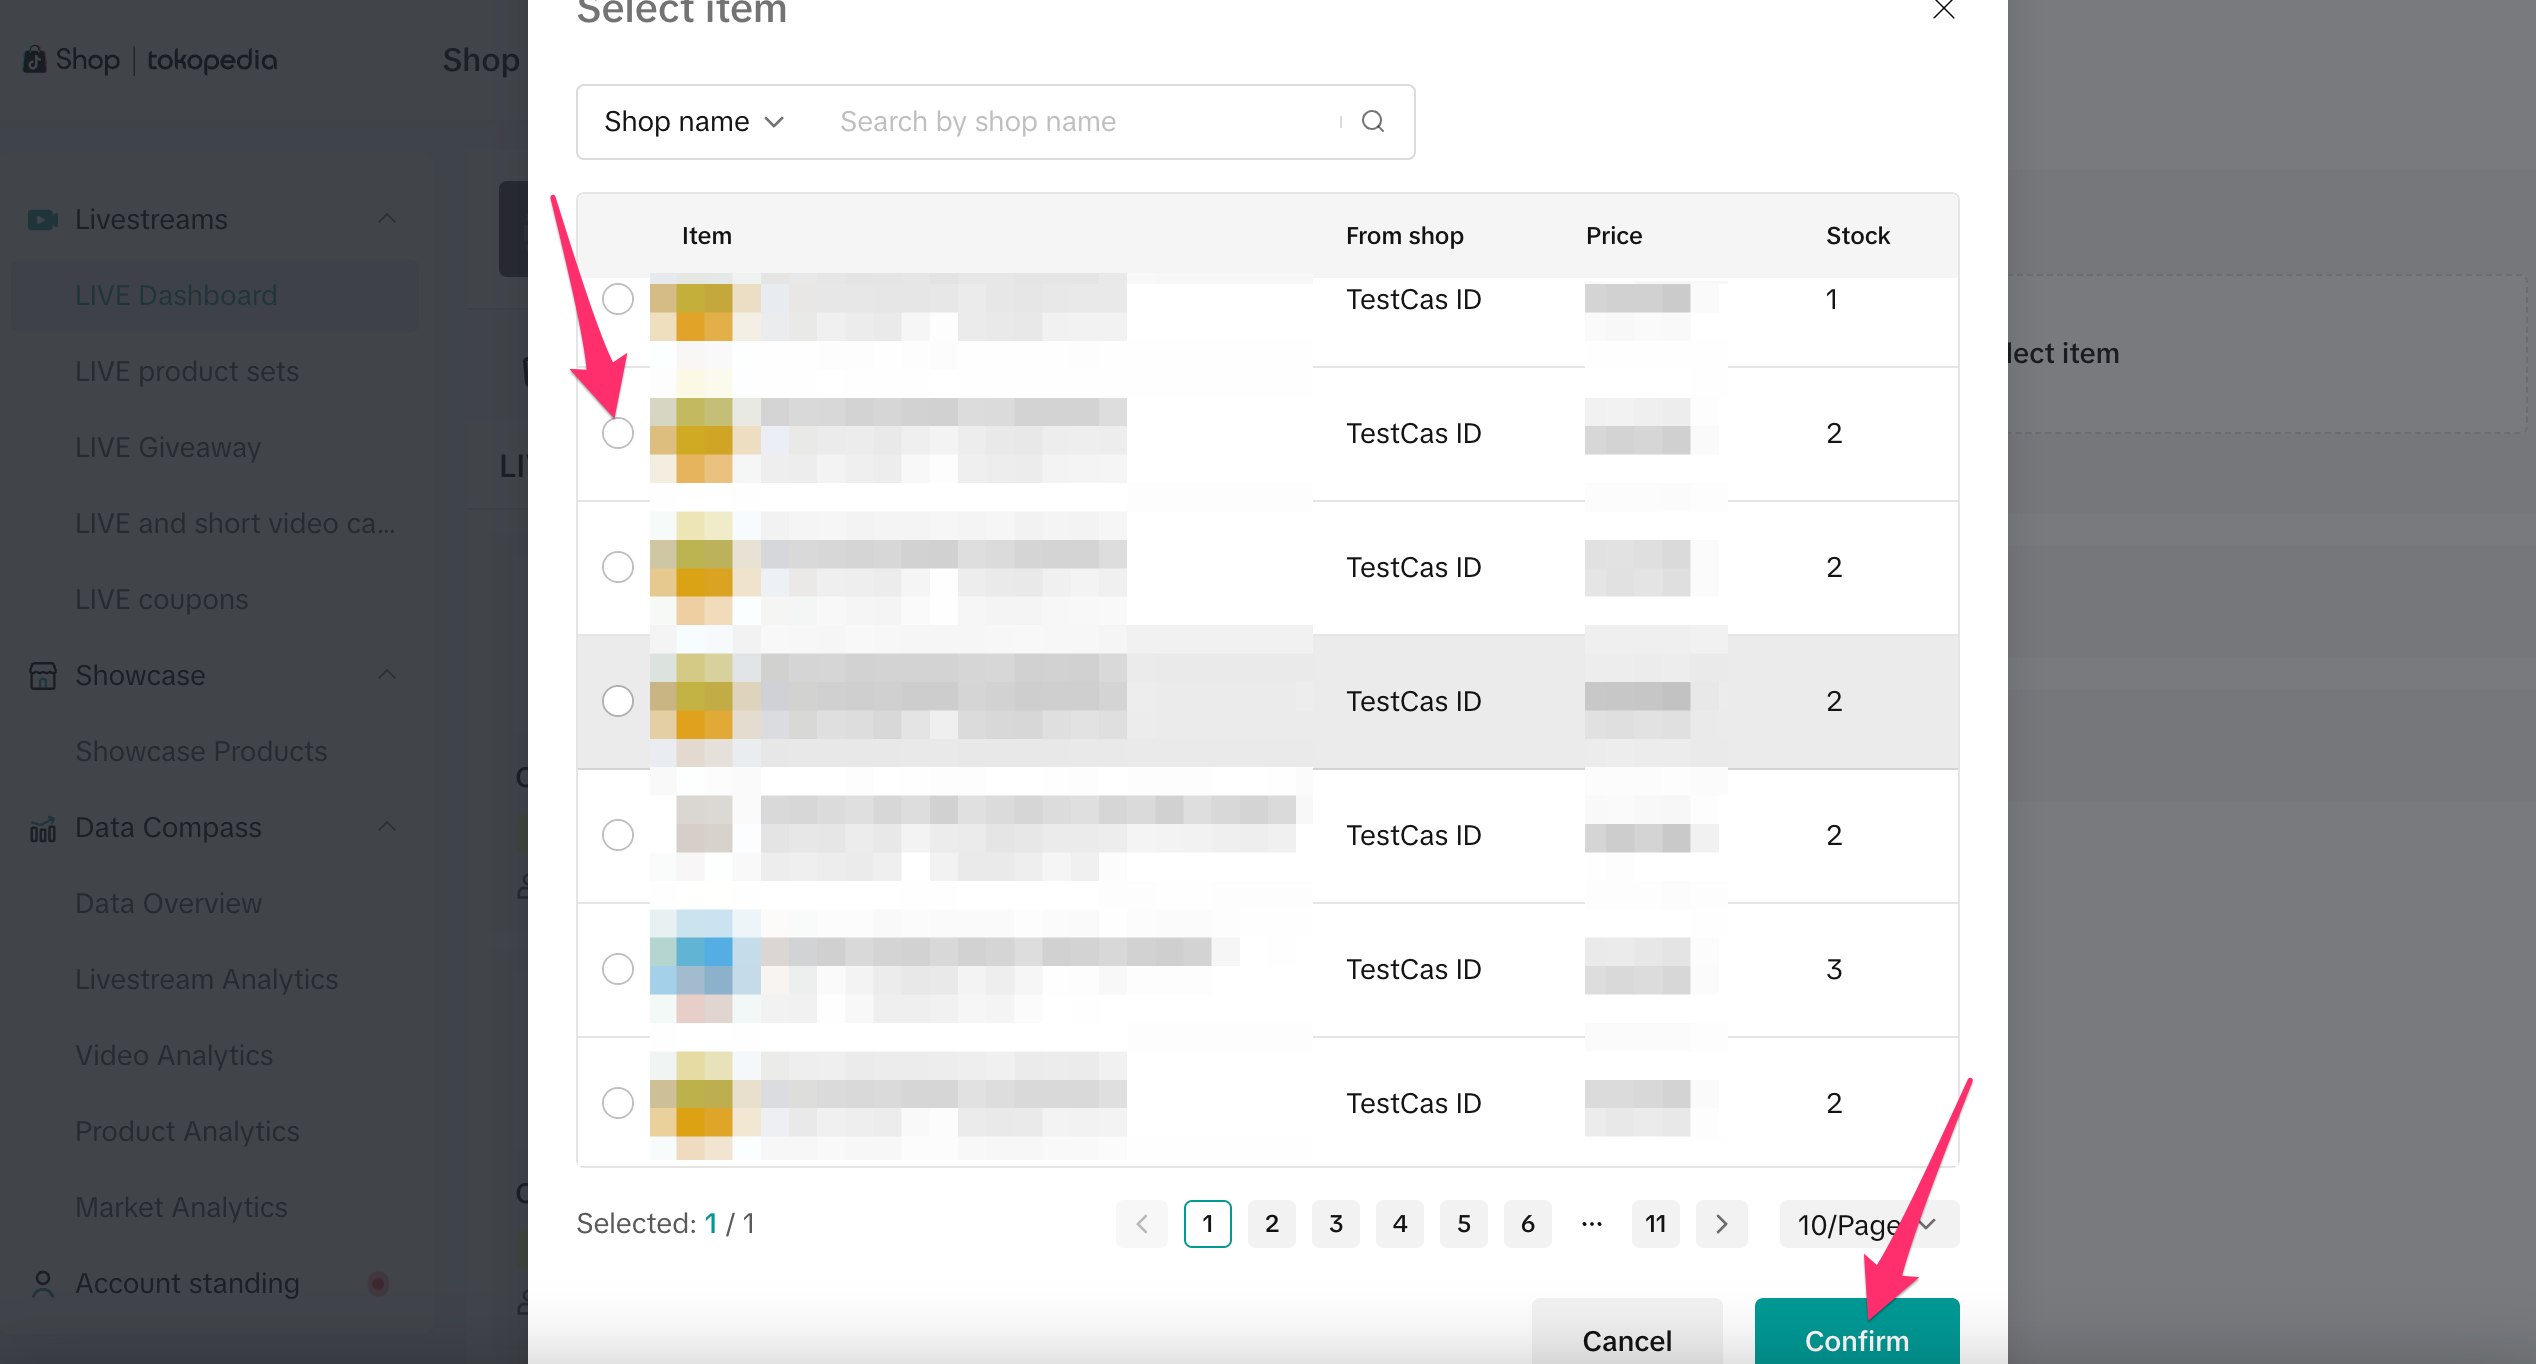
On the Create new screen, click Select item to see available items for prizes. Click on the button next to the item to add the item to your giveaway.
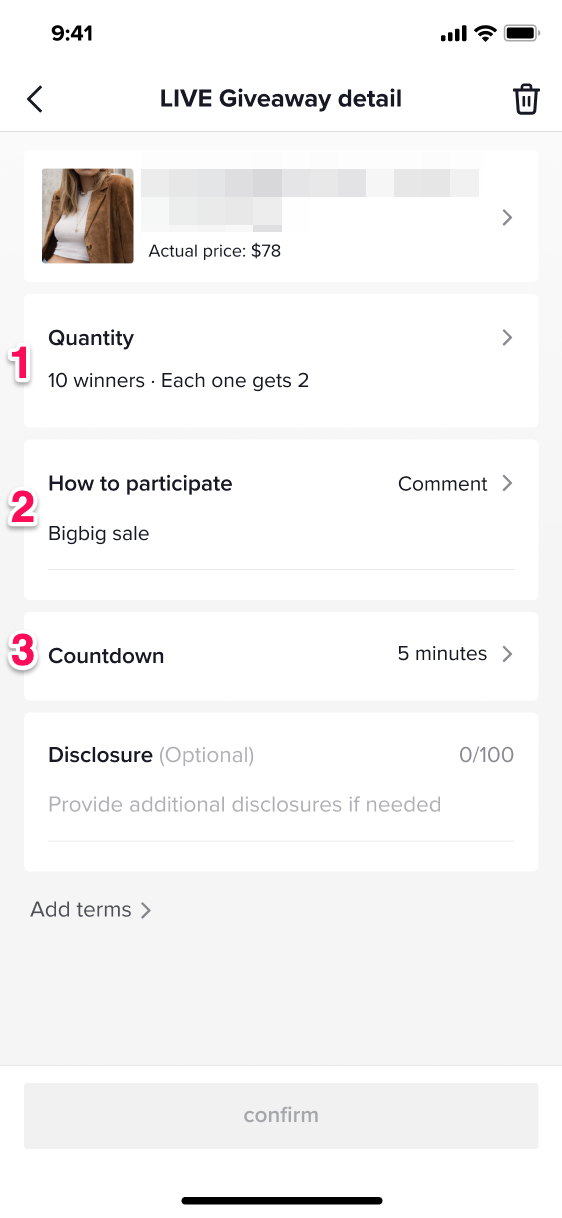
 Step 3: Set up the details of your LIVE Giveway
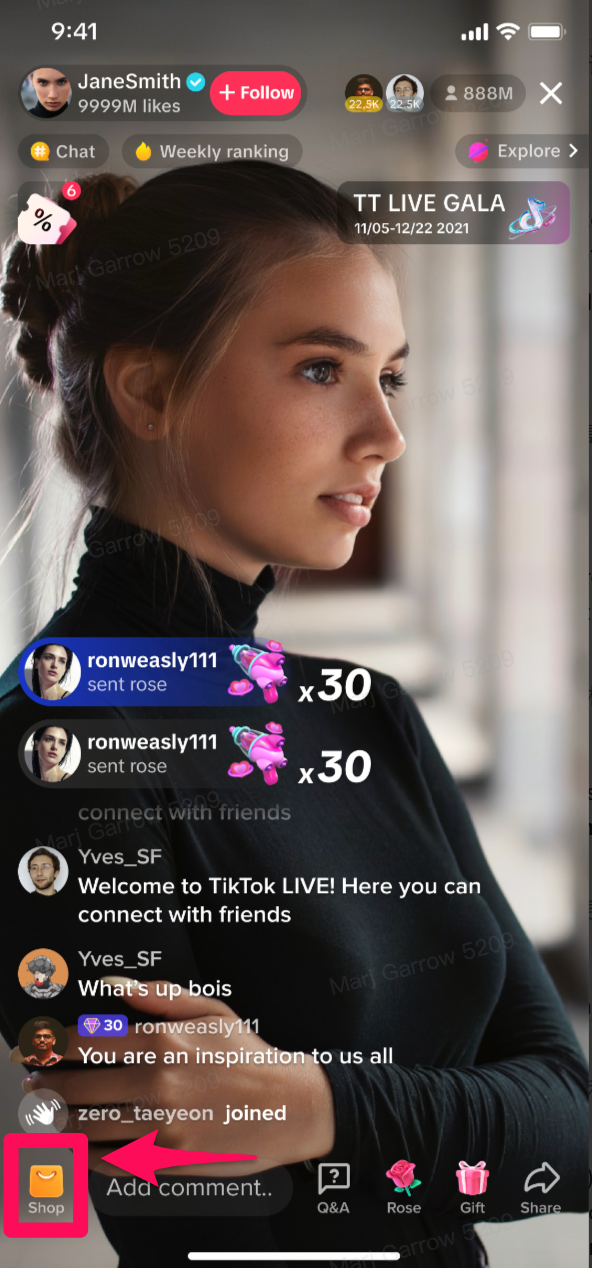
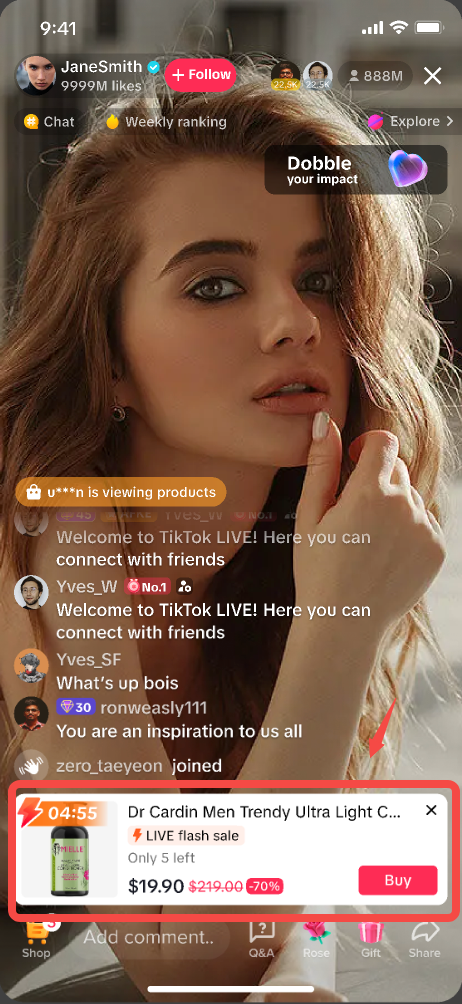
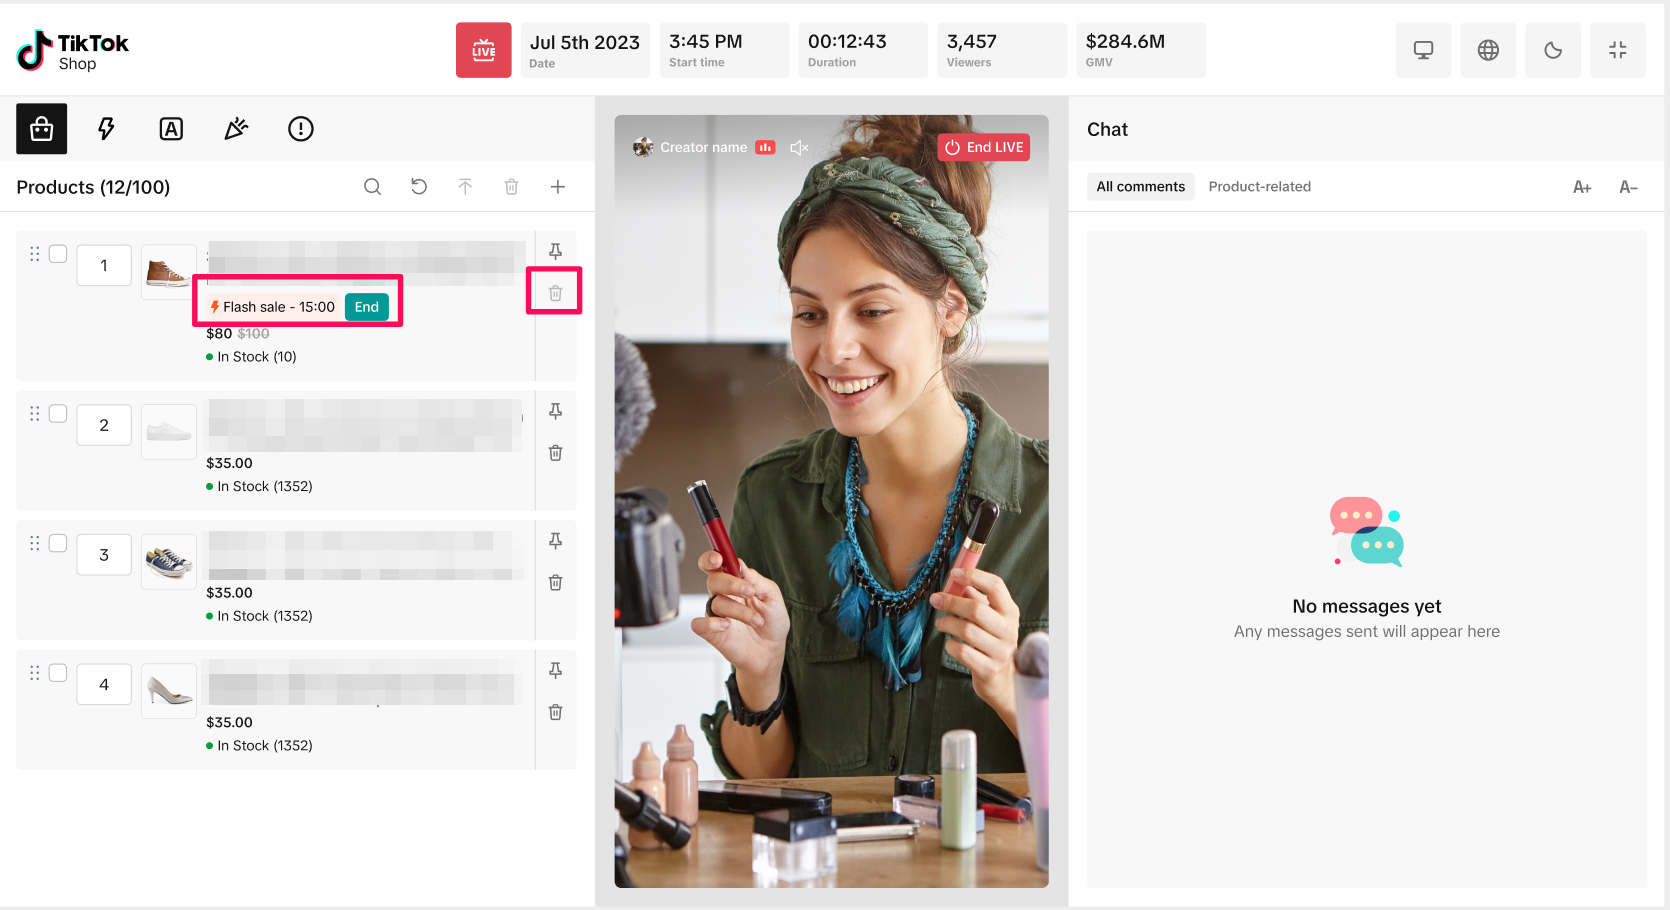
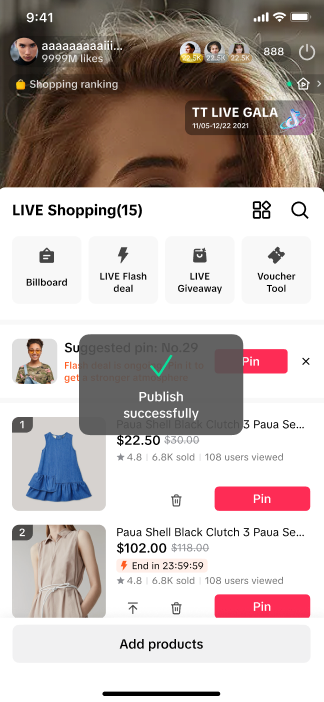
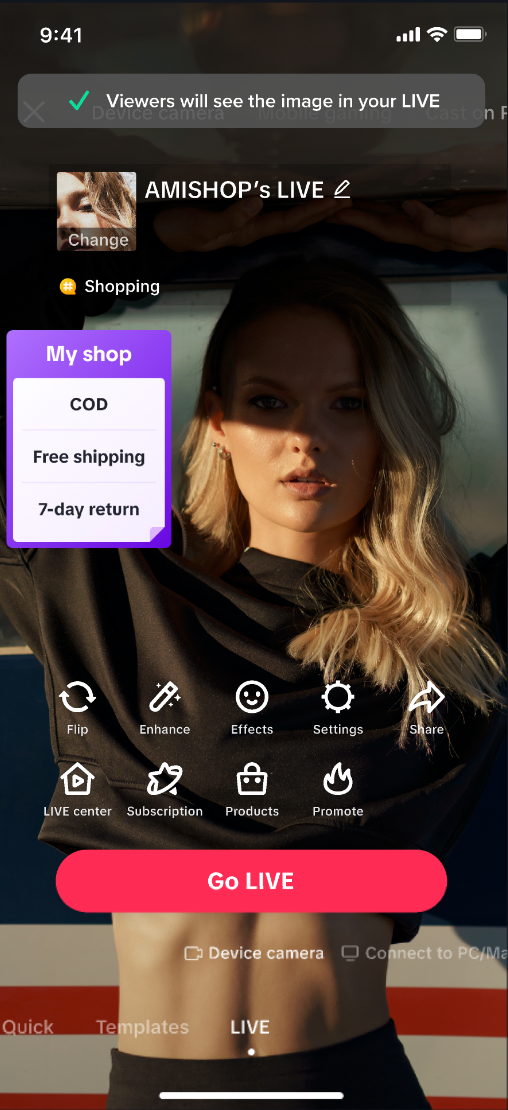
 Below is what viewers will see as they tune in to your live — clicking the shopping bag icon will take them to all of the products that you're including in your live session for purchasing.
Tip: Make sure you remind viewers to tap on the shopping bag throughout the LIVE so that as people enter and exit the session, they know where to go to see your products.
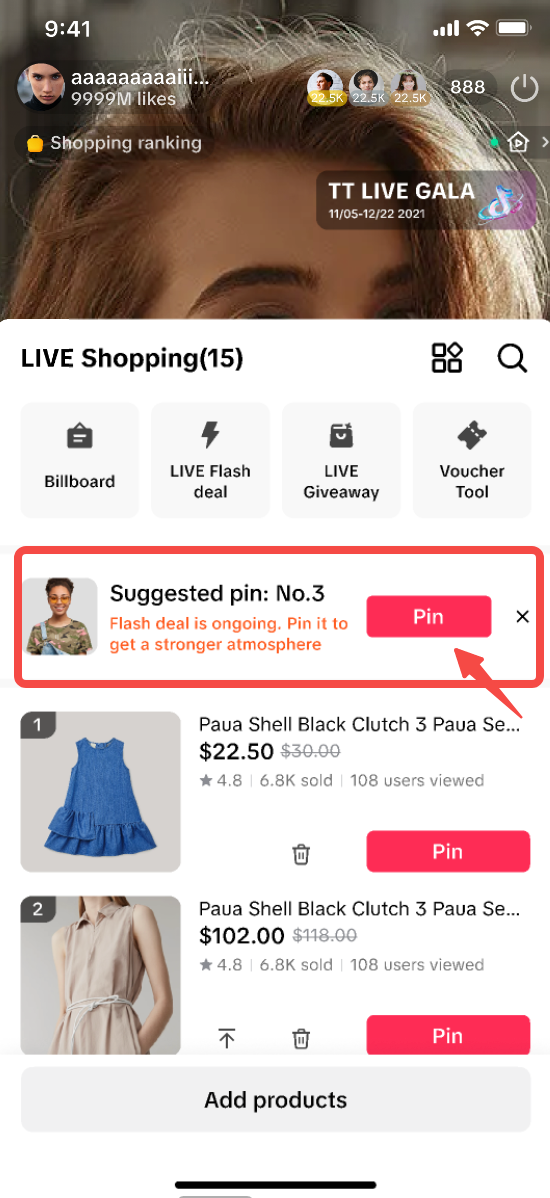
 You can also use Billboards to quickly launch a LIVE Flash Seal and keep viewers' attention on the promotion.
Under Content Performance, you can check overall content metrics by GMV, views, and items sold.
 This is also a great surface to check for account-level trends over time across short videos and LIVE.
By clicking the See trend button, the trend graph card will expand to show the trend of GMV by default, but you can select different metrics and observe those trends over time as well.
Product-level performance is also available in this view. You can access metric definitions, customize the metrics you want to display, and download the dashboard for offline viewing. LIVE recordings can also be found here and expire after 14 days.
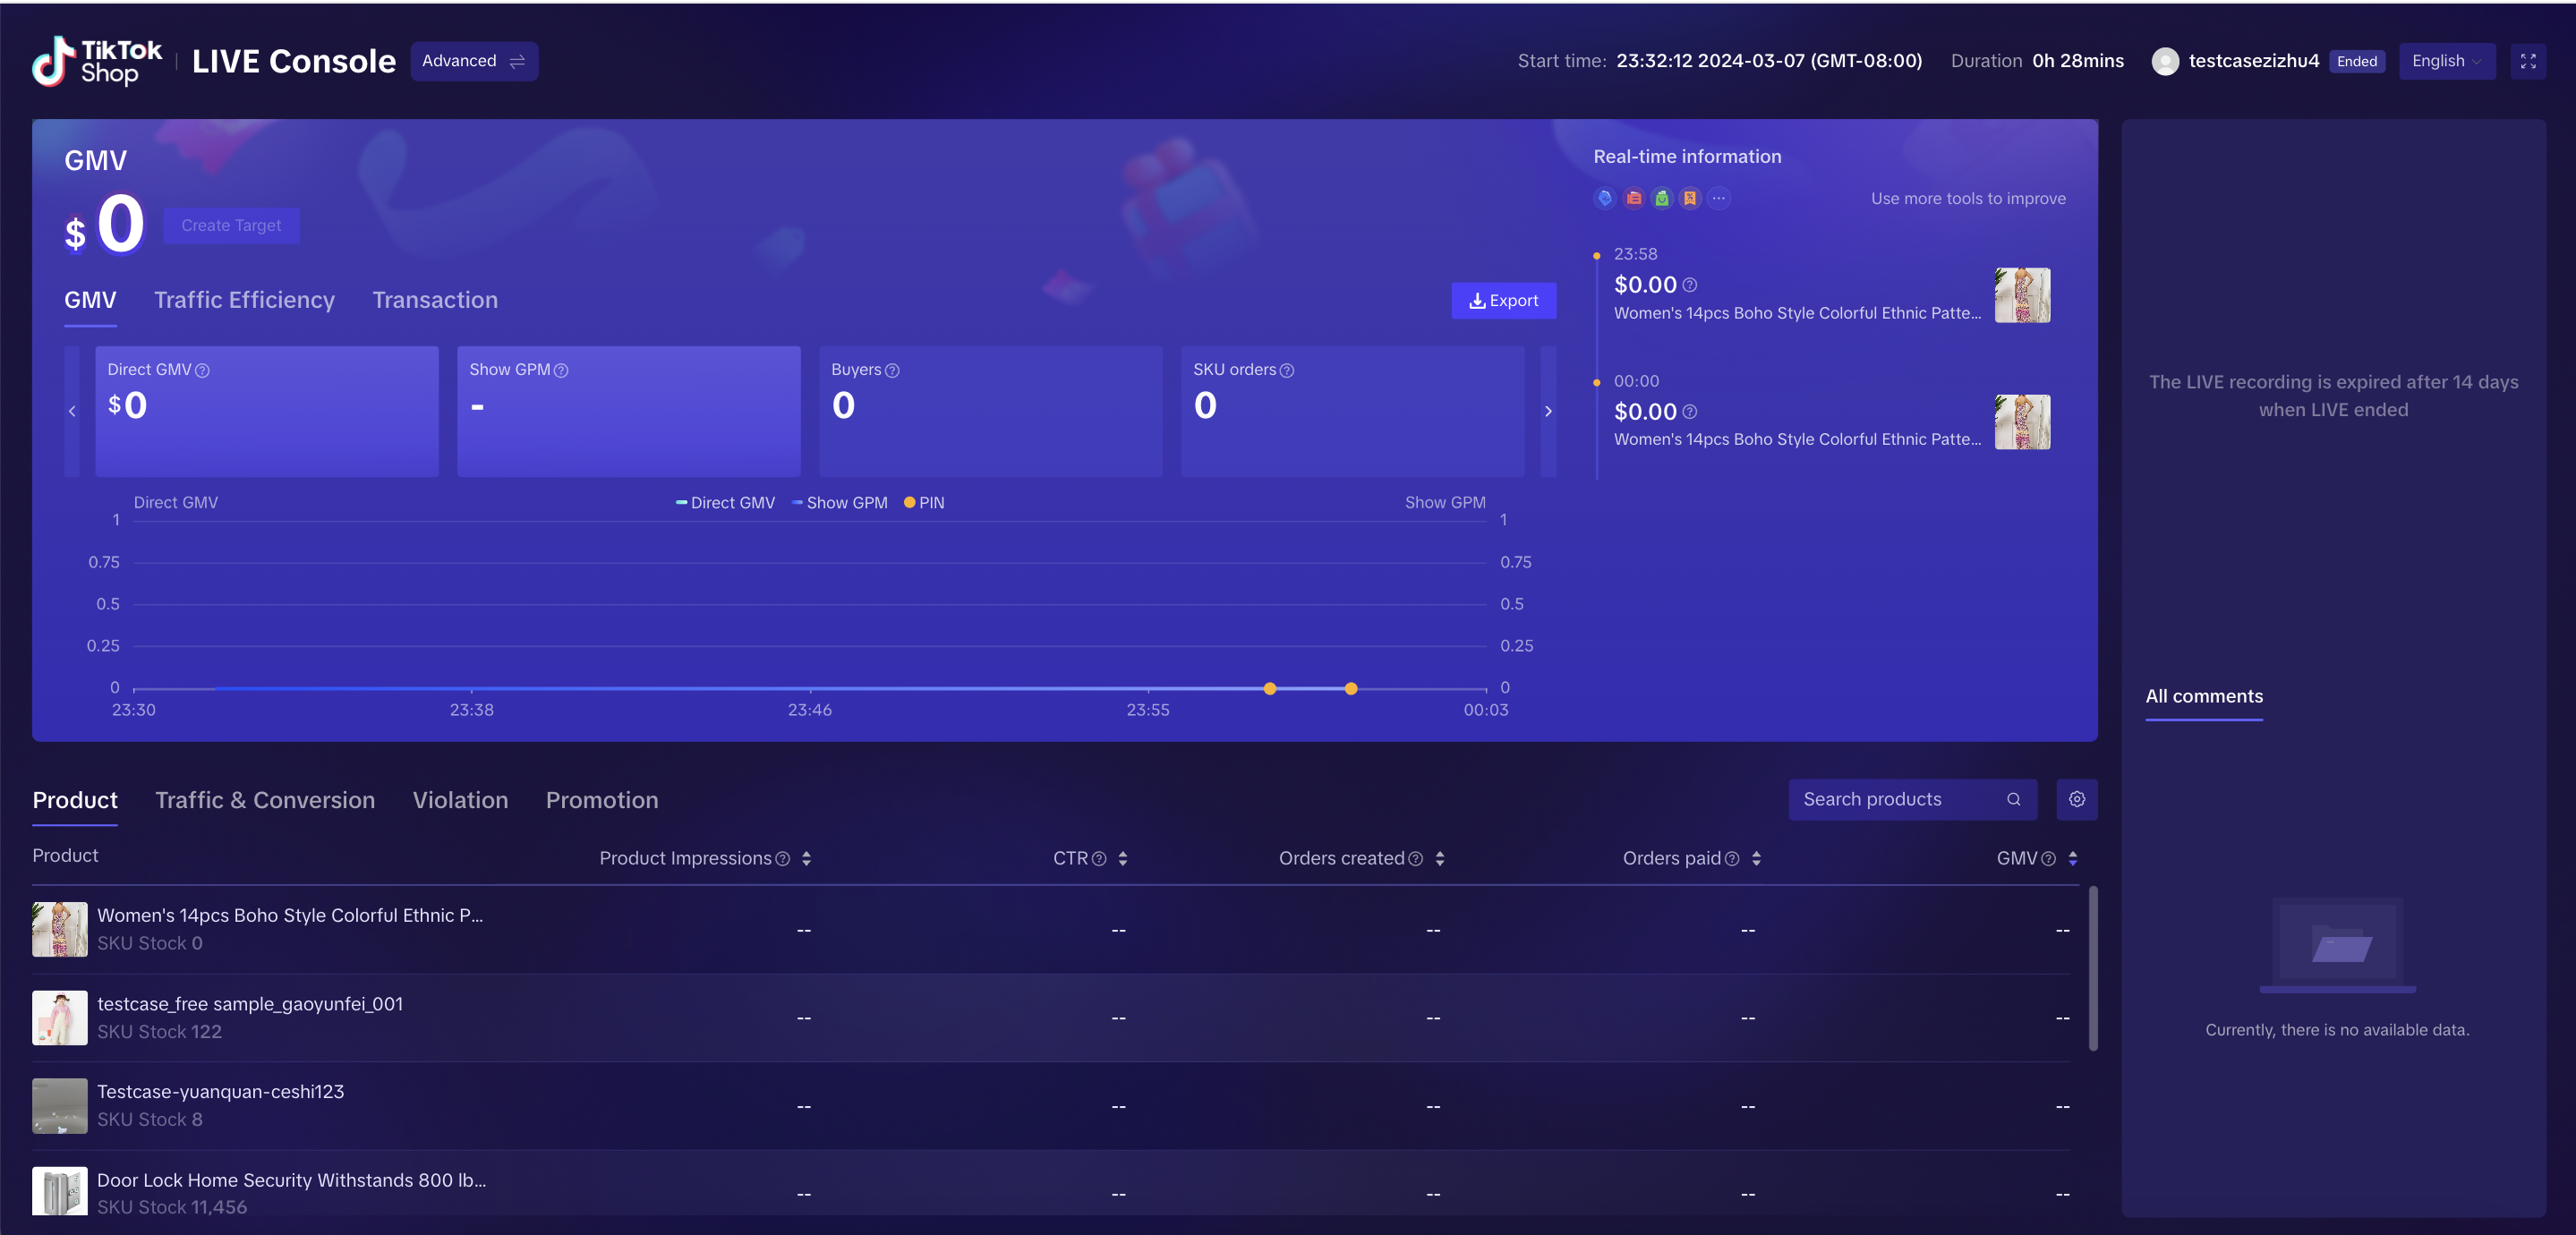
 Advanced Dashboard provides enhanced performance metrics for a deeper dive into your session. In addition to GMV and viewing and engagement trends, you can also view traffic and transactions performance. Specific LIVE clips from the stream are also highlighted, so you can take a look at your behavior during specific points of the session.
The lower module provides more insights into Traffic & Conversion, product-specific performance results, and violation information. If you ran ads for your session, you can check the impact of those ads in terms of generating GMV, driving viewers to your LIVE, and driving transaction conversions by navigating to Promotions.
Lastly, review comments you received during the stream to see what type of engagement you received to help you conduct sentiment analysis and understand the perception of your stream to users throughout the session.


LIVE Events through LIVE Console have a one-too-many relationship with your livestreams, so over the duration of your LIVE Event, you can have multiple LIVE sessions within one LIVE Event. This allows you to pause, take a break, and resume your session for the duration of your LIVE Event.
Note: Unlike LIVE Events created on mobile, which need to be scheduled at least 2 hours in advance, when creating a LIVE Event through the LIVE Console desktop, you can schedule in advance or go LIVE immediately.
To create a Billboard with an image, start with an image that’s at least 480x360 pixels and upload it to the image tab.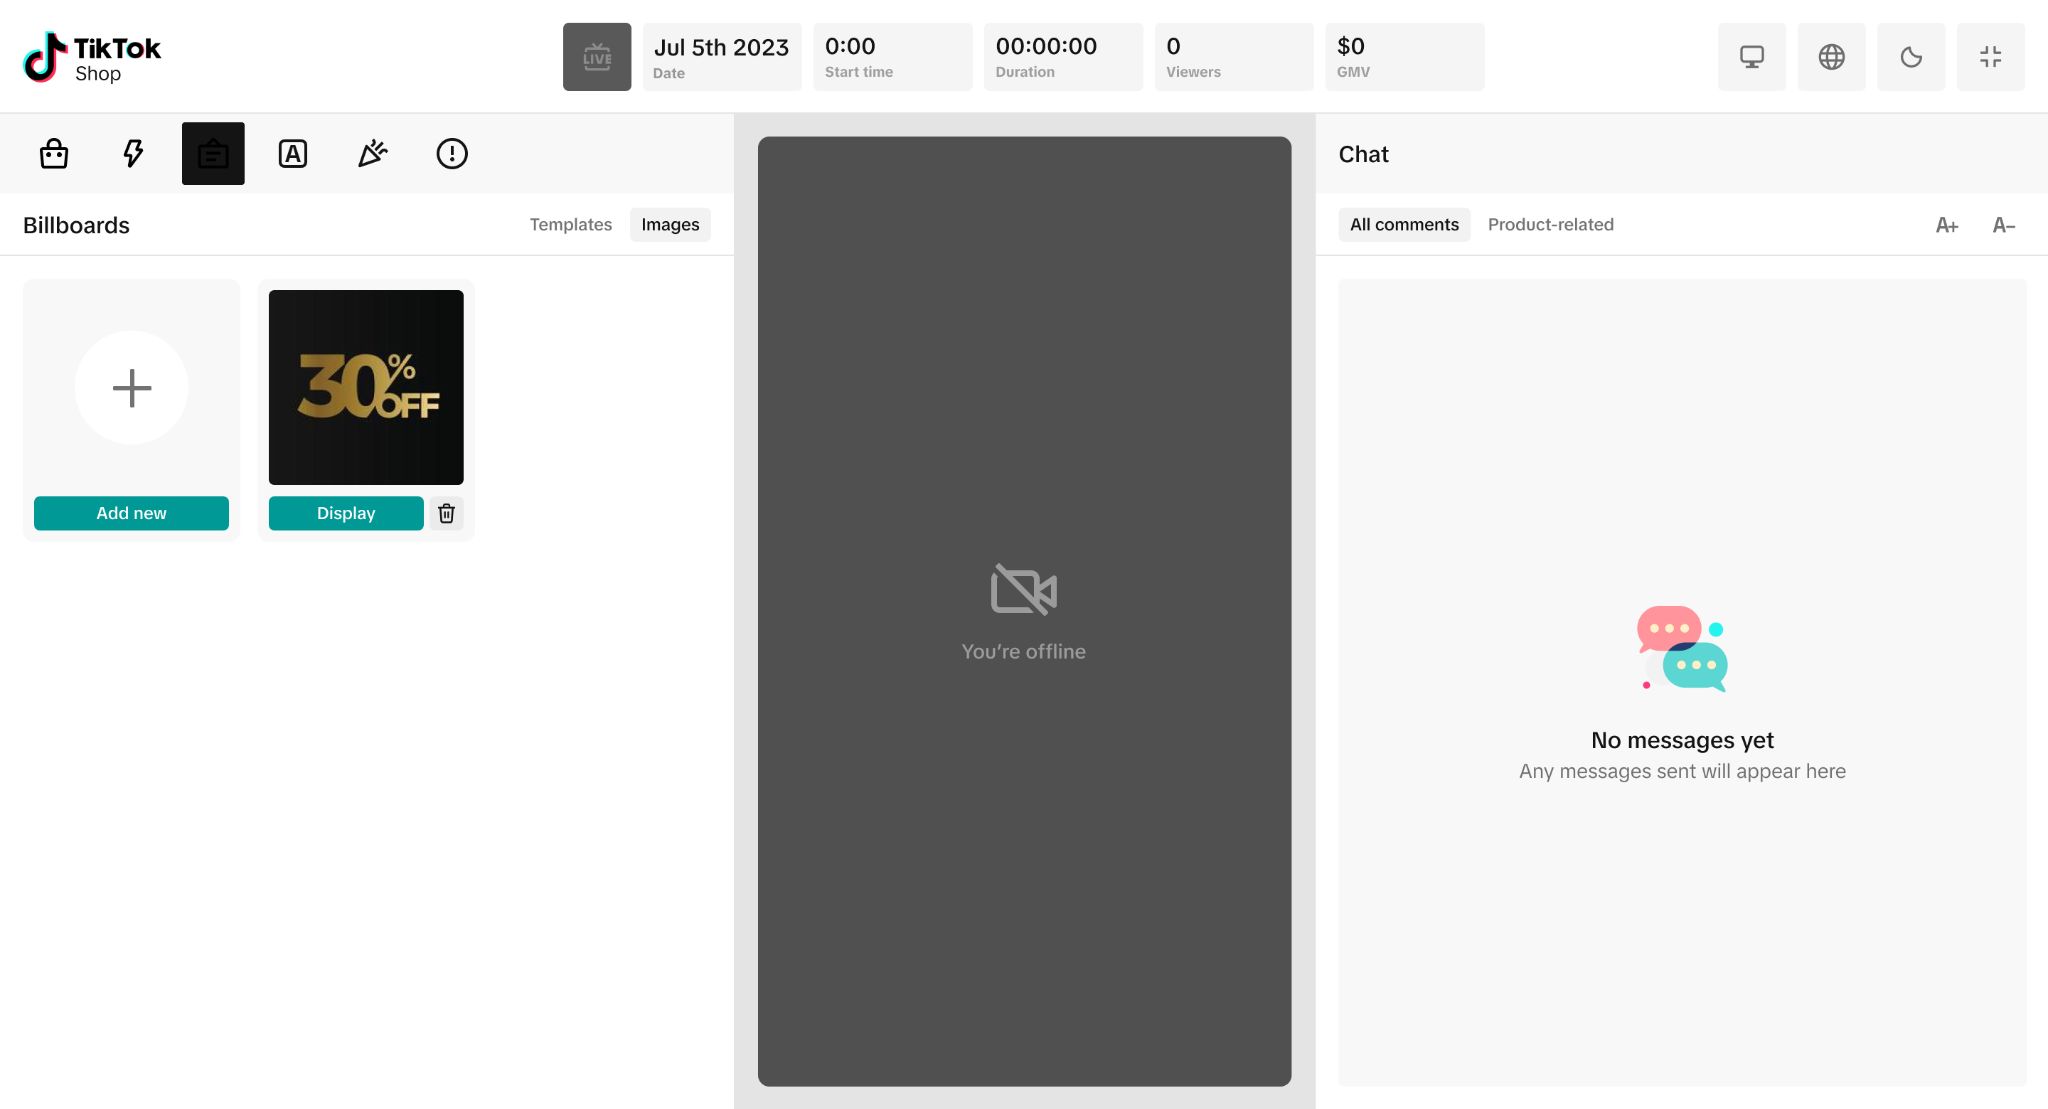
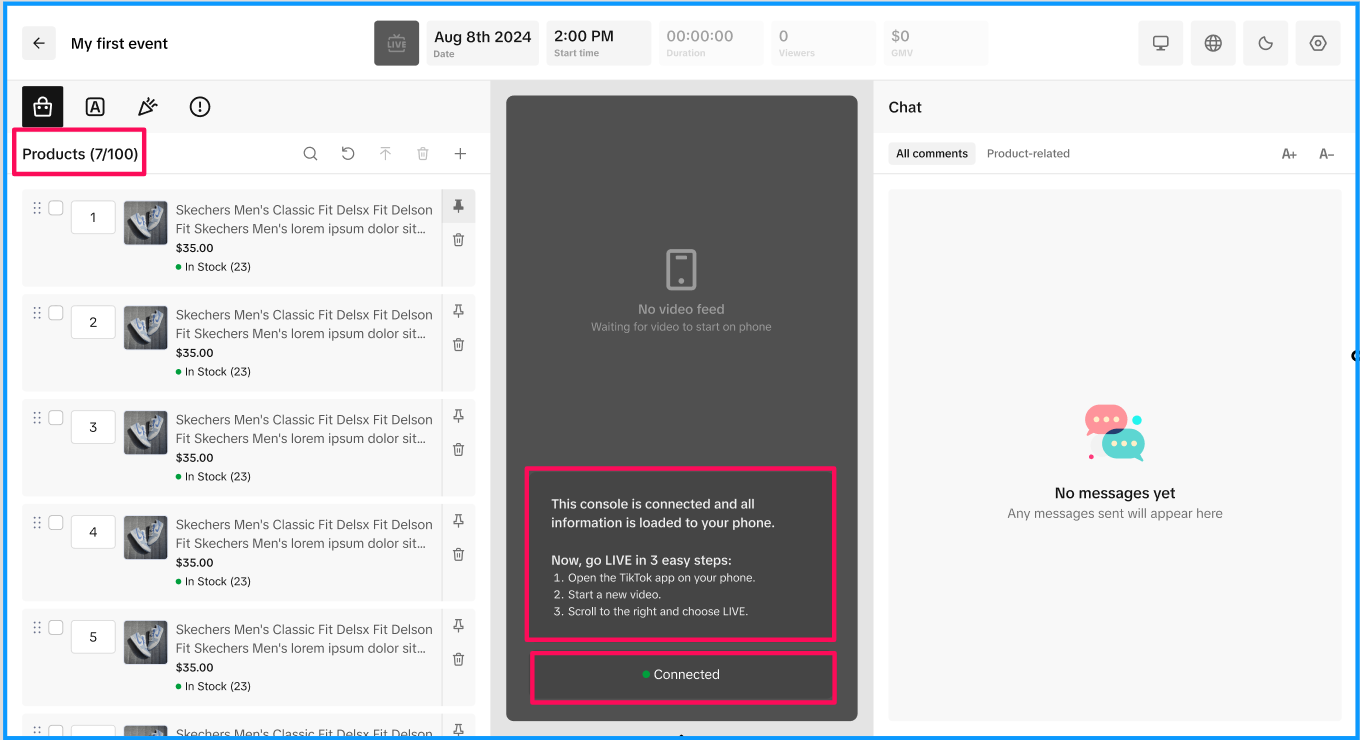
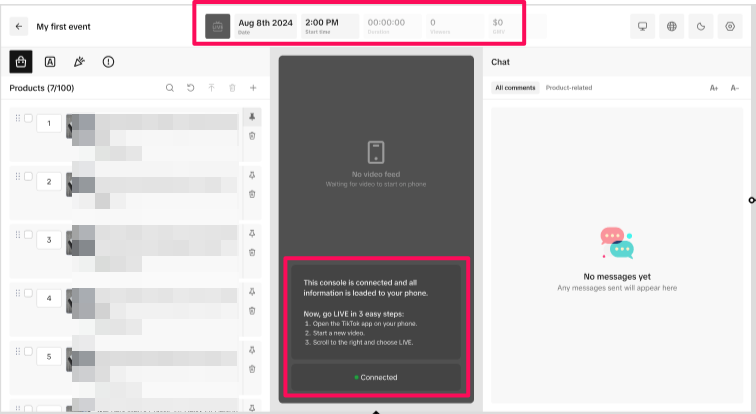
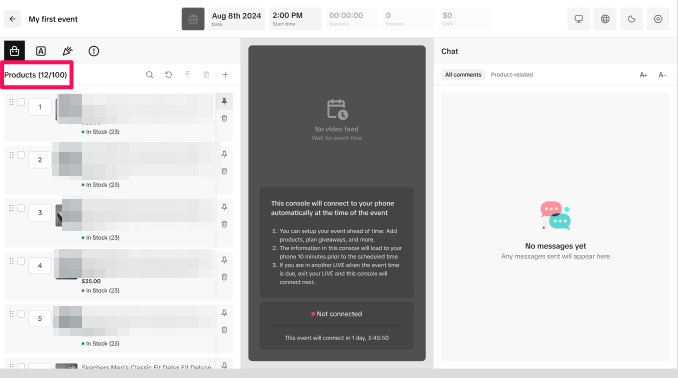
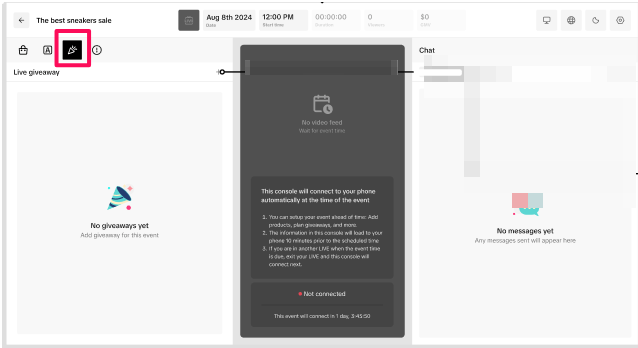
 Ten minutes before the scheduled start of your event, the console will load all selected products into the console and your phone as indicated by the center screen. Below, you can see, 7 products in the console are synced with 7 products on mobile. You'll also receive a notification on mobile reminding you that your upcoming event will be set up shortly.
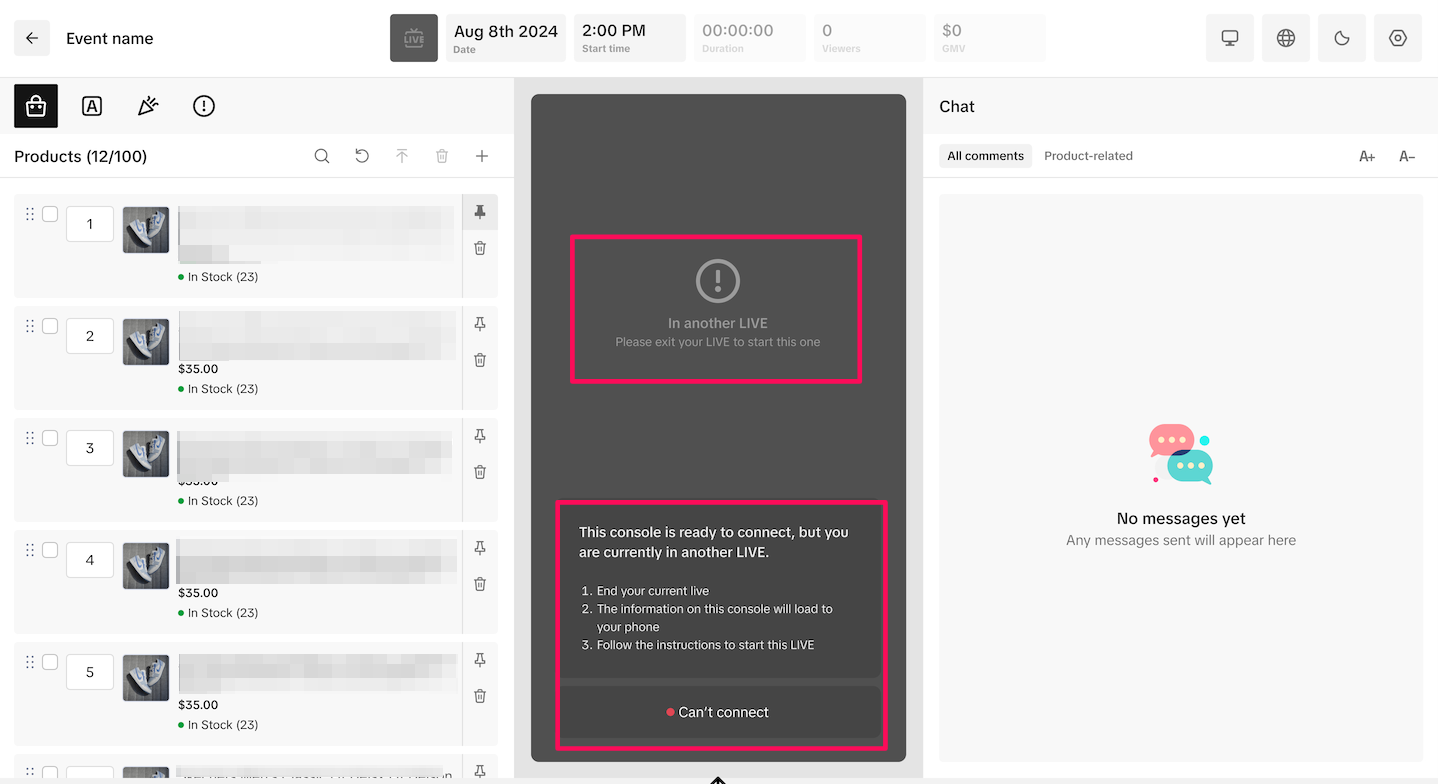
 Note: If you're already live in the LIVE Console and you click into your event within 10 minutes of it starting, the center screen will remind you to end your current LIVE in order to begin your LIVE Event.

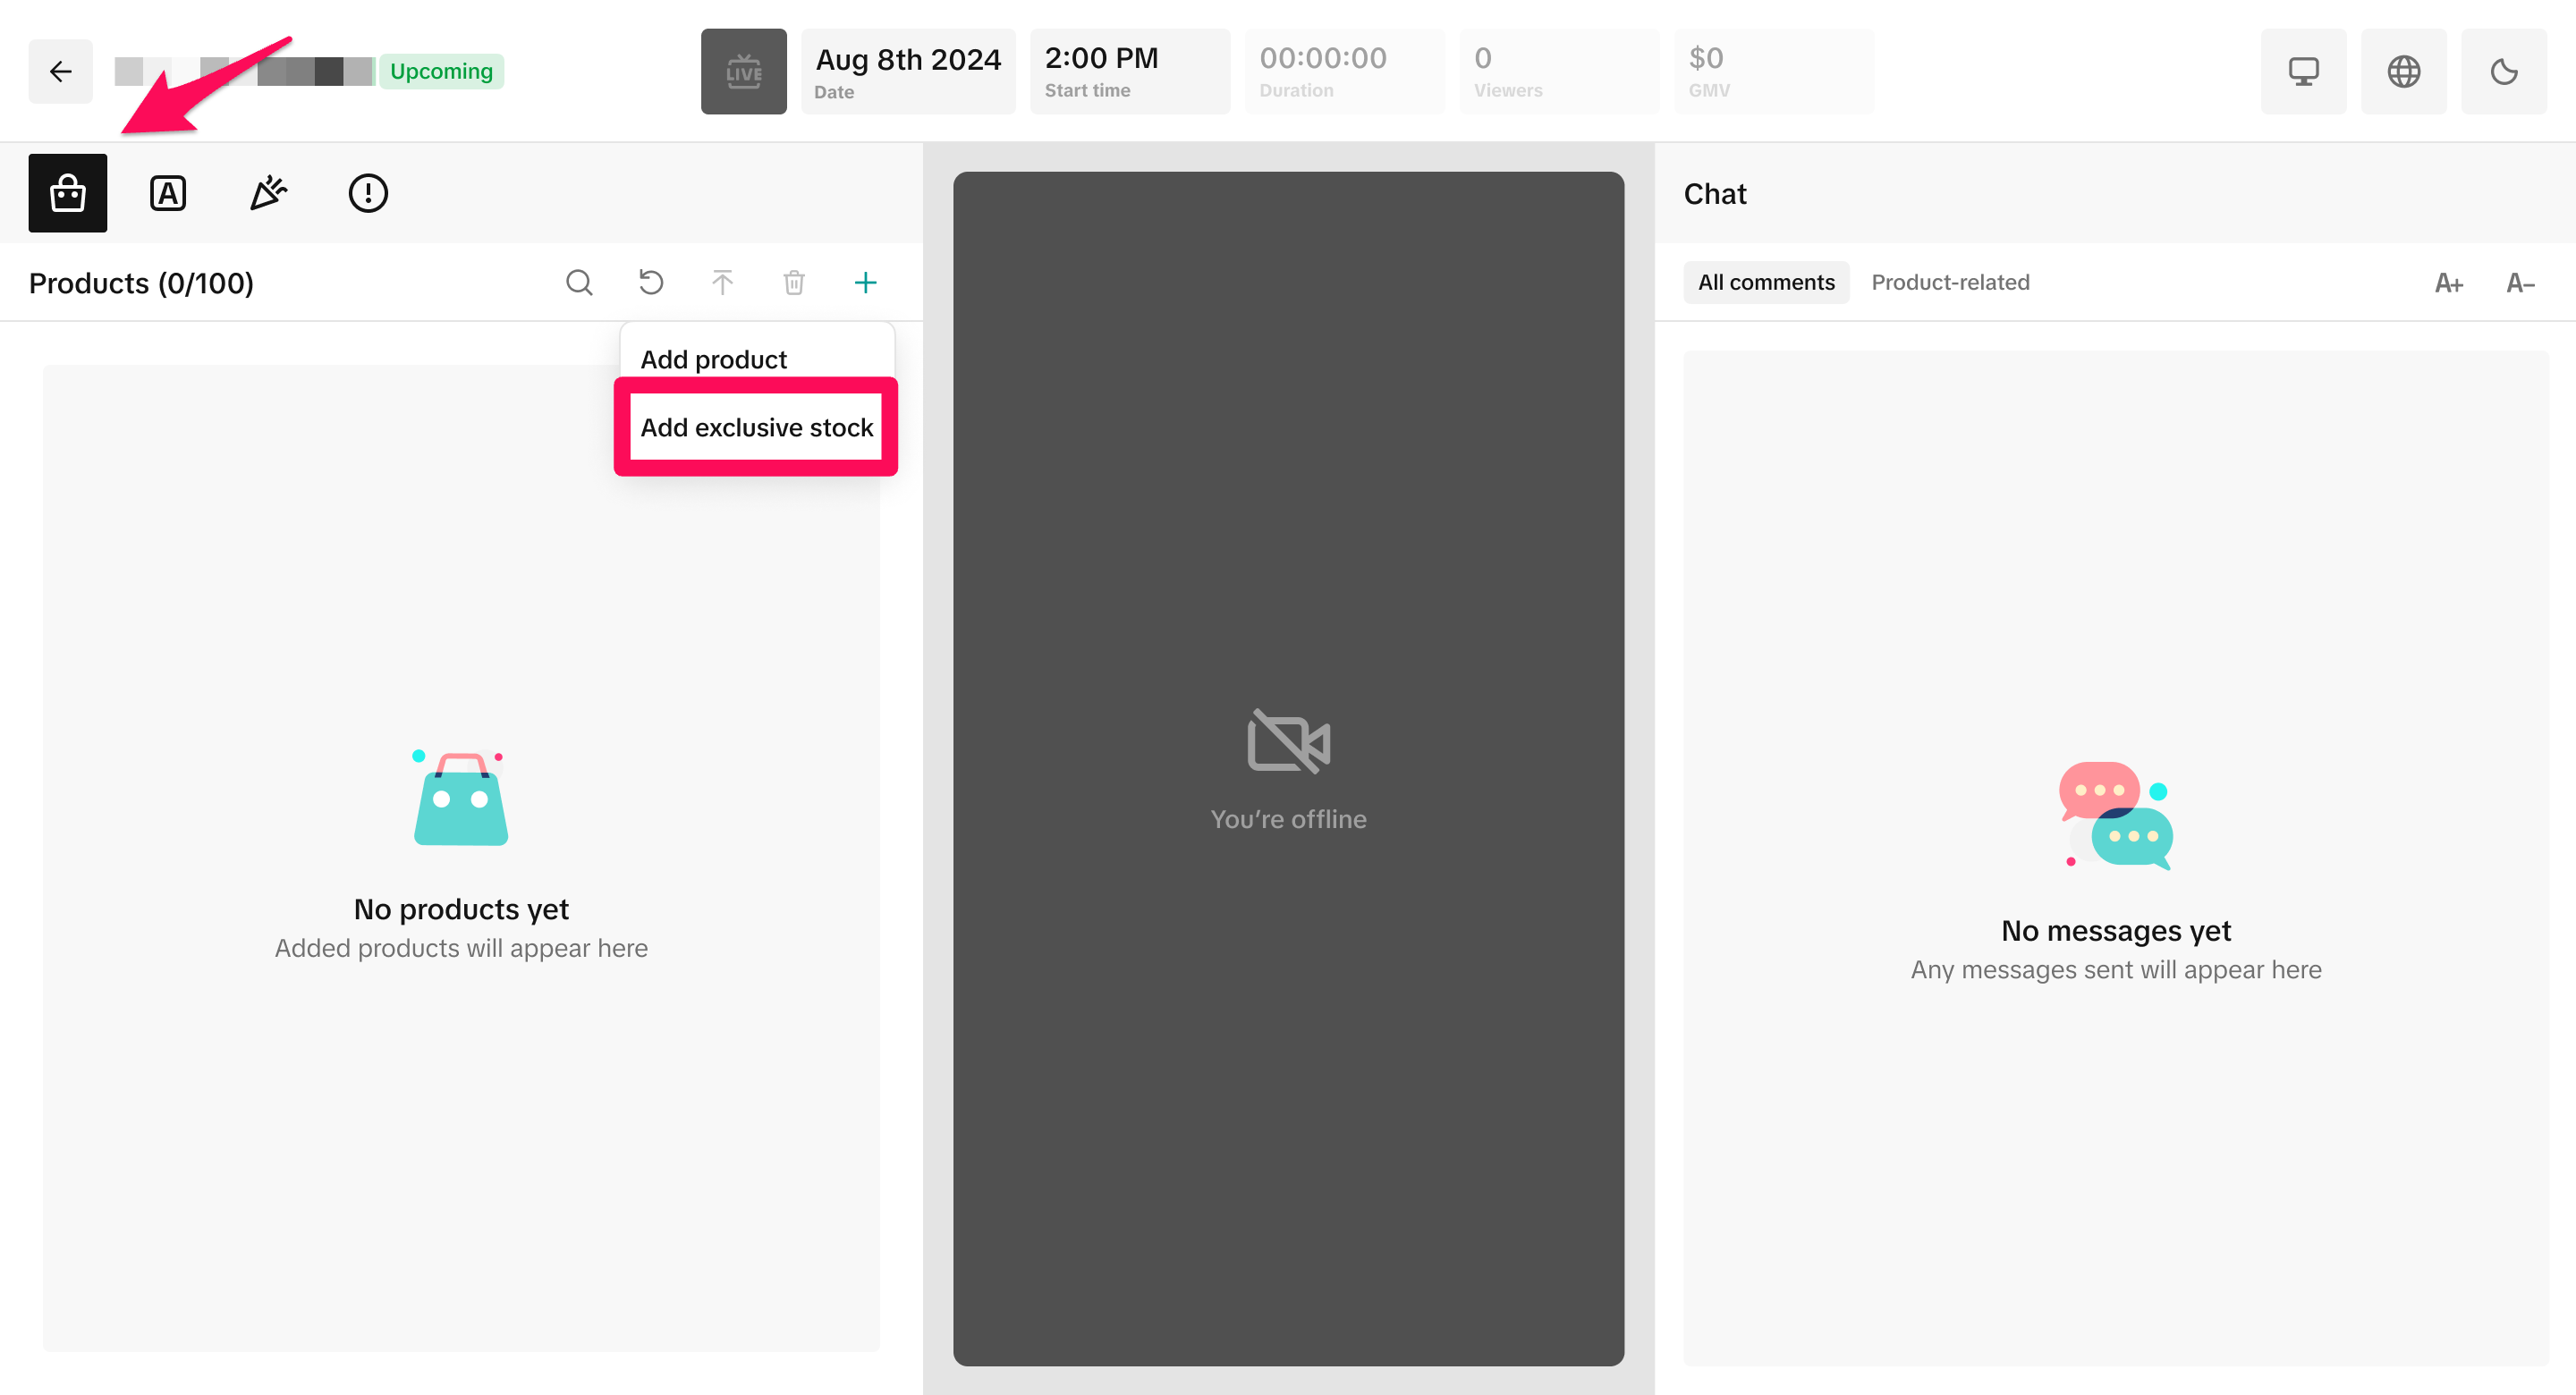
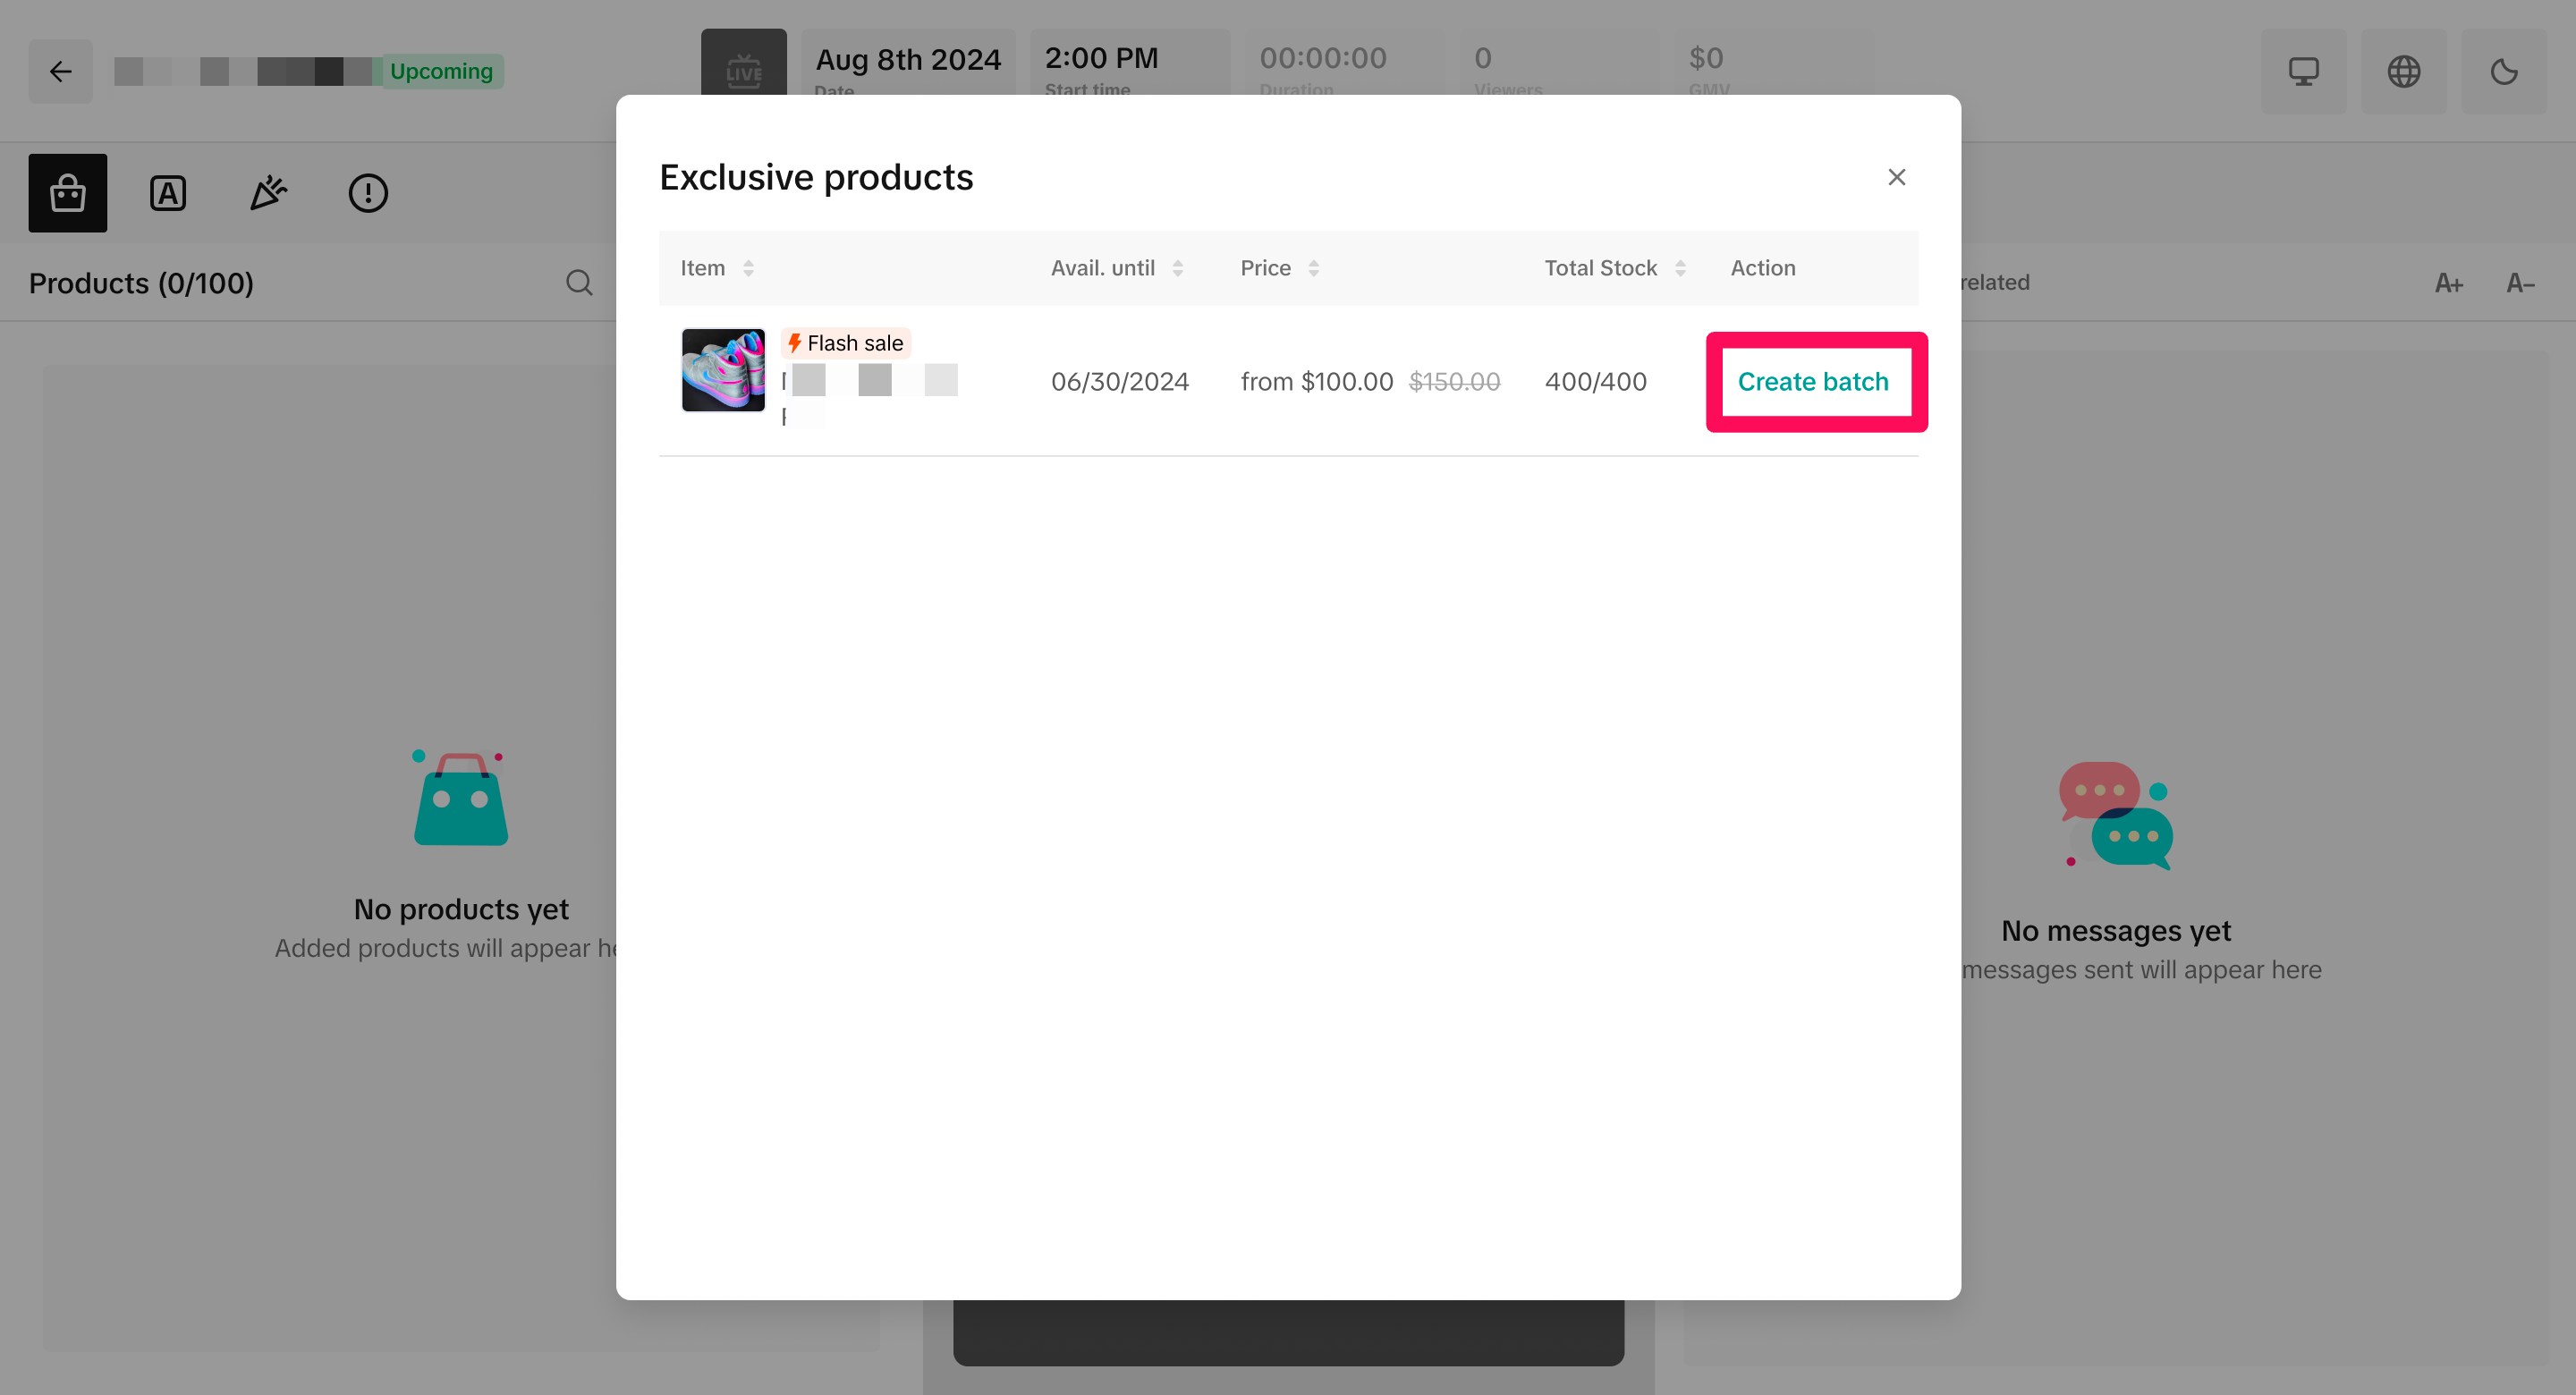
Note: Keep in mind that in order to access this feature, you'll need a Collab Invite from a seller, and that seller will need to allocate you exclusive inventory to sell in your LIVE session. Step 1: Within the LIVE Console, navigate to the Product Listing slide and select the shopping bag icon. Click Add exclusive stock.
 Step 2: Select the exclusive stock product you'd like to include in the Flash Sale.
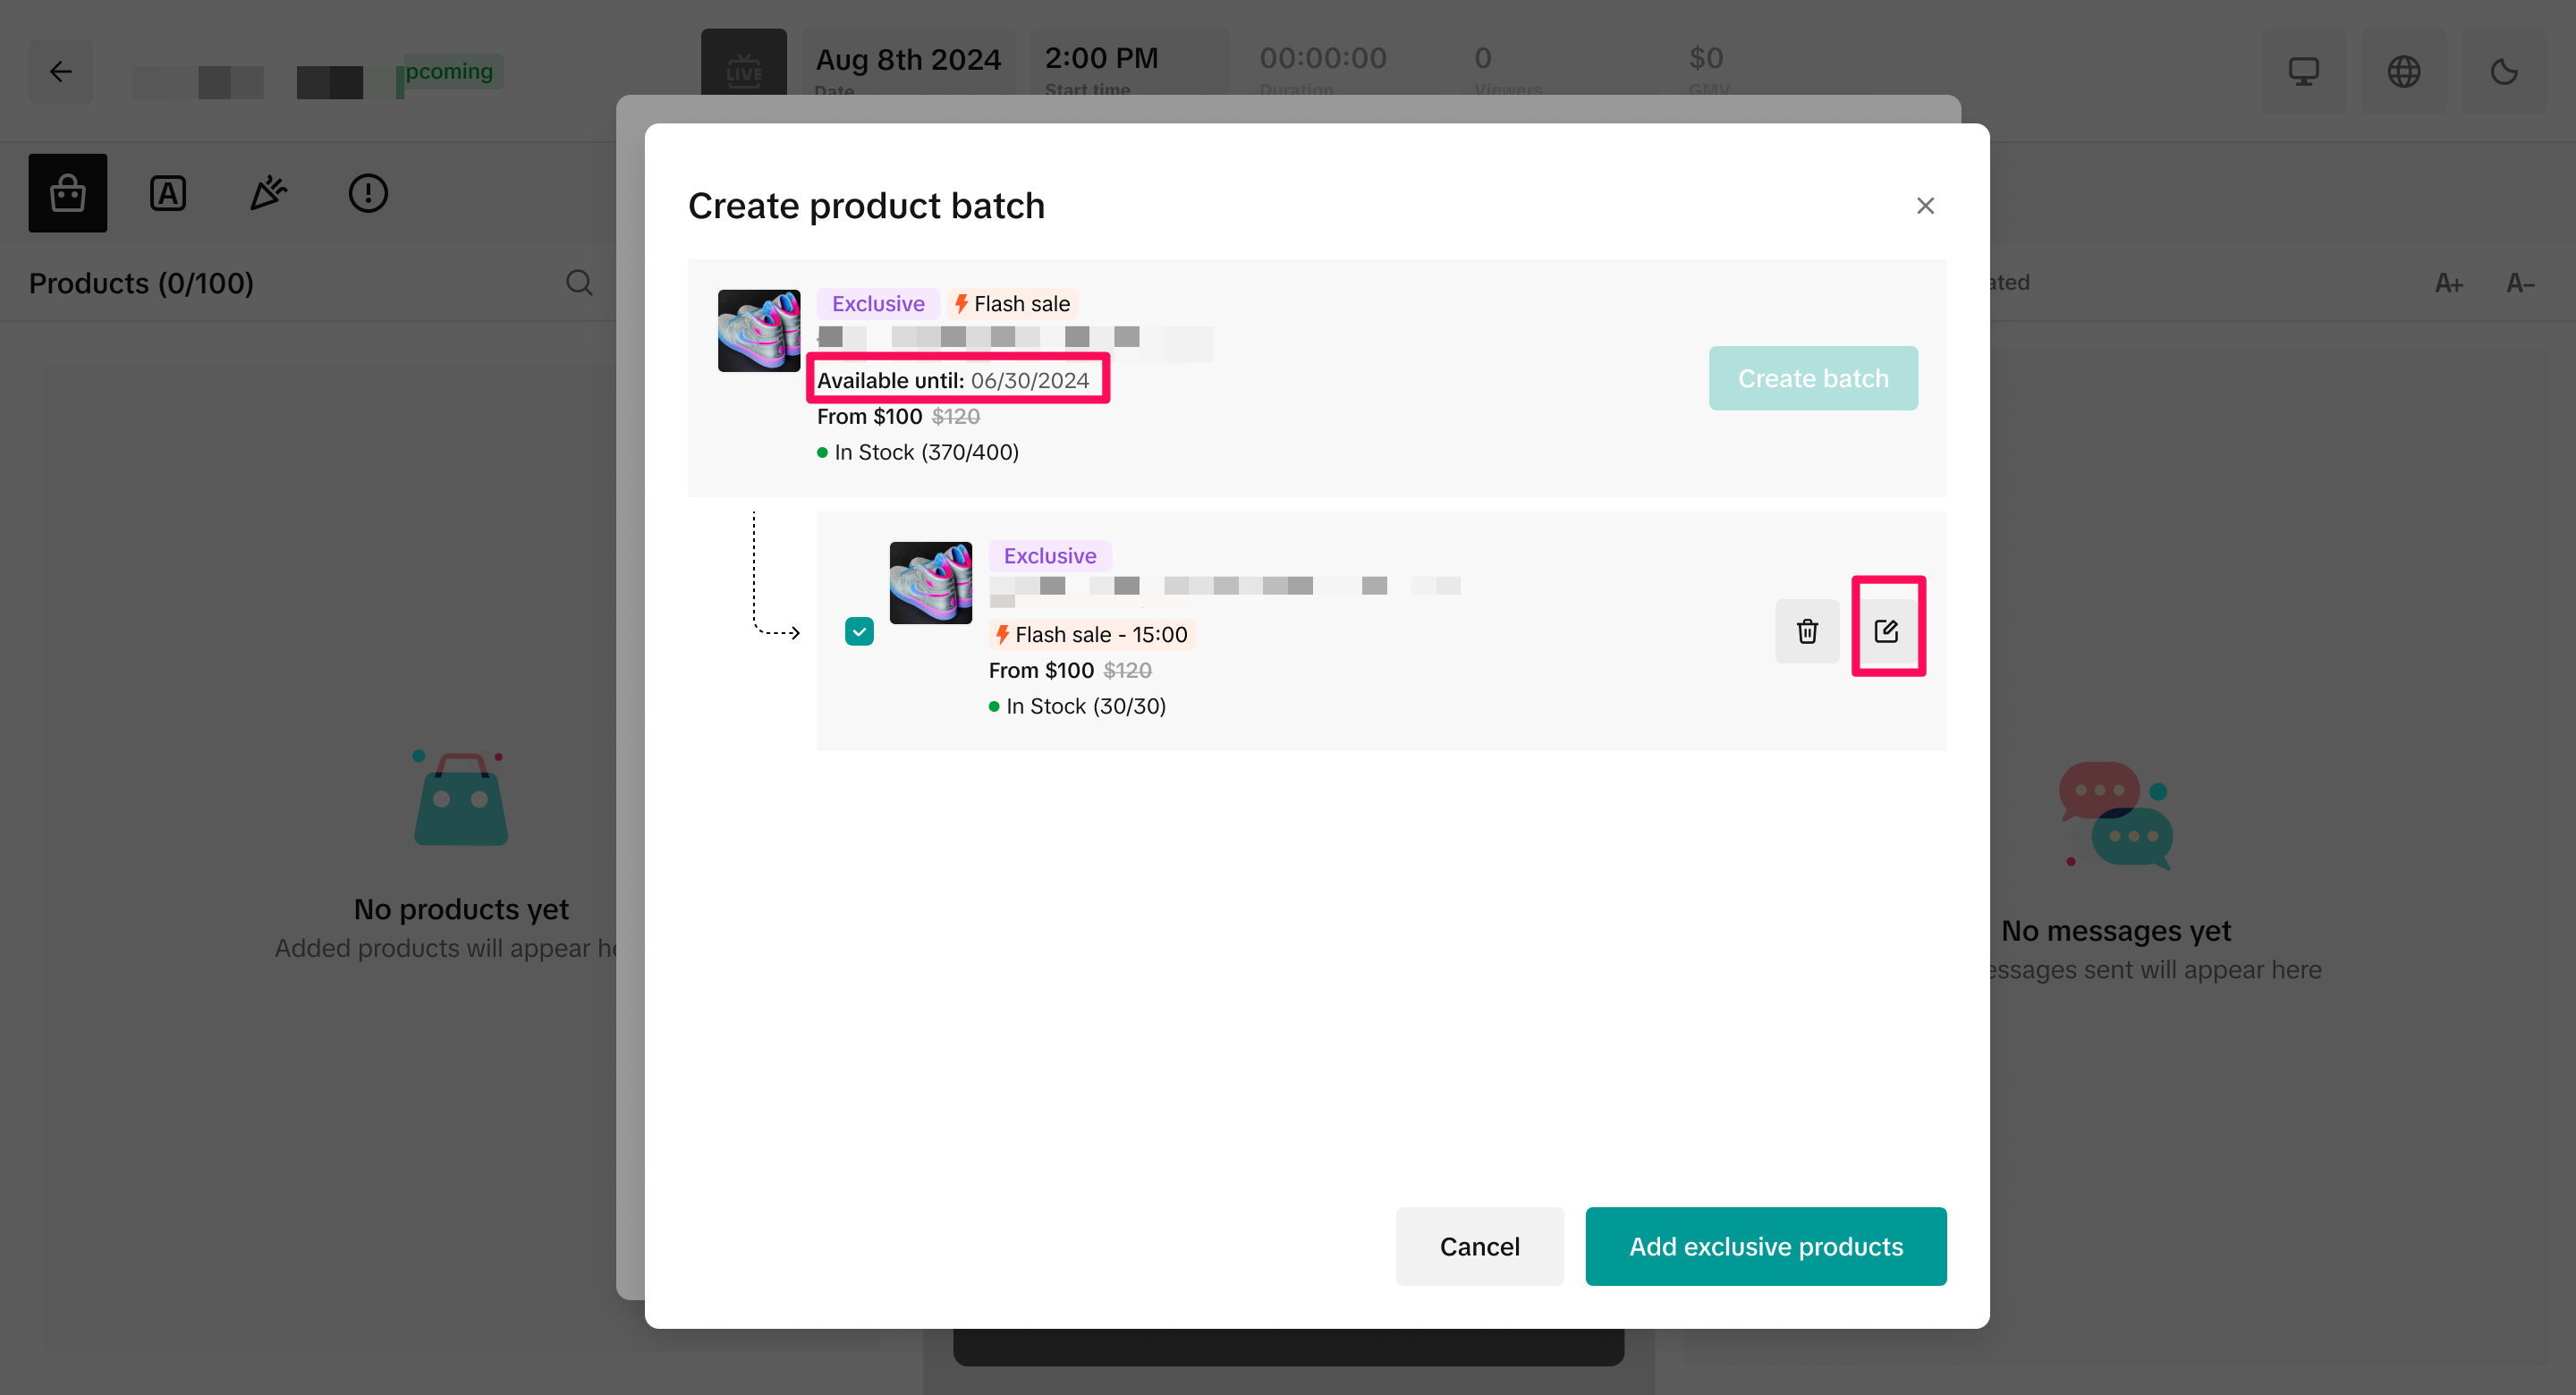
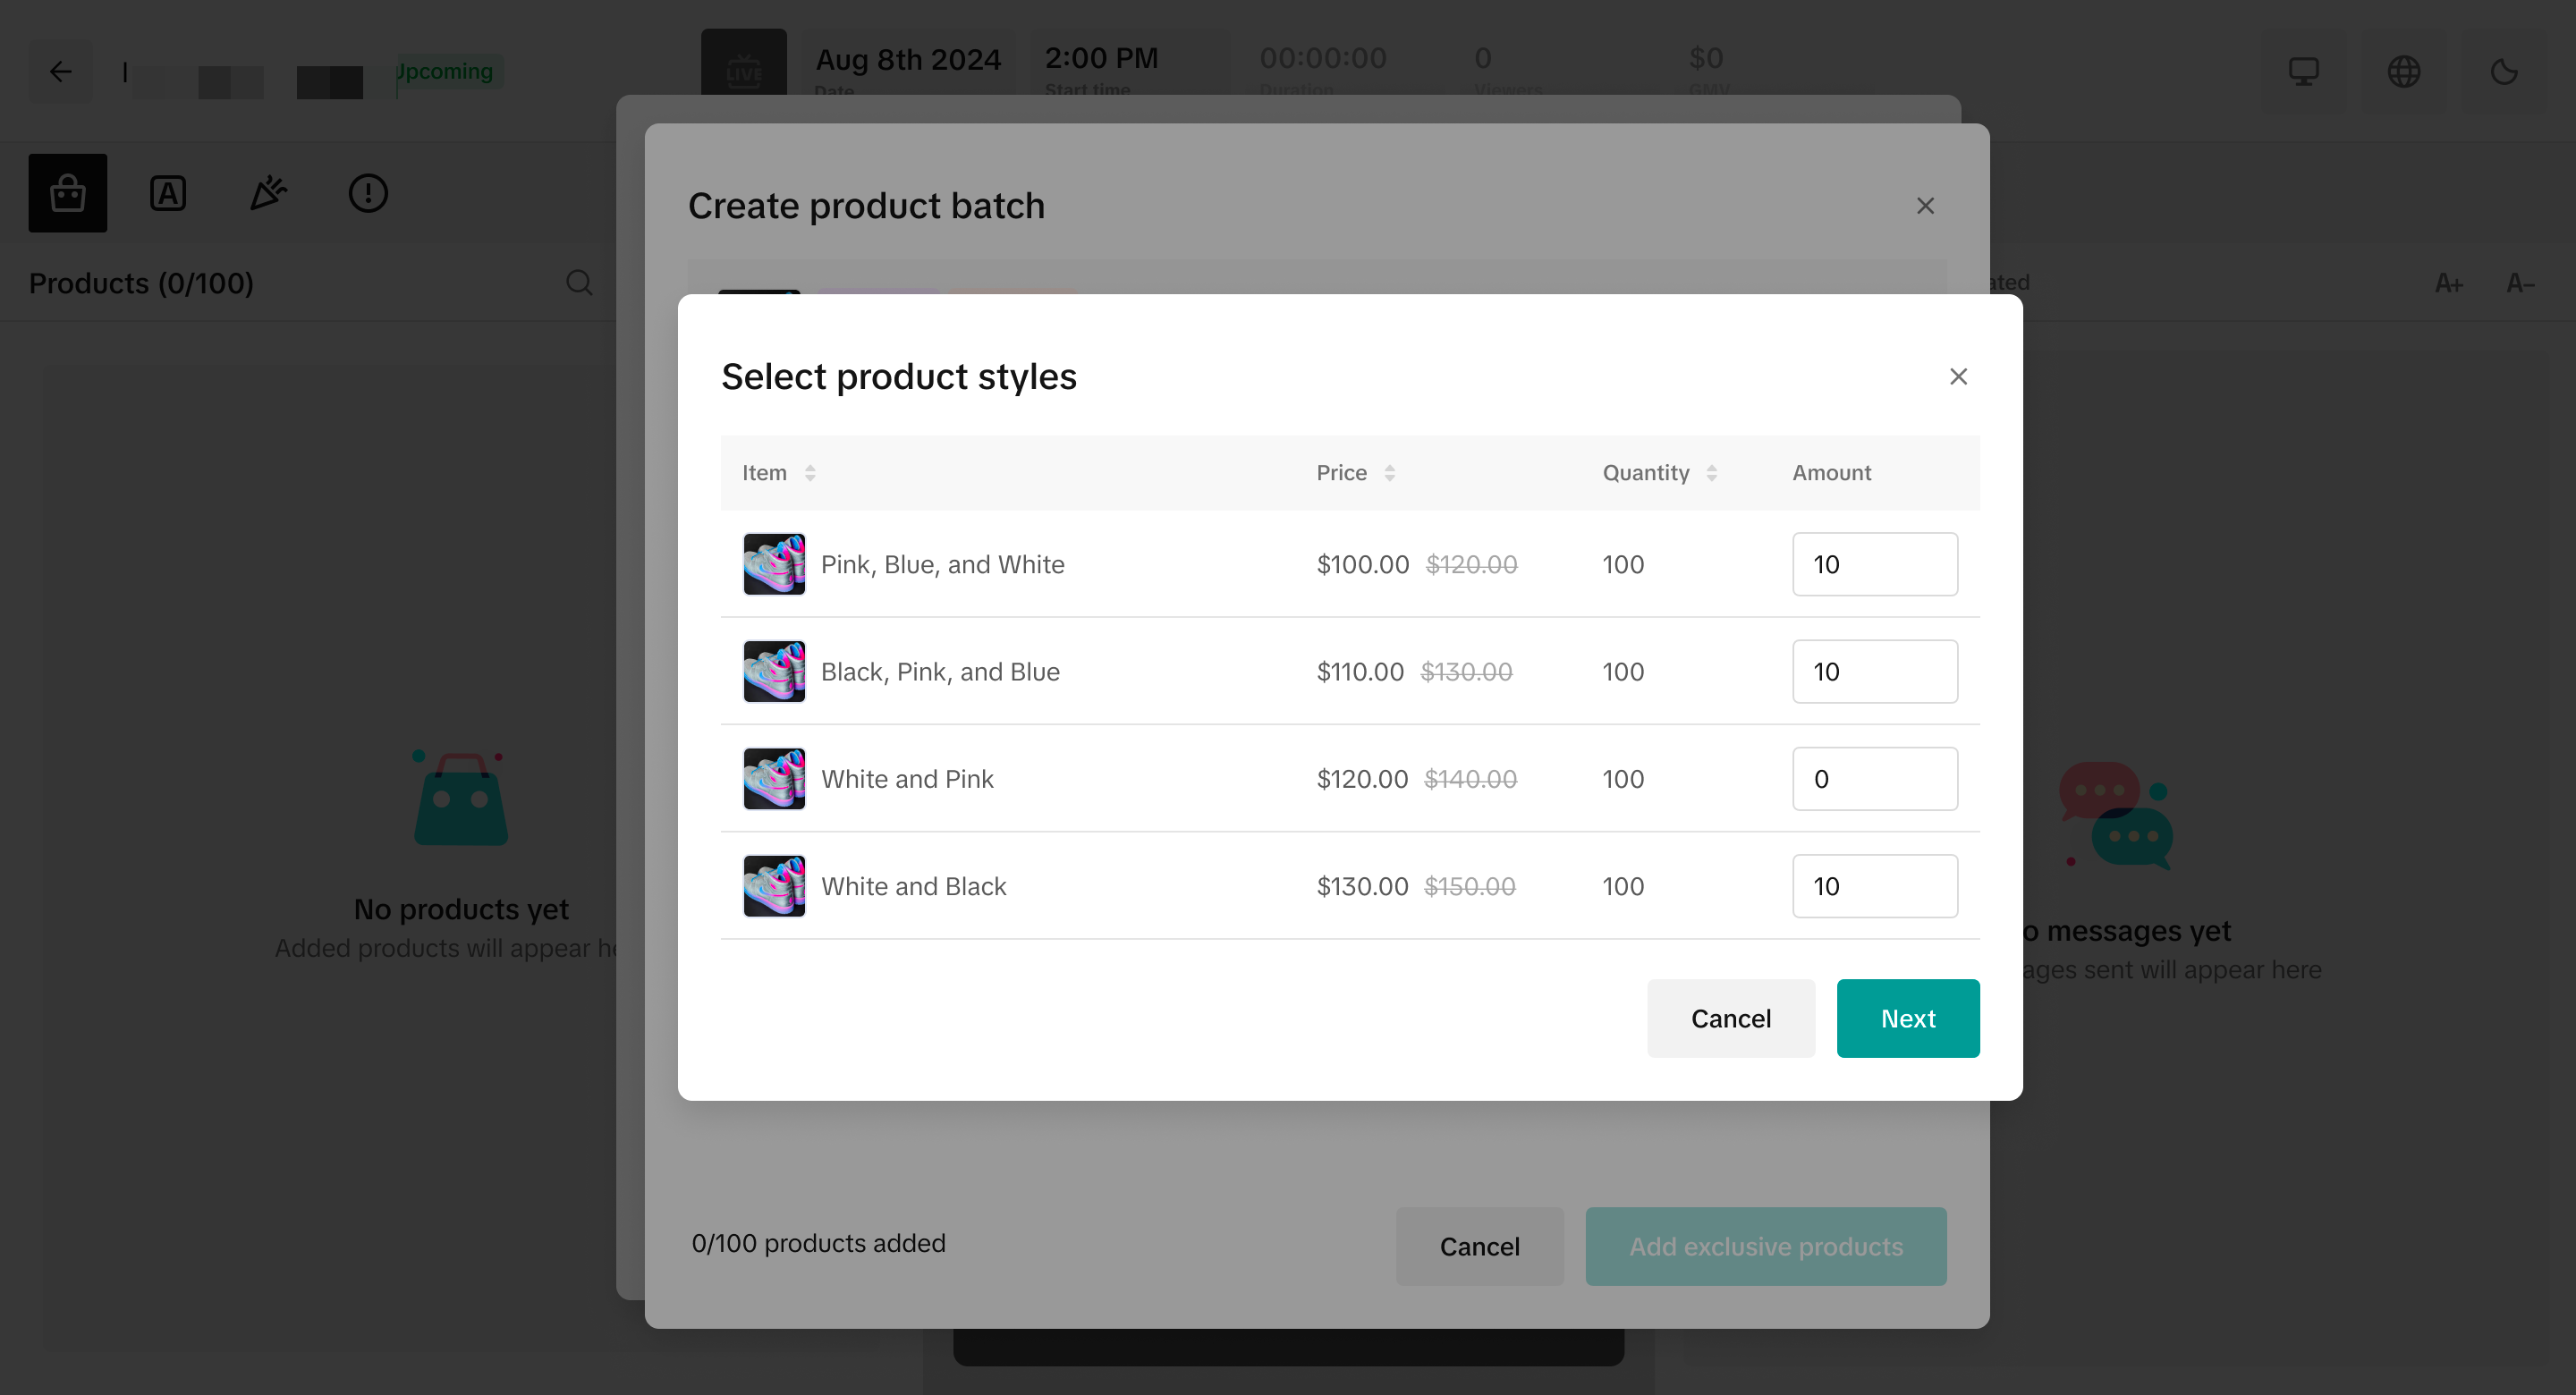
 Step 3: Specify product styles, buyer purchase limits, and quantities you'd like to offer.
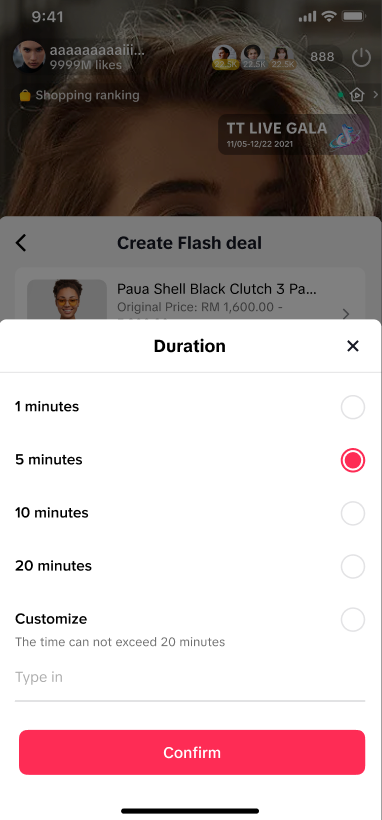
 Step 4: Here, you can set the Flash Sale Countdown (60 seconds to 300 seconds) and Sale duration (max 20 minutes).
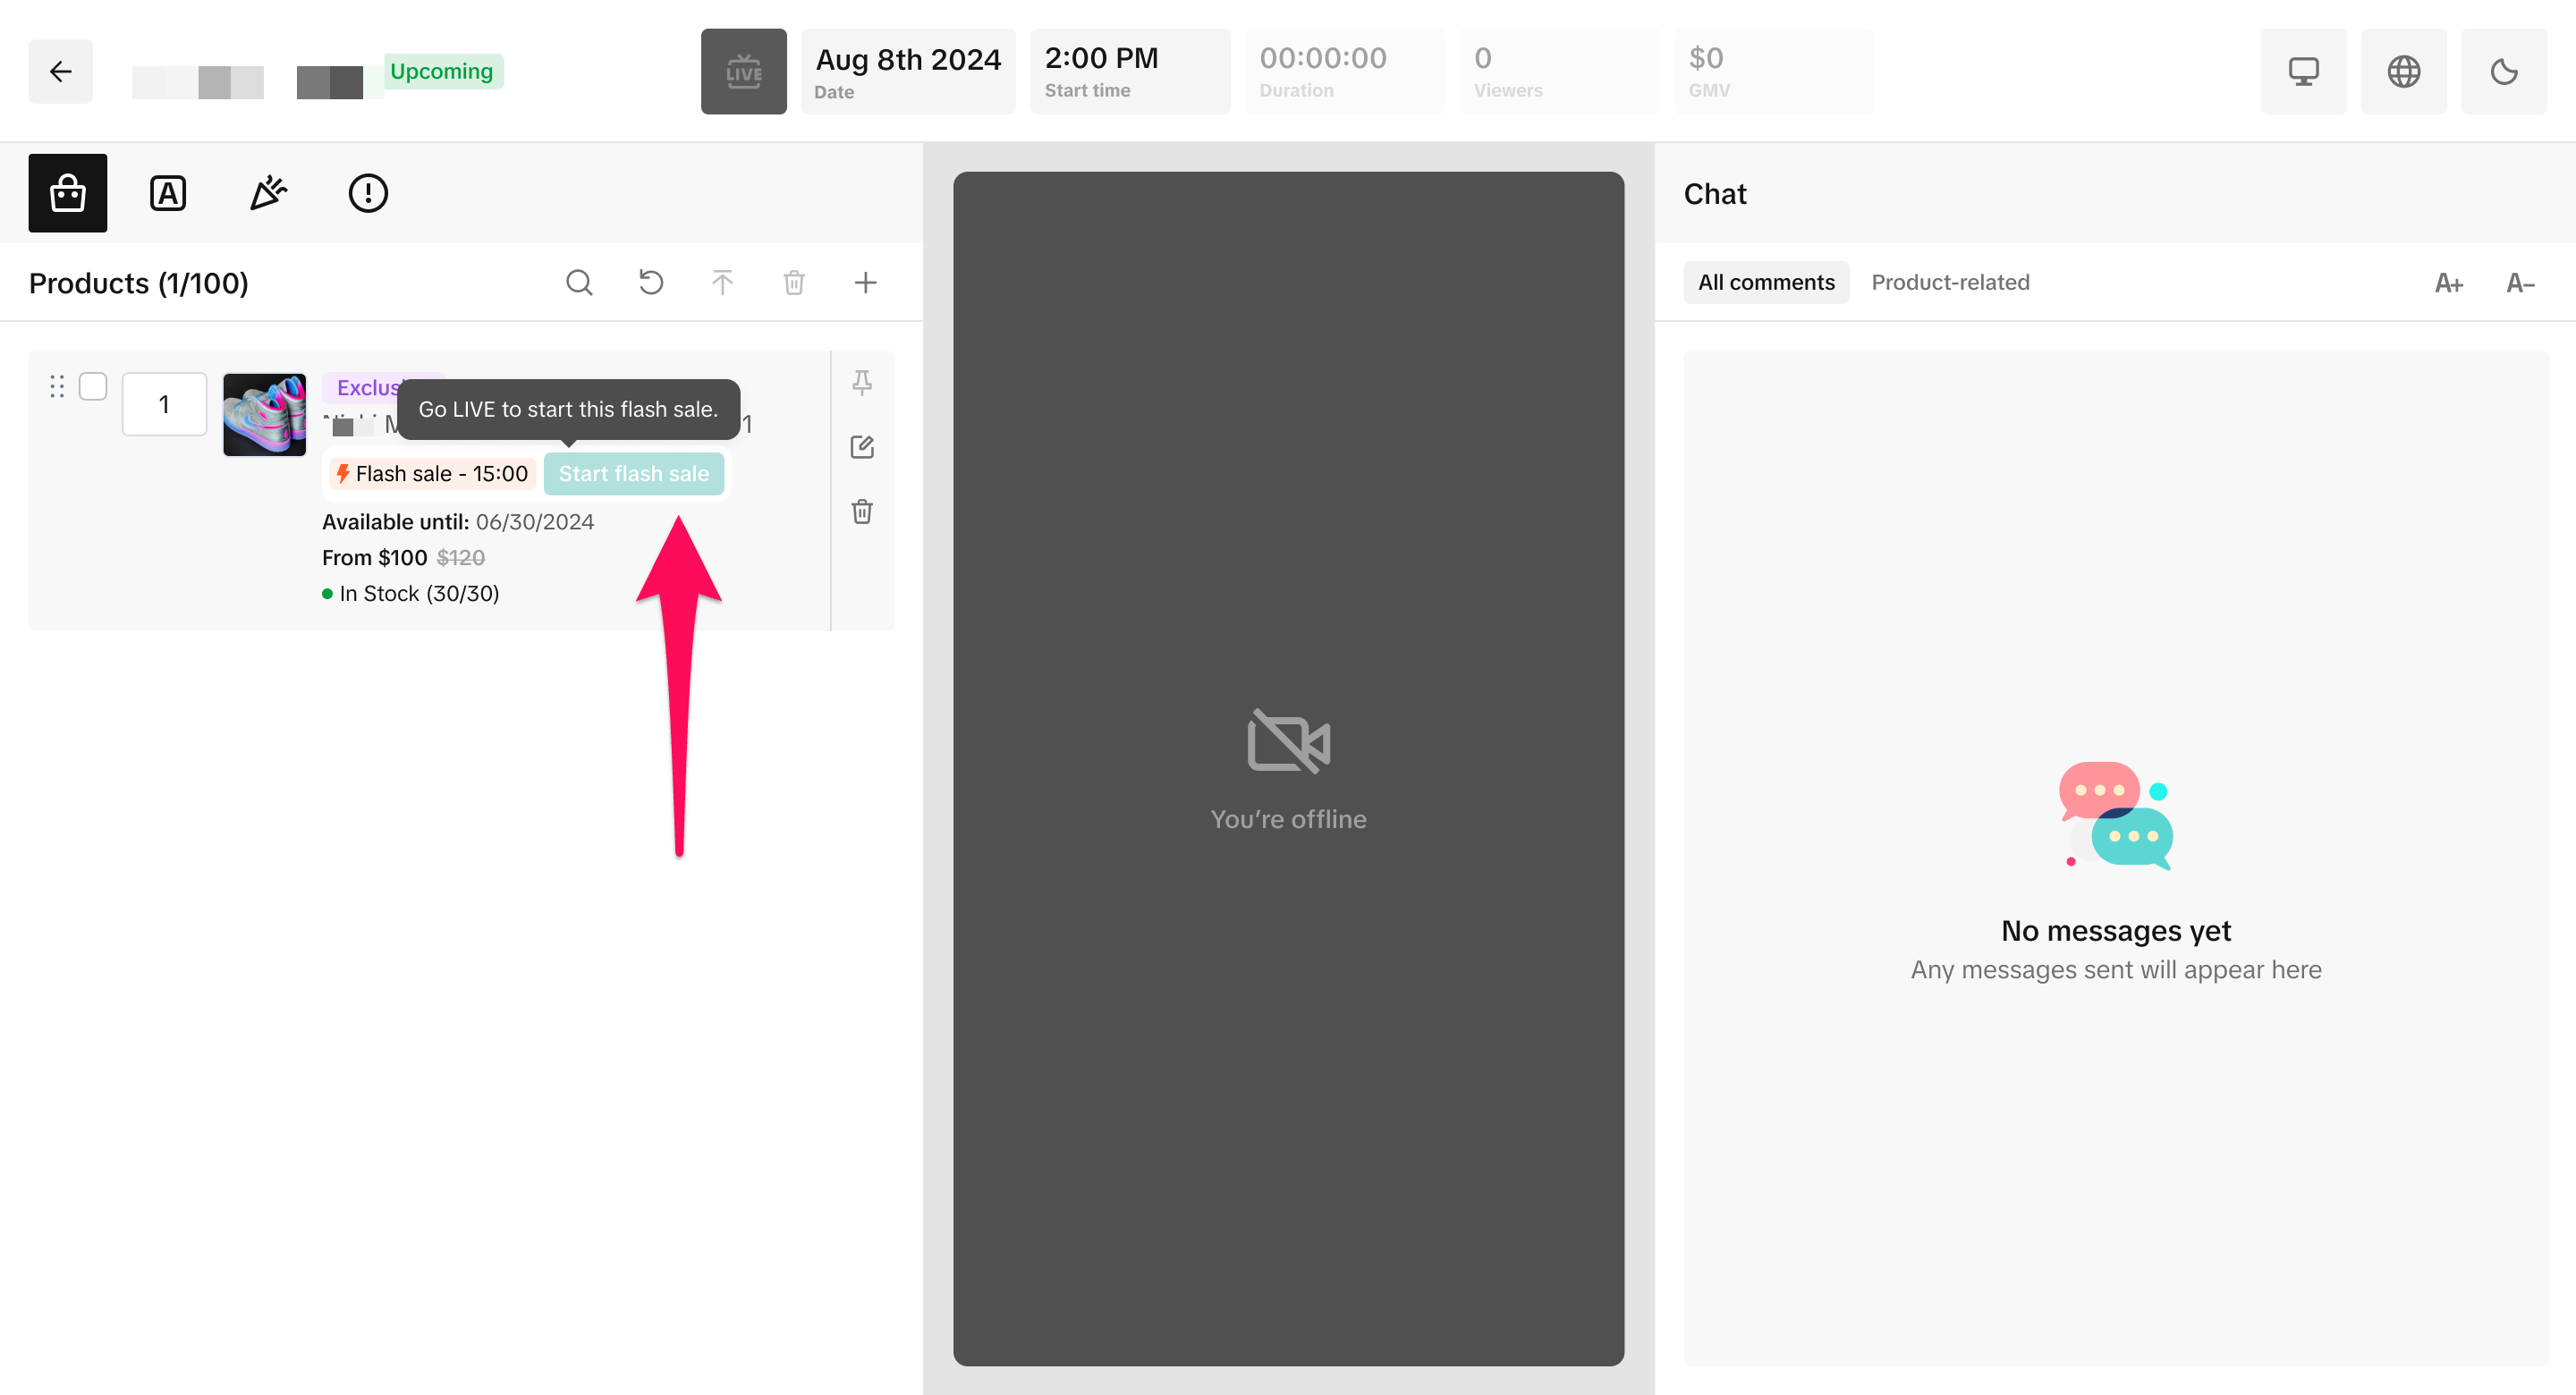
 The exclusive inventory is now ready to be deployed.
 You can decide whether you want to access a Basic or Advanced view of your performance:
Lastly, review comments you received during the stream to see what type of engagement you received to help you conduct sentiment analysis and understand the perception of your stream to users throughout the session.
With a scheduled LIVE Event, you can plan, promote, and manage all aspects of your TikTok Shop LIVE sessions ahead of time to drive viewership, audience engagement, and sales. You can select products to feature, prepare promotional moments like LIVE Giveaways, and build confidence before your session with the knowledge that you have a gameplan.
There are a number of benefits when you create a TikTok LIVE Event, including:
- Plan all aspects of your LIVE Events around your schedule in advance
- Promote your upcoming LIVE Events to your audience on and off TikTok
- Engage with your audience more easily during your LIVE with LIVE Giveaways and Flash Sale fully integrated into your LIVE Event set-up

TikTok Shop LIVE Events (mobile)
Pre LIVE Checklist
As you get started with planning a TikTok Shop LIVE Event, follow our helpful checklist:- Schedule your LIVE Event
- Promote your LIVE Event
- Pick Products to promote
- Schedule LIVE Giveaways (optional)
- Prepare your Moderators (optional)
Enter from creator tools
 |  |  |
 |  |
Note that LIVE shopping tools won't be available in practice mode.
 |  |  |
Scheduling your LIVE Event
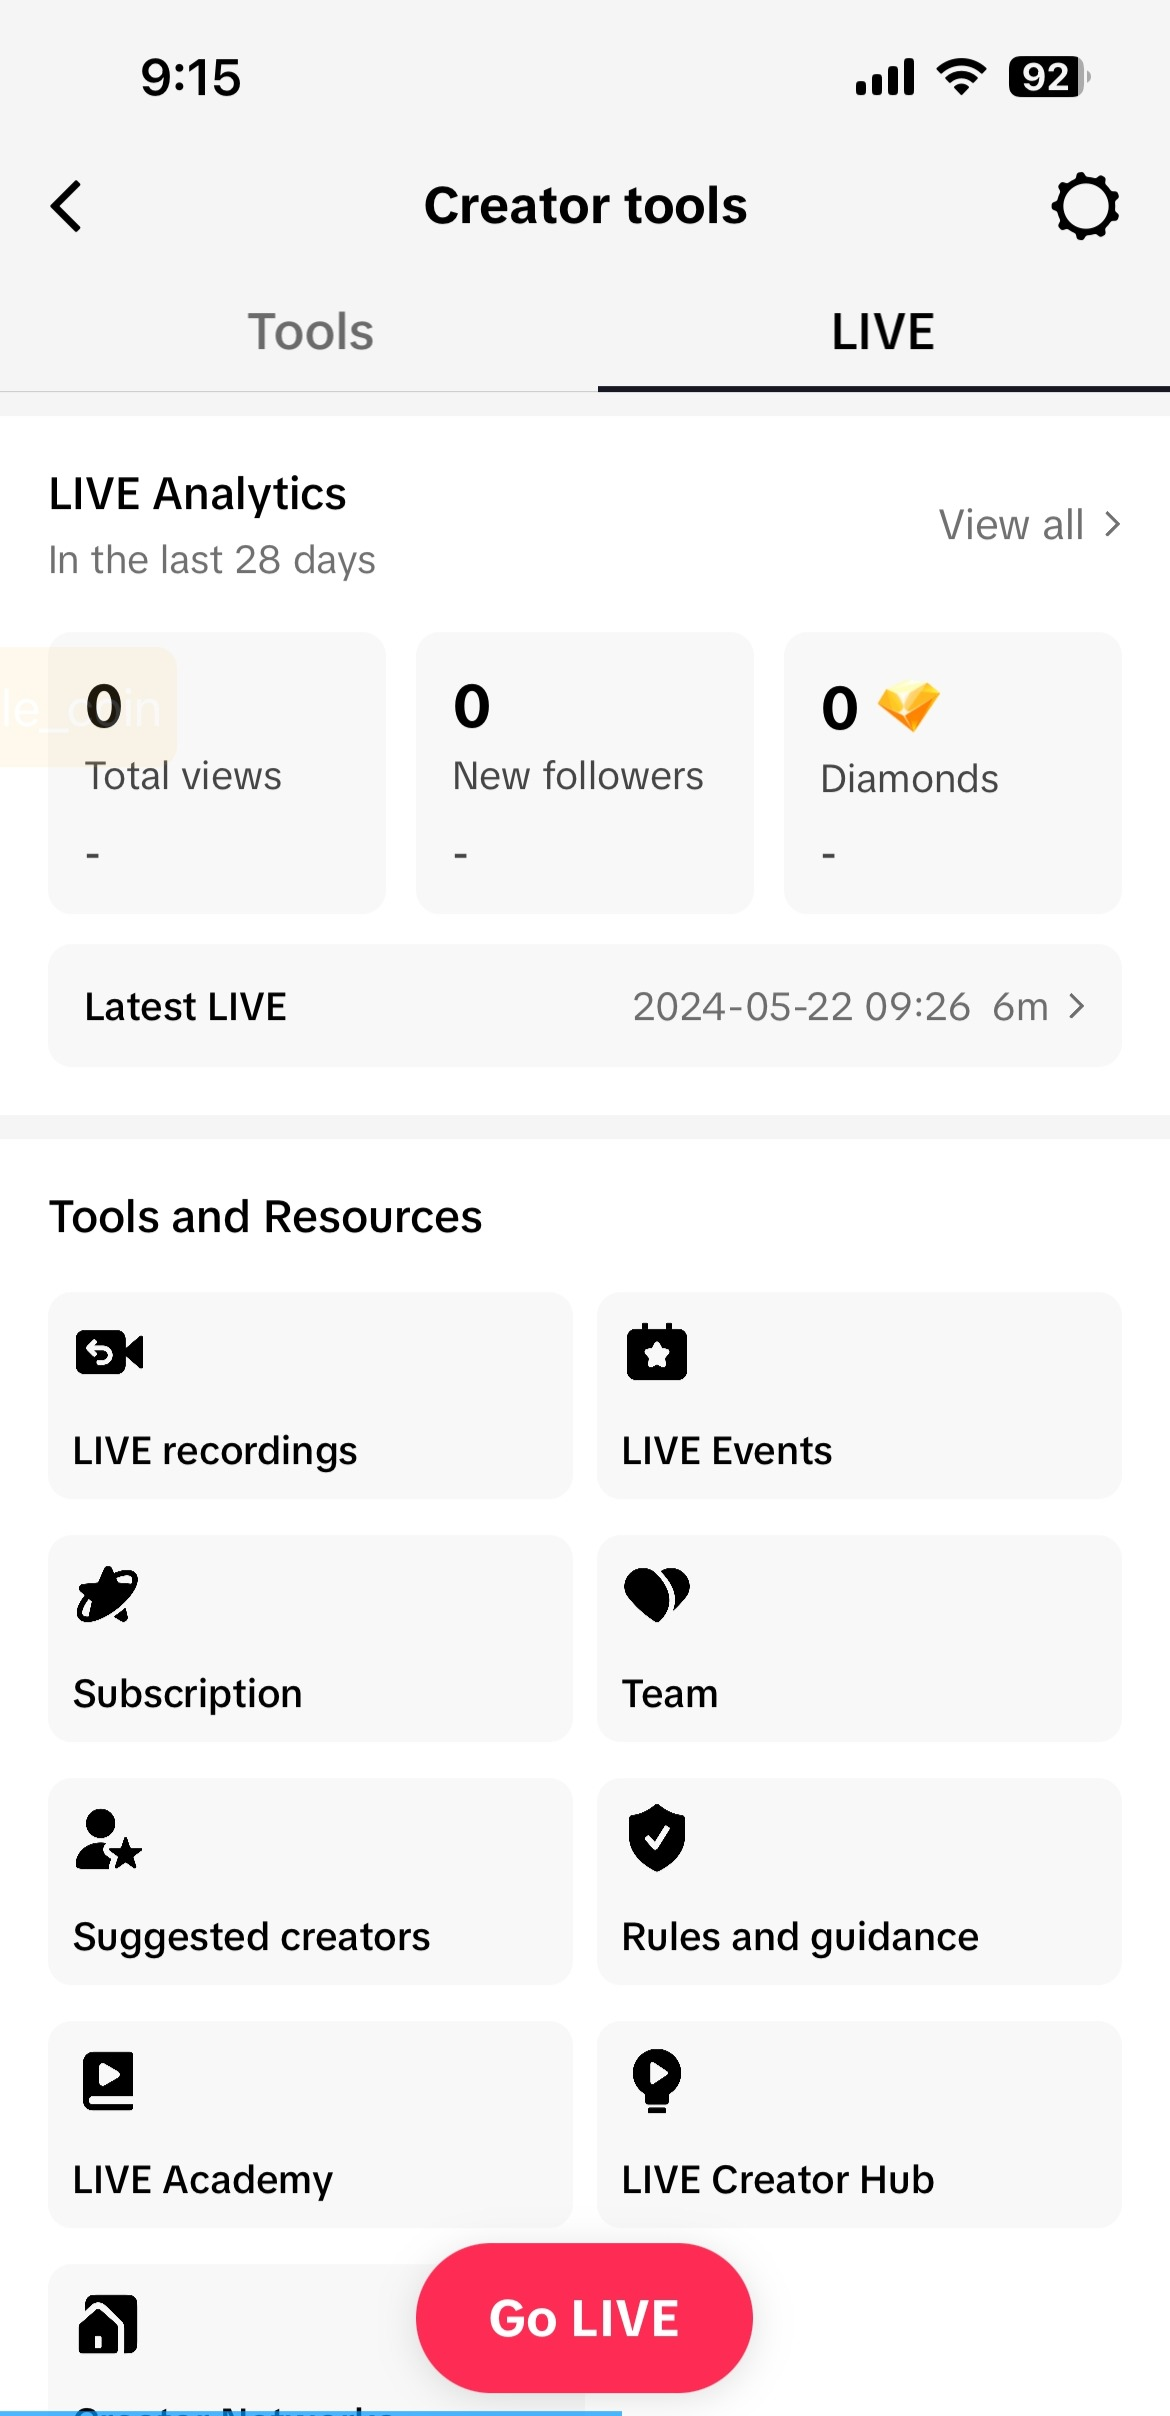
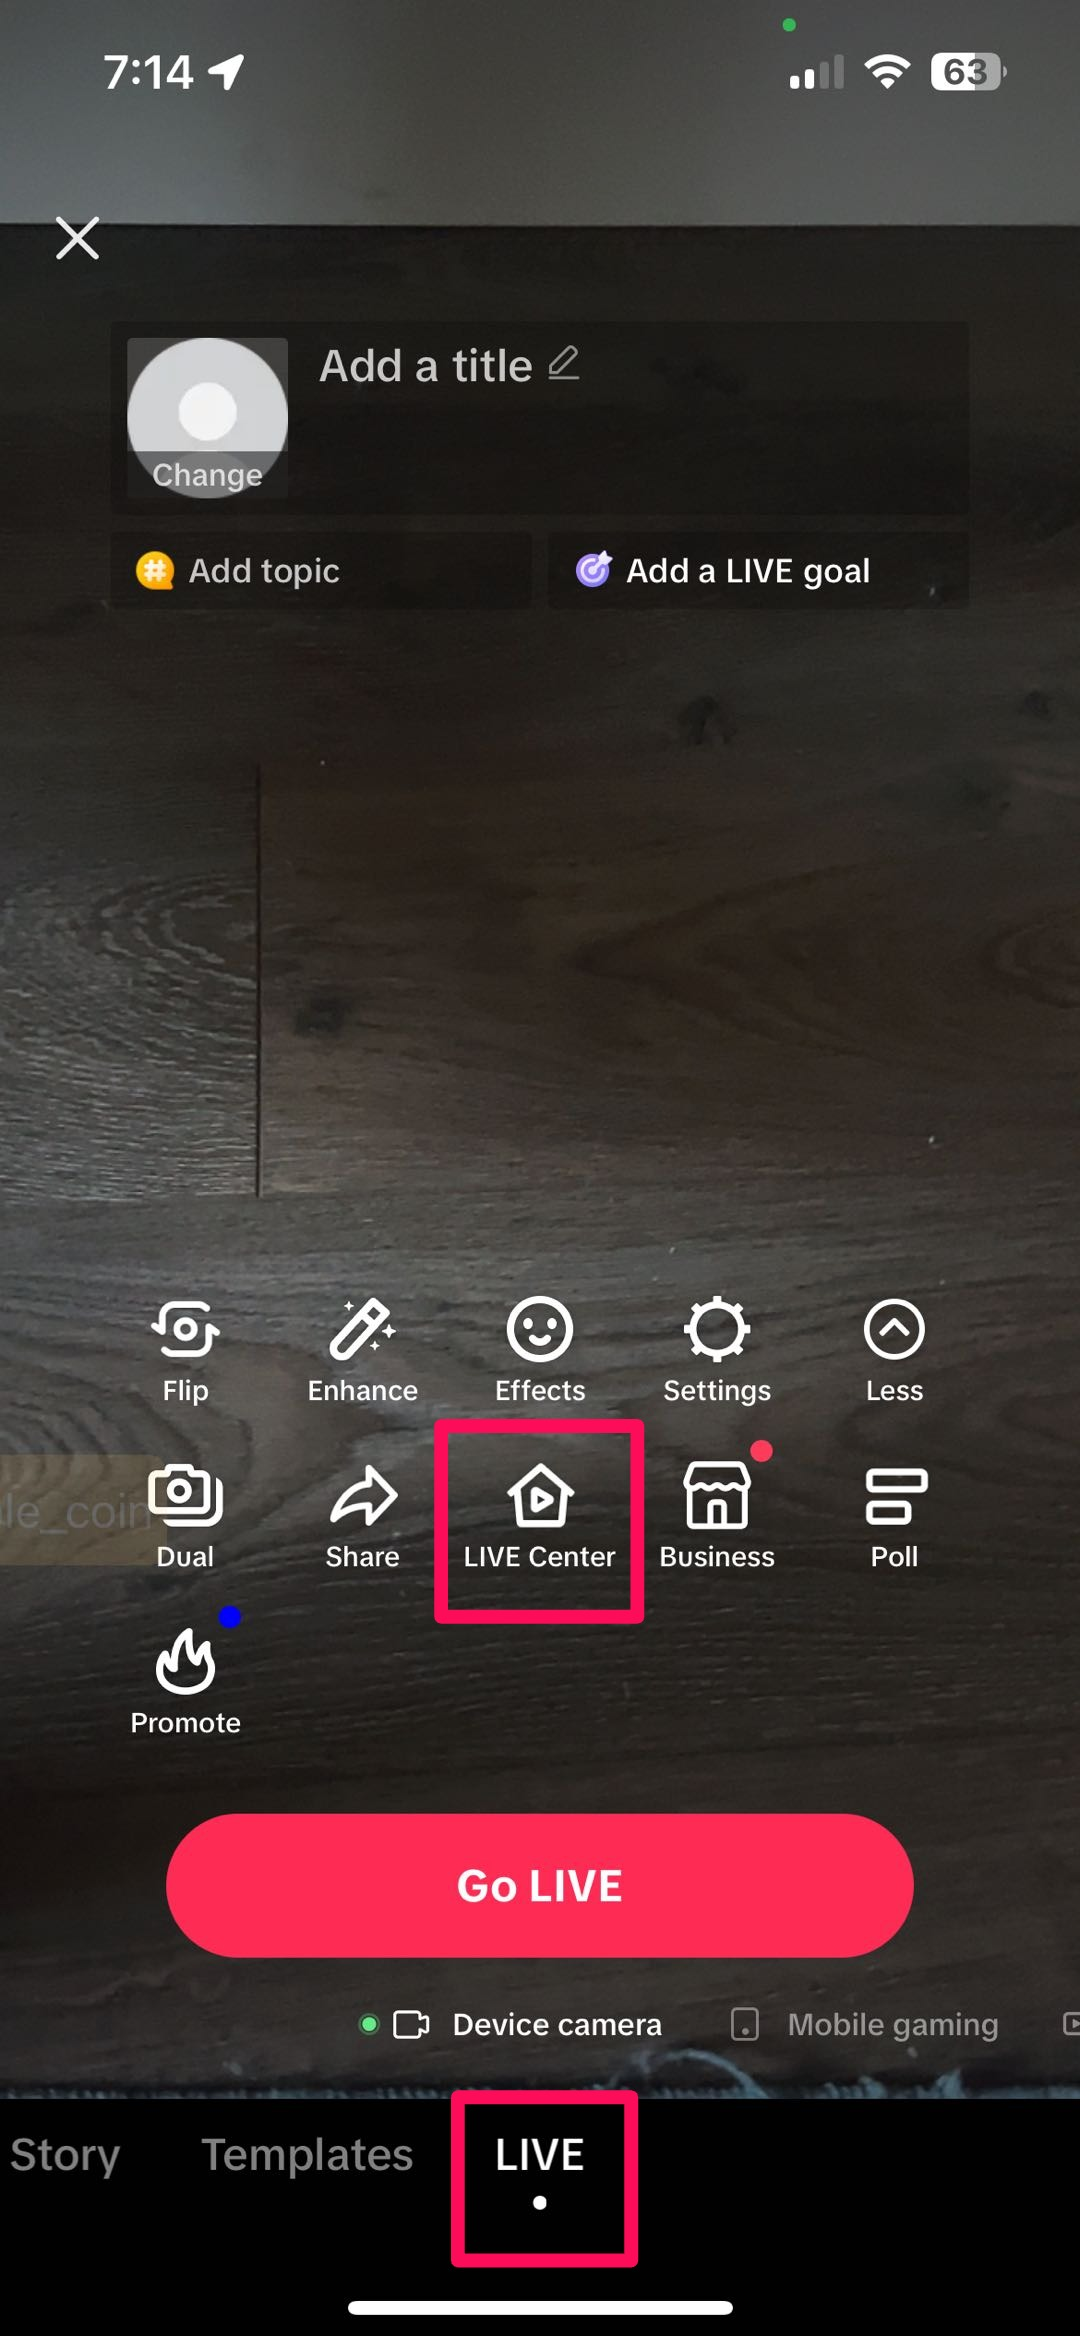
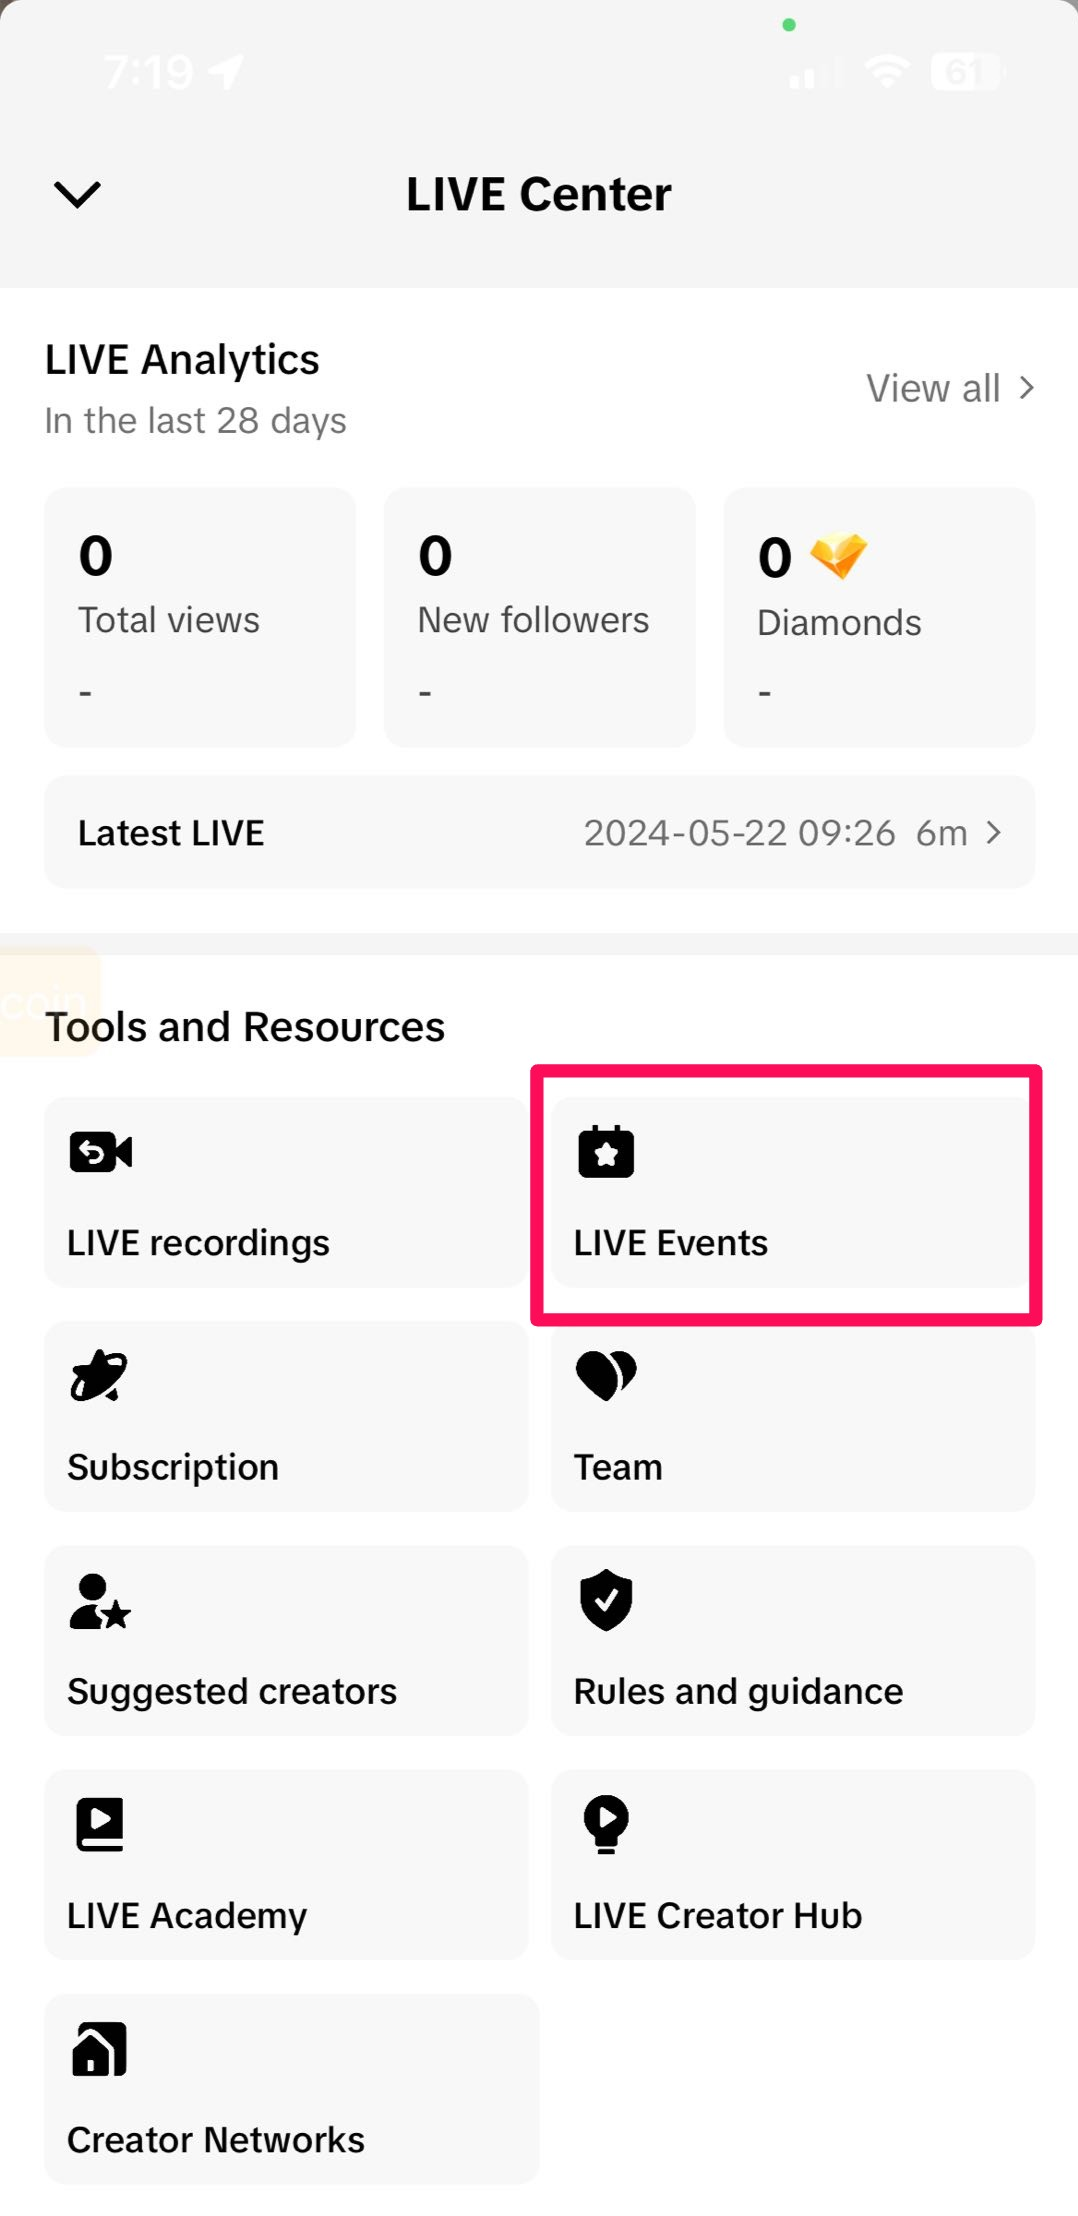
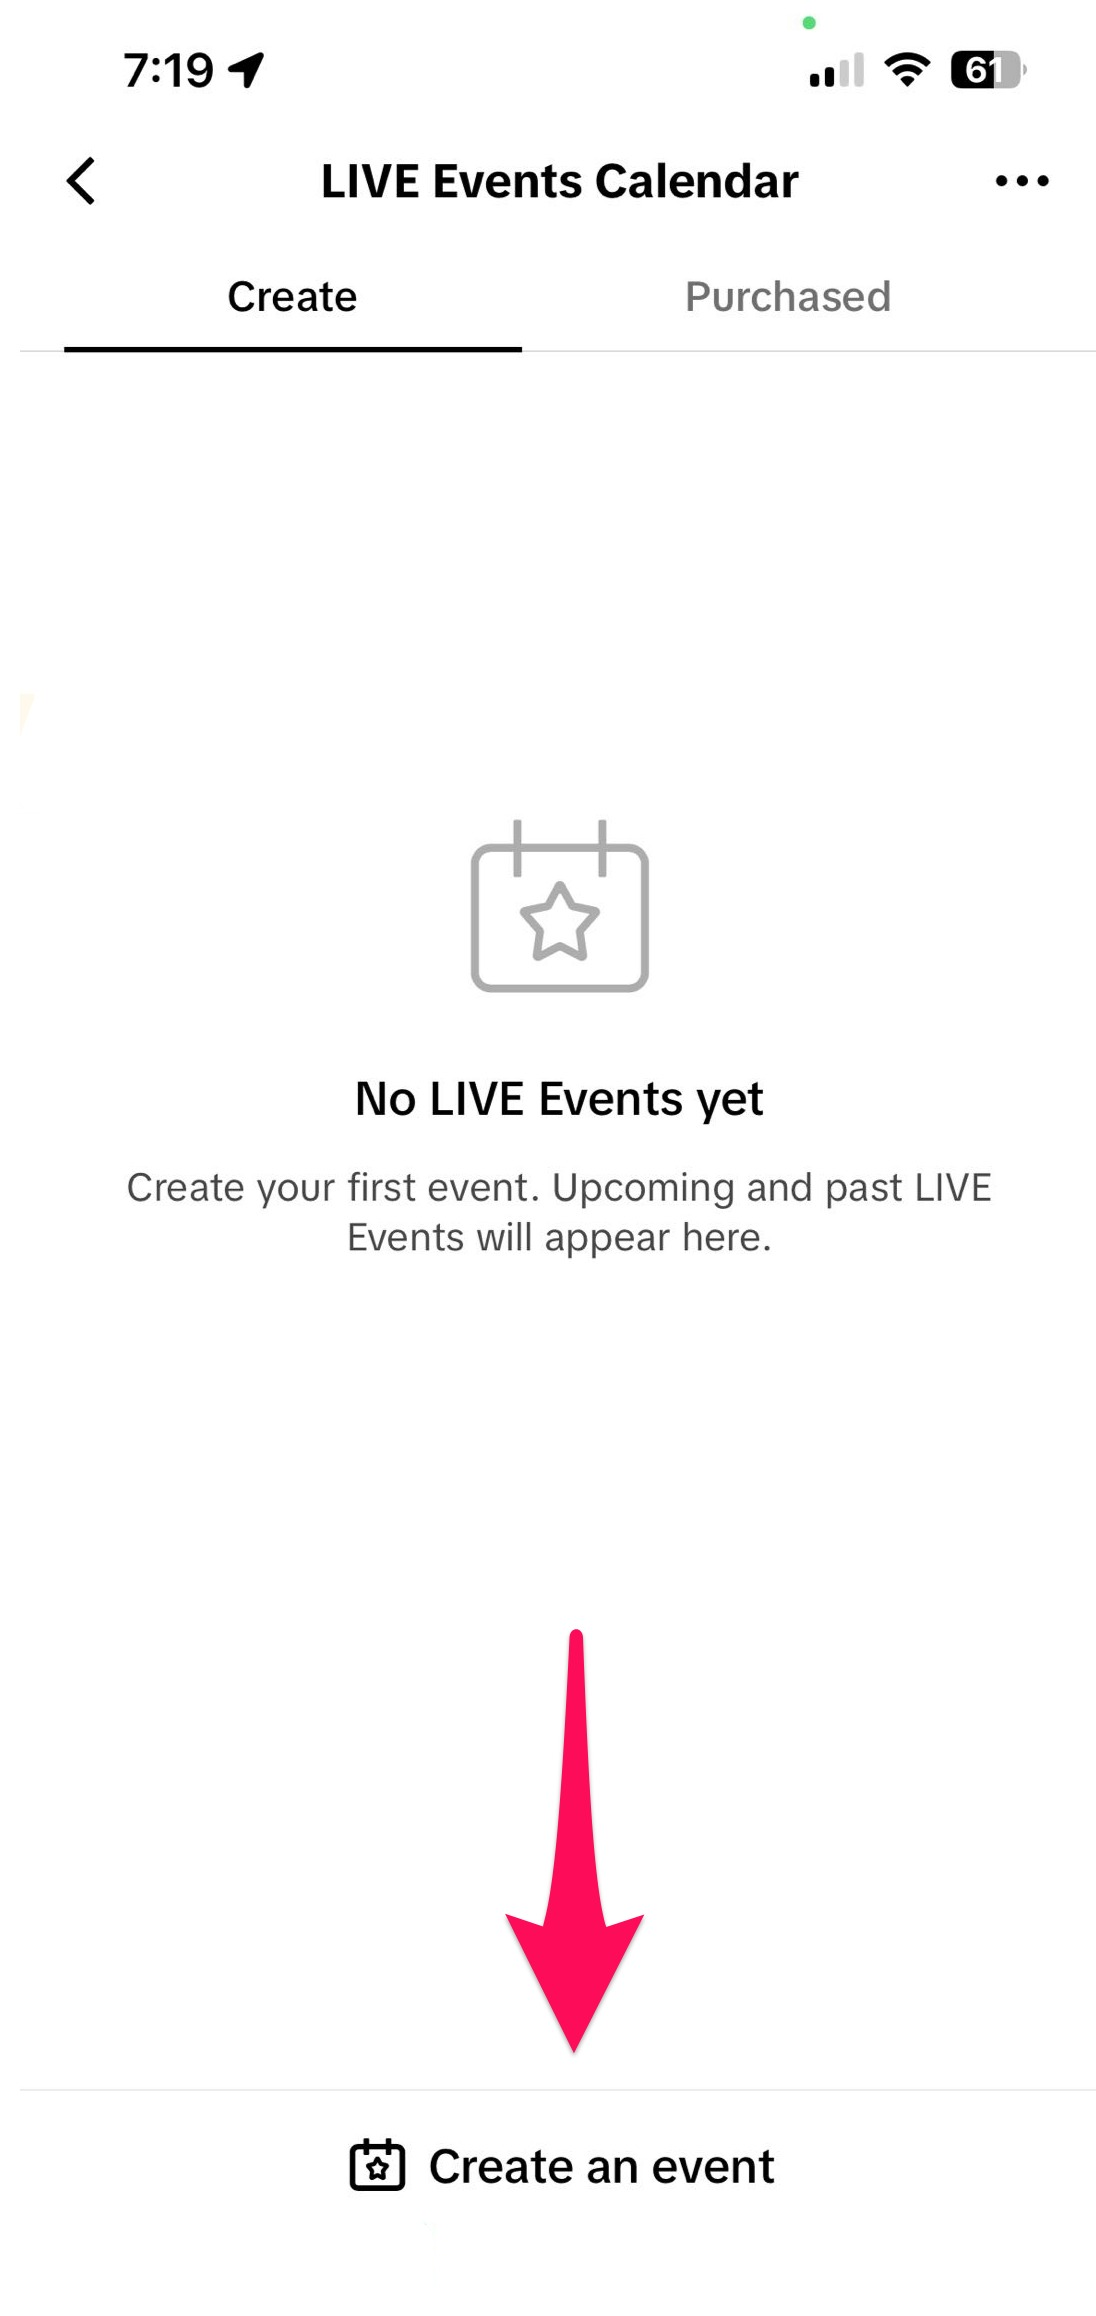
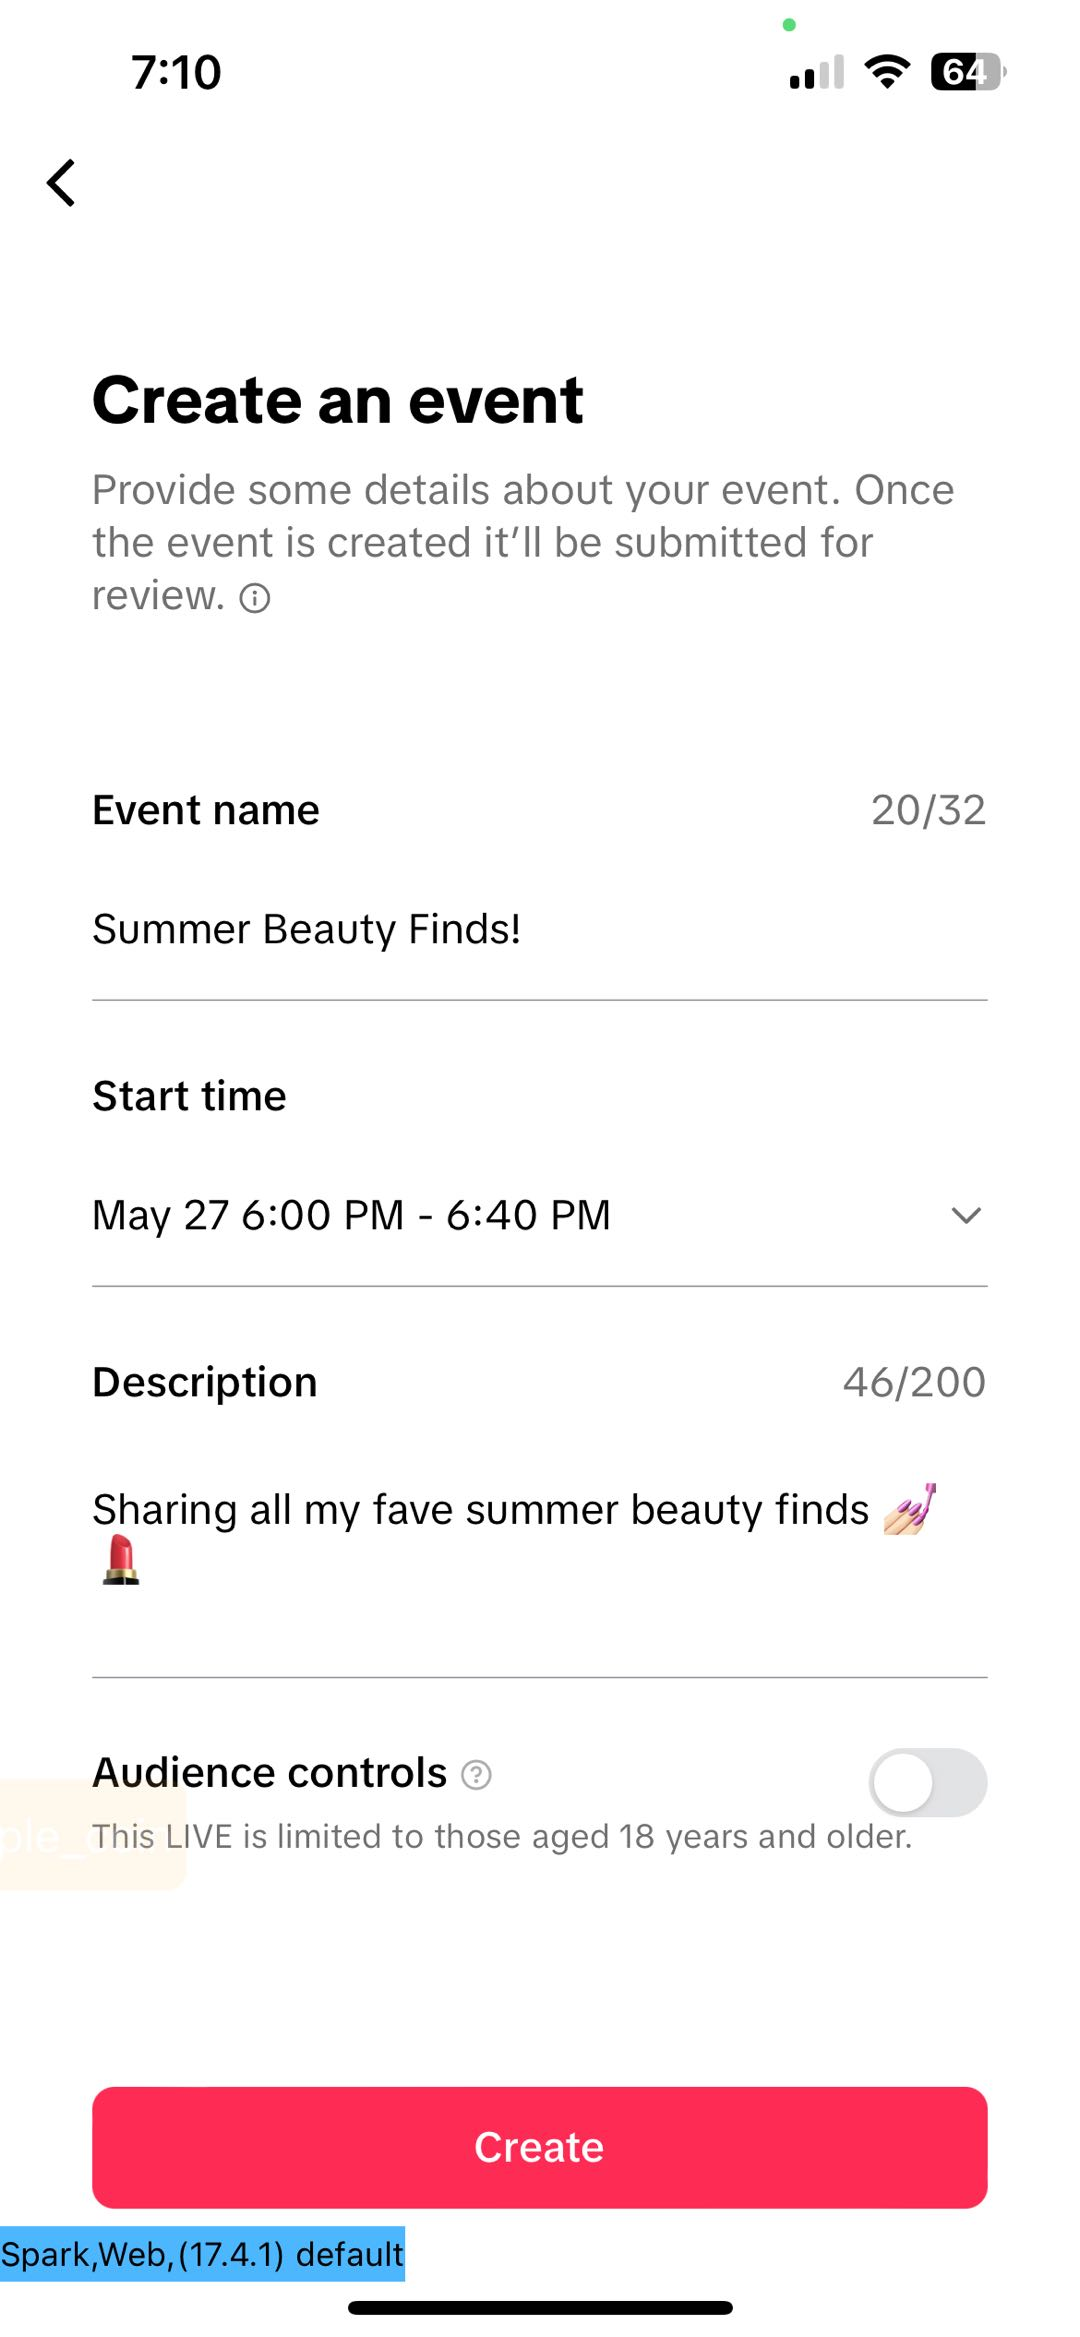
- Open your camera and navigate to the LIVE Center. Within LIVE Center, click LIVE Events, then Create an event
 |  |  |
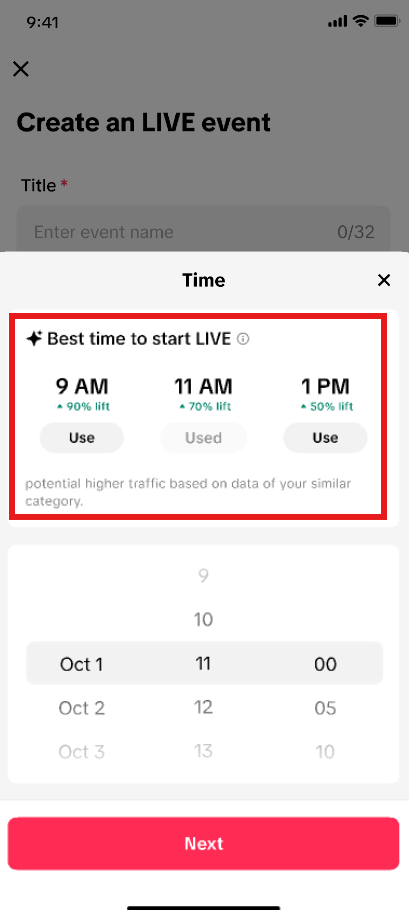
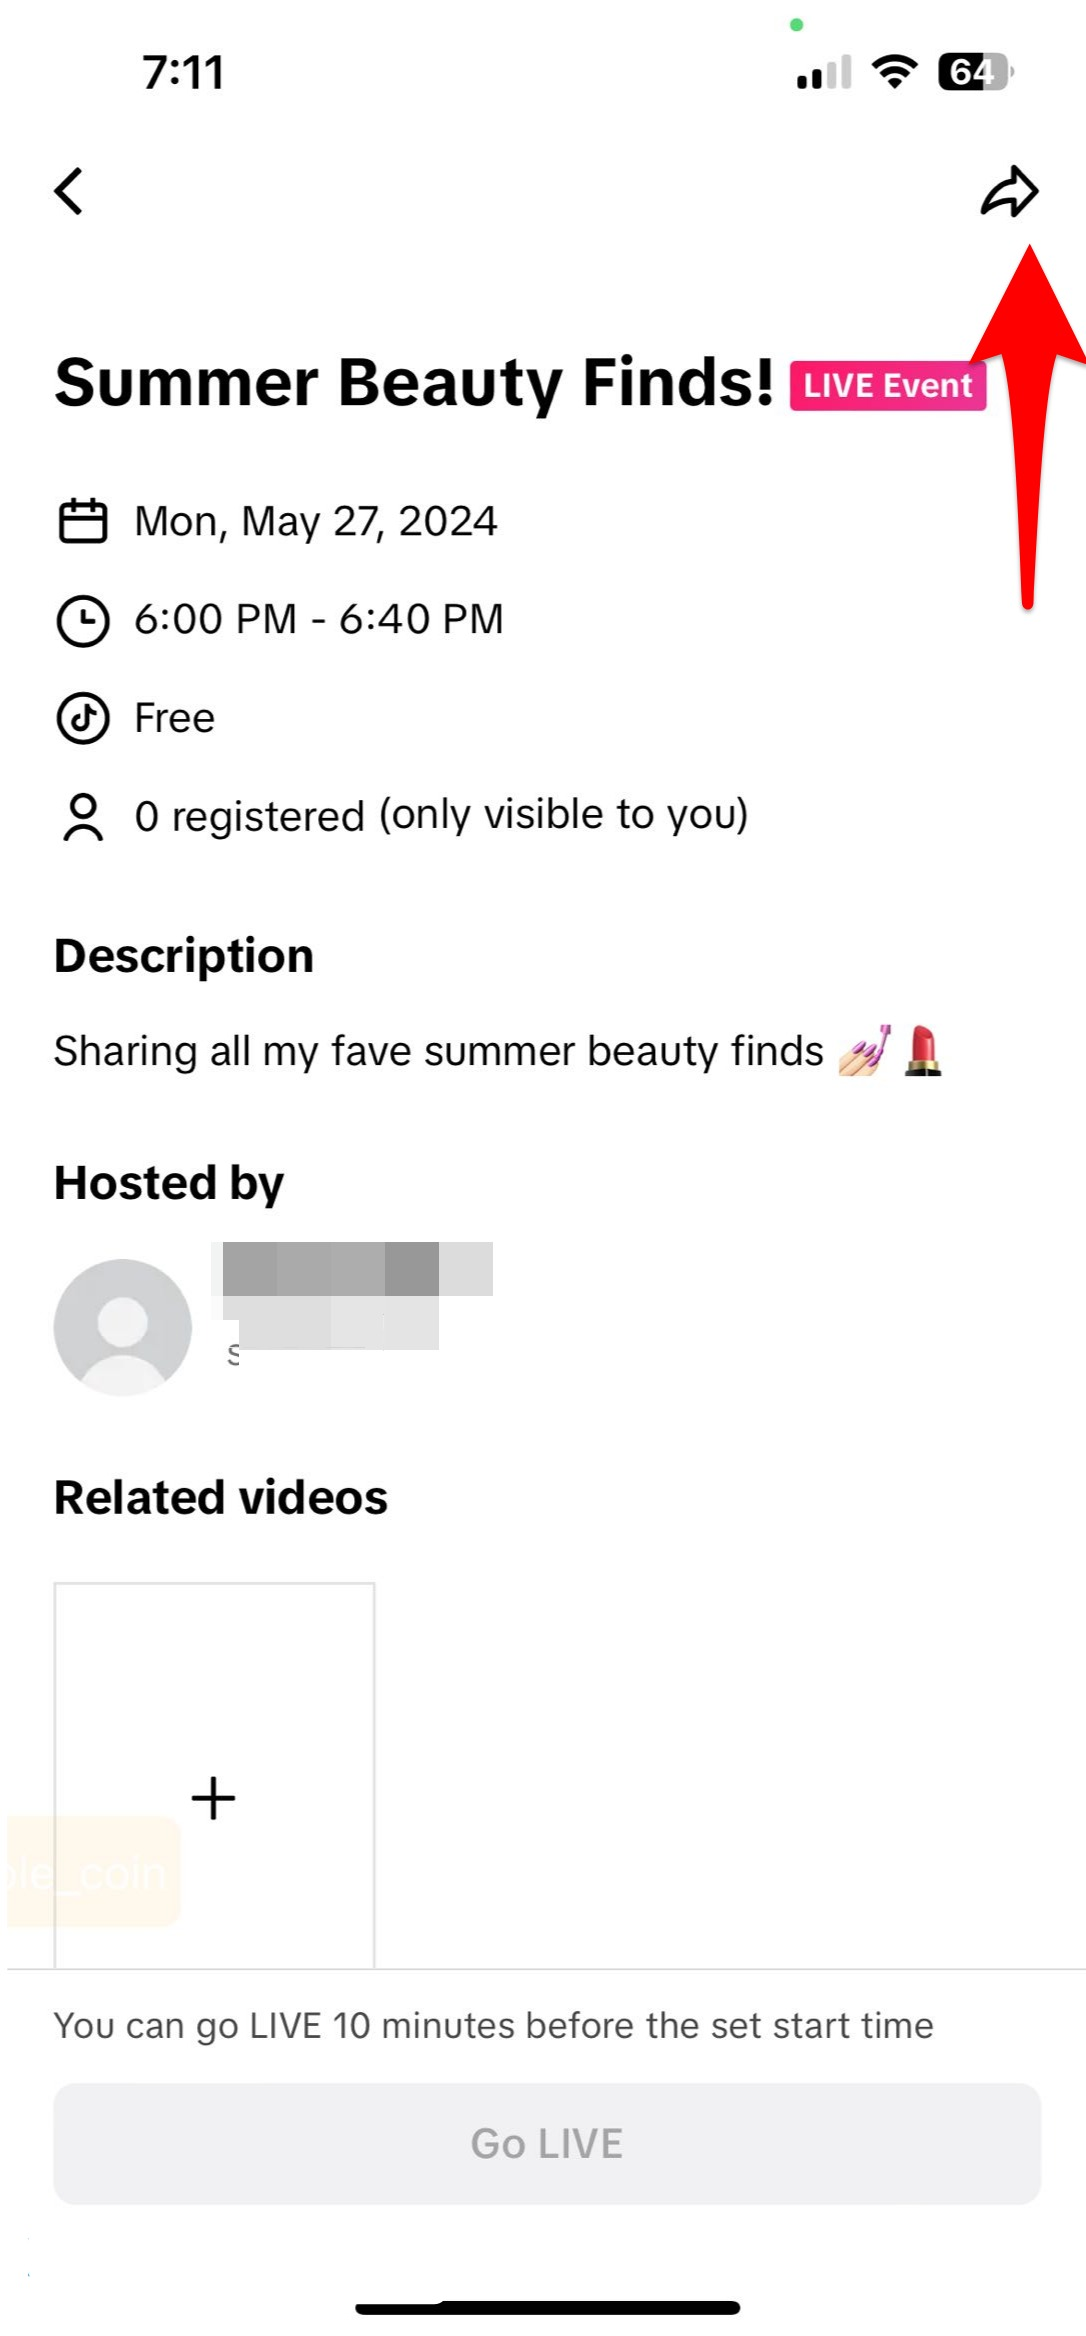
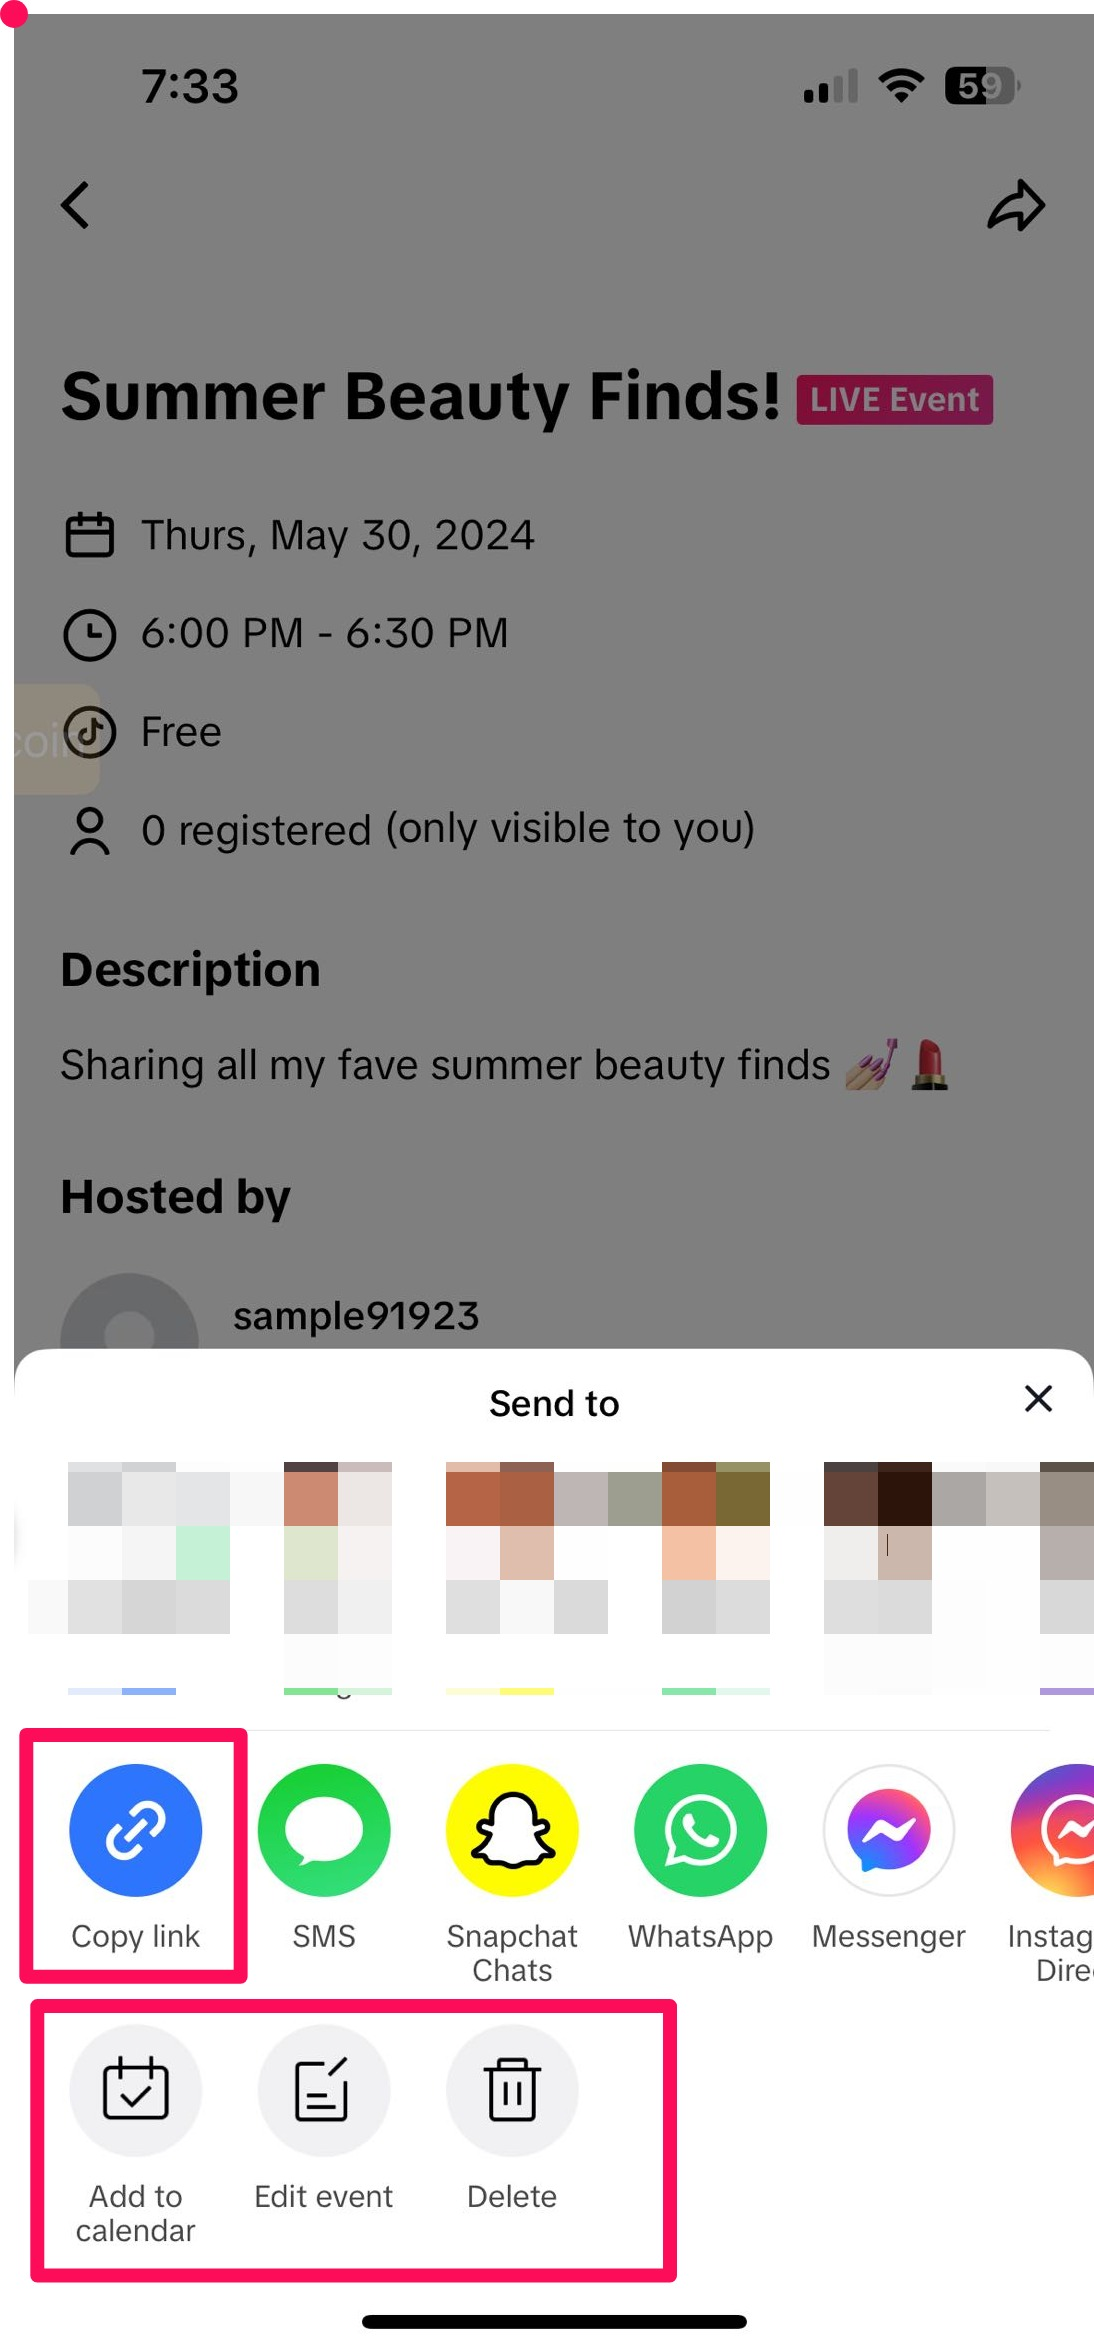
- Add in the details of your LIVE Event, such as date and time, duration, and an eye-catching description. Once you've scheduled the LIVE Event, it will go through a review. You'll be notified once the review is complete. Click the arrow button to share the LIVE Event link on TikTok and other platforms.
 |  |  |
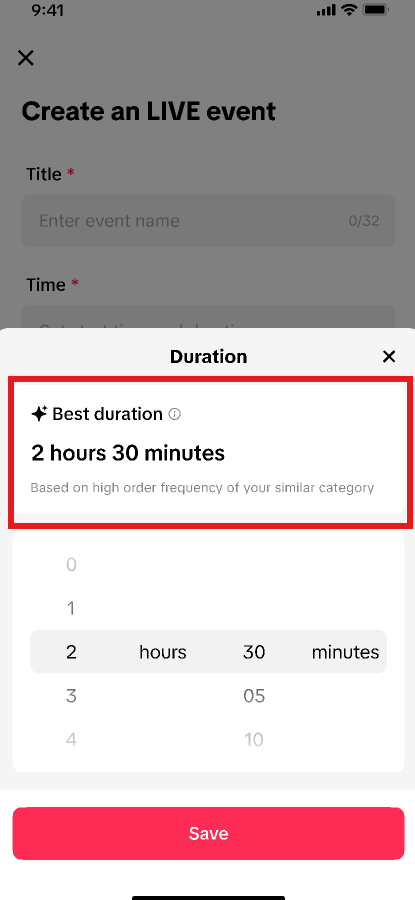
Suggested LIVE time during LIVE Event
At times, when you create a LIVE Event, we may suggest a "Best time to start LIVE" and your "LIVE duration" based on your GMV, LIVE room exposure, and average online viewers.Promoting your LIVE Event
Build pre-event awareness and increase attendance by promoting your LIVE Event in advance on and off TikTok. This is an essential preparatory step to take. By increasing awareness and attendance ahead of time, you're more likely to have a larger, more engaged audience during your event, which can lead to increased traffic and sales!To create a video to promote your LIVE Event, tap the + icon under Related videos on the LIVE Event page. After recording your video, select Next and then tap Add link to choose the LIVE Event you want to promote. The LIVE Event link will be added to your video. You can then press Done and Post to publish.
Tip: 2-3 days before your LIVE Event, you can Promote your short video to drive awareness ahead of the event.
 |  |  |  |
Preparing products for your LIVE Event
You can create LIVE product sets ahead of your LIVE shopping event to select and organize the products you'll be featuring in your LIVE. LIVE product sets help you save time by making it easier to add a selection of products to your session before and during the event with just one click.
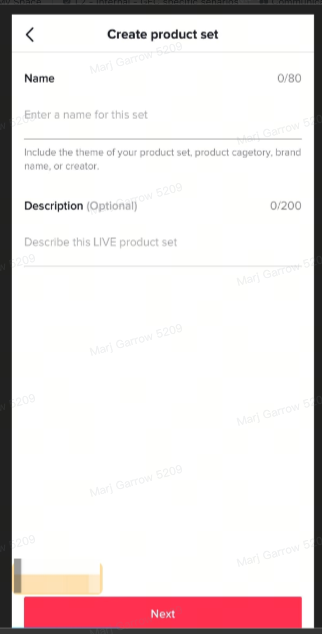
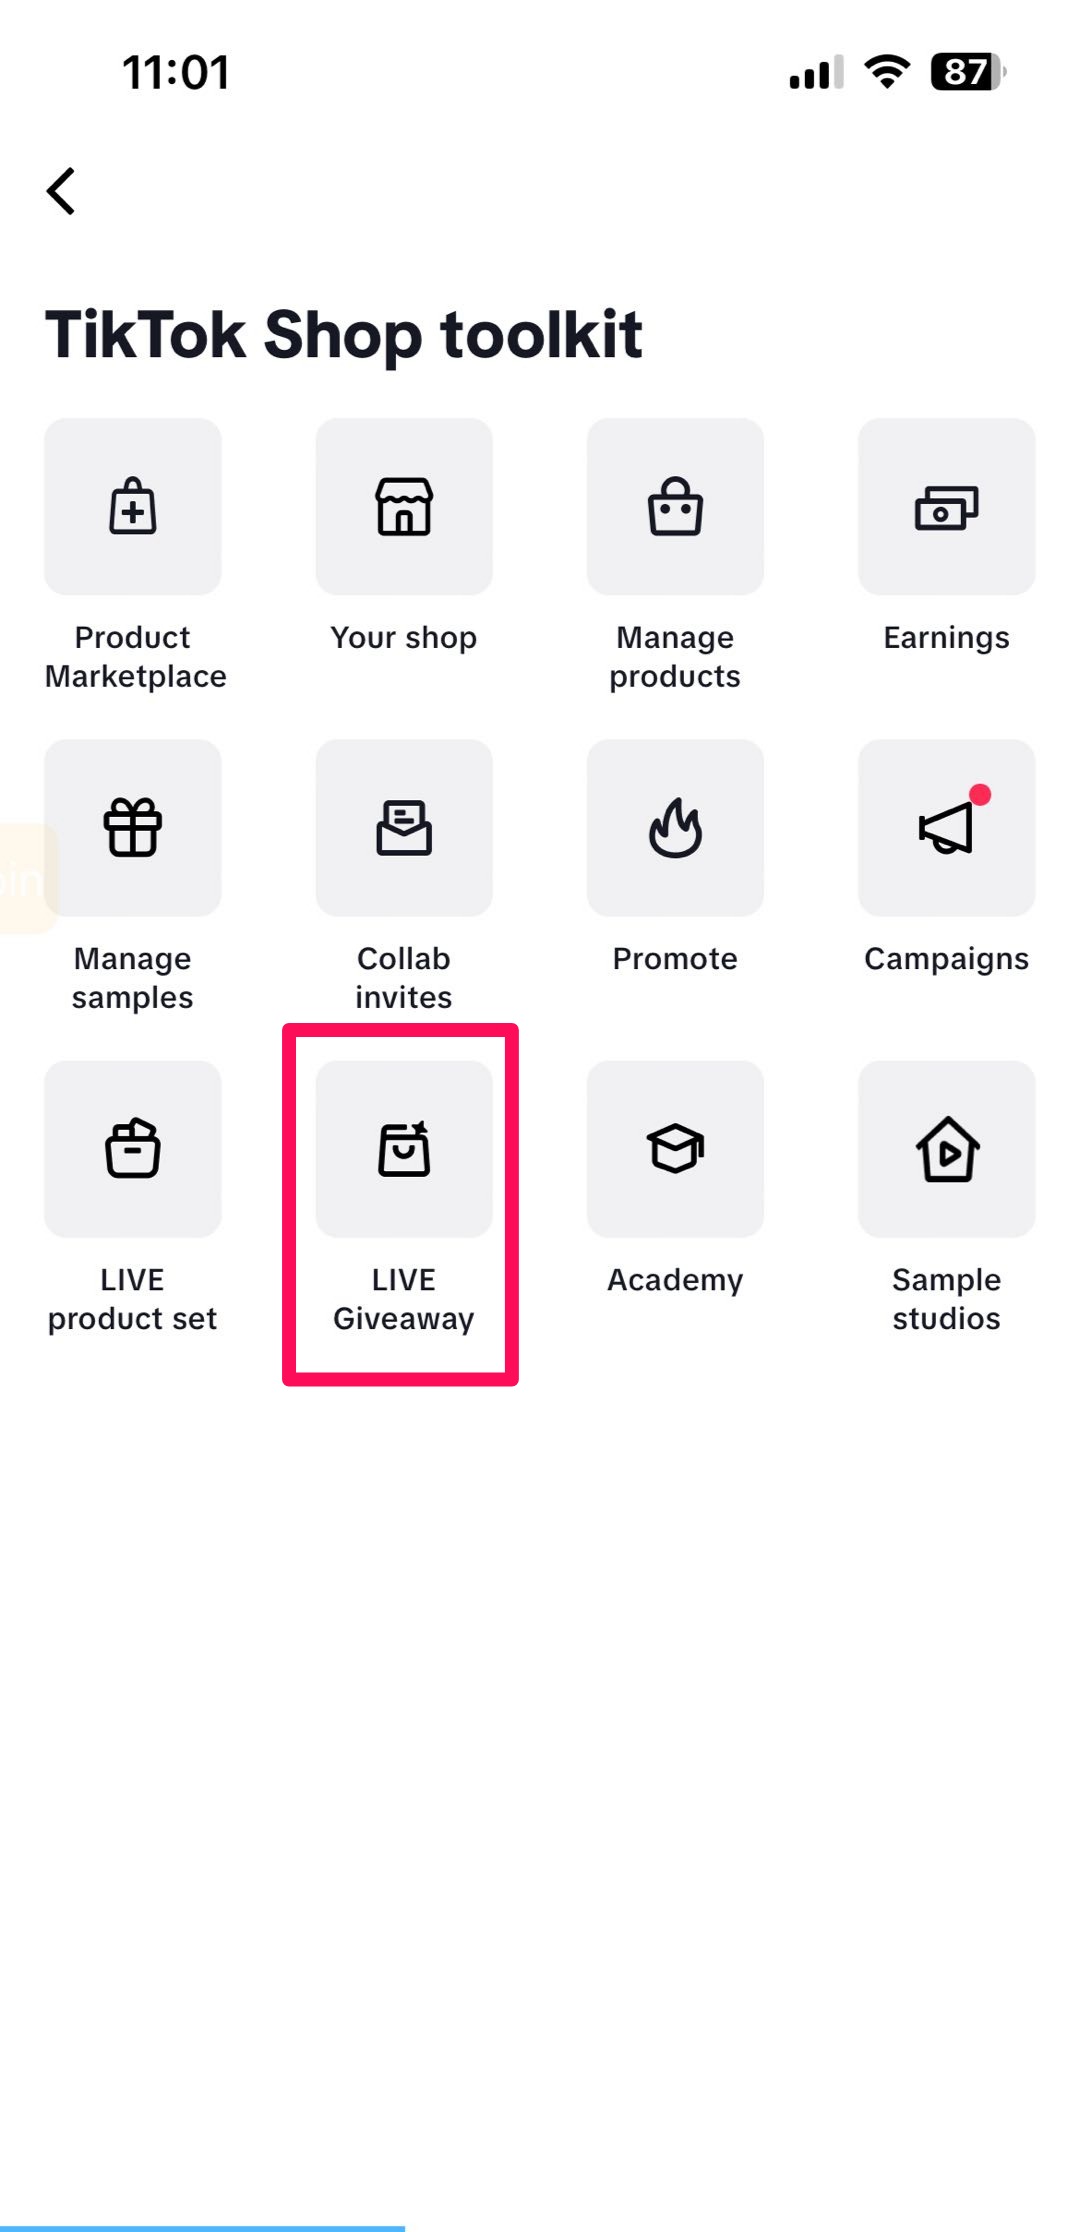
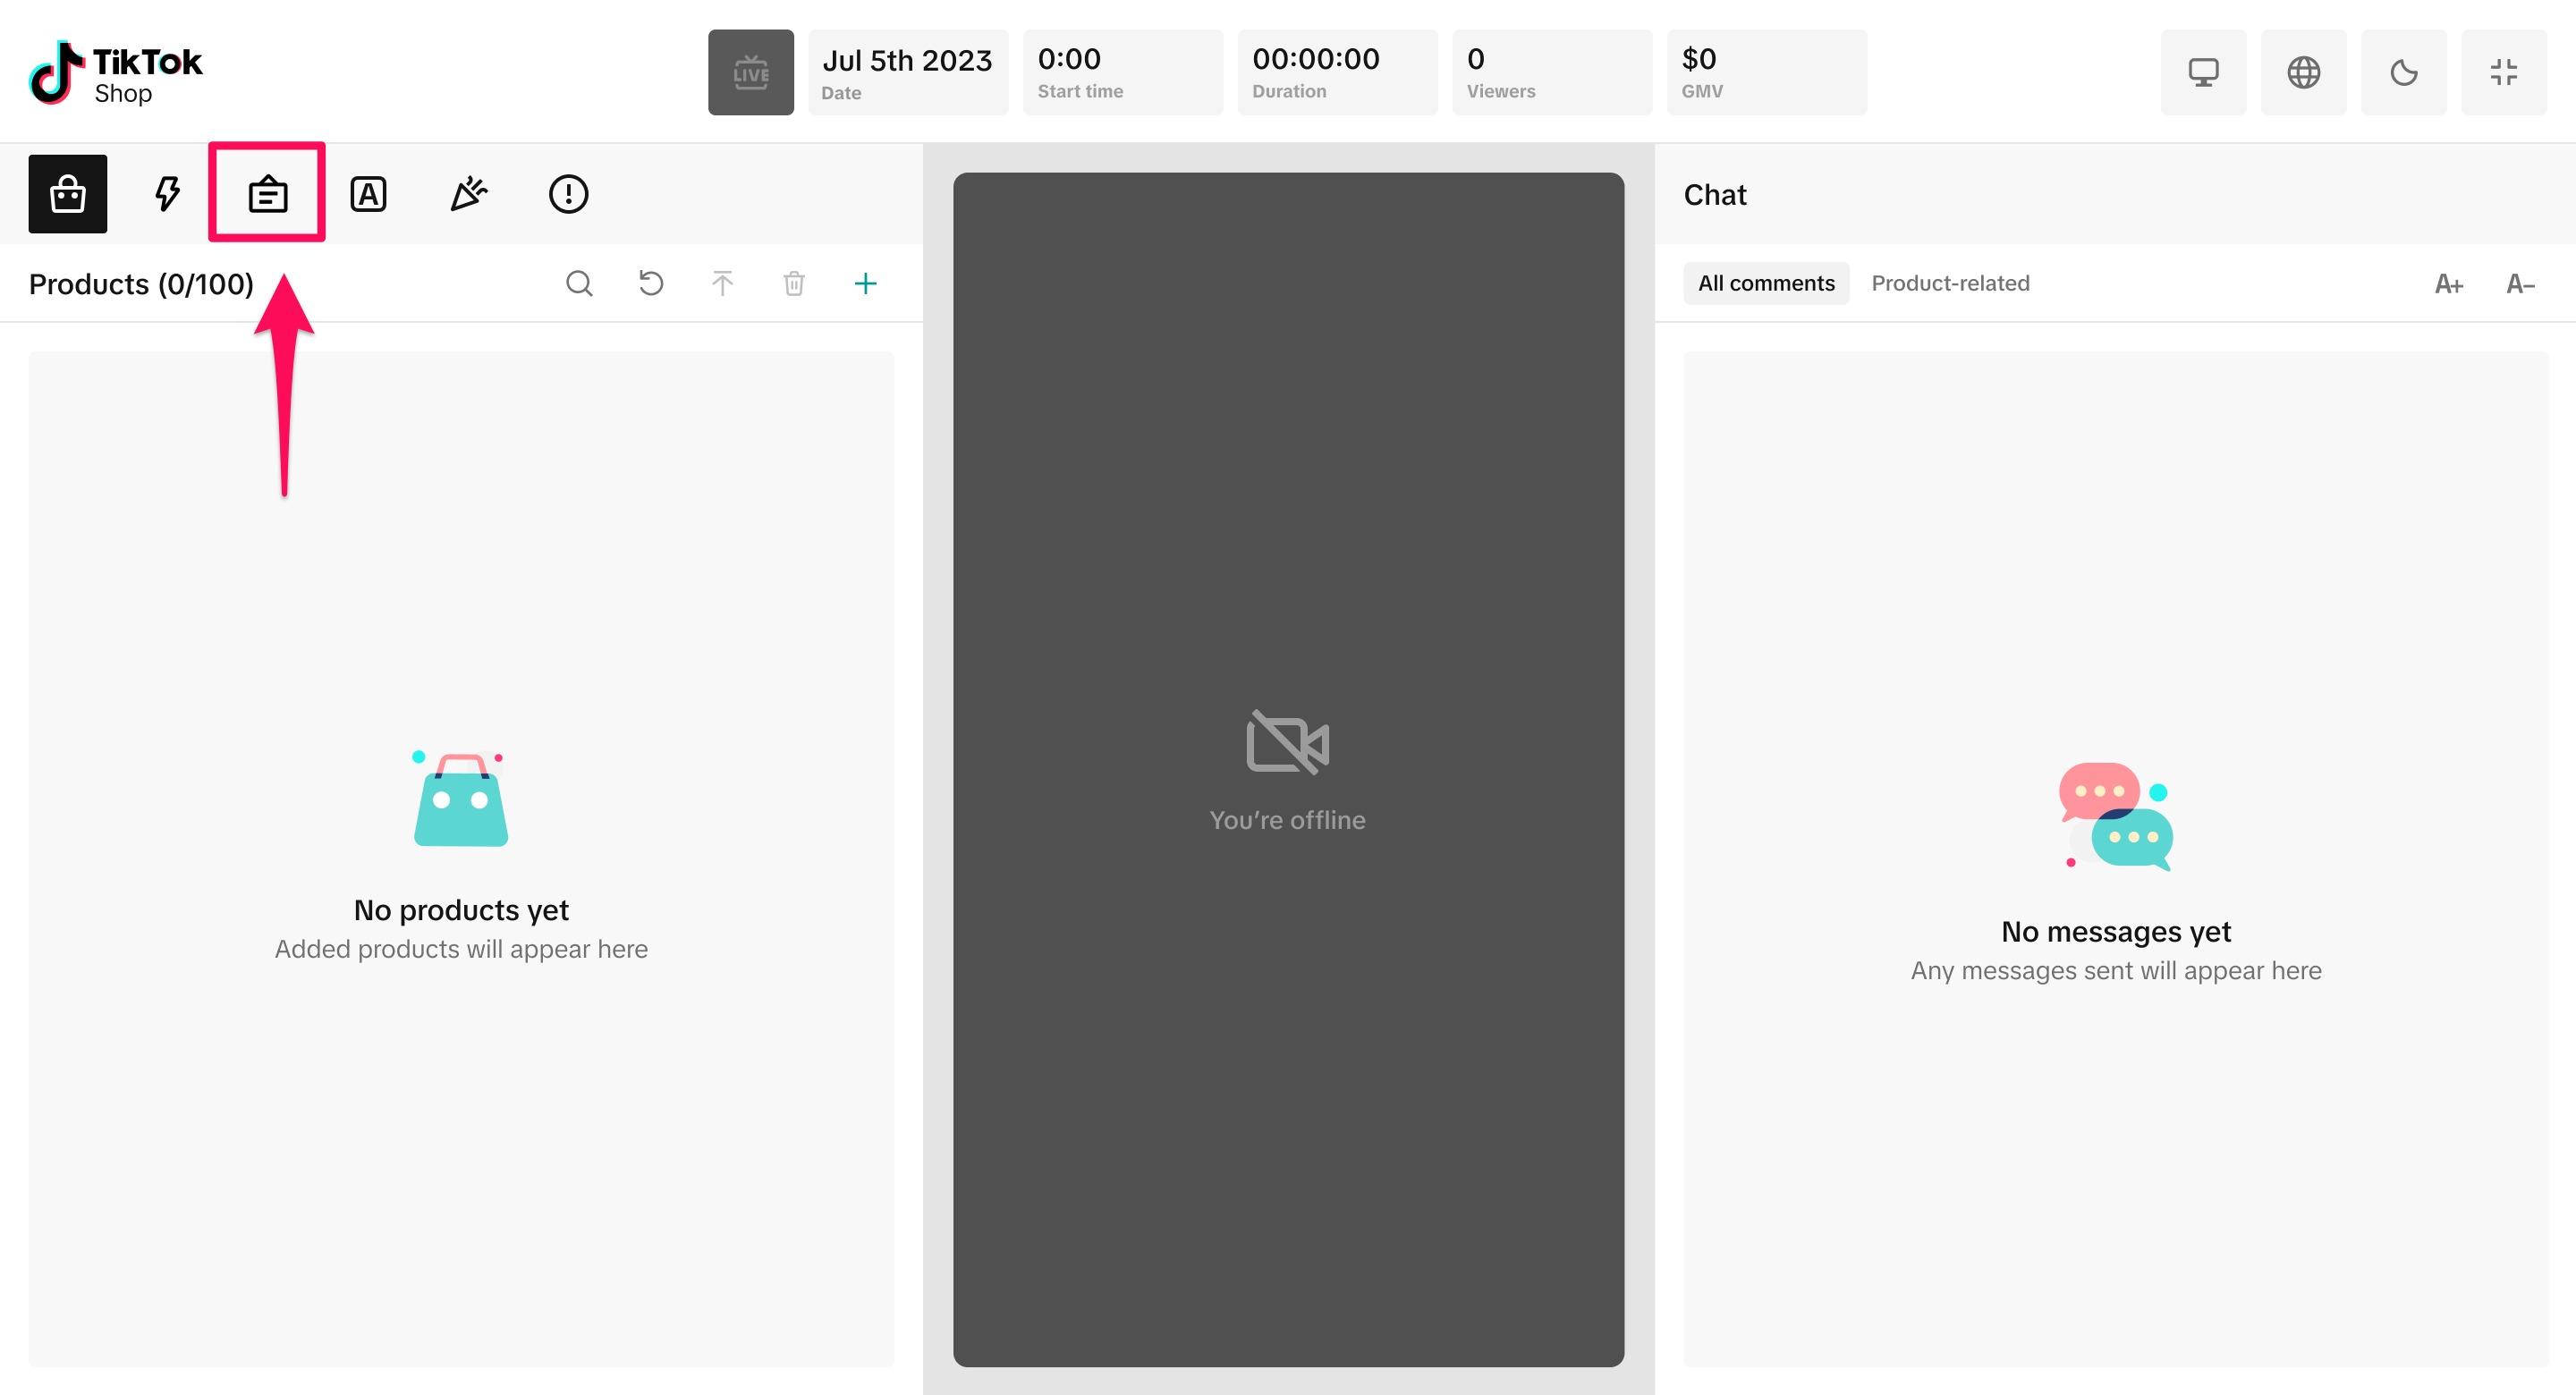
Step 1: In TikTok Shop Creator Center, navigate to the TikTok Shop toolkit and select LIVE product set. Enter the name and description (optional) of your product set and then click Next.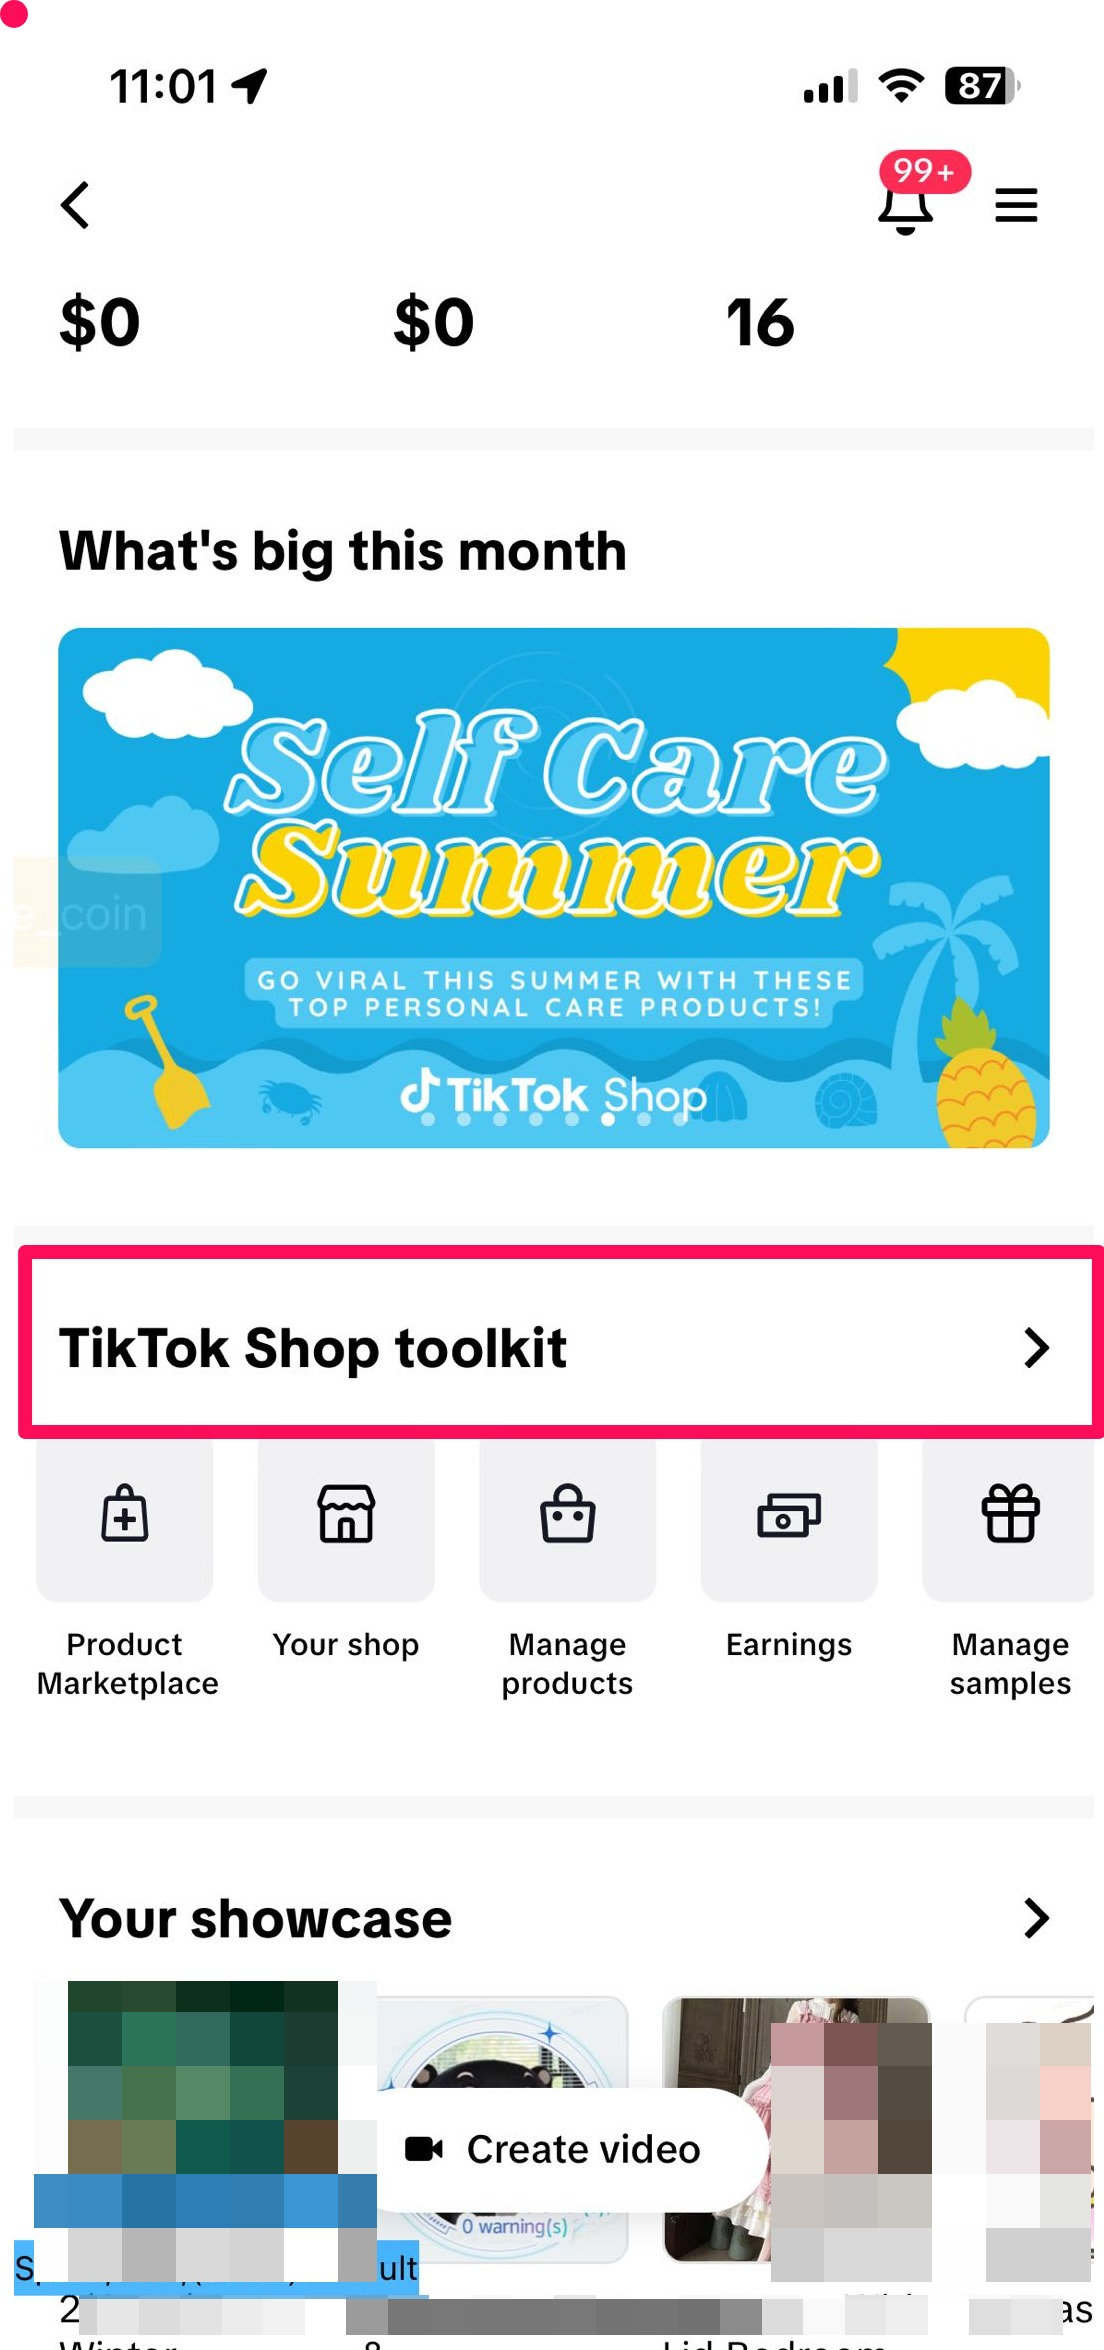 | 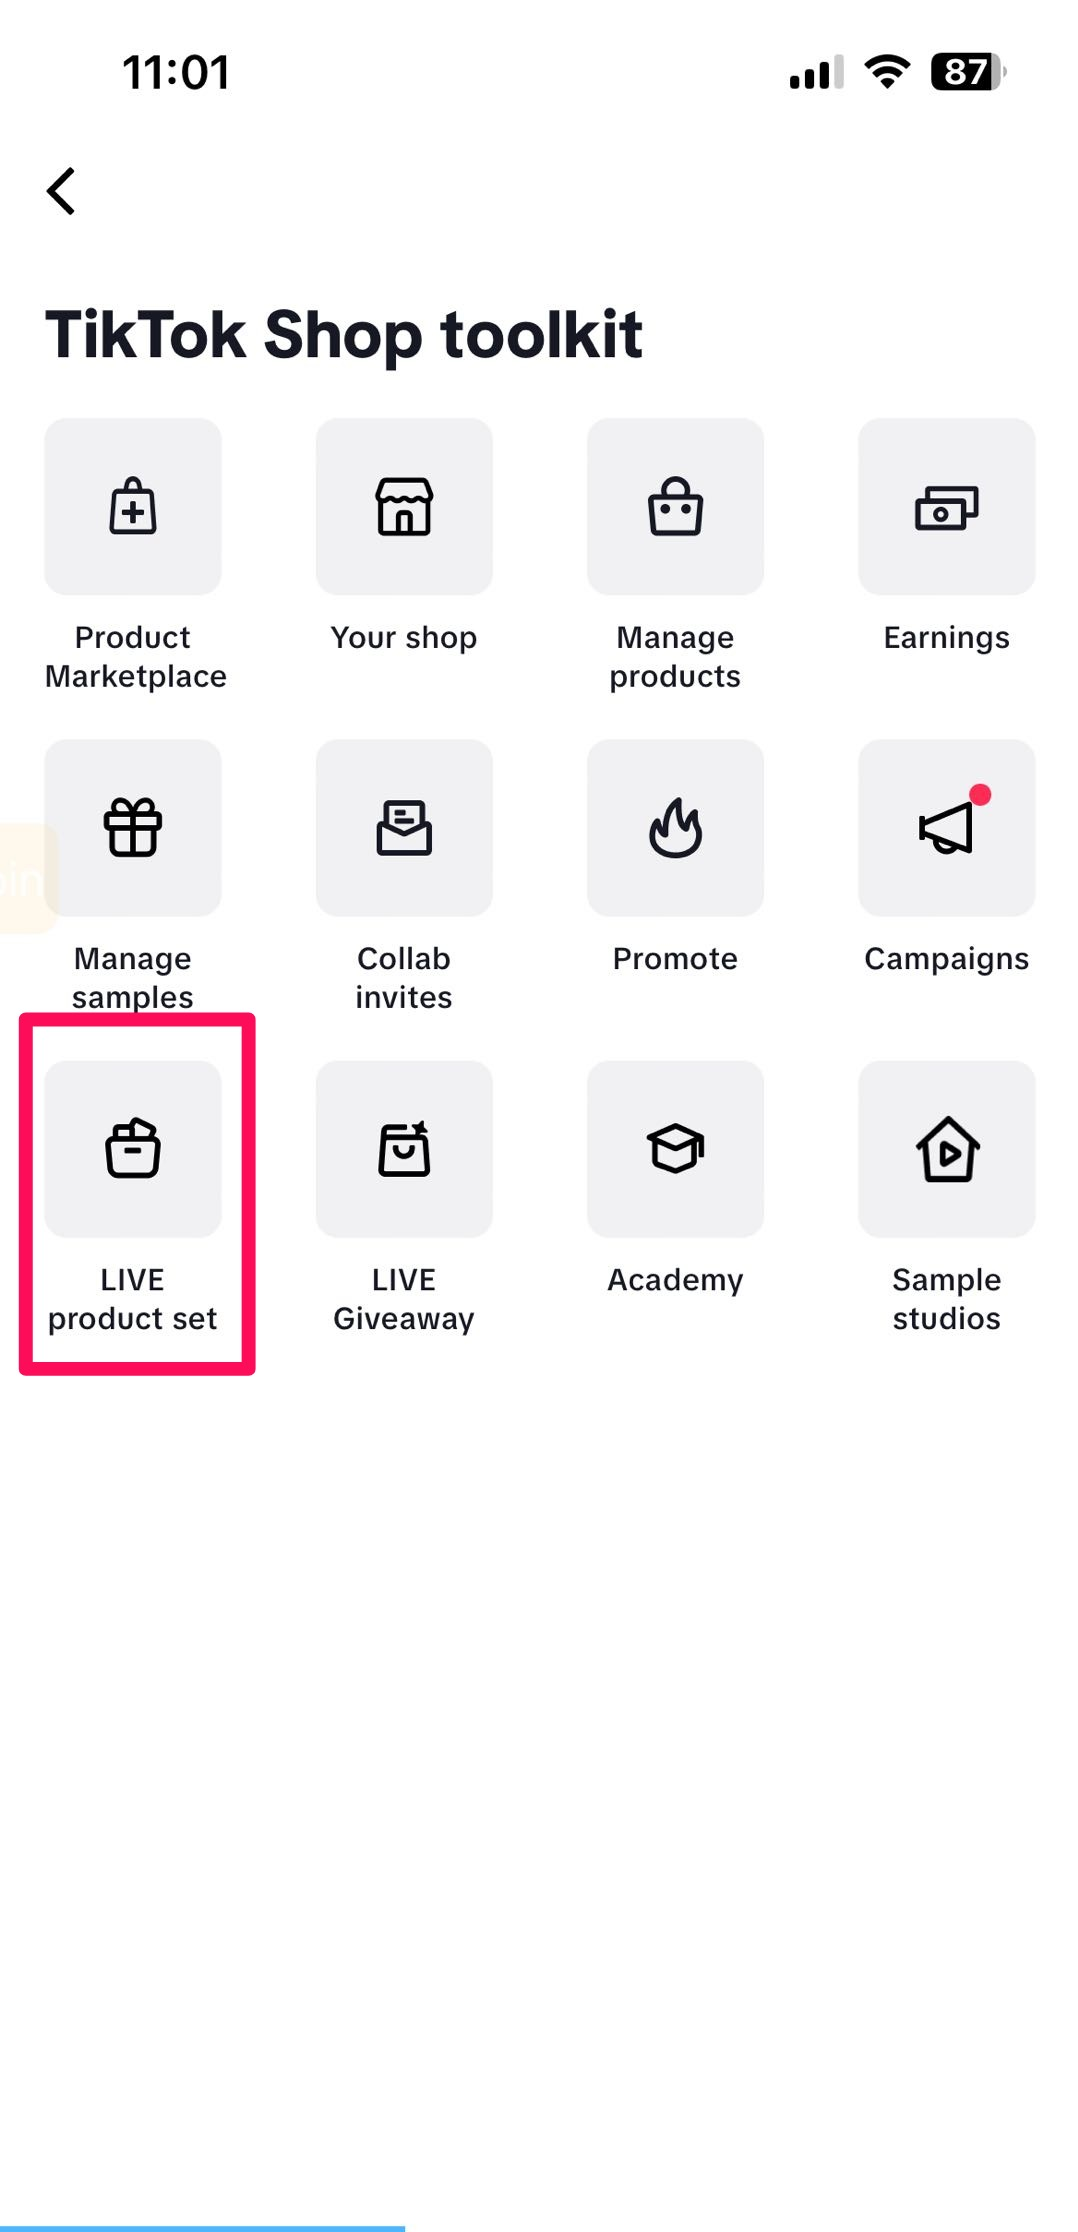 |
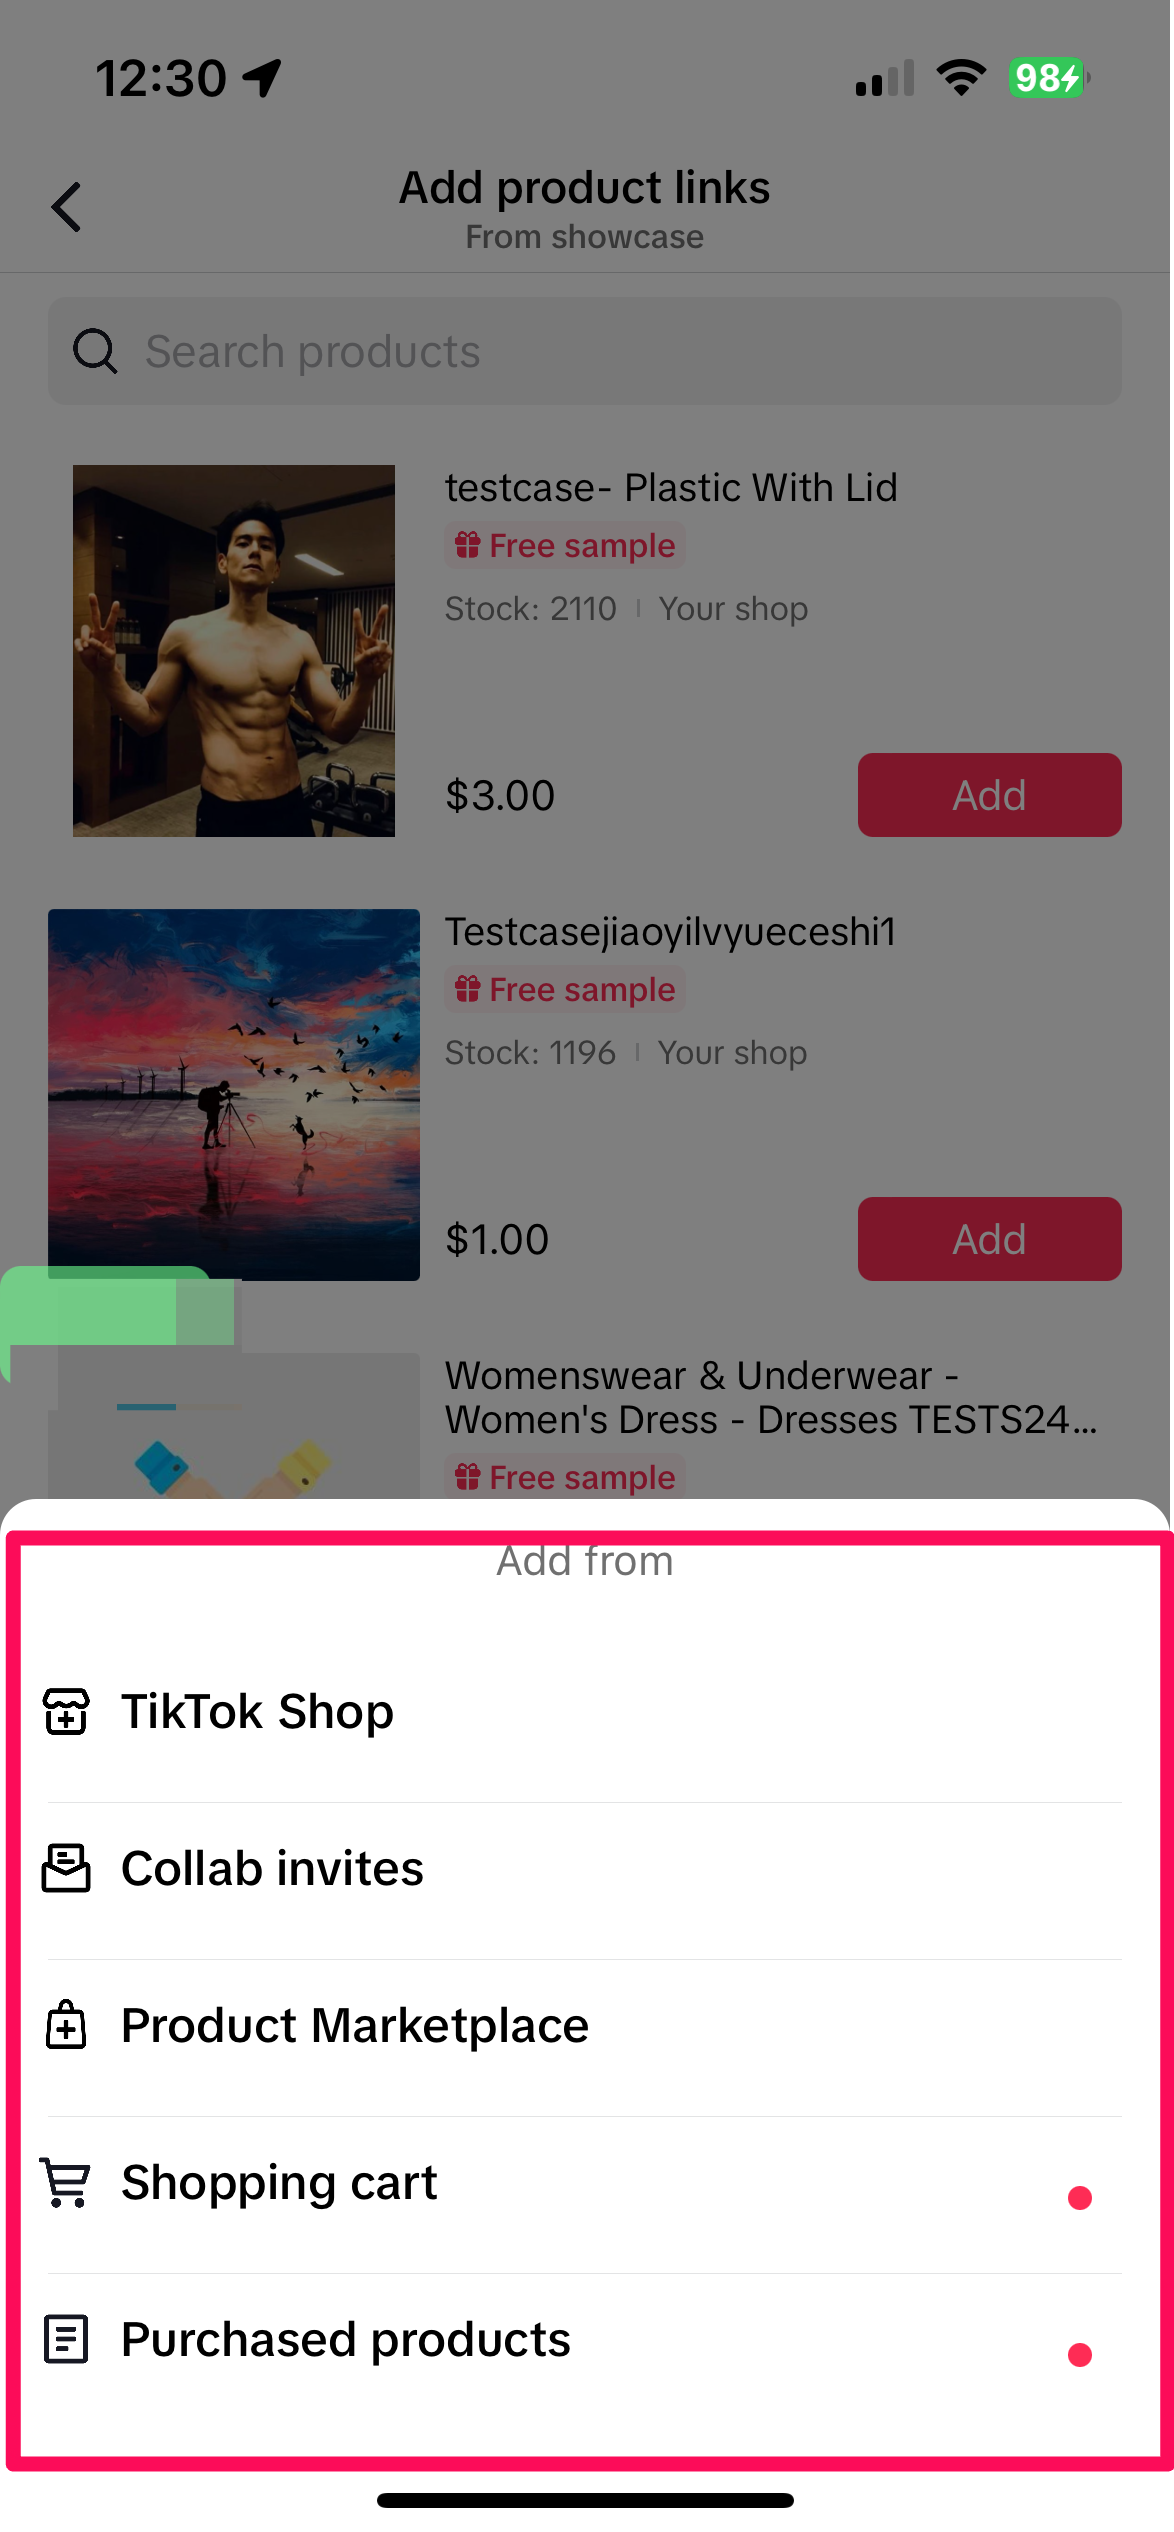
- TikTok Shop
- Showcase
- Collab invites
- Product Marketplace
- Shopping cart
- Purchased products
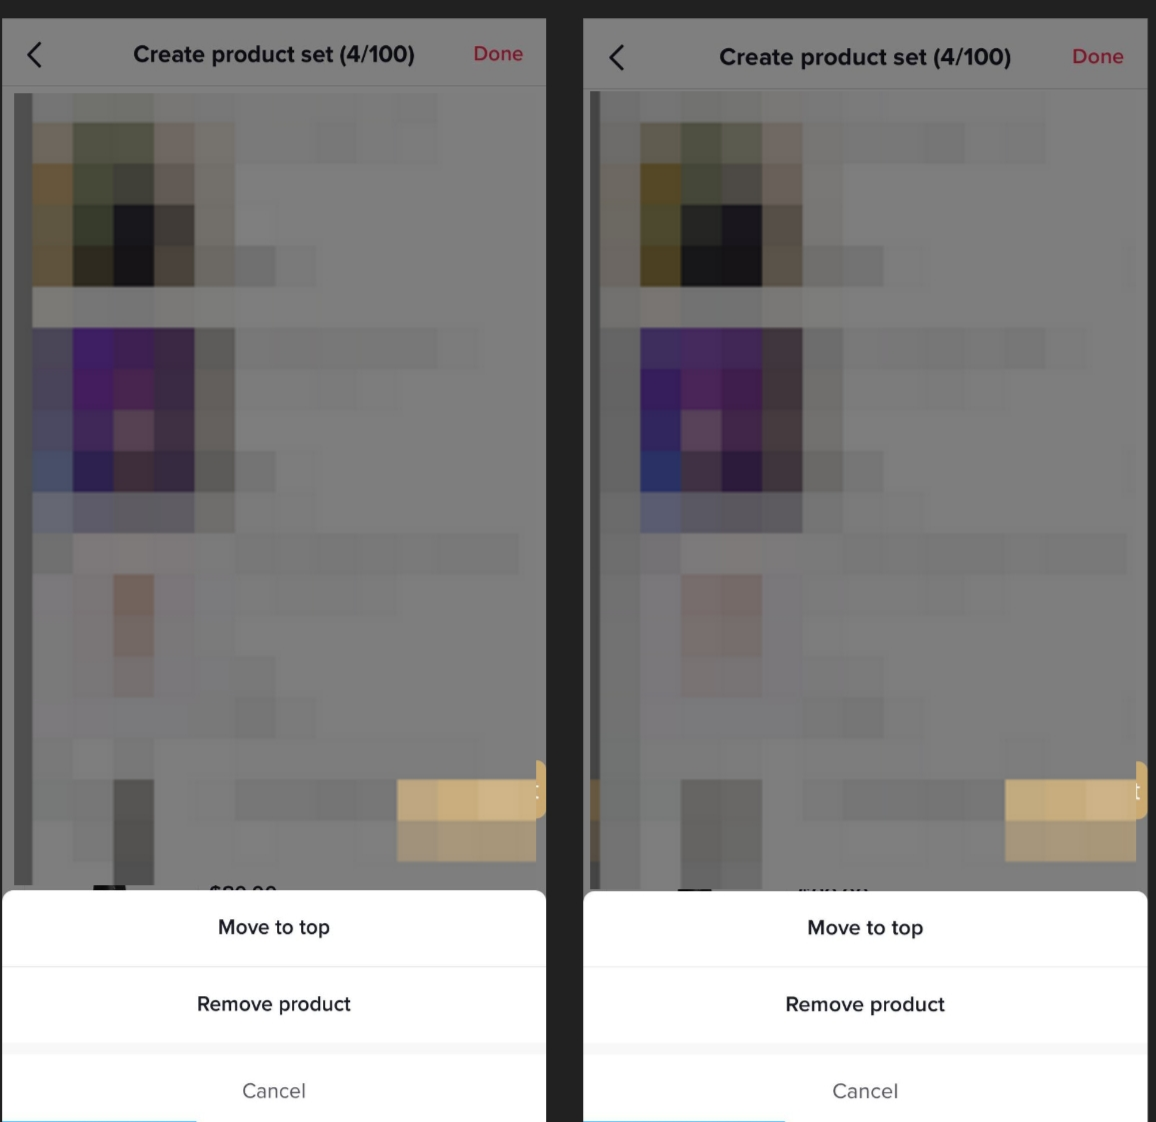
- Add: Click the Create Product Set button to create a new product set.
- Delete: Swipe left on the product set you want to delete and select Delete.
- Copy: Swipe left on the product set you want to duplicate and select Copy.
- Edit: Click on Product Set to enter the detail edit page.
Scheduling LIVE giveways
LIVE Giveaways can help you increase LIVE engagement and views by offering exclusive prizes, comment tasks, and countdowns. LIVE Giveaways can attract the attention of existing and new audiences, and are a great way to keep energy high. You can schedule LIVE Giveaways in advance or during your LIVE.
Note: Unless you're a creator with your own products and inventory, a seller will need to invite you to participate in a LIVE Giveaway for their products before you're able to set up a Giveaway. For more information, check out our feature guide on LIVE Giveaways.Step 1: In TikTok Shop Creator Center, navigate to the TikTok Shop toolkit and select LIVE Giveaway On the Create new screen, click Select item to see available items for prizes. Click on the button next to the item to add the item to your giveaway.
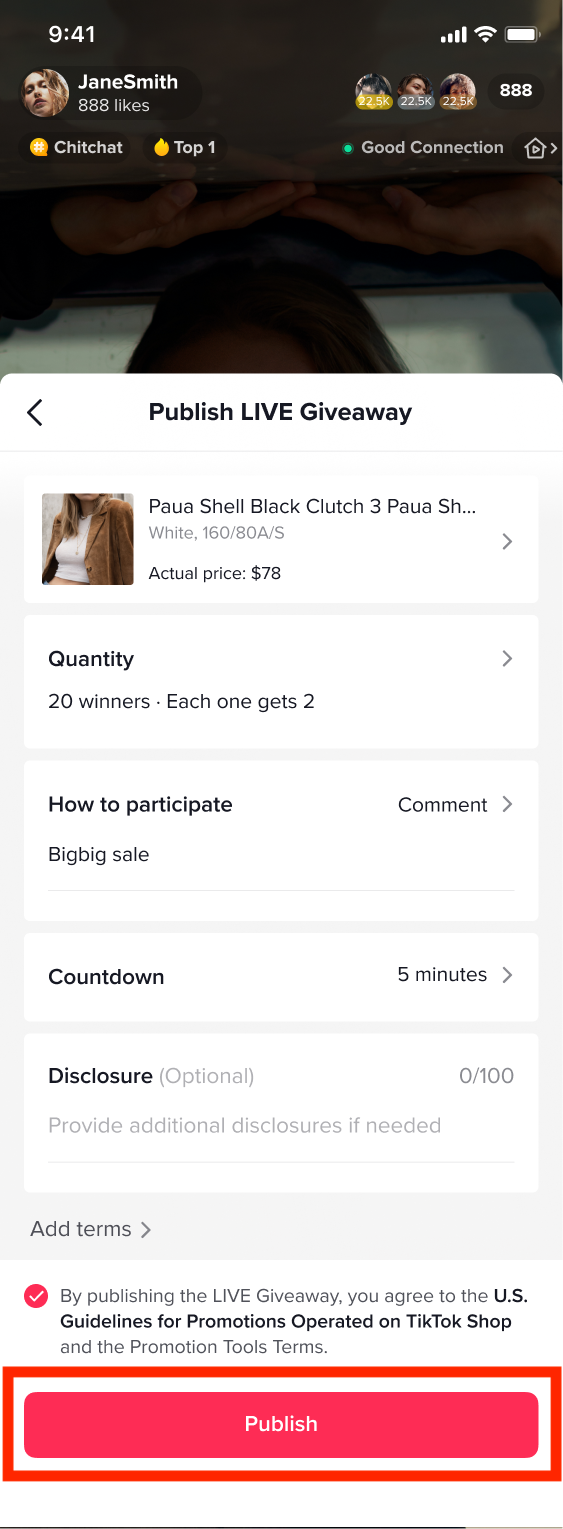
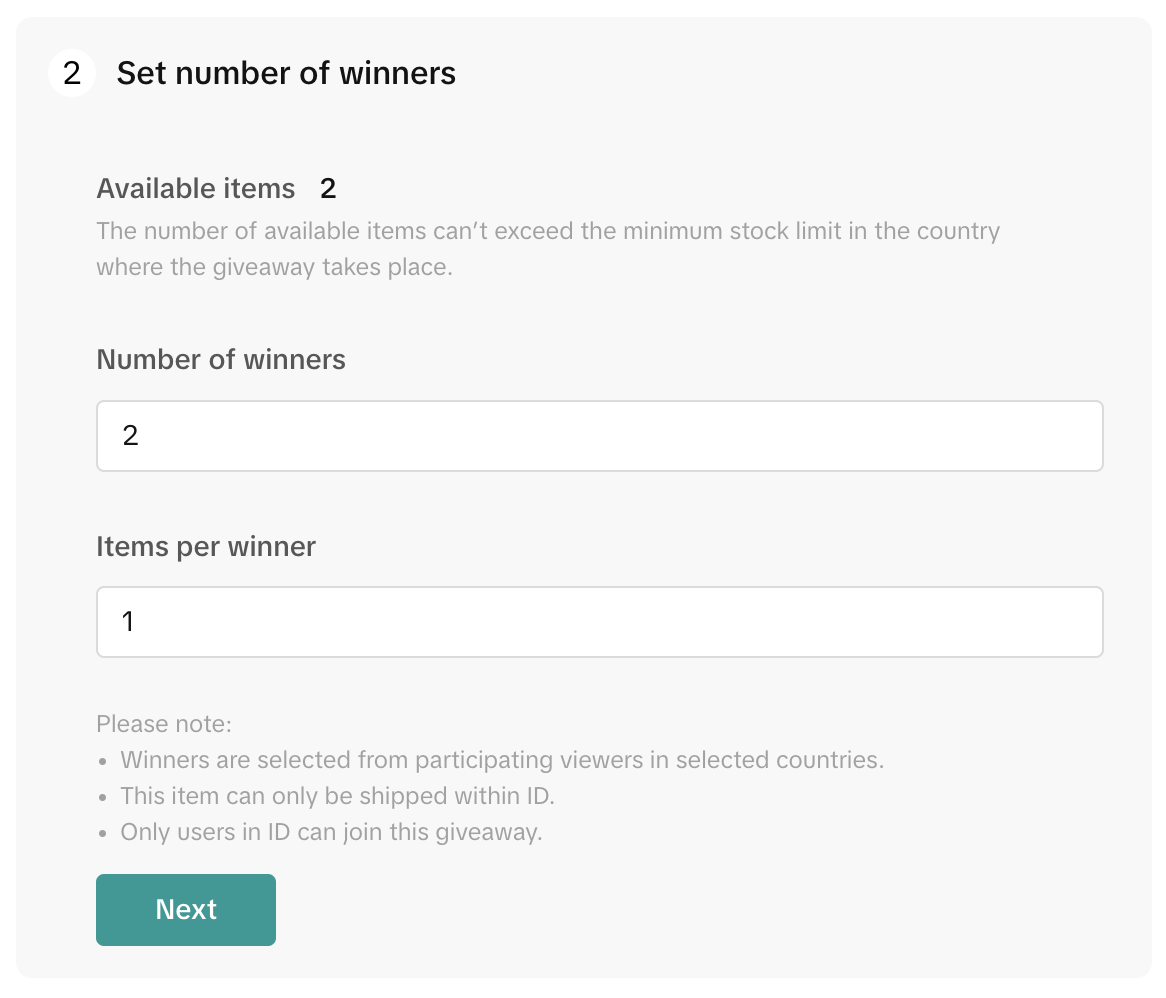
- Select the number of winners for your LIVE Giveaway and the prize quantity each winner will receive.
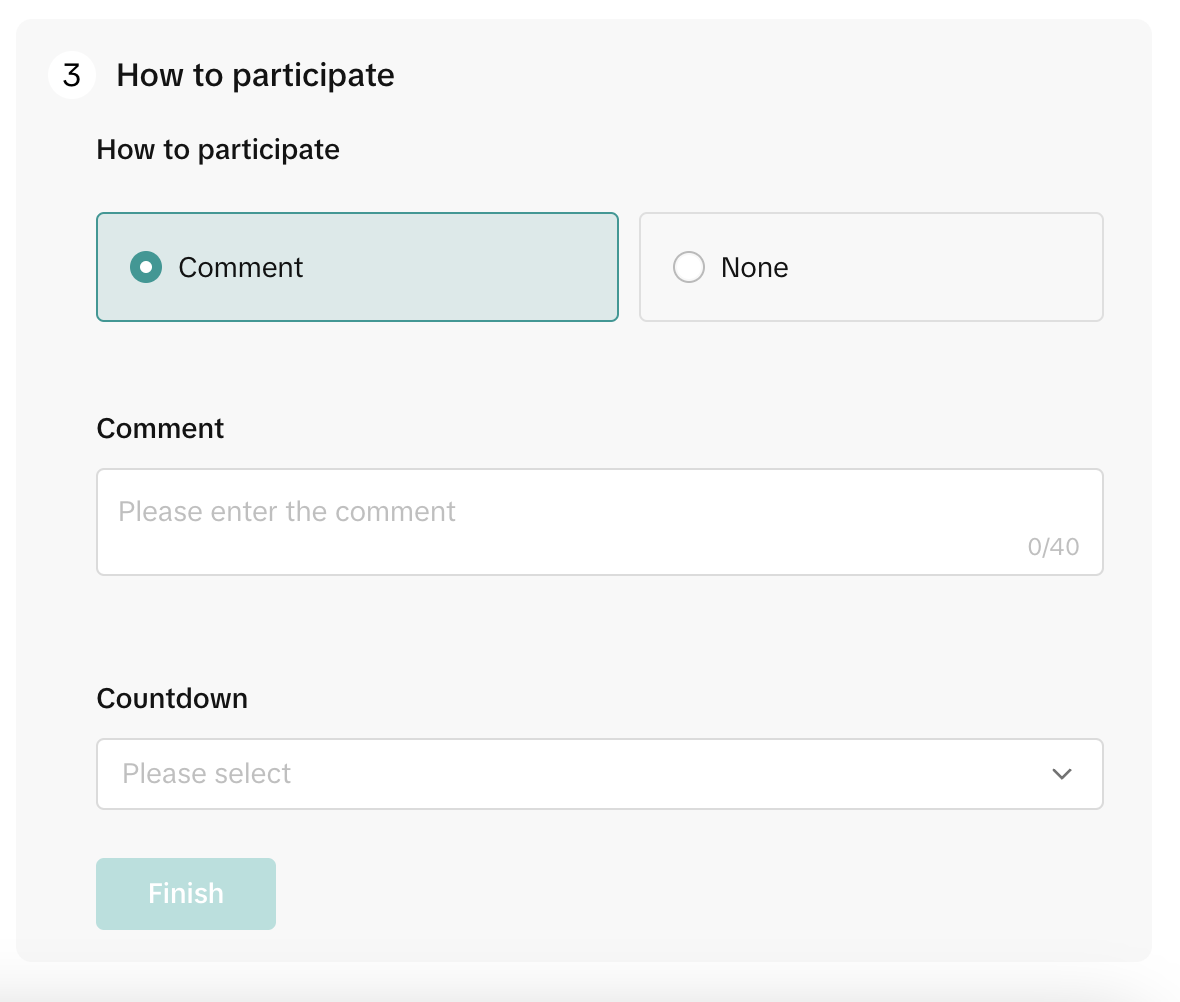
- Select the user requirement for participation in the LIVE Giveaway. By selecting Comment, users will be required to leave a comment on your LIVE to be eligible to win. This encourages users to post a comment which fosters engagement, helps increase the visibility of your LIVE, and attracts more traffic.
- Select the duration of your LIVE Giveaway with in Countdown. You can choose 5, 10, or 15 minutes
Prepare your moderators
Moderation helps ensure a safe, fun, and engaging environment. In the Pre-LIVE screen, tap Settings > Moderators to search users by username and add them as moderators. You can add up to 20 moderators for each LIVE. Once the moderator is added, they can mute individual users from commenting during the LIVE if necessary.Go LIVE checklist
It's time to go LIVE! Follow our helpful checklist below to make the most out of your LIVE session:- Start your LIVE
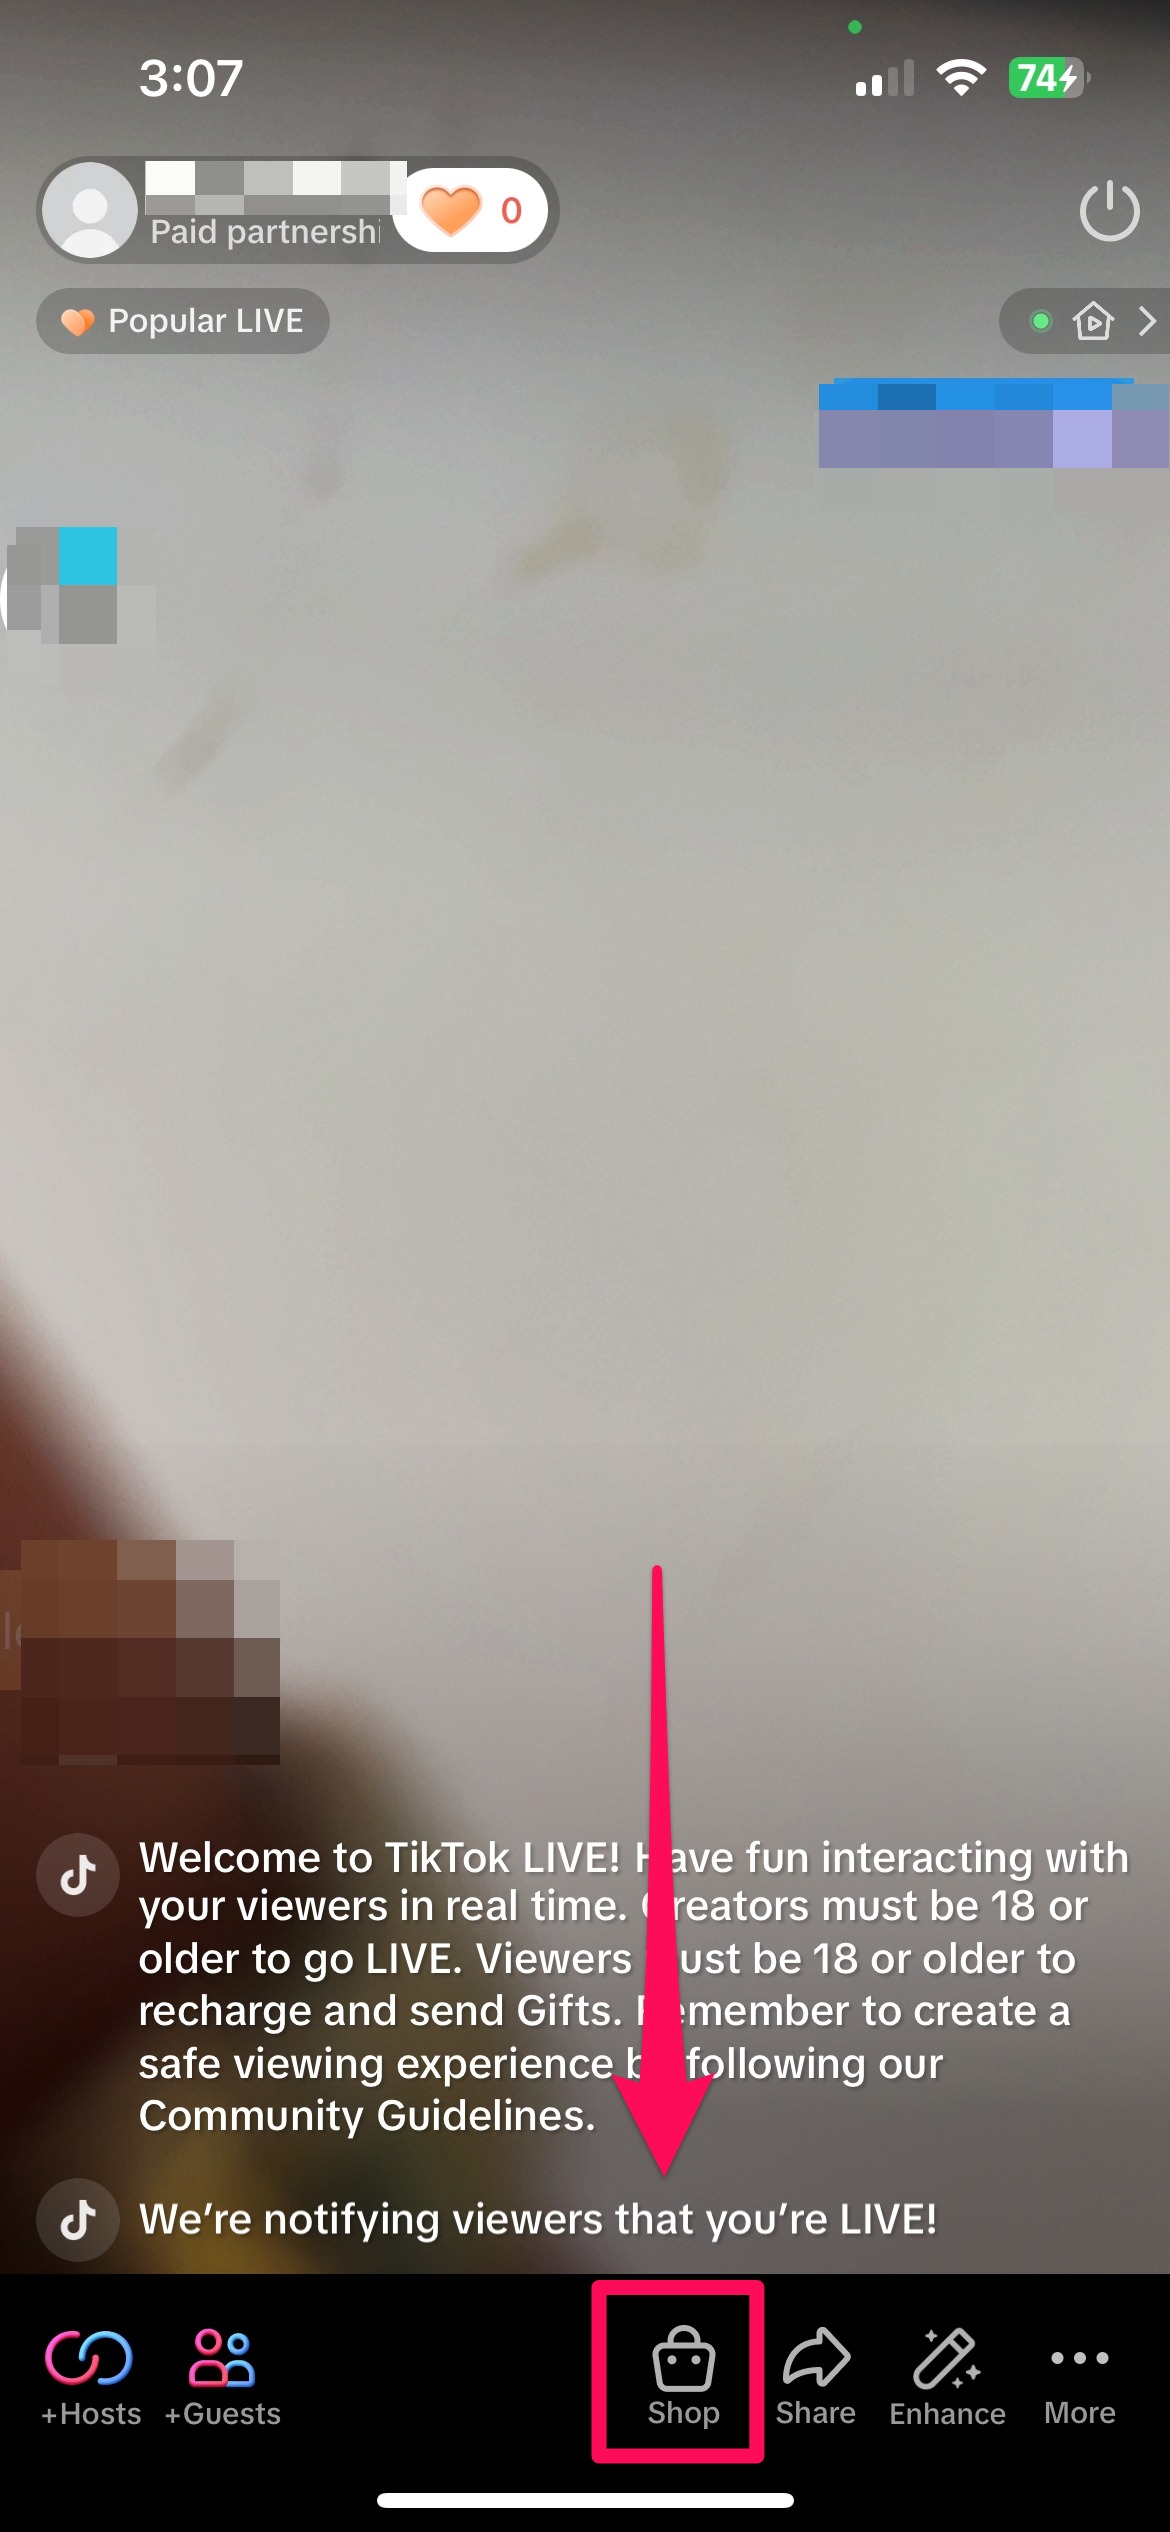
- Pin and pitch your products
- Launch a LIVE Giveaway
- Launch a Flash Sale
- Use LIVE Billboards
Starting your LIVE Event
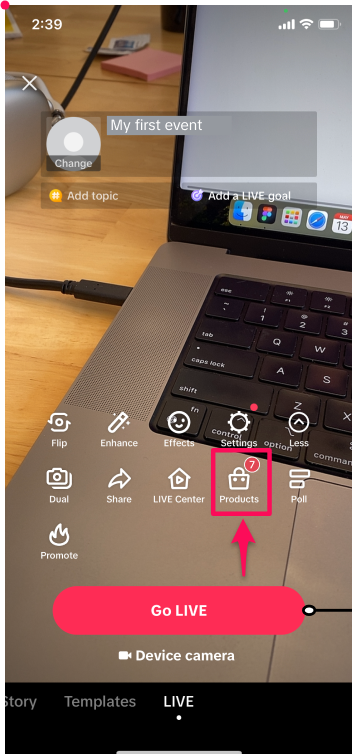
Ready to kick off your LIVE Event? You can initiate your LIVE Event within 10 minutes of your scheduled start time by tapping Go LIVE on the LIVE Event page. When the LIVE starts, subscribers to the event will receive a push notification.
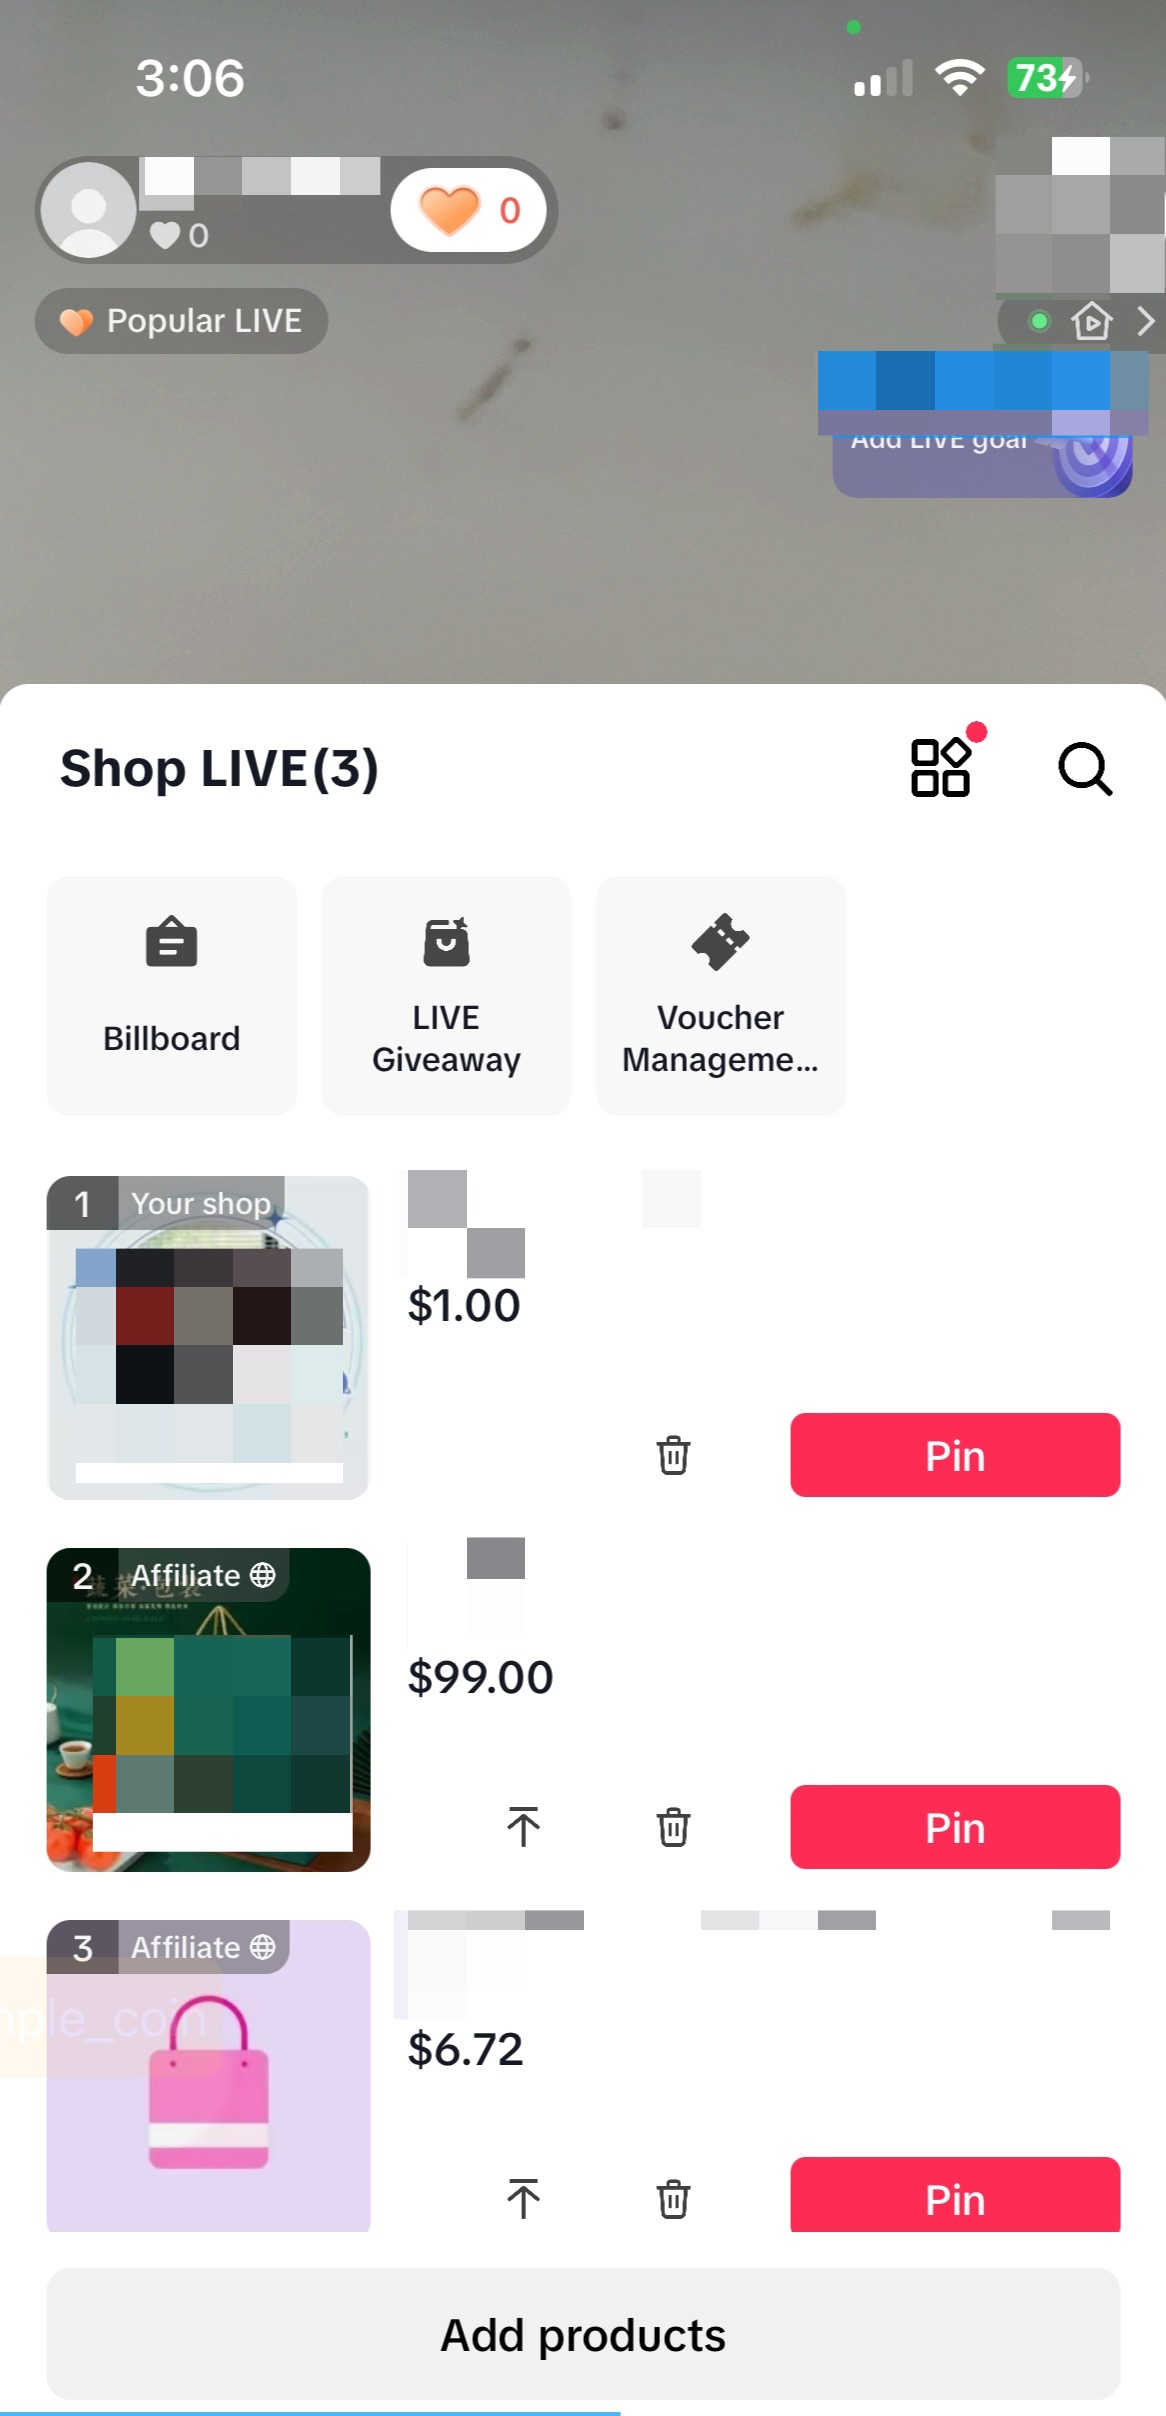
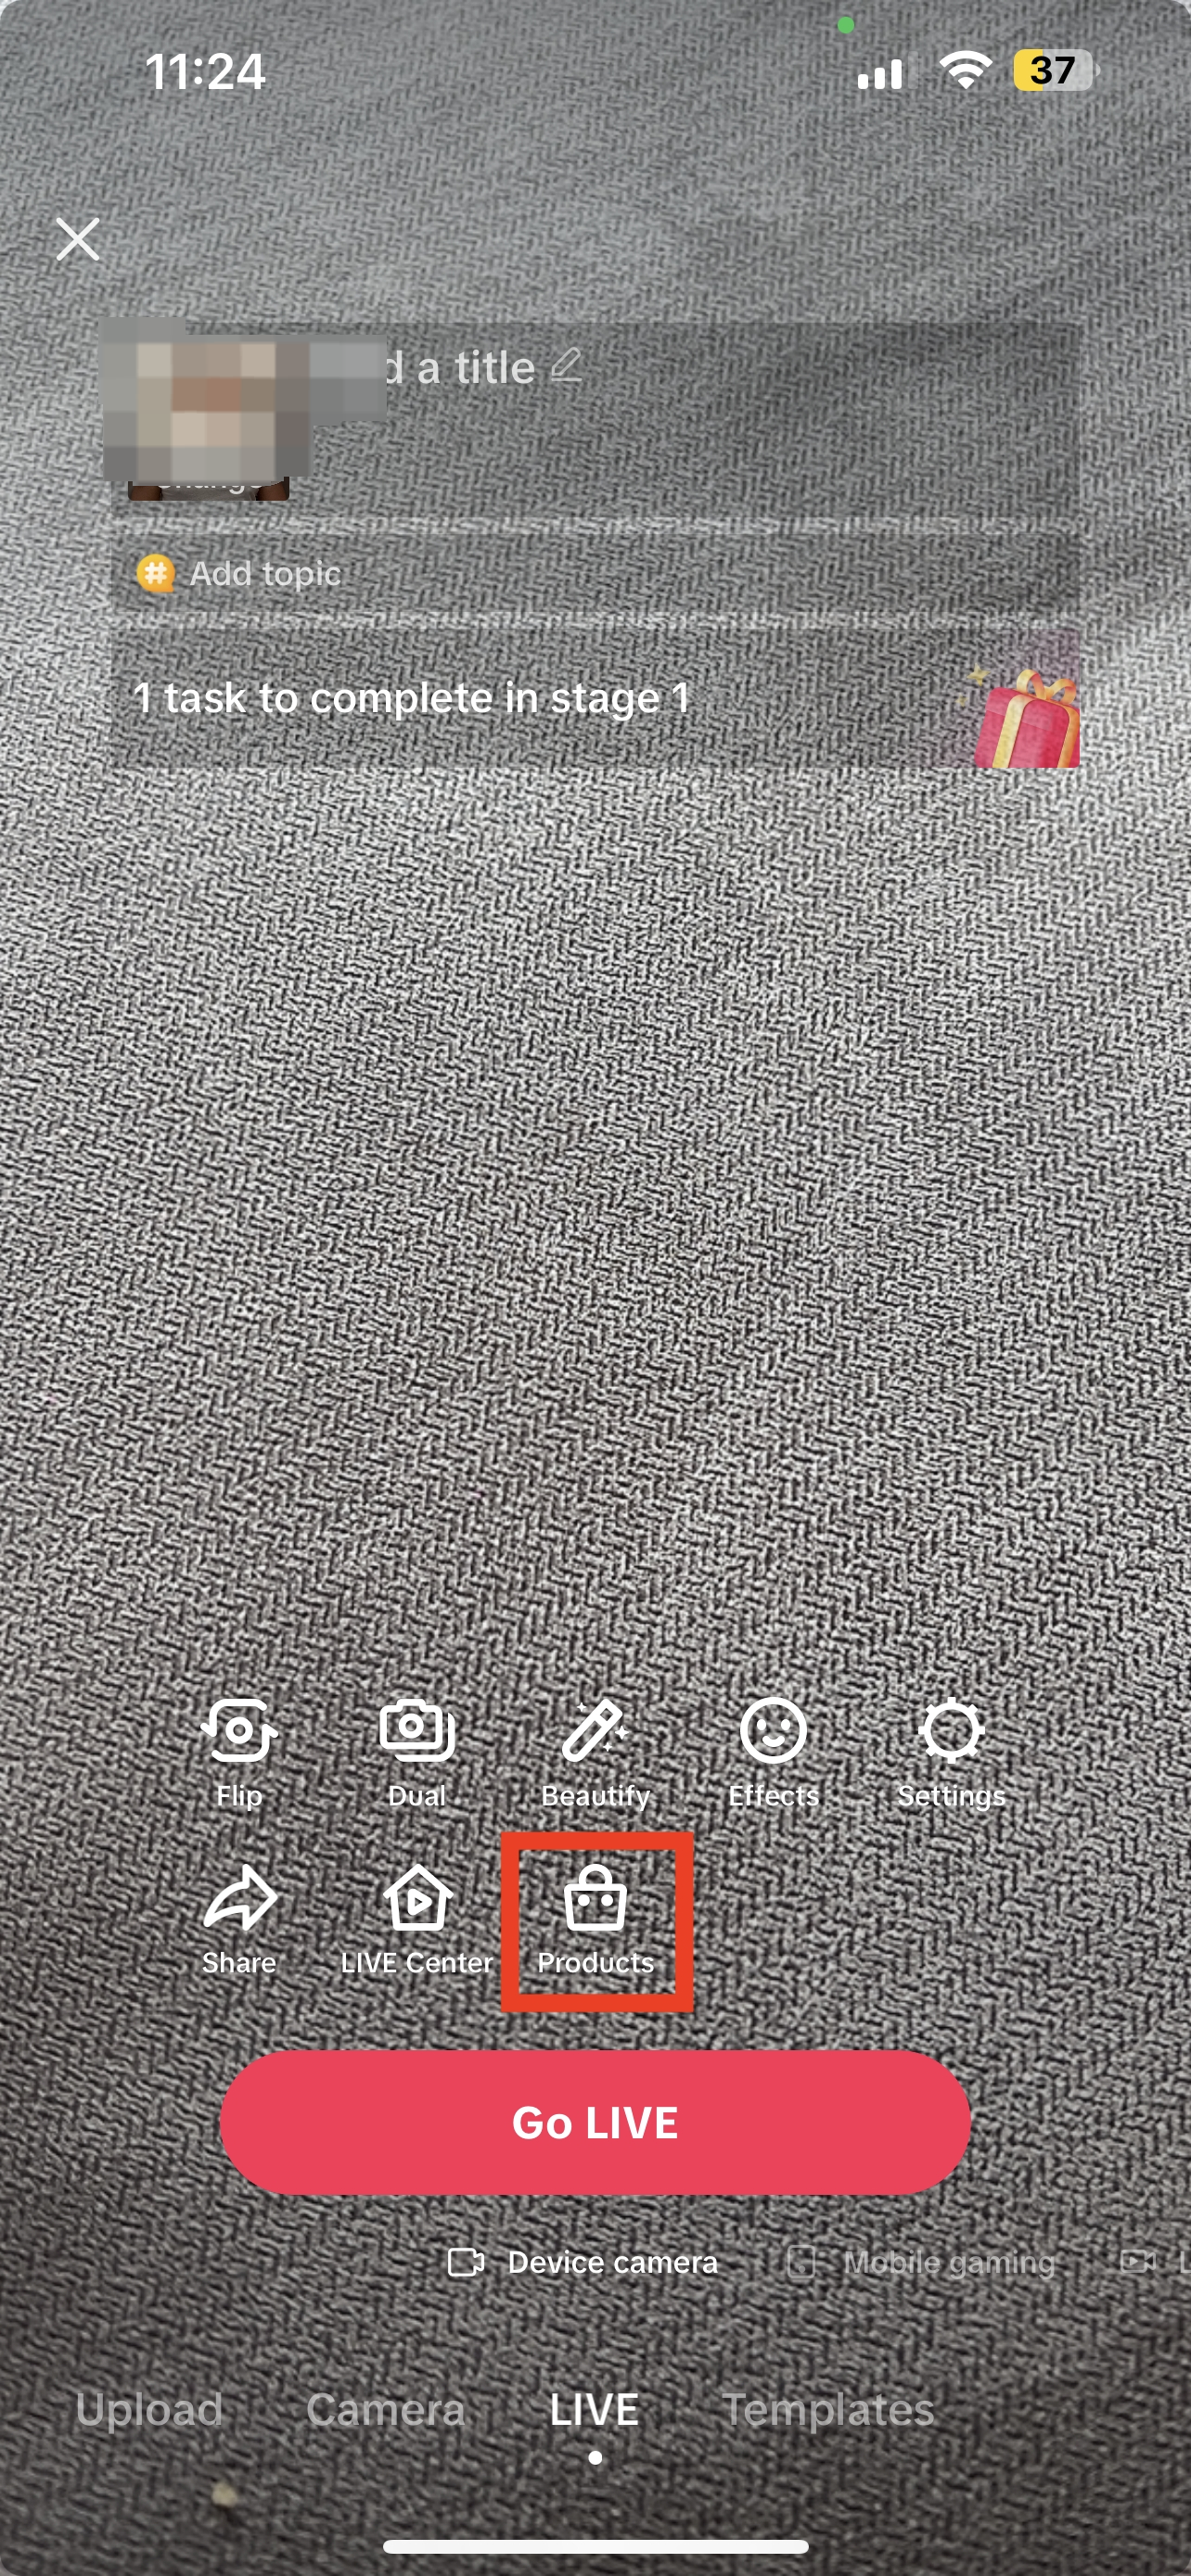
Get started by pinning products you want to feature in your session. Tap the shop icon and simply pin to begin.Tip: Make sure you remind viewers to tap on the shopping bag throughout the LIVE so that as people enter and exit the session, they know where to go to see your products.
Launching a LIVE Giveaway
Once you're live, launch your scheduled LIVE Giveaway to encourage engagement from your viewers.- To launch a LIVE Giveaway during your LIVE, go to the LIVE Giveaway page and select the Giveaway tab to see all available giveaways.
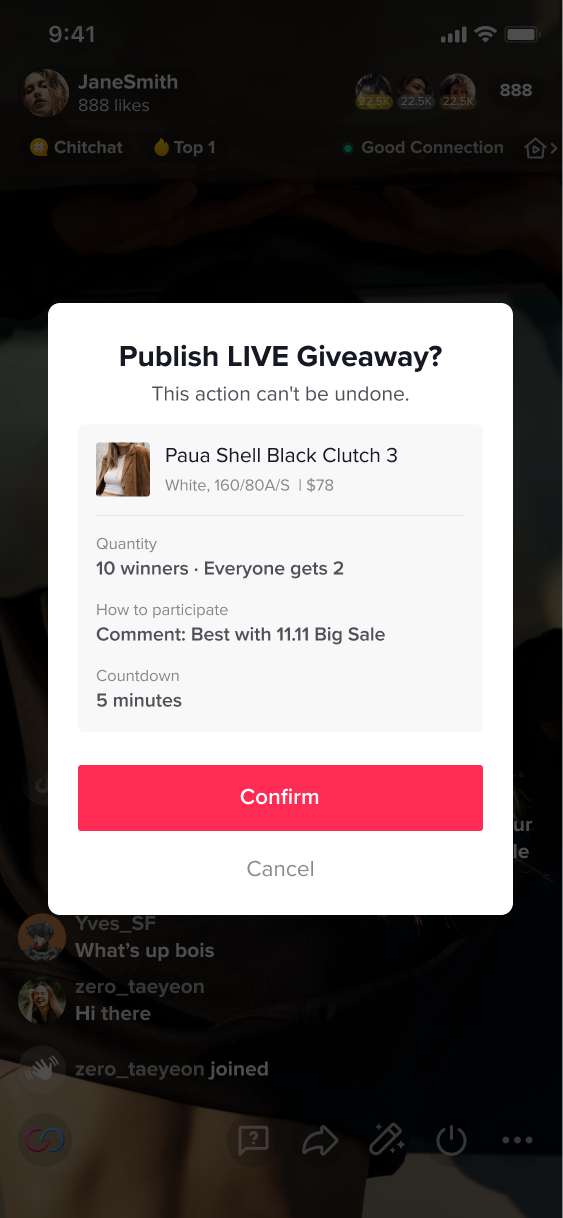
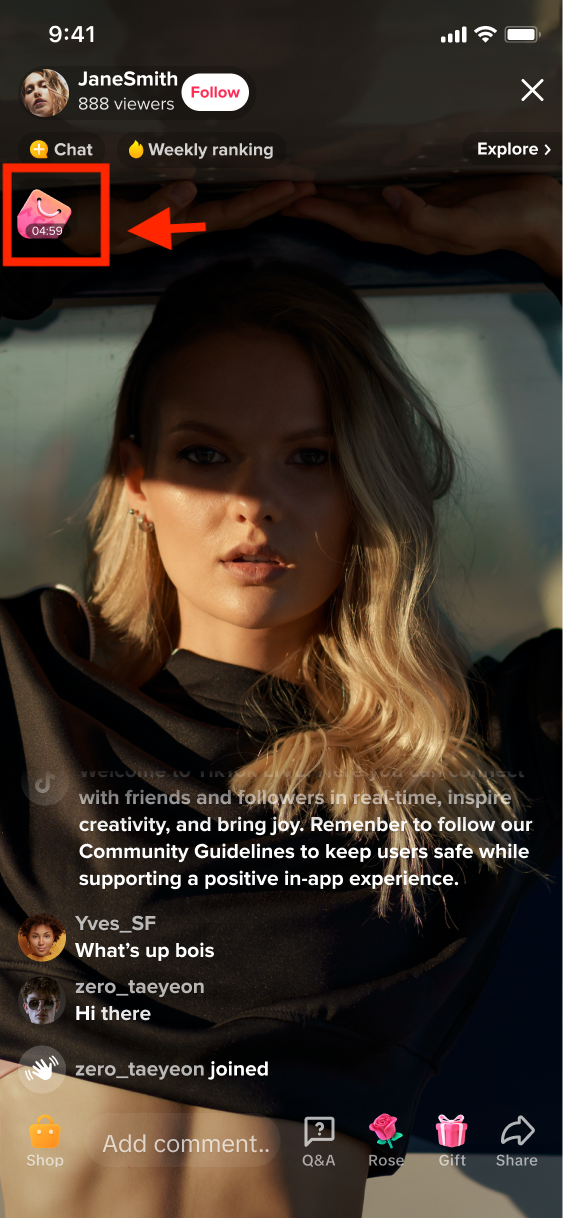
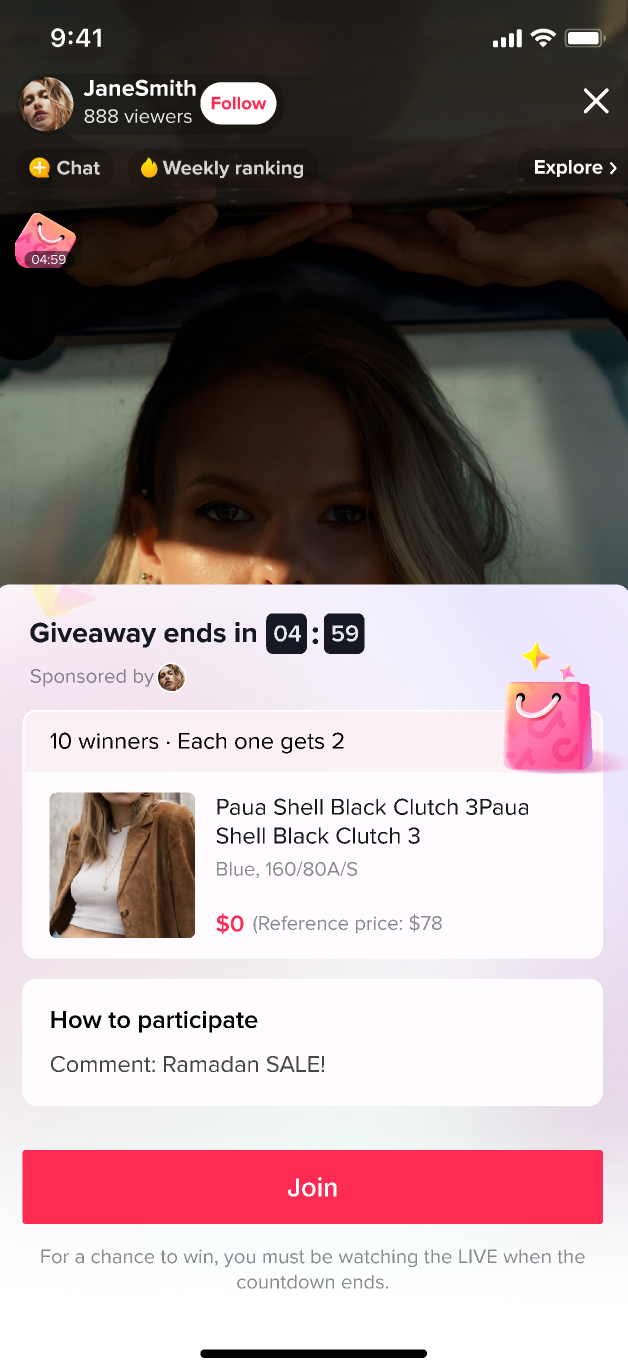
- Select the LIVE Giveaway that you want to use and click Publish. Review the details and click Confirm to launch your giveaway. You'll see a tag in the lefthand corner indicating the giveaway has started, along with a countdown of time remaining.
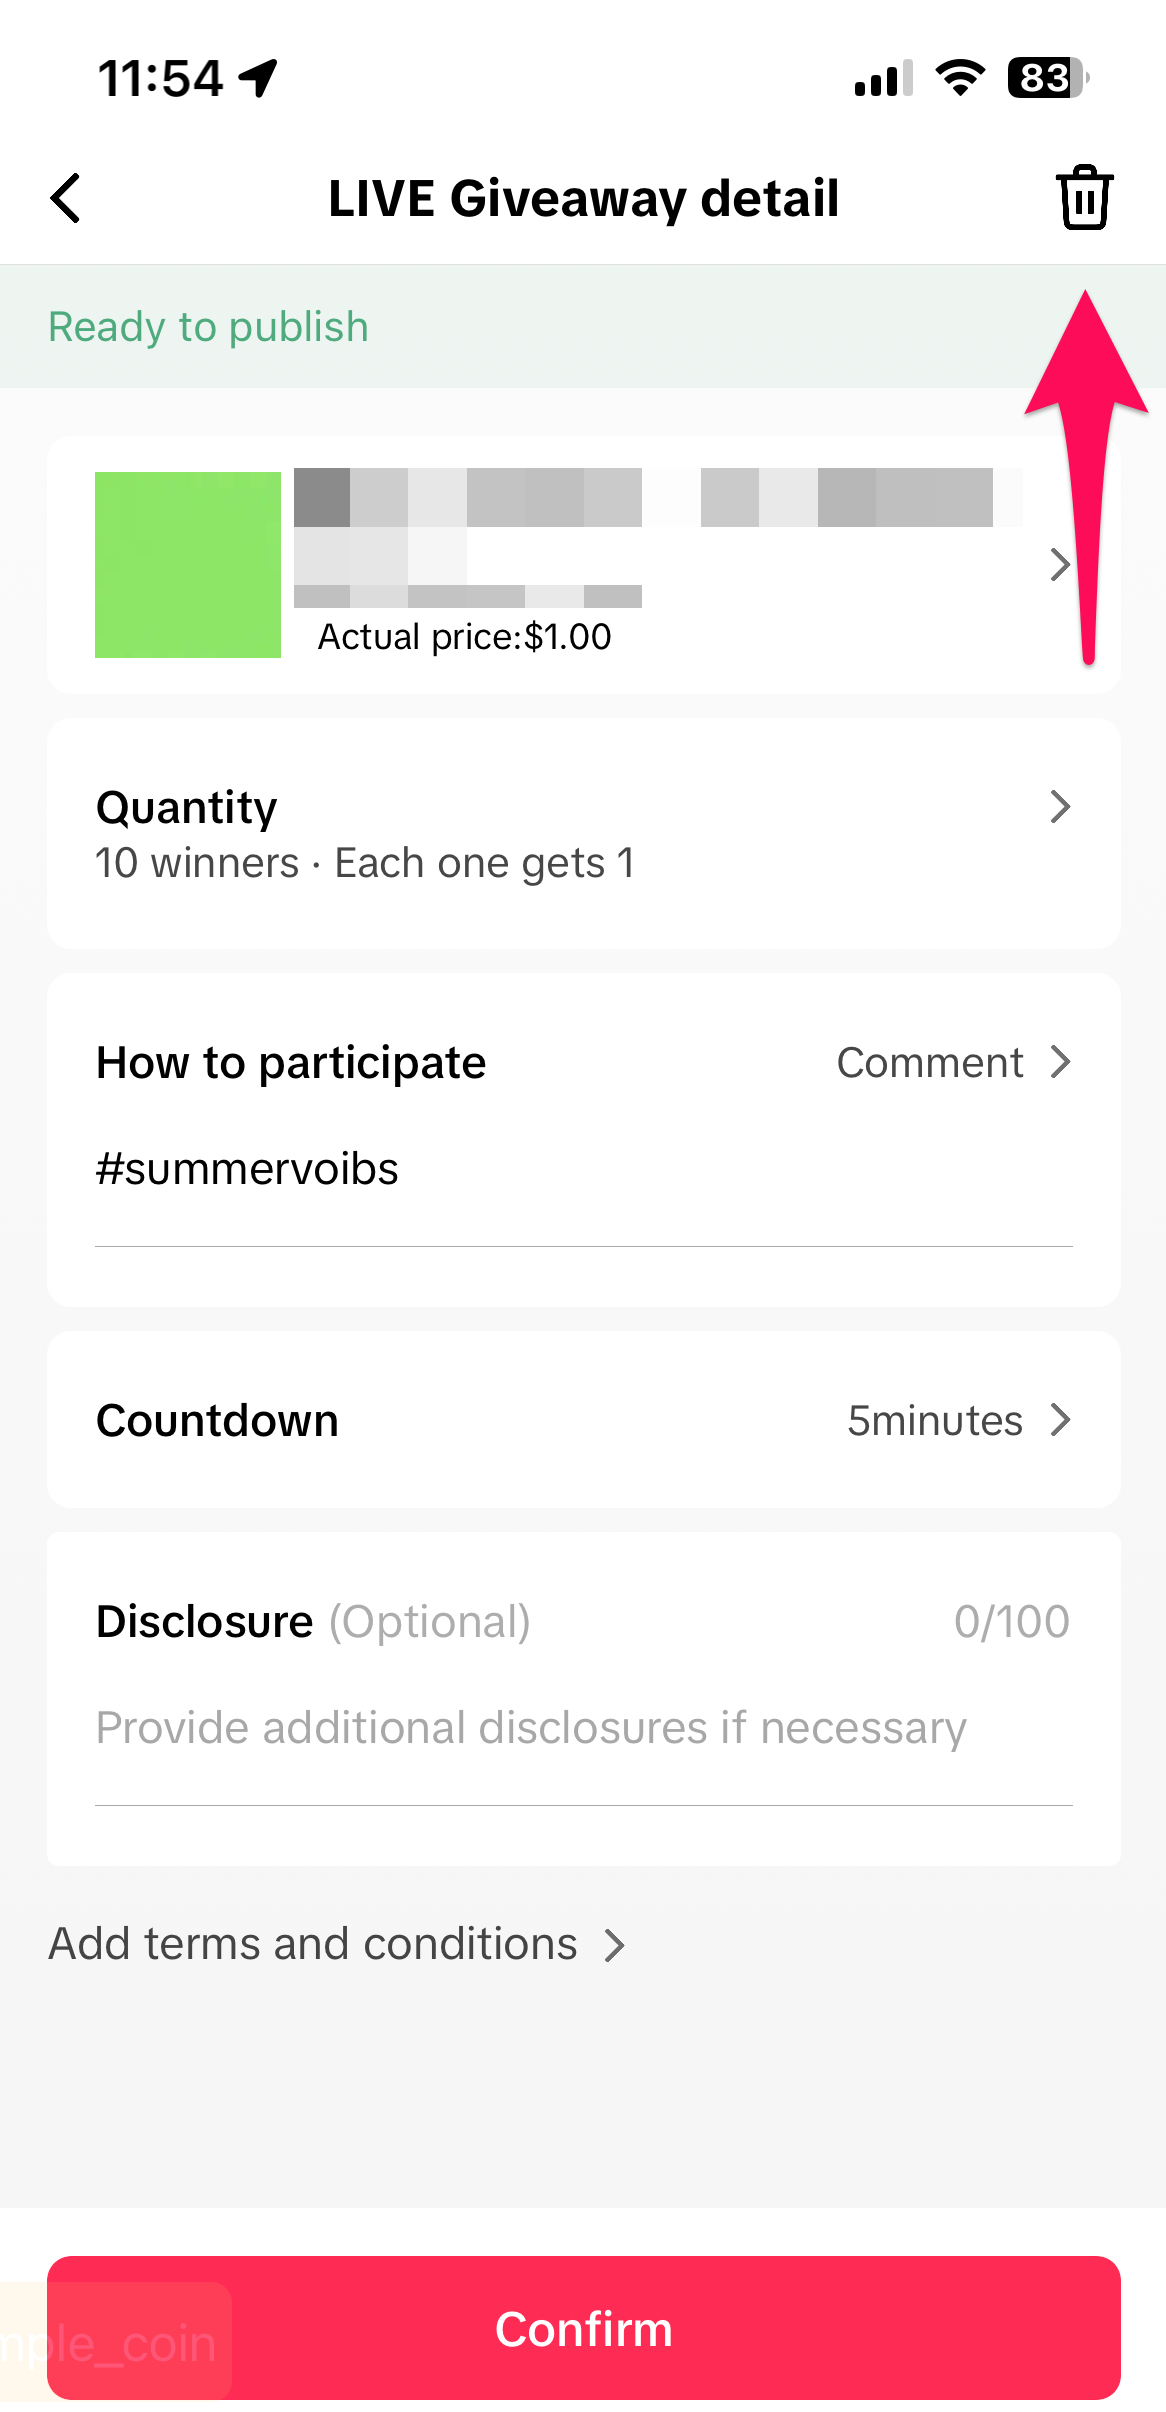
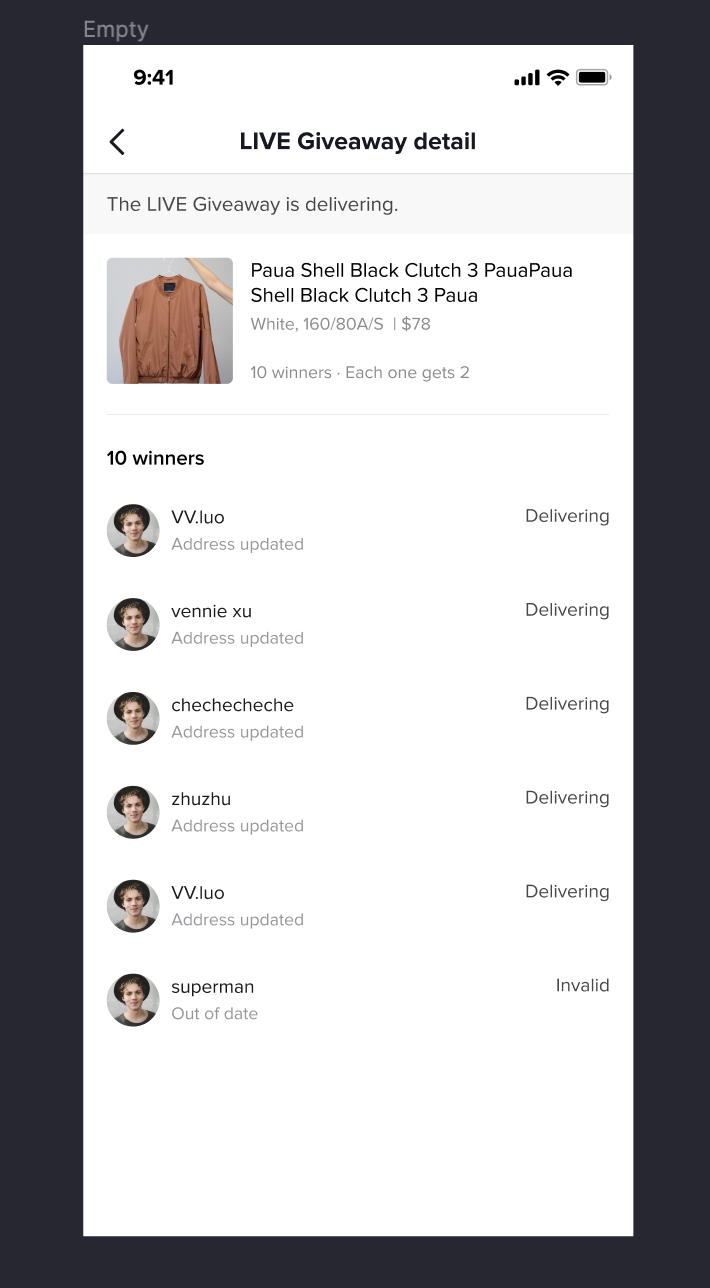
- Once a LIVE Giveaway ends, you can track the delivery status of prizes sent to winners on the LIVE Giveaway detail page.
Launching a Flash Sale
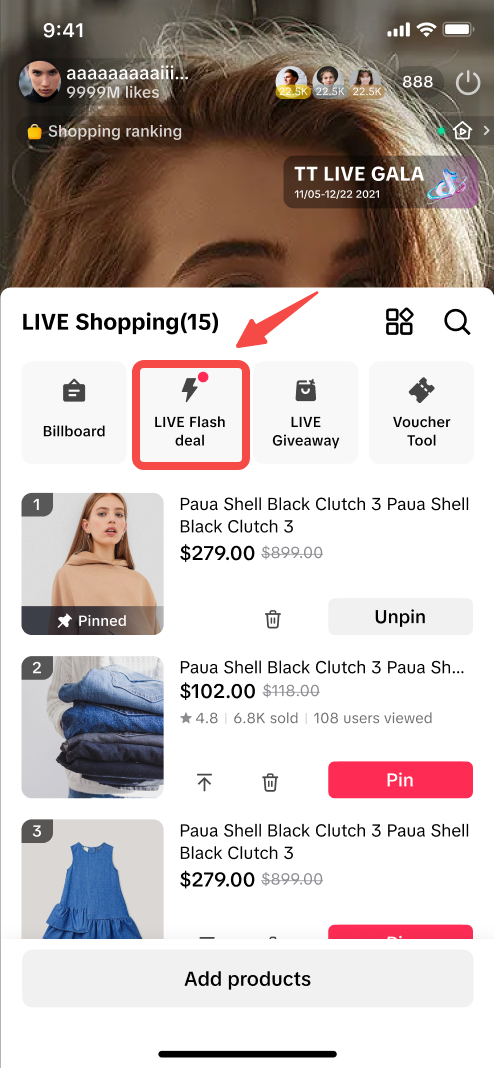
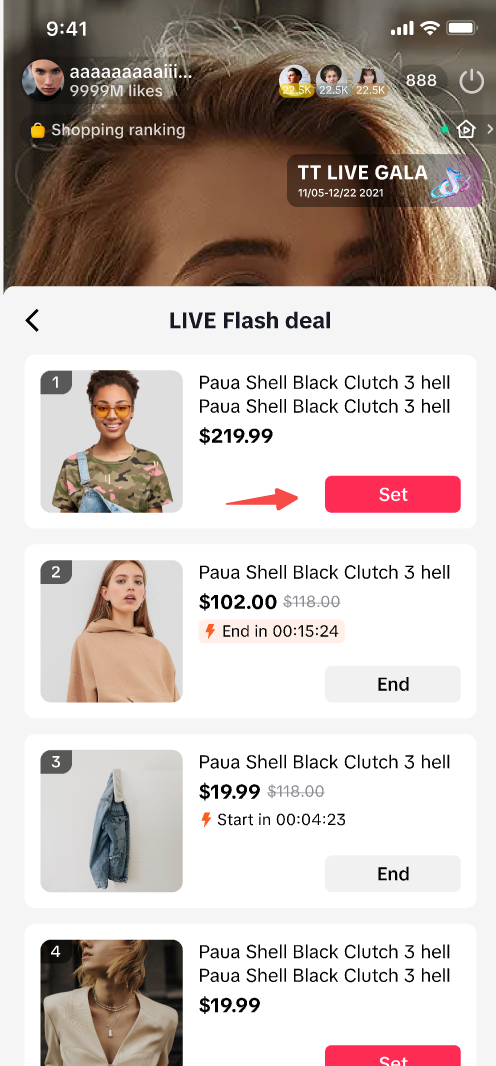
If you're a creator with your own products and inventory, to spark more engagement from your viewers and boost sales during your session, launch a LIVE Flash Sale for your products with limited time deals and exclusive inventory.- Within LIVE Shopping on mobile, select LIVE Flash Sale and pick the product you'd like to include.
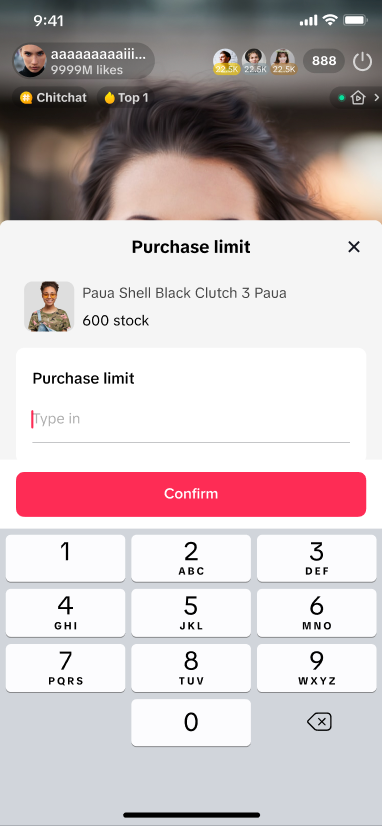
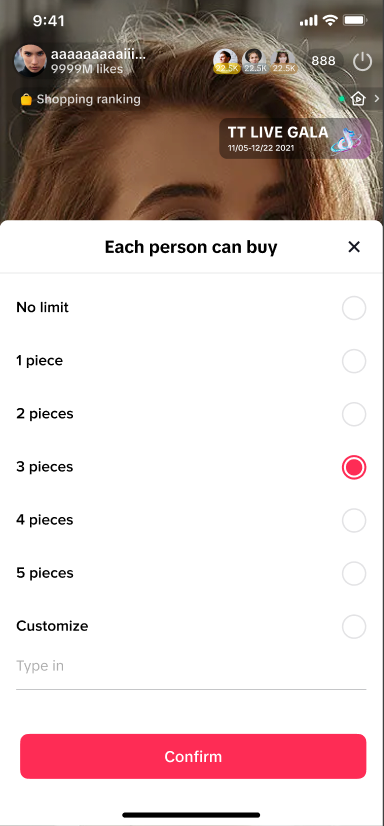
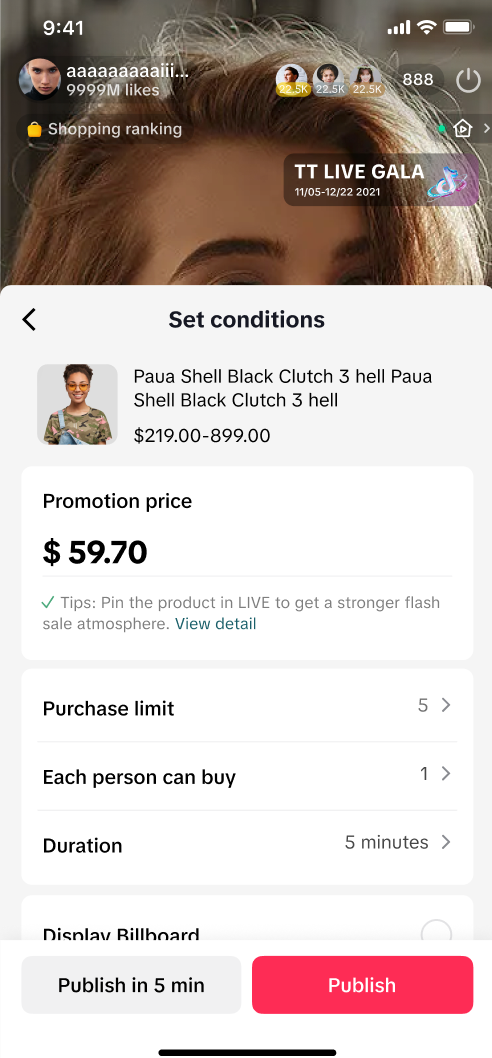
- Set Flash Sale conditions such as price, amount of inventory, per-person purchase limits, and duration.
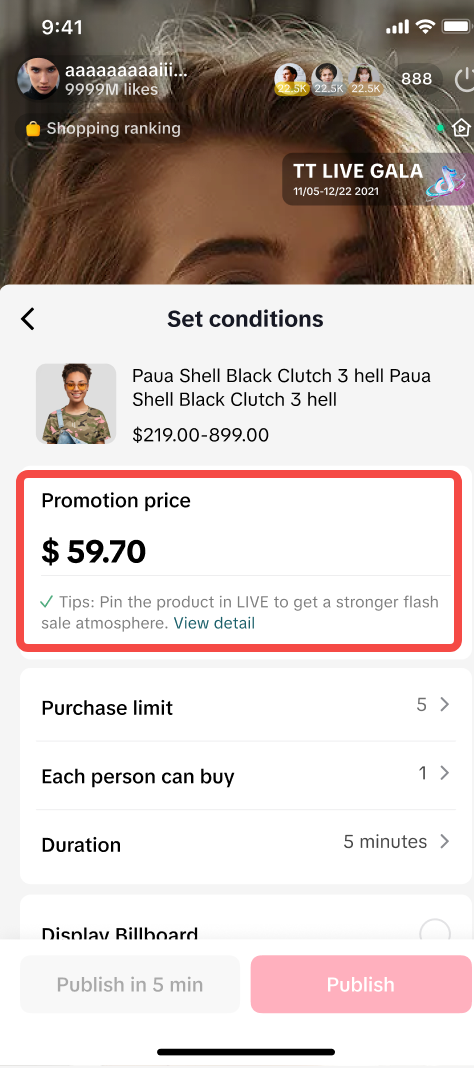
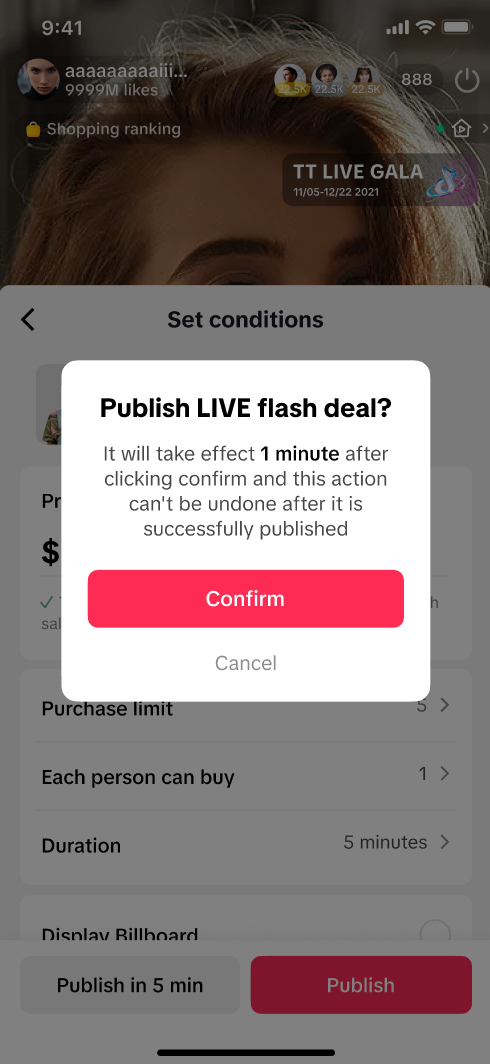
- Choose to publish in 5 minutes to build up excitement or 1 minute for a faster launch and tap Publish.
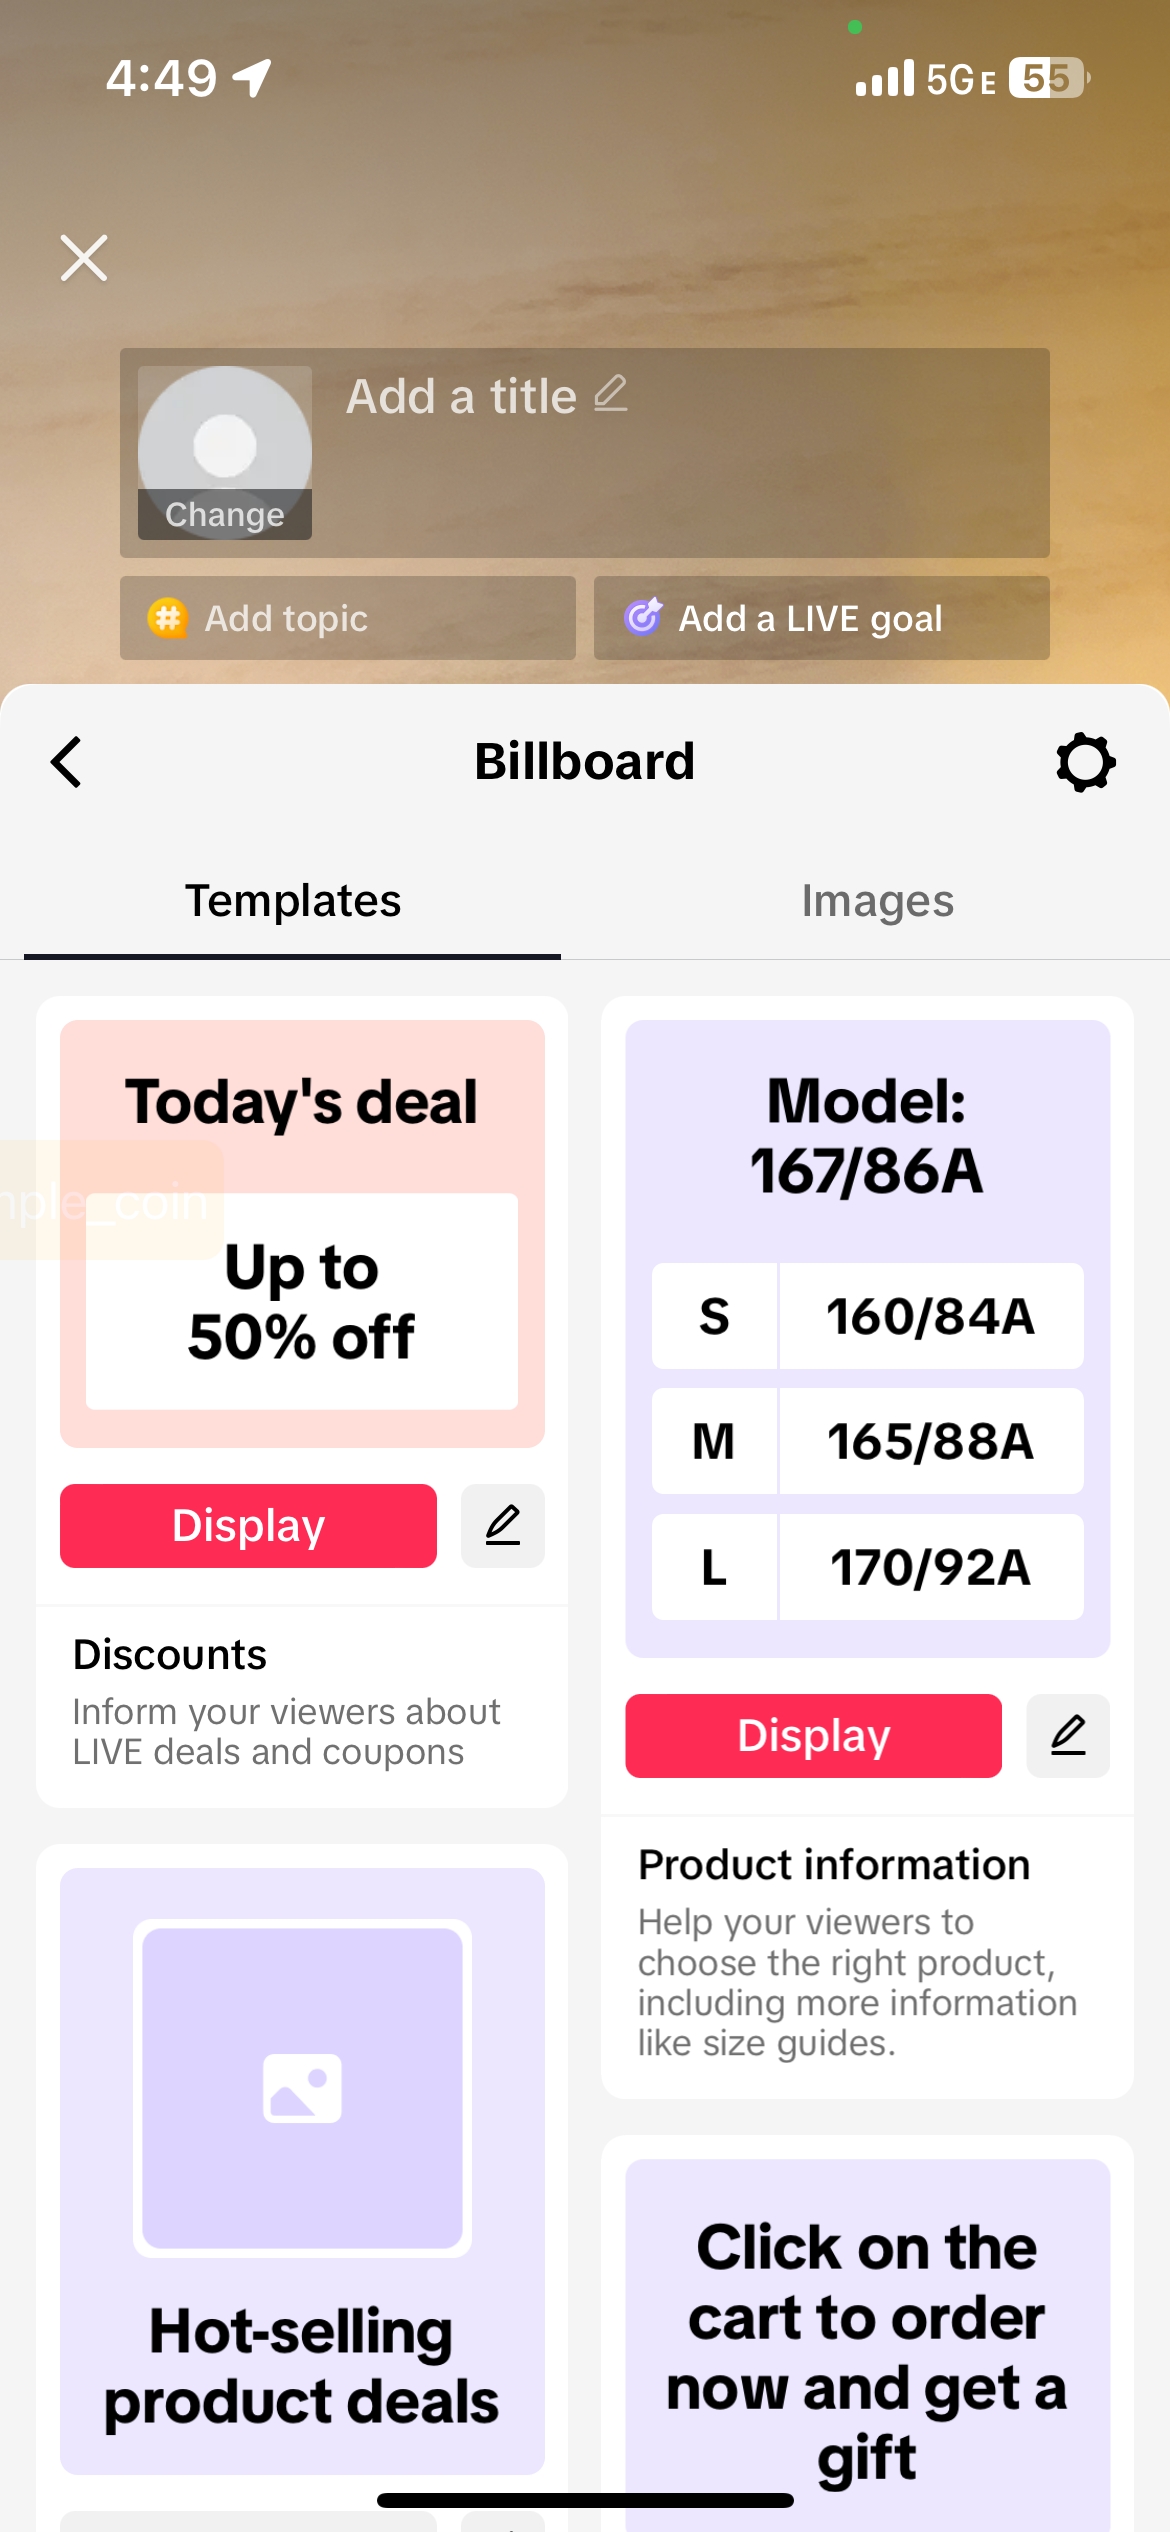
LIVE Billboards
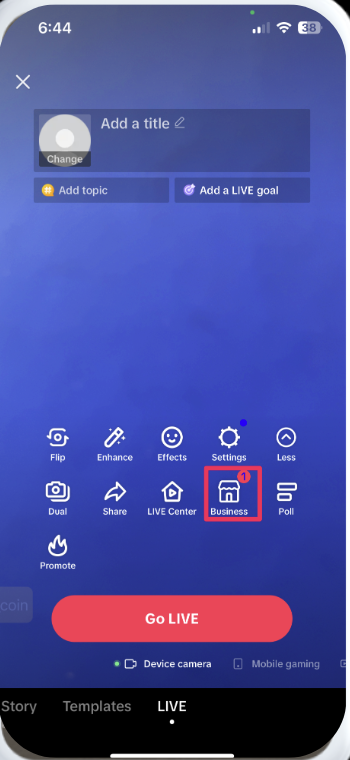
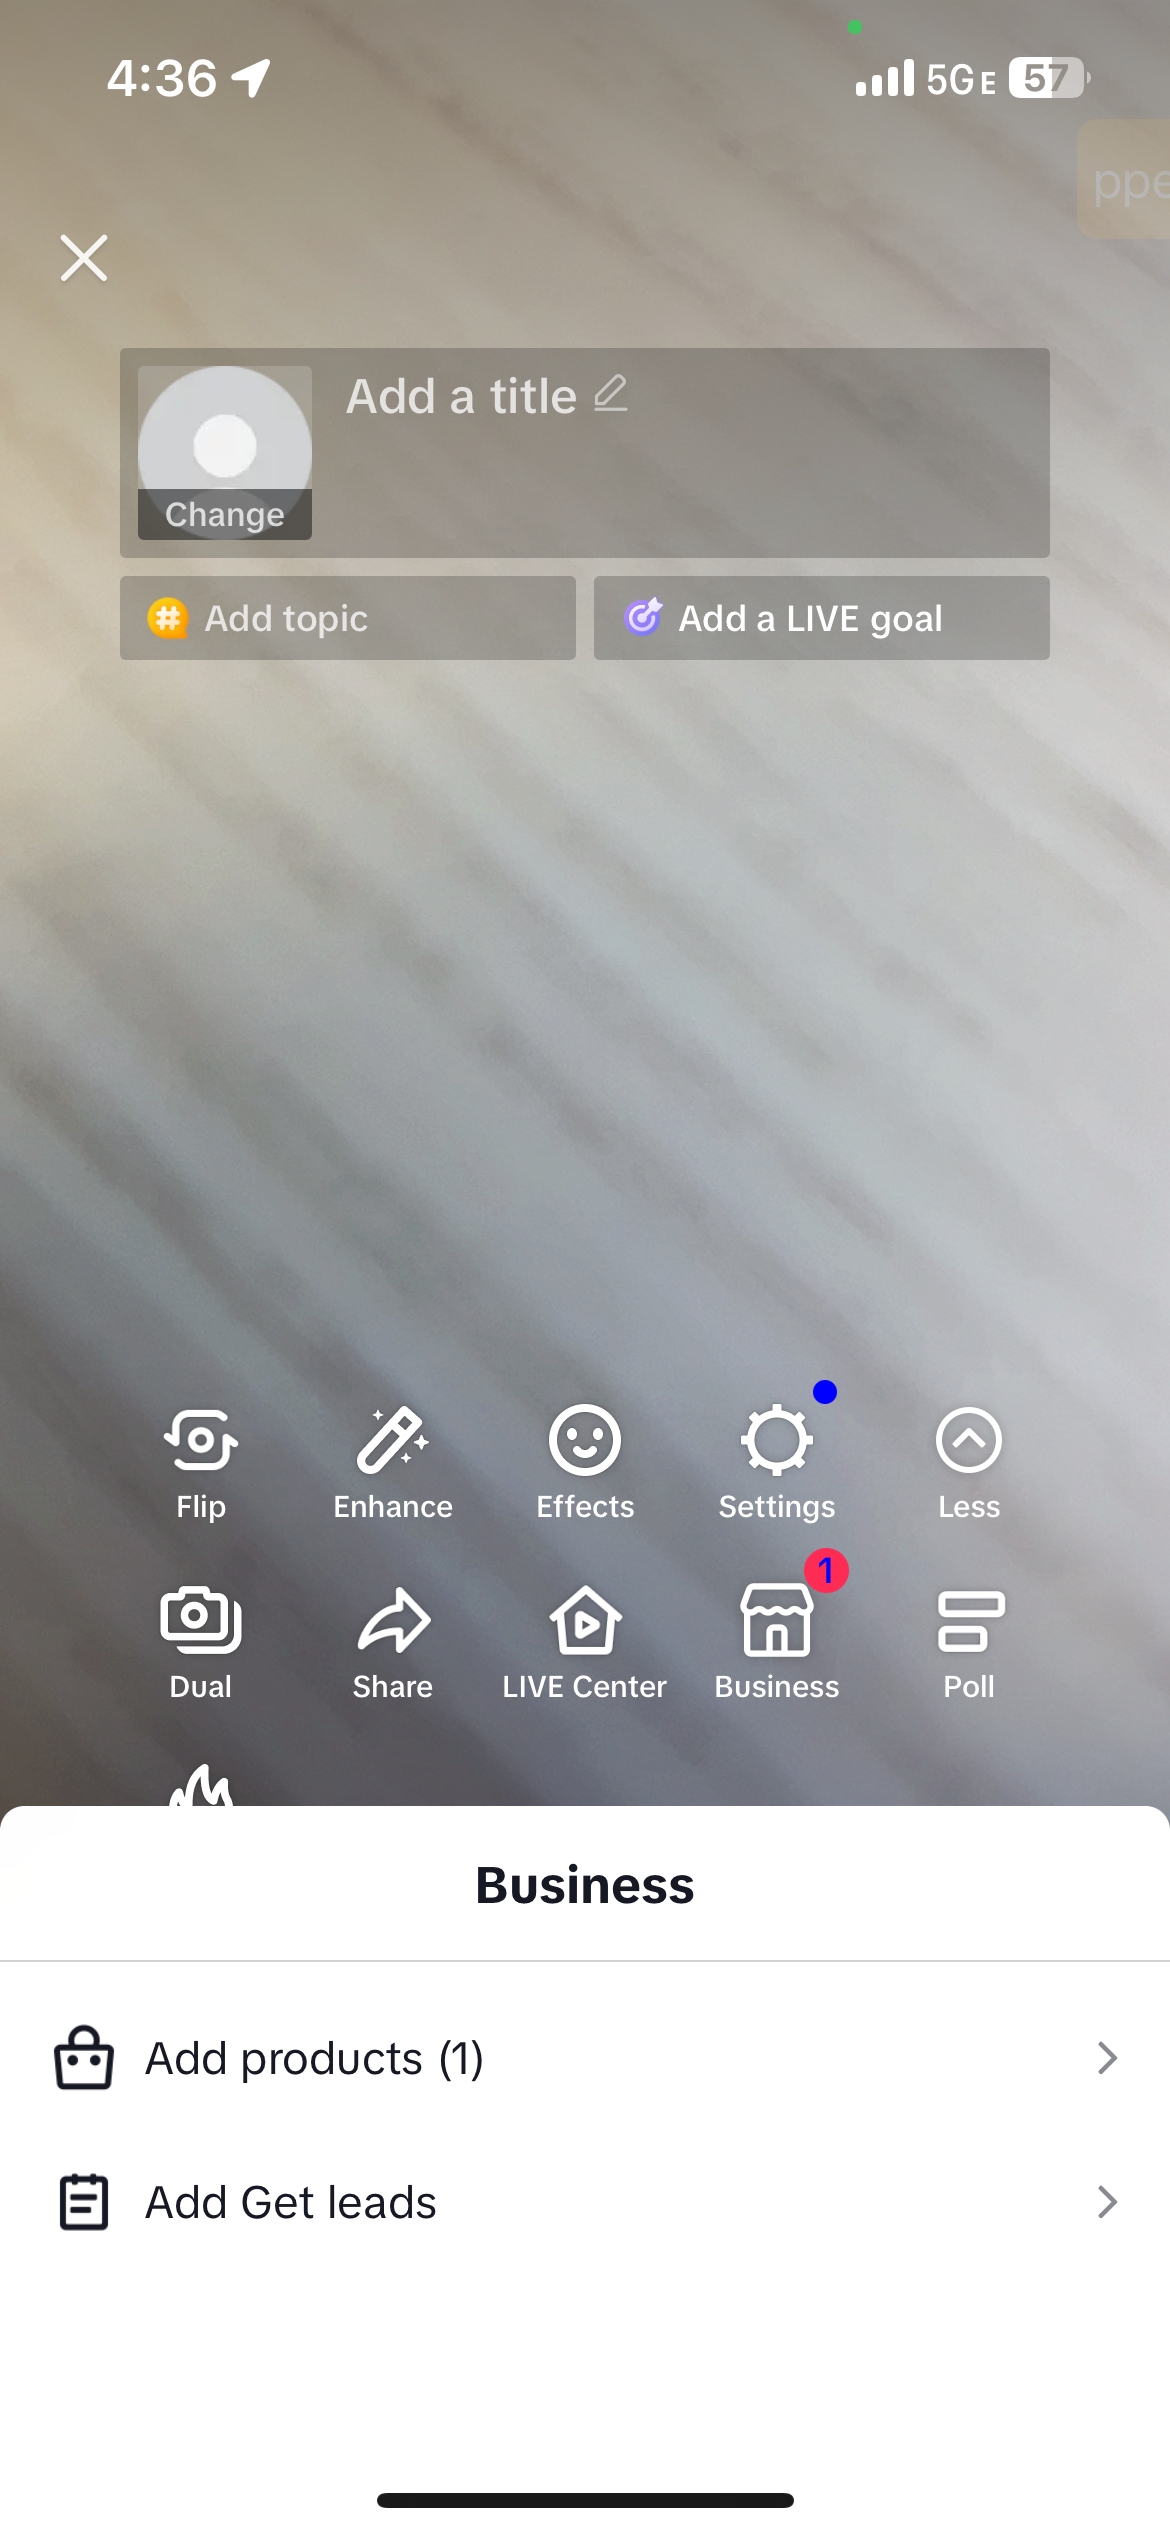
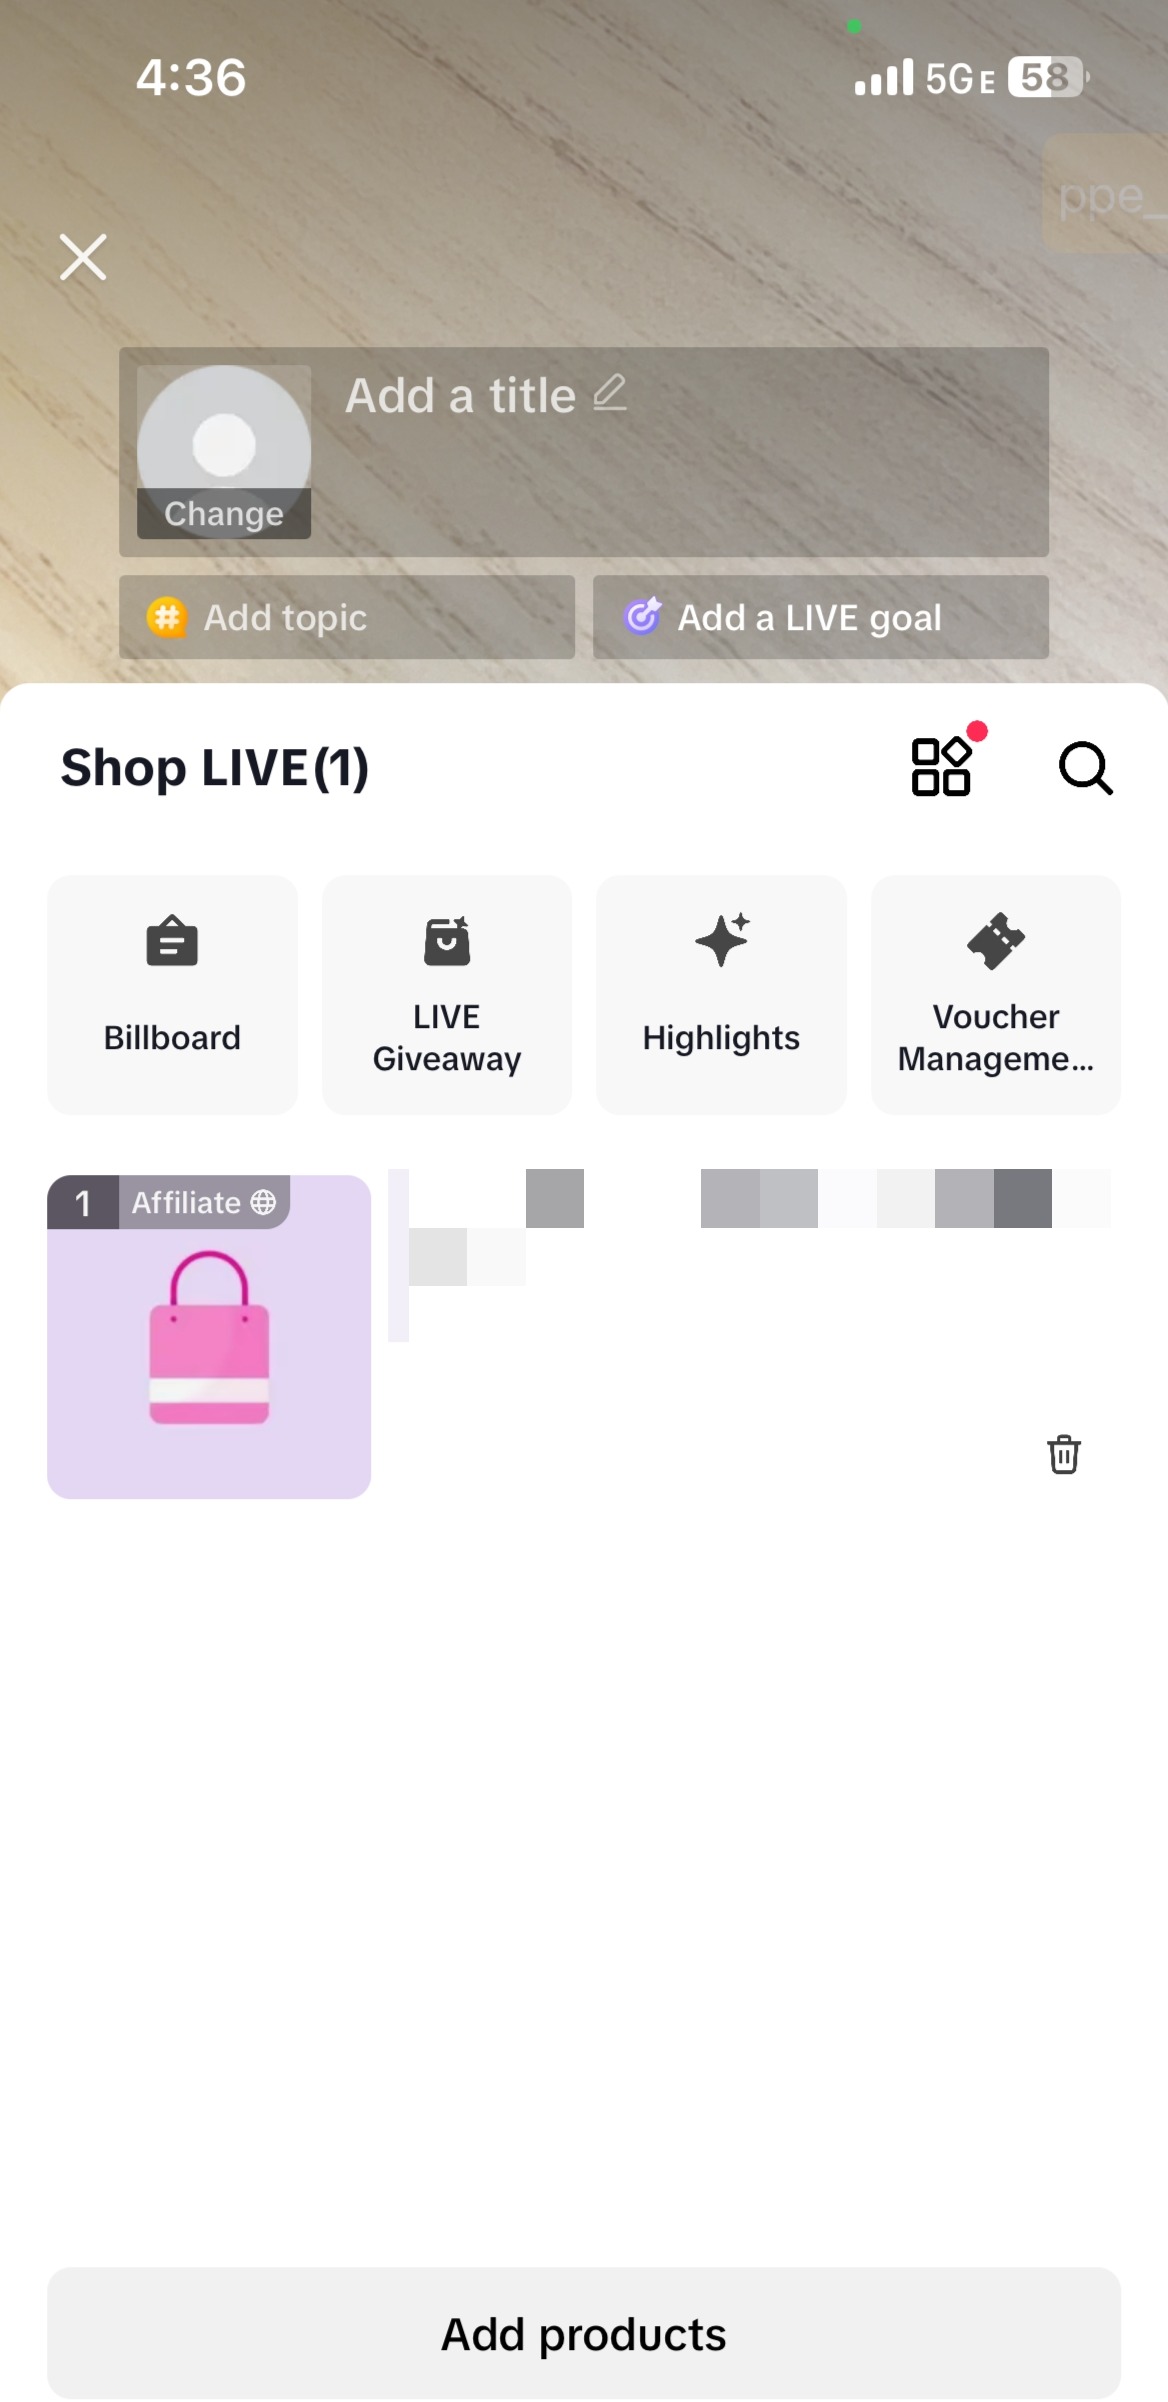
LIVE Billboards help you communicate critical selling points and promotions throughout the duration of the session as shoppers enter and leave. Refresh your LIVE Billboards throughout your live to rotate important messaging and interact with viewers:- From your device camera, navigate to Business, select Add Products, then Billboard.
- You can add a Billboard from pre-existing templates or create a new one from images on your phone.
Post-LIVE Checklist
Once your LIVE ends, follow our post-LIVE checklist below:- Create and post LIVE highlights
- Analyze performance
- Prepare for your next session
Create and post LIVE highlights
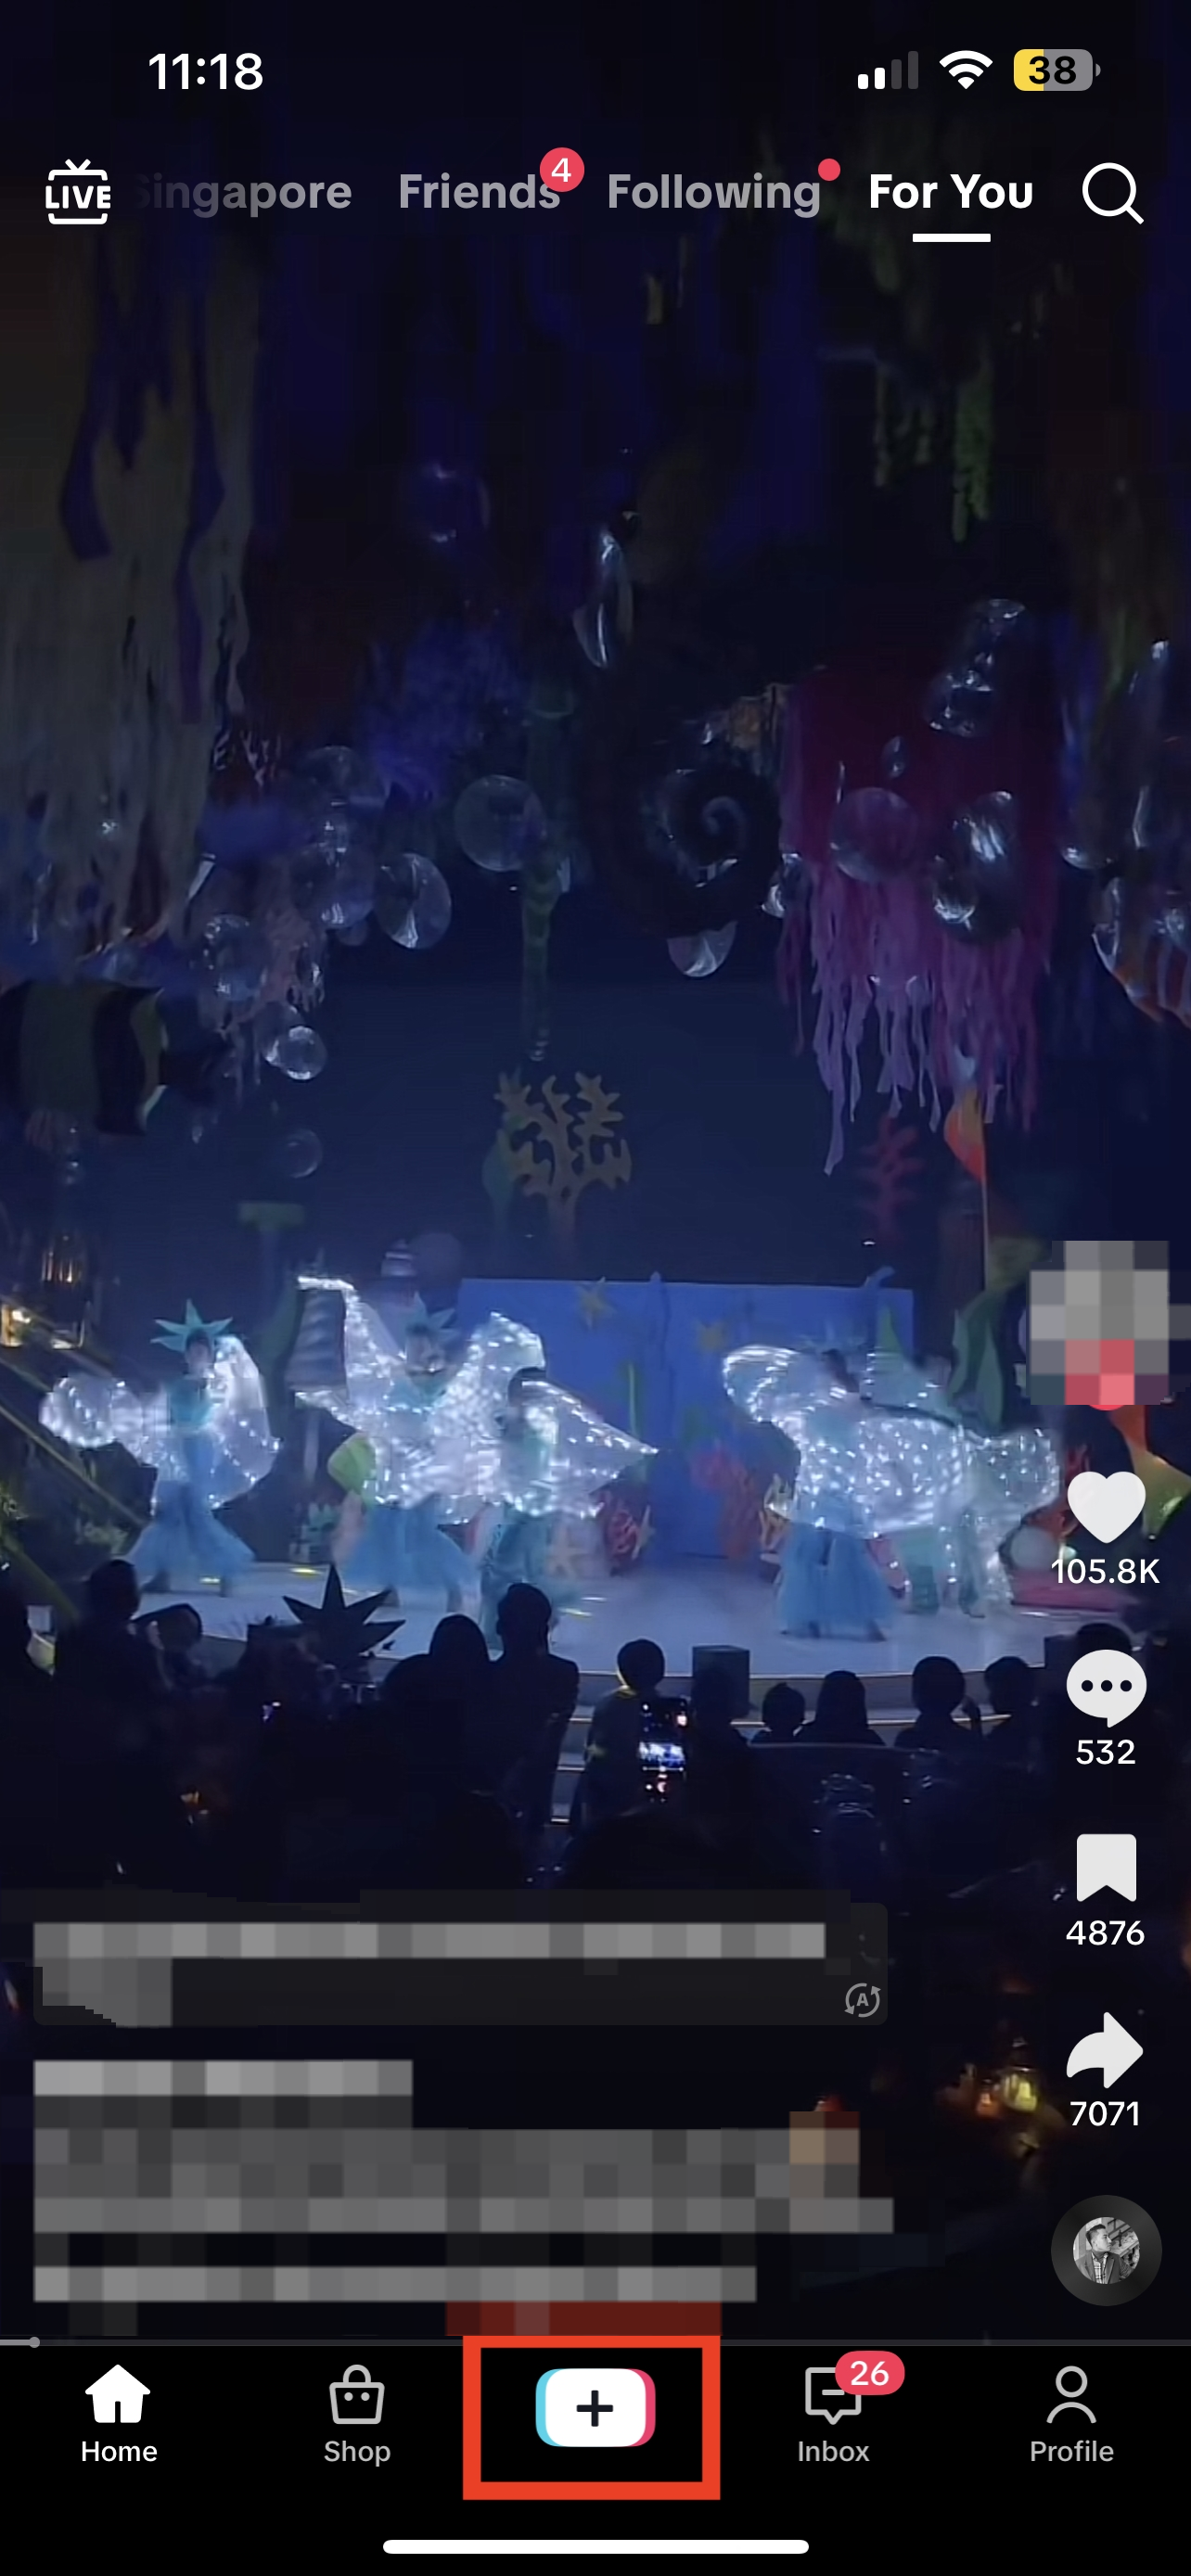
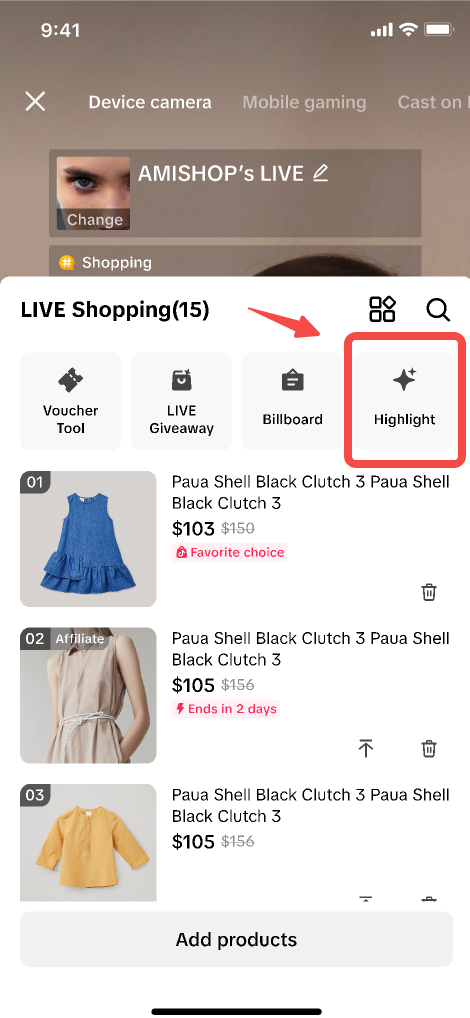
Celebrate the high points of your LIVE Event with LIVE highlights, a tool that enables you to transform the most engaging parts of your LIVE Event into a shoppable video that you can use to promote future sessions.- To get started, click the + button > LIVE > Click on Products to open the LIVE Shopping Bag. Click the Highlight button.
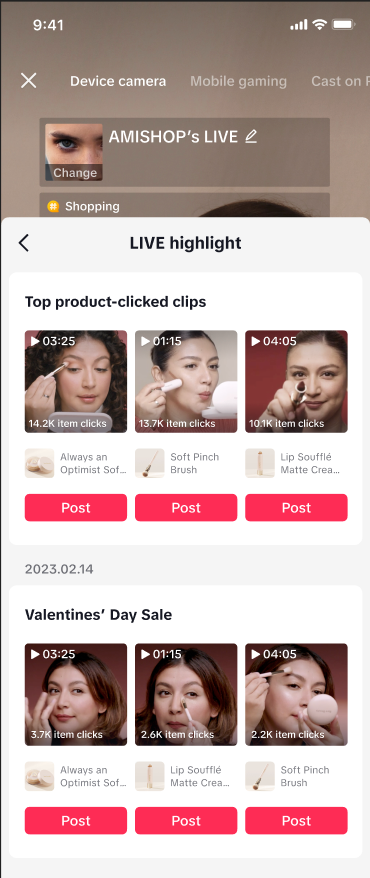
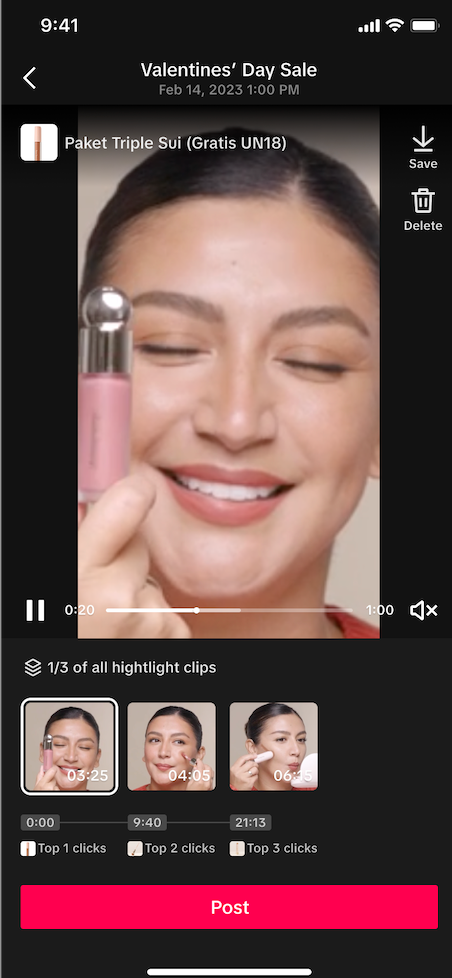
- Open product-clicked highlights to select the clips to feature in the video. Select and edit a highlight video to publish.
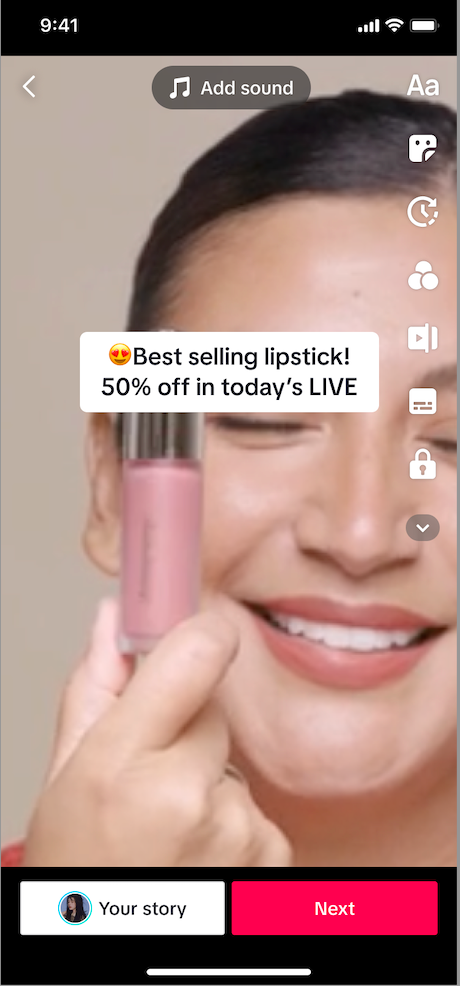
- Check the provided product link, add your own description, tags, and information. Maximize your reach by using trending sounds and hashtags, adding captions to your videos, and using engaging stickers to attract potential customers. These practices will ensure your highlights lead to more conversions. Once complete, you can post the video to your feed.
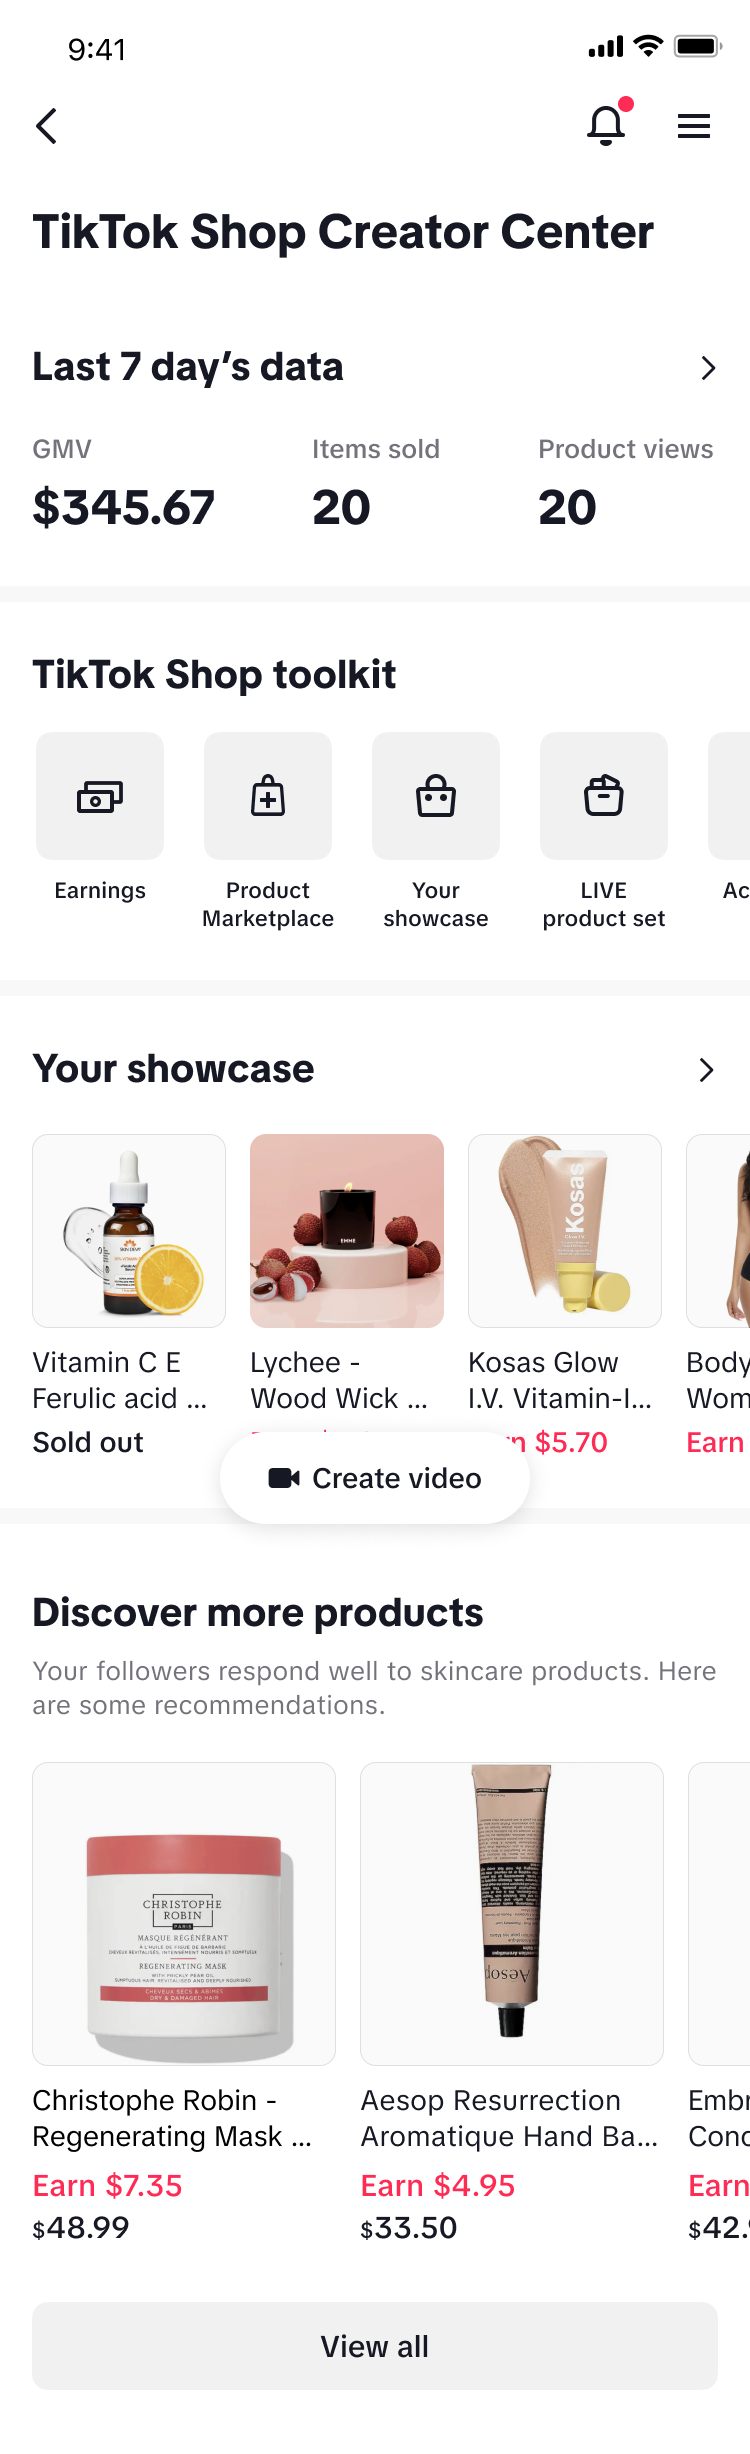
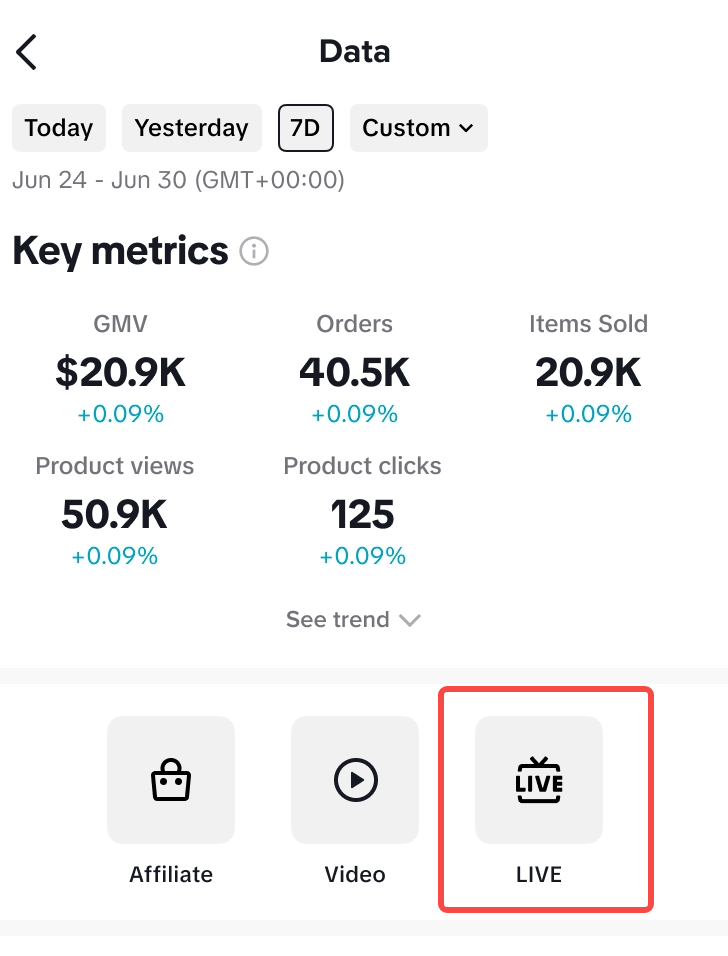
Analyze your performance
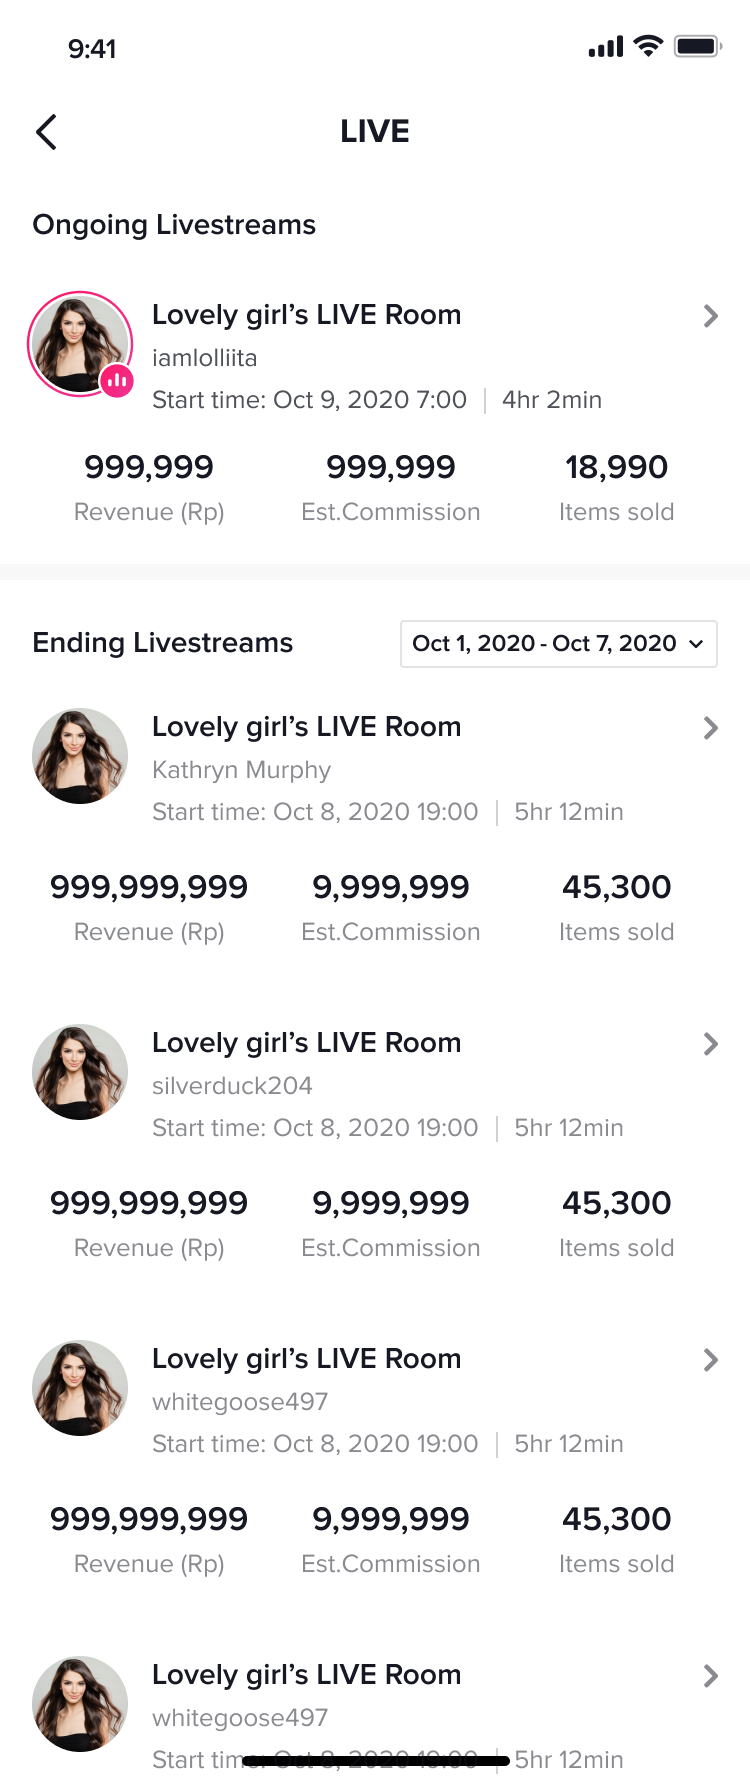
After your LIVE is complete, you can view detailed performance of your individual session on mobile by heading to TikTok Shop Creator Center. In TikTok Shop Creator Center, click on the arrow icon at the right side of Last 7 day's data, and you'll be directed to the overview page. Click on the LIVE icon to go to the LIVE detailed page. From there, you can check the performance of ongoing and historical livestreams.Under Content Performance, you can check overall content metrics by GMV, views, and items sold.
- Video: Display GMV top 2 videos within the selected time period.
- LIVE: Display GMV top 2 livestream within the selected time period.
By clicking the See trend button, the trend graph card will expand to show the trend of GMV by default, but you can select different metrics and observe those trends over time as well.
Analyze your performance on the LIVE Dashboard
After your LIVE is complete, you can also view your detailed performance by heading to the LIVE Console desktop surface, covered in more detail below.- You can access LIVE Console on TikTok Shop Business by clicking Log In and selecting LIVE Manager. Alternatively, navigate to our LIVE Manager directly.
- You can decide whether you want to access a Basic or Advanced view of your performance.
Product-level performance is also available in this view. You can access metric definitions, customize the metrics you want to display, and download the dashboard for offline viewing. LIVE recordings can also be found here and expire after 14 days.
The lower module provides more insights into Traffic & Conversion, product-specific performance results, and violation information. If you ran ads for your session, you can check the impact of those ads in terms of generating GMV, driving viewers to your LIVE, and driving transaction conversions by navigating to Promotions.
Lastly, review comments you received during the stream to see what type of engagement you received to help you conduct sentiment analysis and understand the perception of your stream to users throughout the session.
TikTok Shop LIVE Events (desktop)
LIVE Manager gives you greater control over how you plan and manage your LIVE Events. With LIVE Console, you can manage all aspects of planning and managing a LIVE shopping event without depending solely on your mobile device. It's also a great way for moderators and assistants to plug in so that you can focus on having fun engaging with your viewers and sharing great products.LIVE Events through LIVE Console have a one-too-many relationship with your livestreams, so over the duration of your LIVE Event, you can have multiple LIVE sessions within one LIVE Event. This allows you to pause, take a break, and resume your session for the duration of your LIVE Event.
Note: Unlike LIVE Events created on mobile, which need to be scheduled at least 2 hours in advance, when creating a LIVE Event through the LIVE Console desktop, you can schedule in advance or go LIVE immediately.
Scheduling your LIVE Event
- You can access LIVE Console on TikTok Shop Business by clicking Log In and selecting LIVE manager. Alternatively, navigate directly to the LIVE manager.
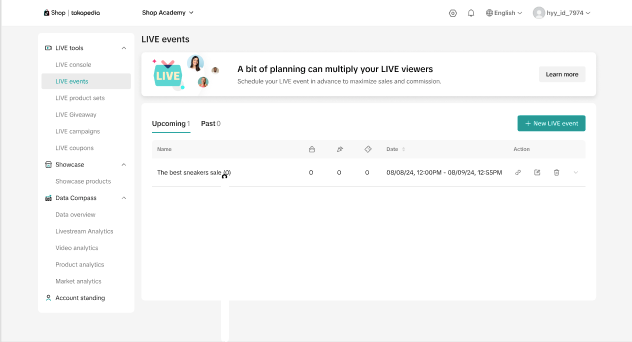
- On the LIVE manager home page, under LIVE tools, select LIVE Events. Here, you can view upcoming and past events, as well as schedule future events.

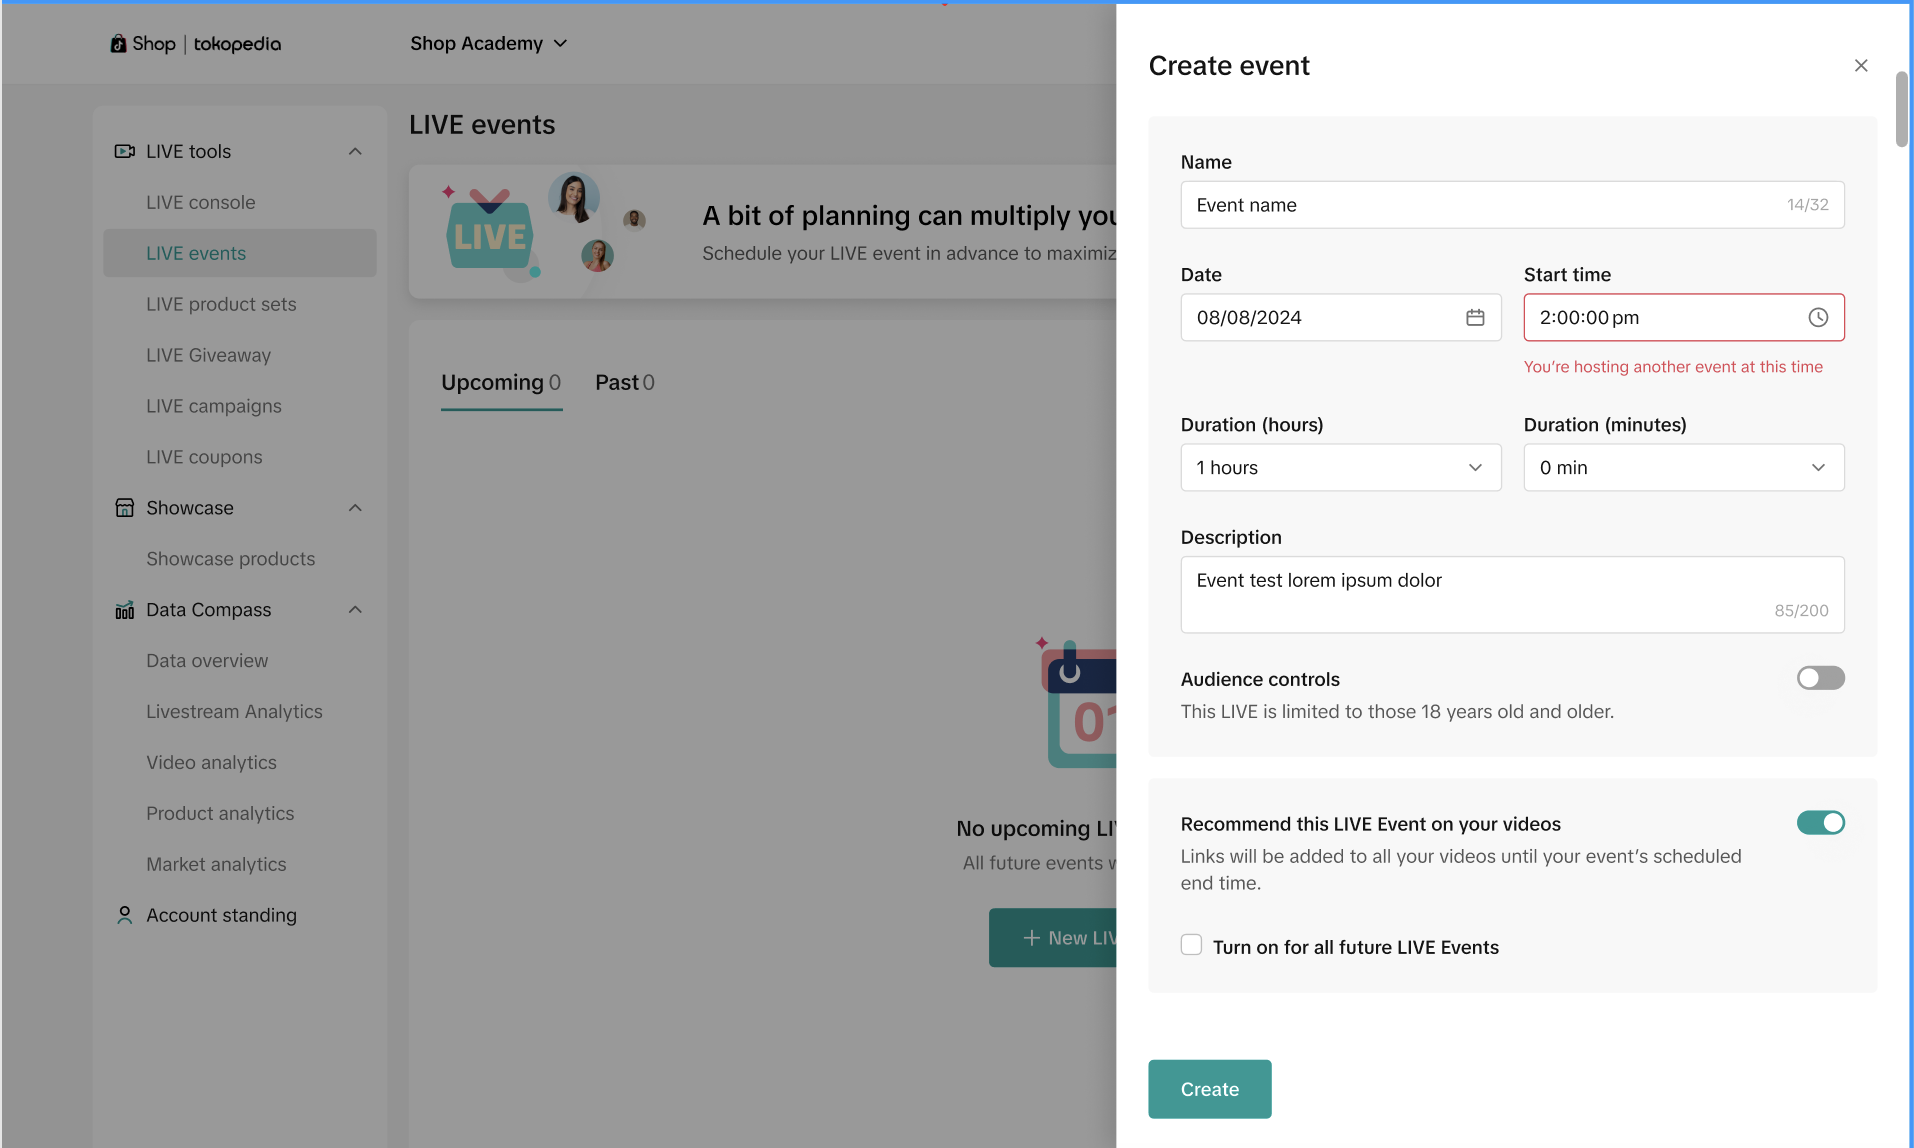
- Click New LIVE Event and add in the details of your upcoming LIVE Event.
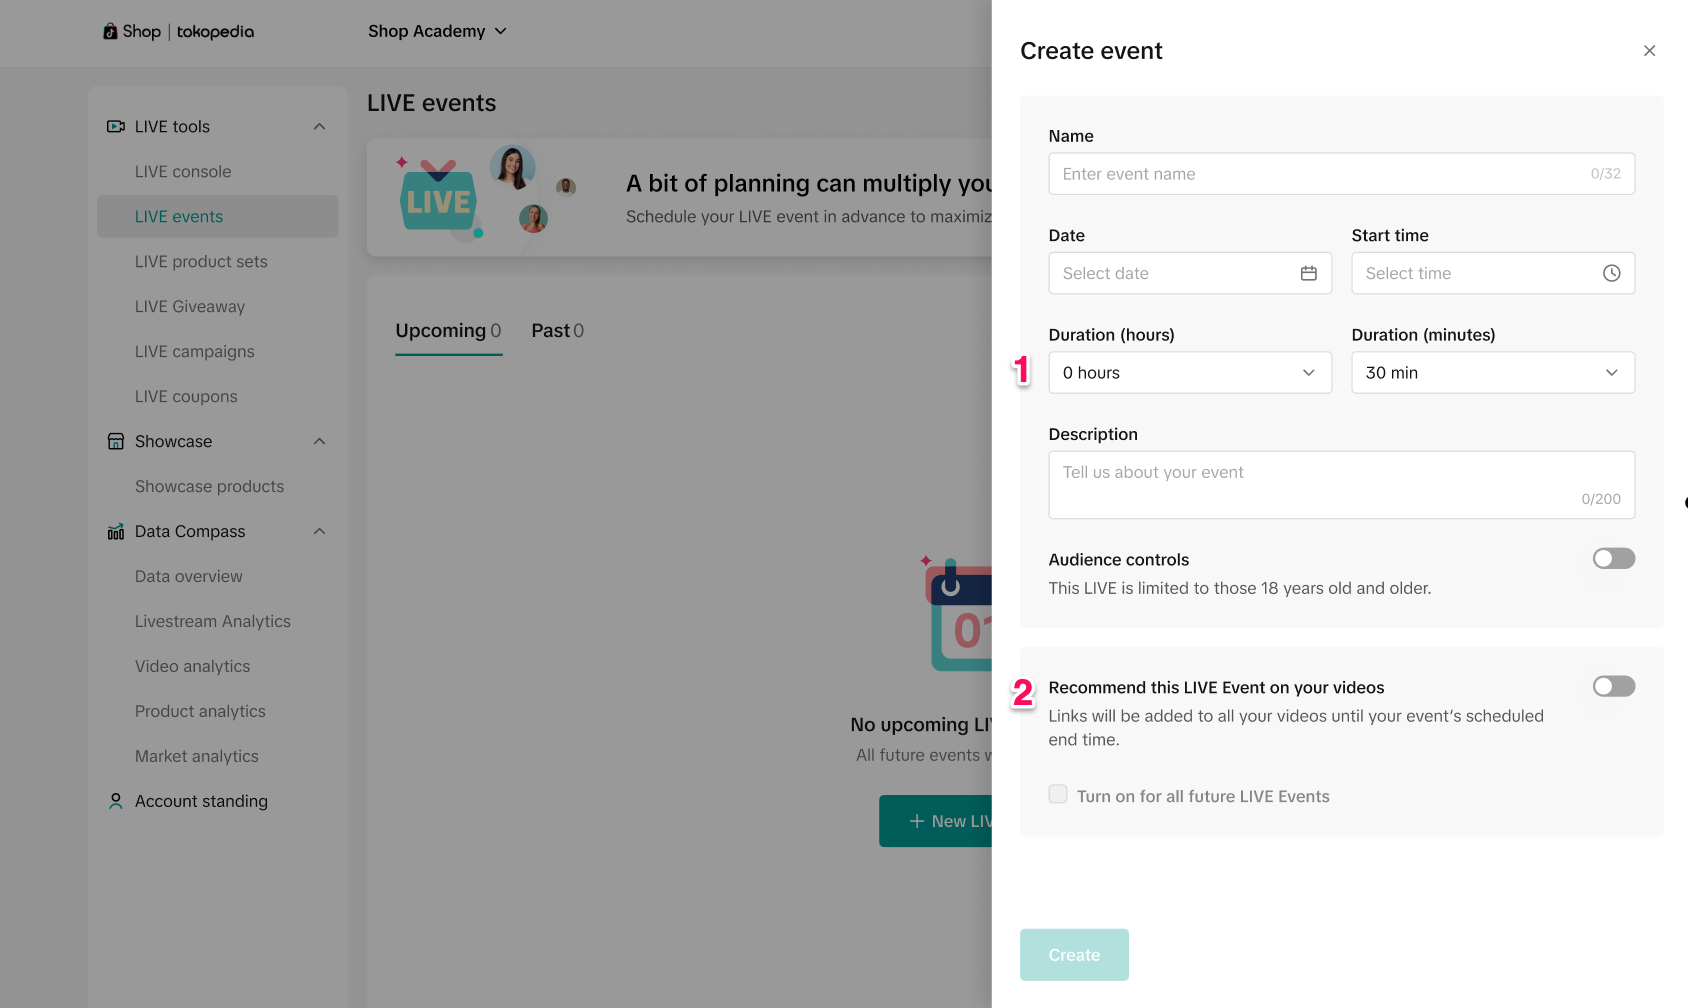
- Duration: Once you've selected your start time, specify the duration, which must be 30 minutes minimum and maximum 13 hours.
- Recommend this LIVE Event on your videos: If you toggle this setting on, events links to your LIVE are added to all videos until the scheduled end time of your event.
- Once you've created your LIVE Event, you can then set up the products, LIVE Giveaways, and other features for your upcoming session.
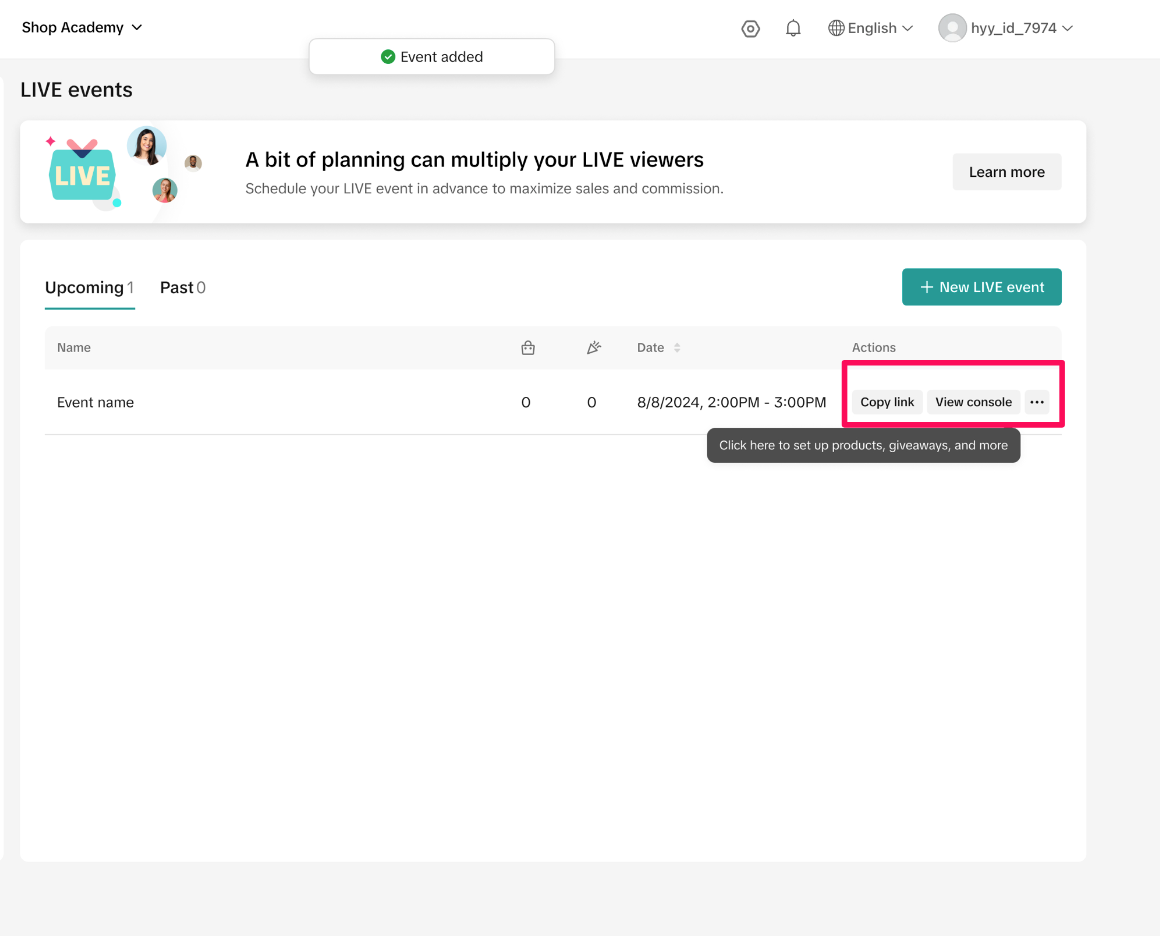
- LIVE Event link sharing lets you promote and share your LIVE Event on TikTok and on other sites so that users can register ahead of time.
- Live Event deleting lets you cancel your LIVE Event from desktop and mobile.
Preparing products for your LIVE Event in LIVE Console
To prepare for your LIVE shopping event, add products ahead of time to your scheduled LIVE Event:- Click into your LIVE Event. You'll be redirected to the event's console, where you can select the products to include.
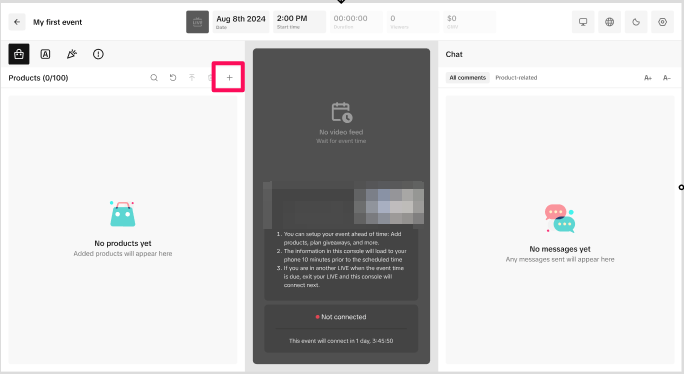
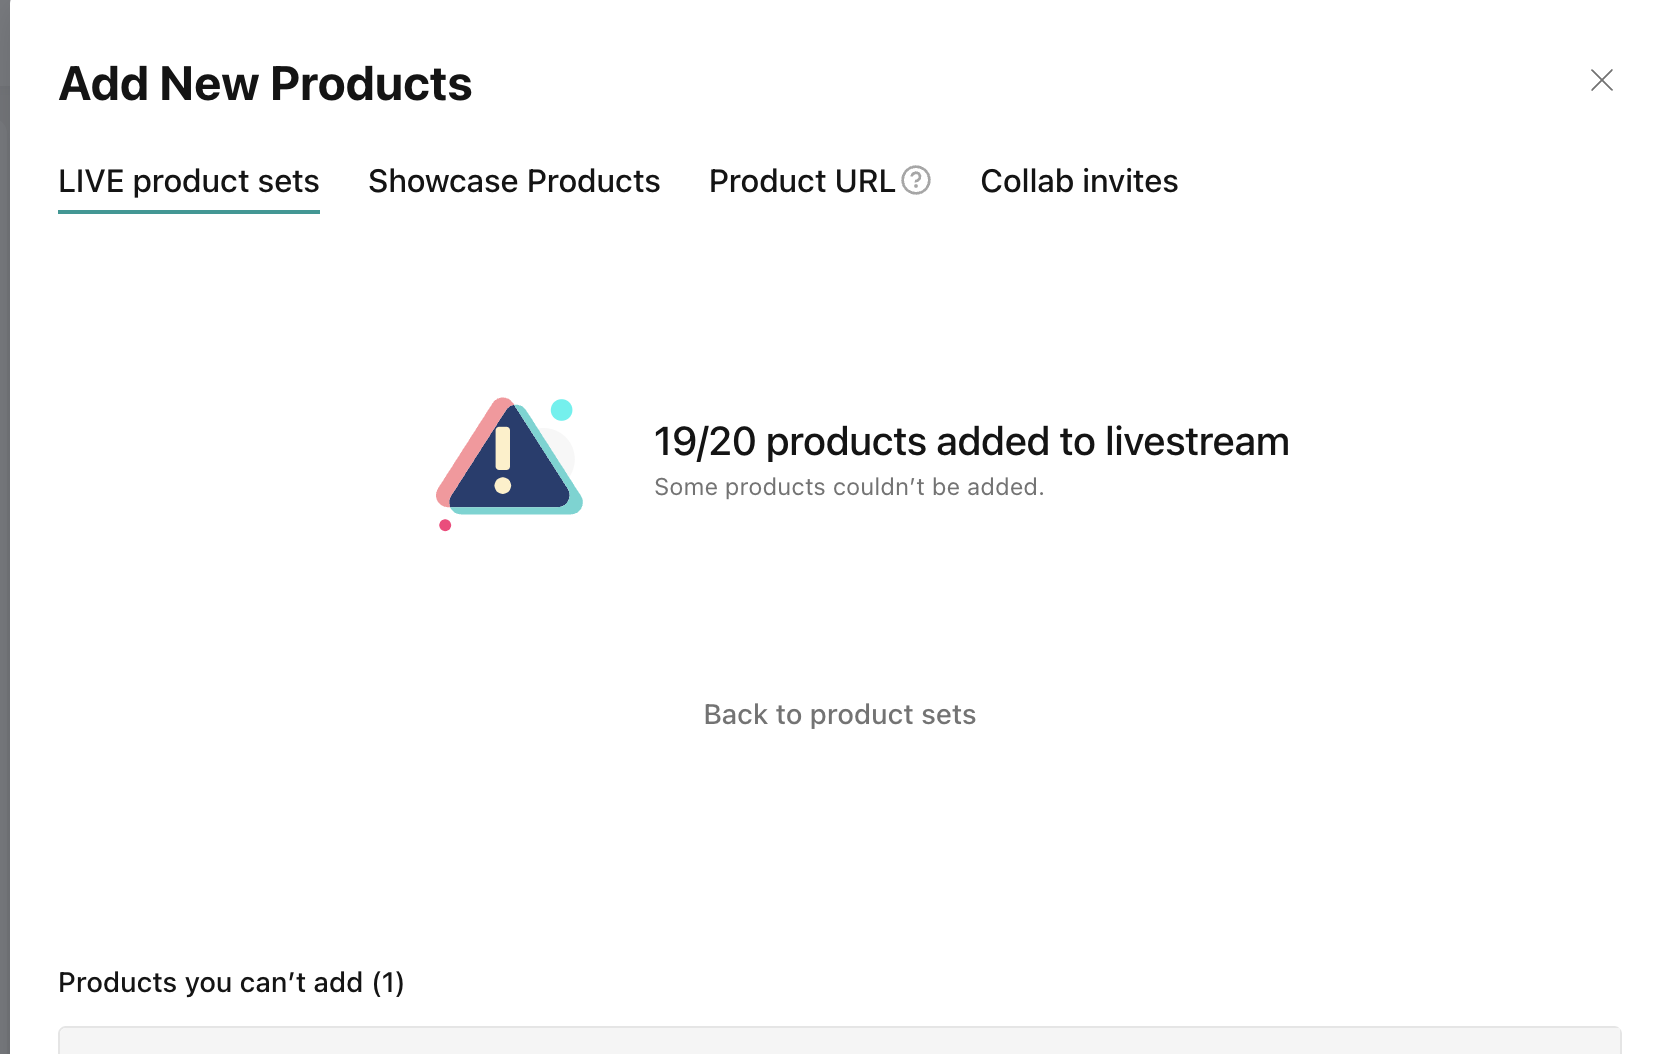
- You can add LIVE product sets, showcase products, product links from sellers, or products from collab invites for a maximum of 100 products total.
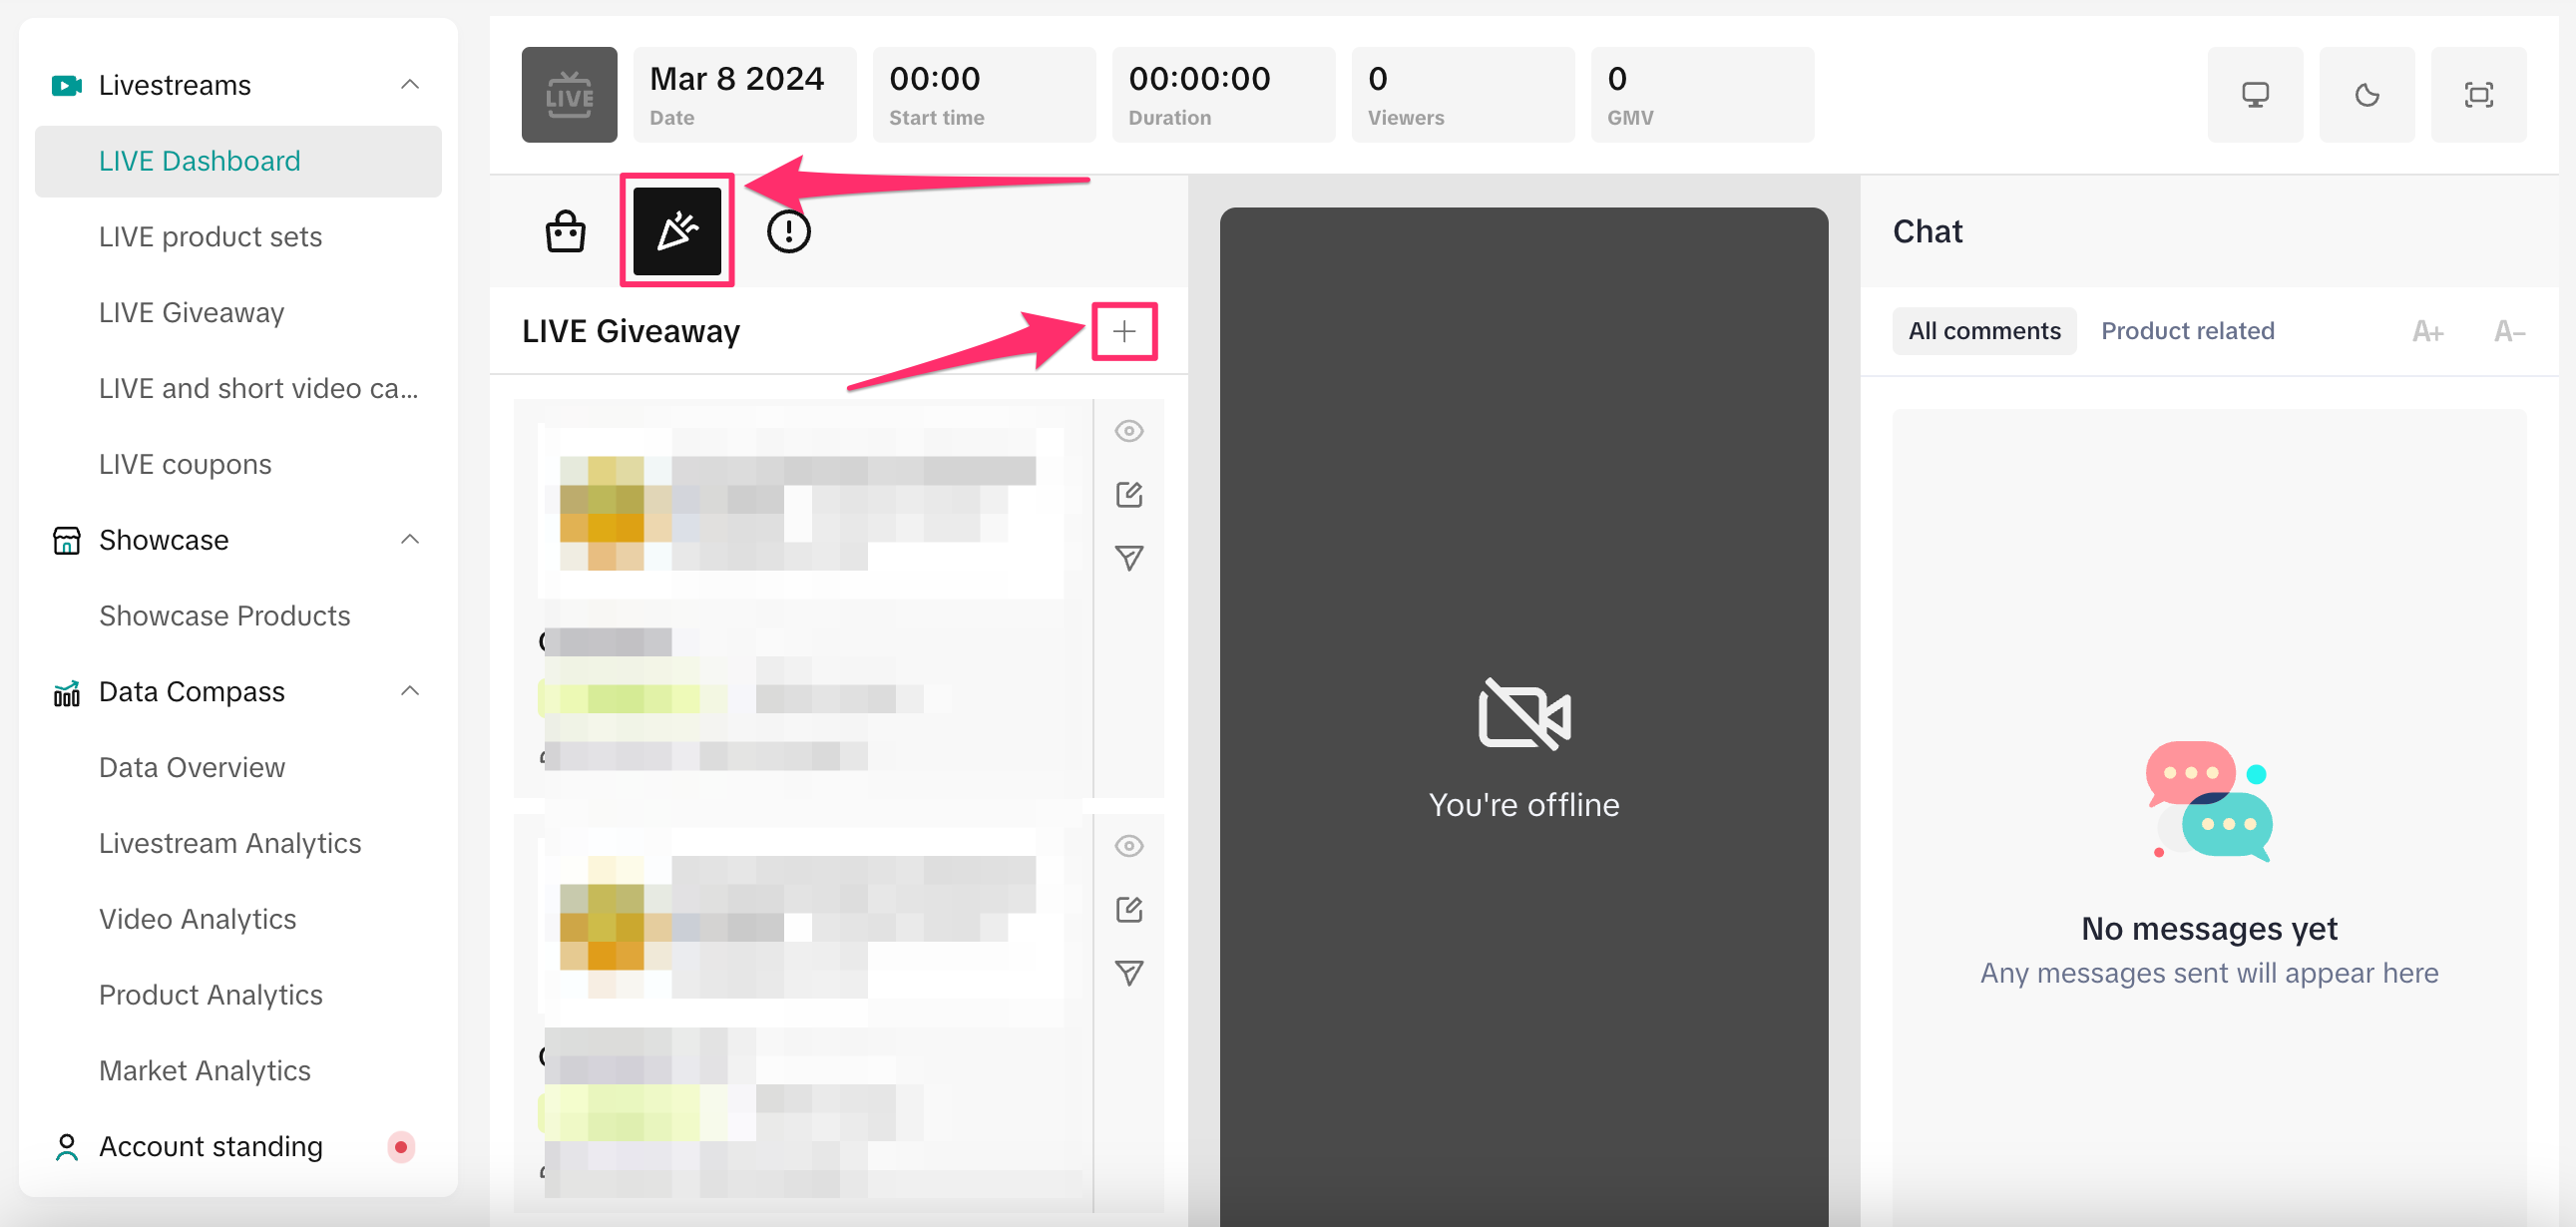
Scheduling LIVE Giveaways in LIVE Events
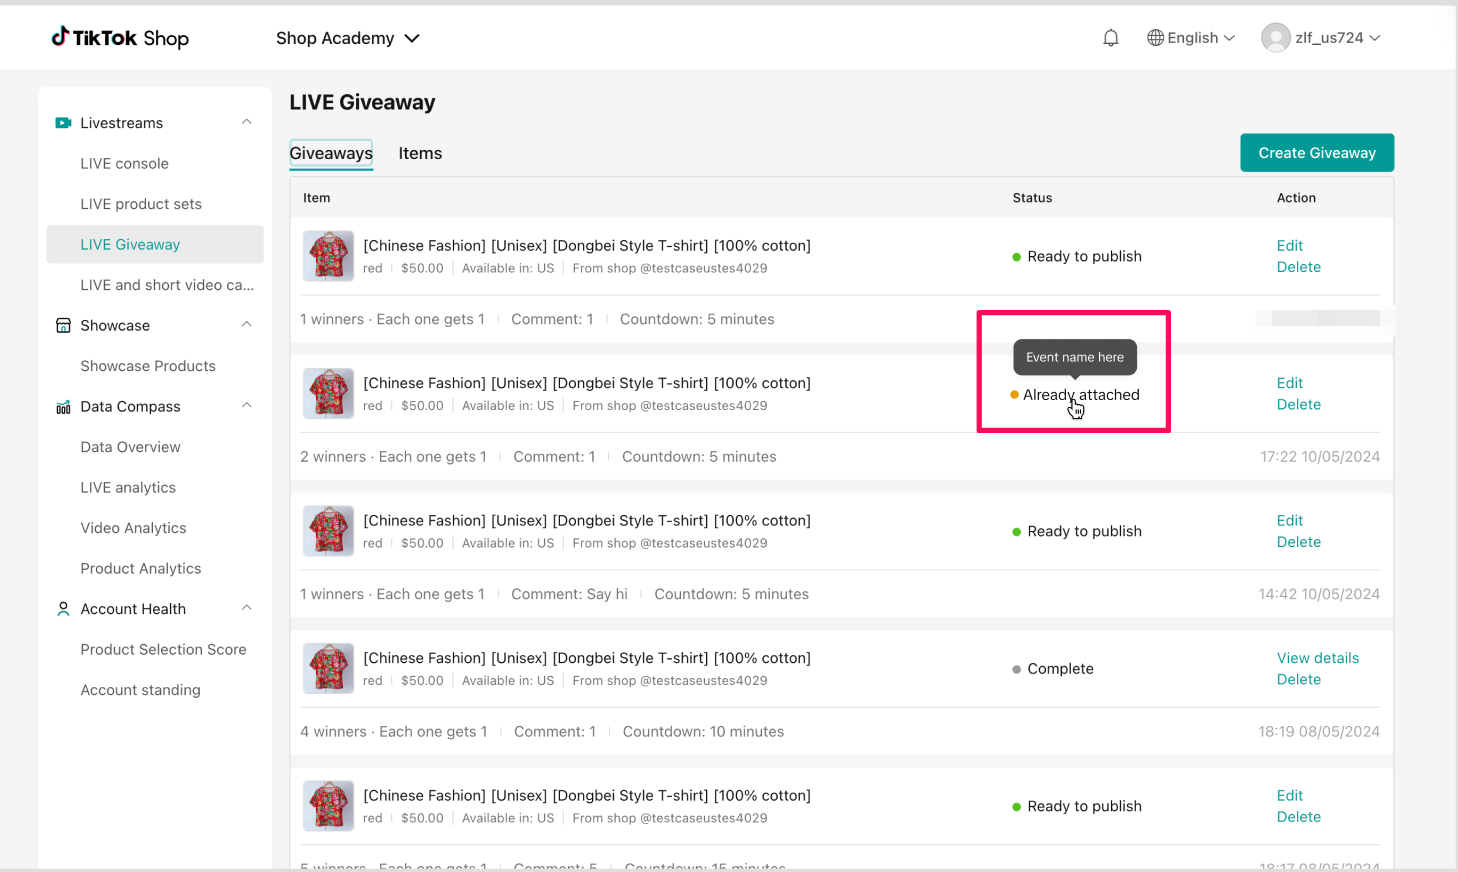
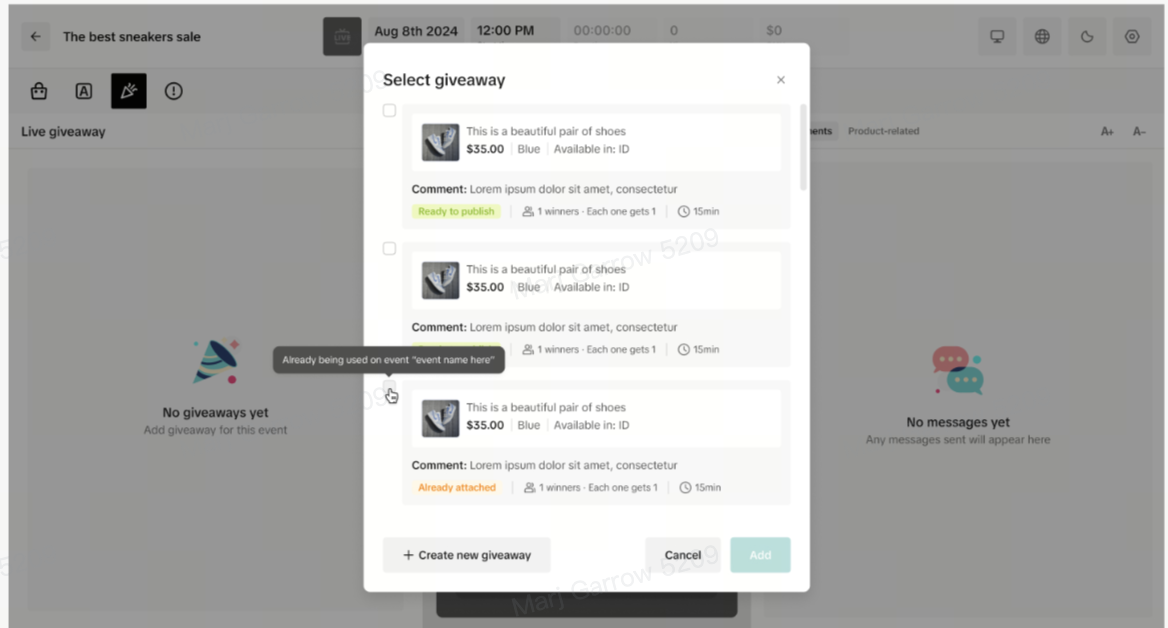
- LIVE Giveaways allow you to offer free products to your fans to help drive engagement during the livestream. Within the LIVE Giveaway tab, you can see any existing giveaways and whether they are already attached to a LIVE Event. If a giveaway is already attached to an event, it cannot be deployed within other events.
- To manage a specific LIVE Event's giveaways, click your LIVE Event. You'll be redirected to the event's console, where you can assign an existing giveaway or set up a new LIVE Giveaway for the event.
- Choose an existing giveaway to add to the session or select Create new giveway.

- If you are creating a new giveaway, select the products you want to add to the giveaway.

- Set the number of winners and items per winner. Keep in mind that the number of winners and items per winner cannot exceed the number of available items.
- Determine how viewers can participate in the giveaway:
- If you select Comment, then enter a comment that viewers must type into the LIVE chat in order to be considered for the giveaway.
- If you choose None, then no comment must be added, but you still have to select a Countdown, which is the period of time during which users can participate in the giveaway.
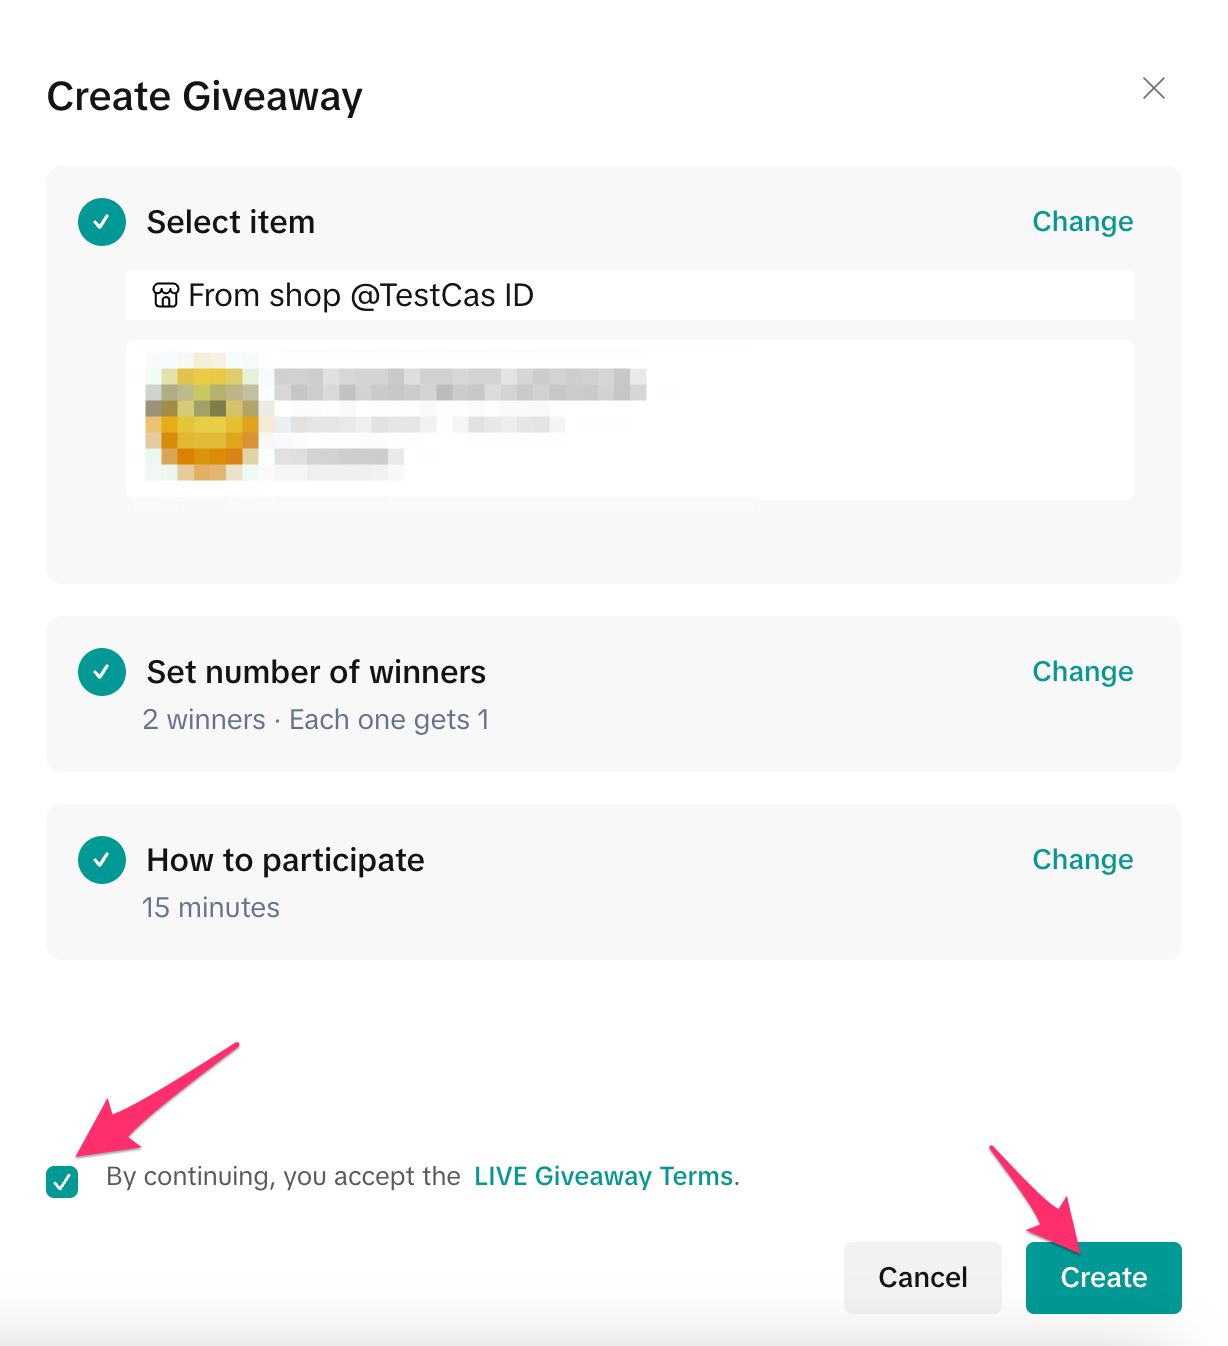
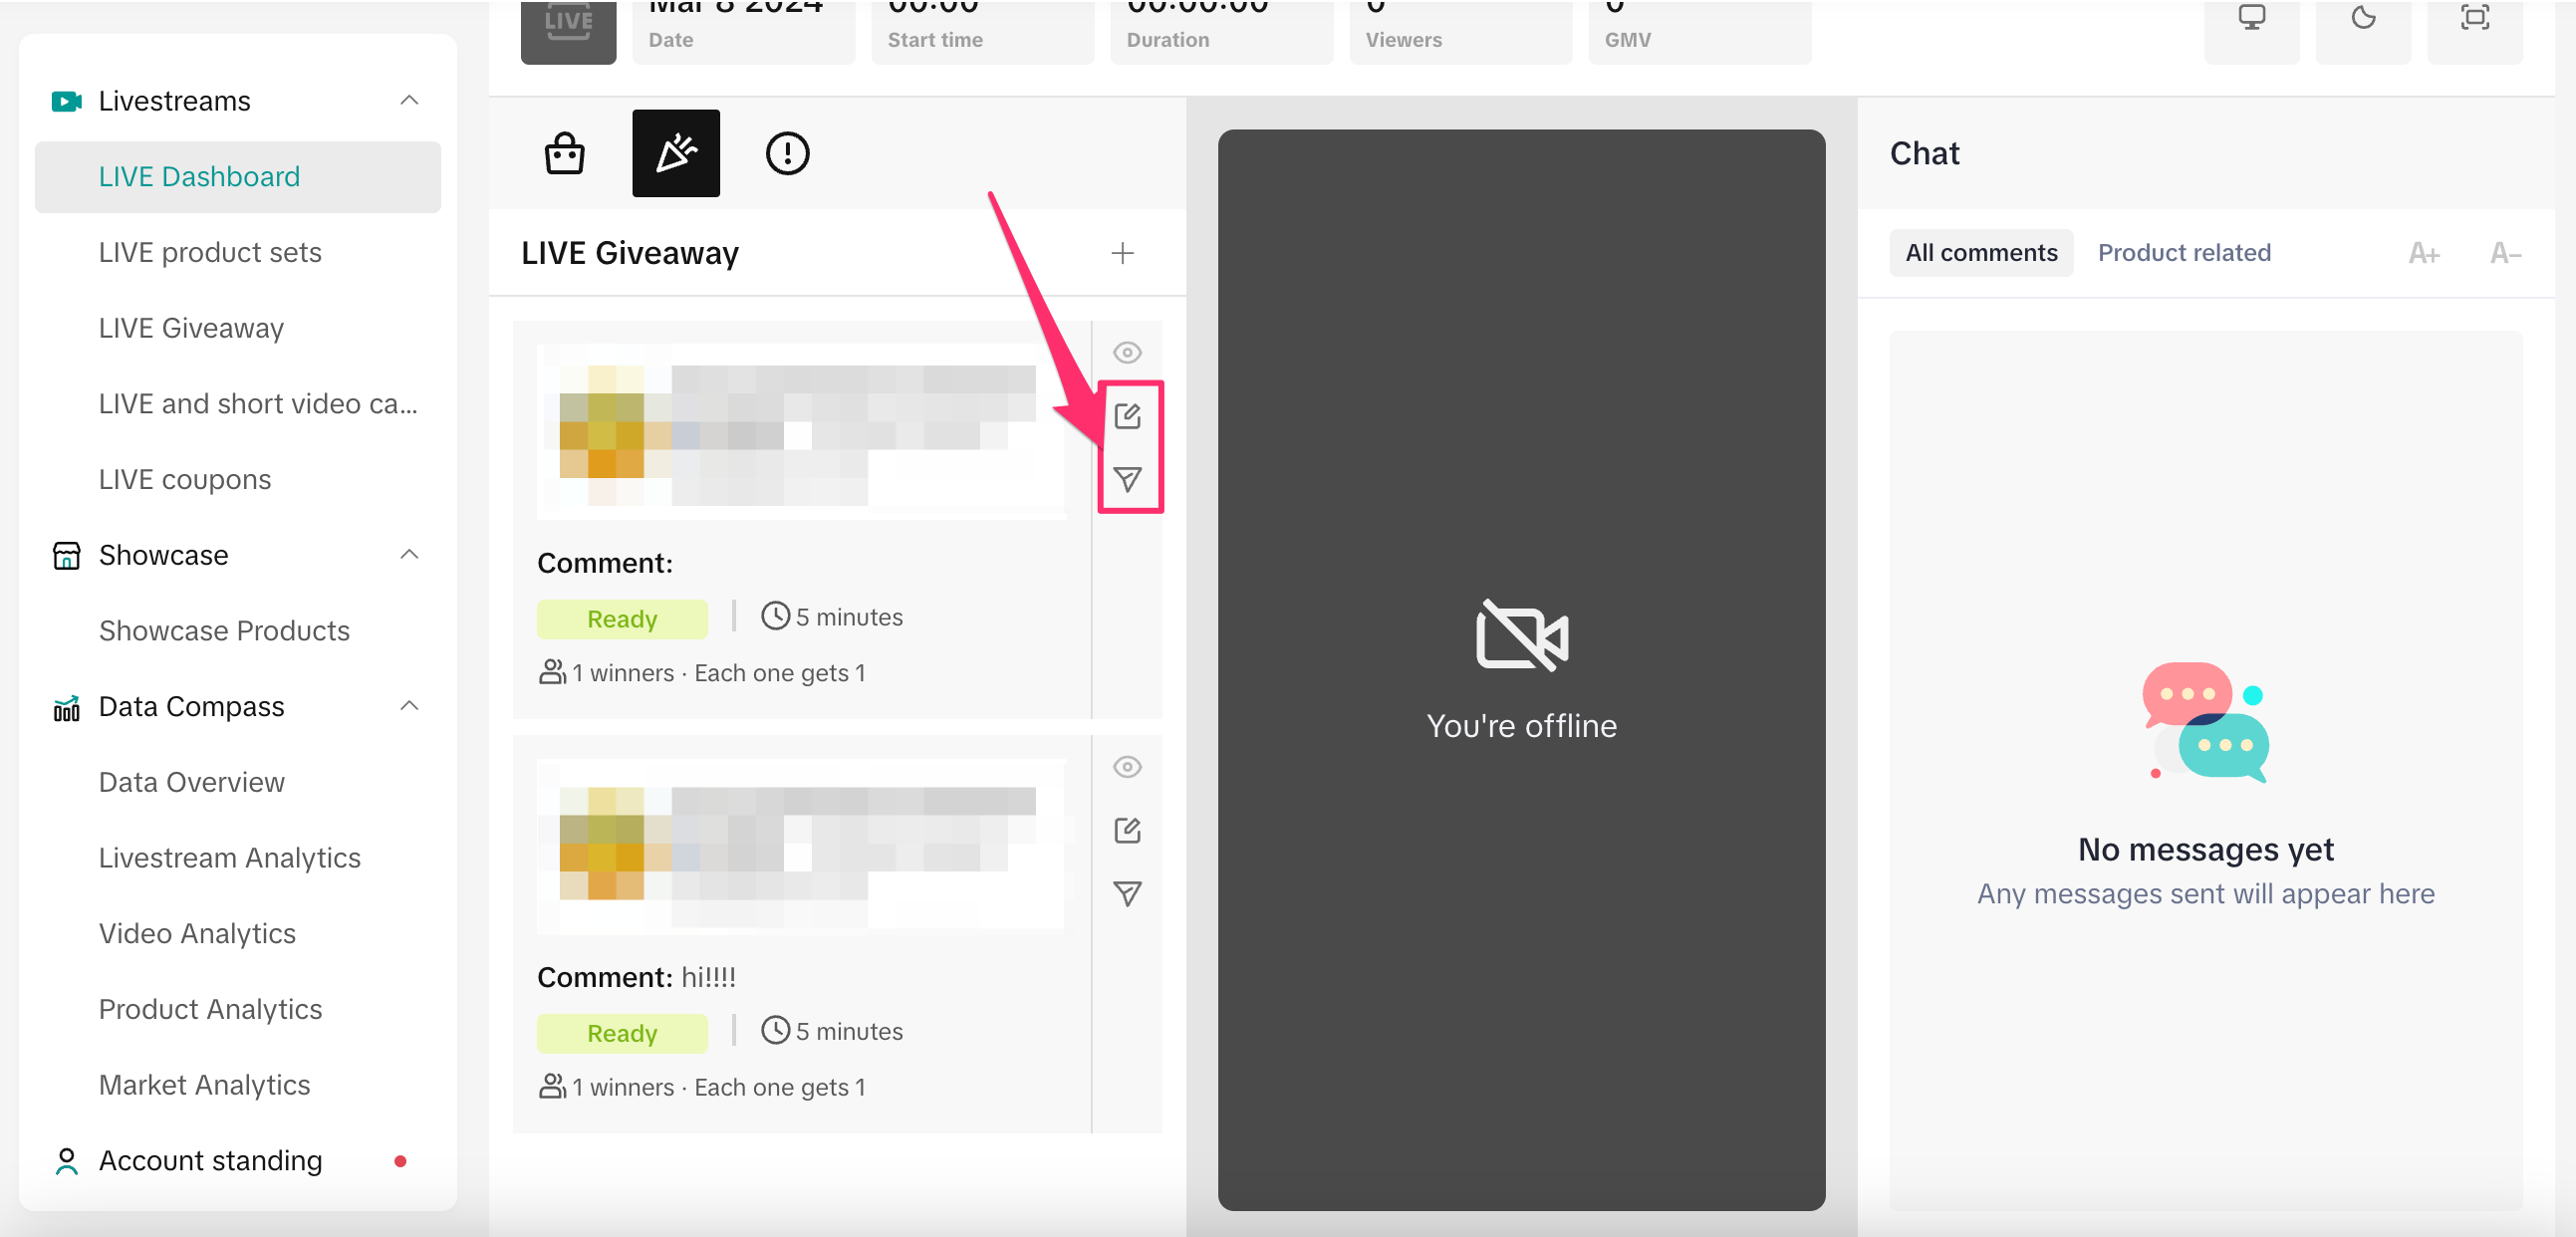
- Accept the terms and then click Create. You have now created a new LIVE Giveaway, which will appear on the left panel. To edit or start the giveaway, use the buttons shown below:
- If you try to set up a giveaway that's already included in another LIVE Event, you'll be reminded that the giveaway is already included in an existing Giveaway and you won't be able to add that giveaway.
- To remove a giveaway from your event, simply select the garbage can icon next to the giveaway.
Setting up LIVE Billboards in LIVE Console
LIVE Billboards can help you communicate critical product selling points and exciting promotions throughout the duration of the session as shoppers enter and leave. You can even use images for an even more eye-catching and engaging experience.- To prepare Billboards in advance within LIVE Console, navigate to the Billboard tab. Click the ‘edit’ icon of a specific template to customize the text, and to prepare a specific Billboard for when you go live, click Display. On mobile, you can drag the billboard’s position and modify the size.
- Here, you can access and edit Billboard templates, as well as create new Billboards from images.
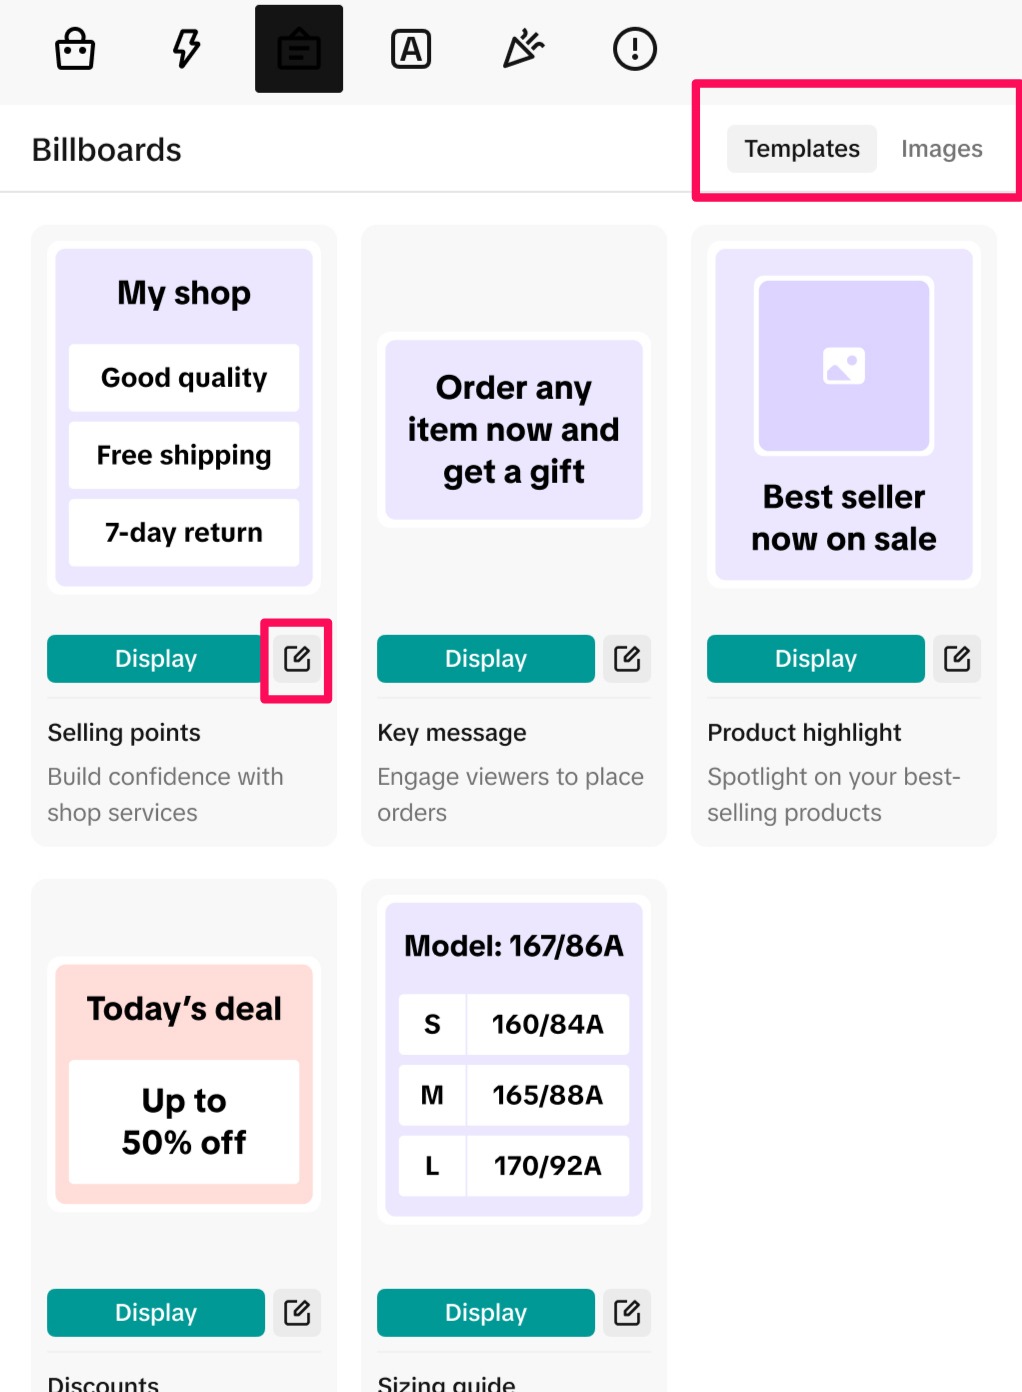
To create a Billboard with an image, start with an image that’s at least 480x360 pixels and upload it to the image tab.
Starting your LIVE Event in LIVE Console
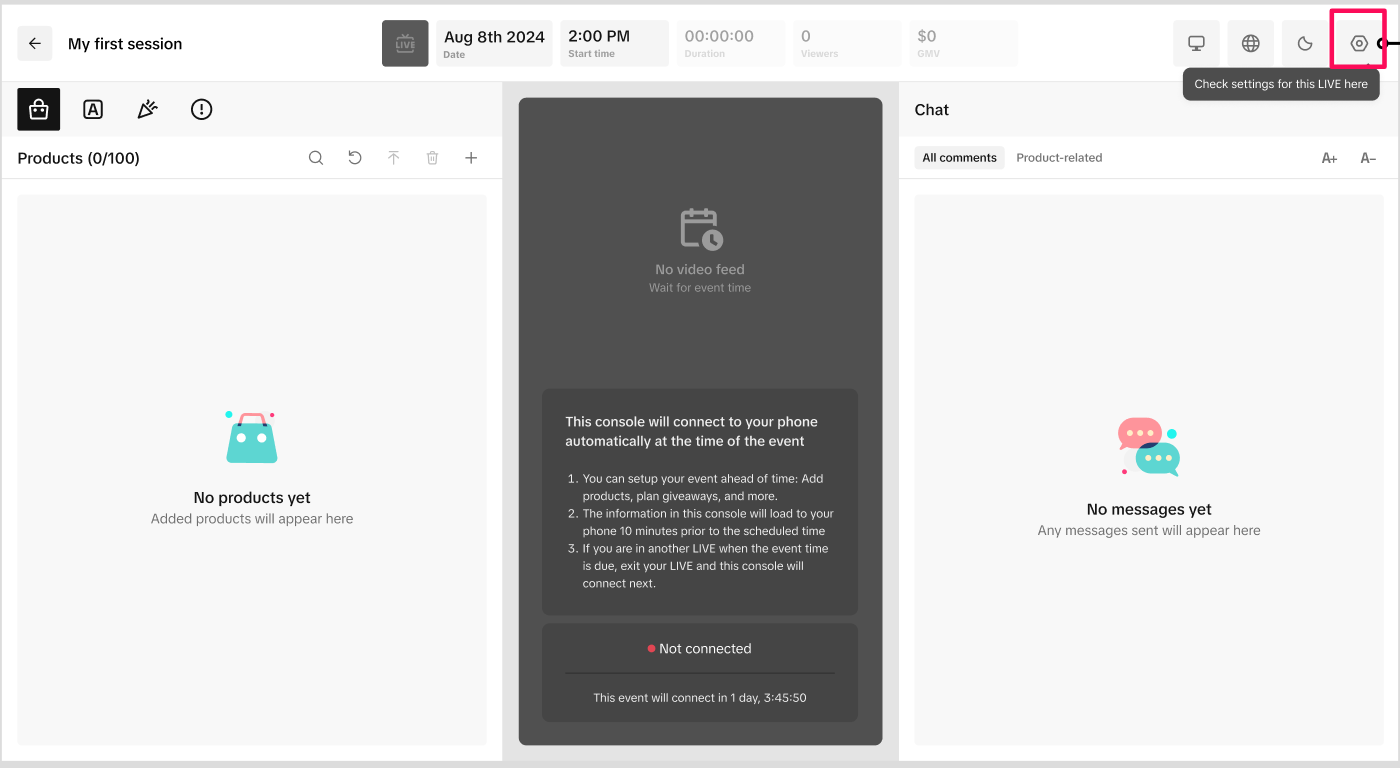
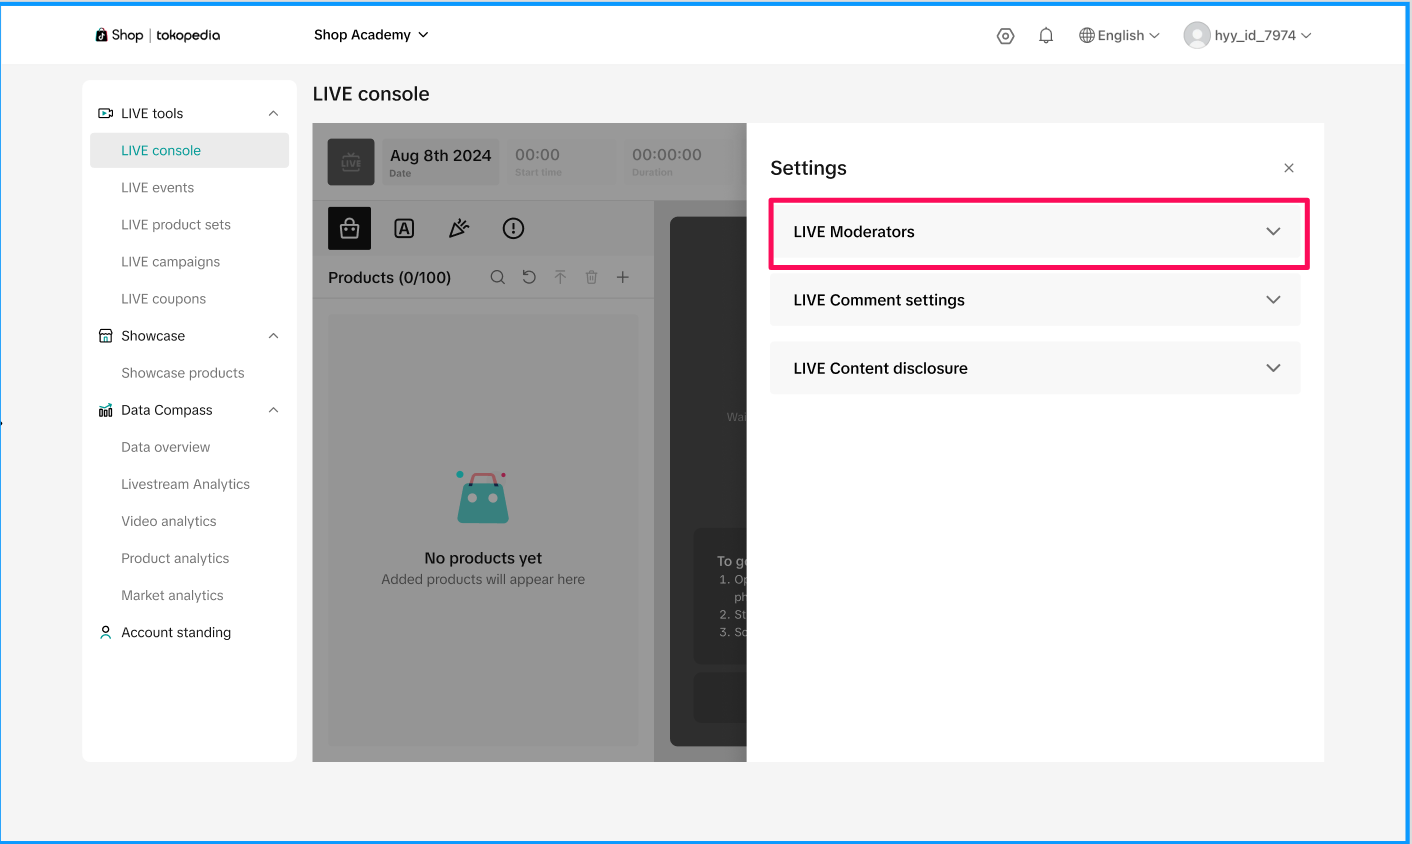
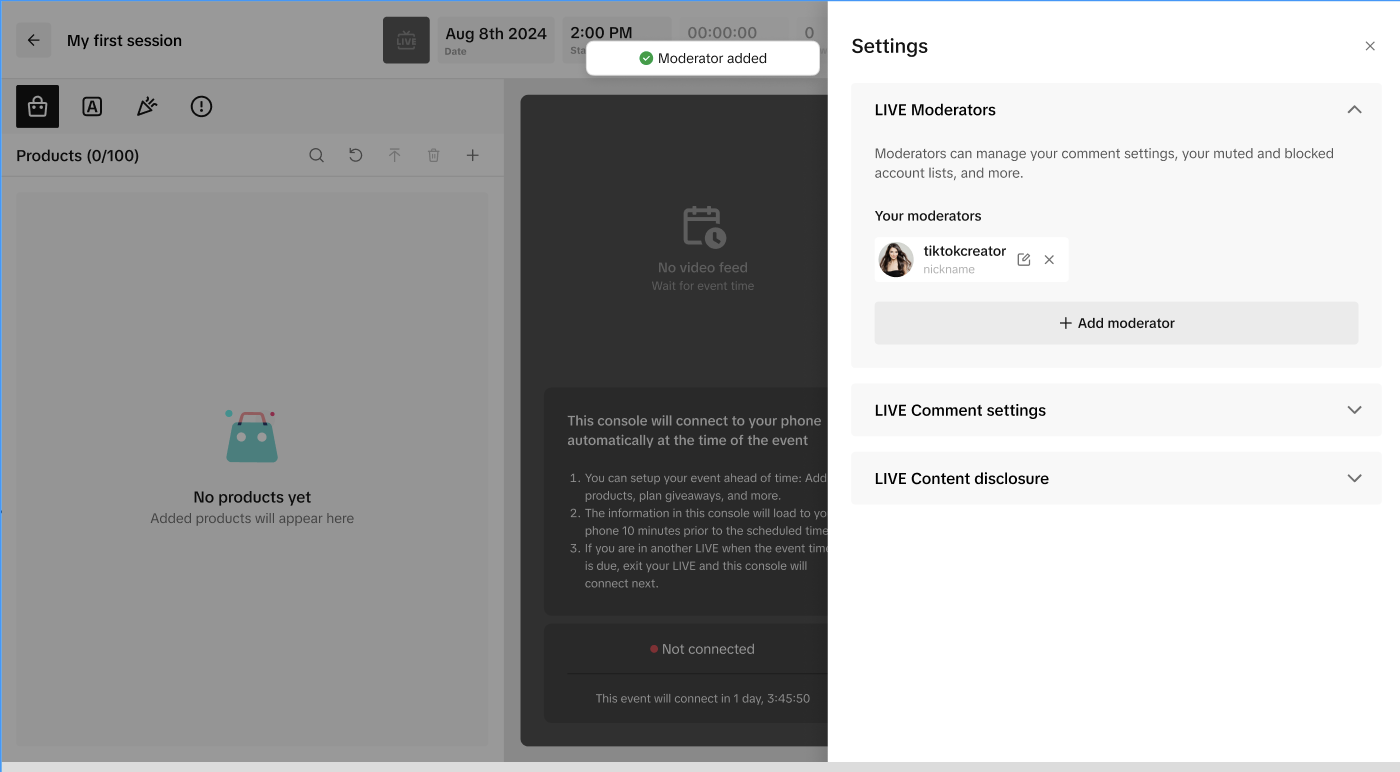
Ready to start your LIVE shopping session? If you're working with a team, get your moderators set up on LIVE Console by going to Settings and LIVE Moderators. You can add as many as 30 moderators to a given event, but the host and moderator must follow each other in order to be added.- Click into your LIVE Event before you're scheduled to start and you'll see a countdown to when your LIVE Event starts.
- On mobile, click Go LIVE to begin the session. Your LIVE event will open into a new page, which will be a full screen version of your console for easier viewing. Your live stream will sync with the LIVE Console, showing you the event's livestream on desktop as well.

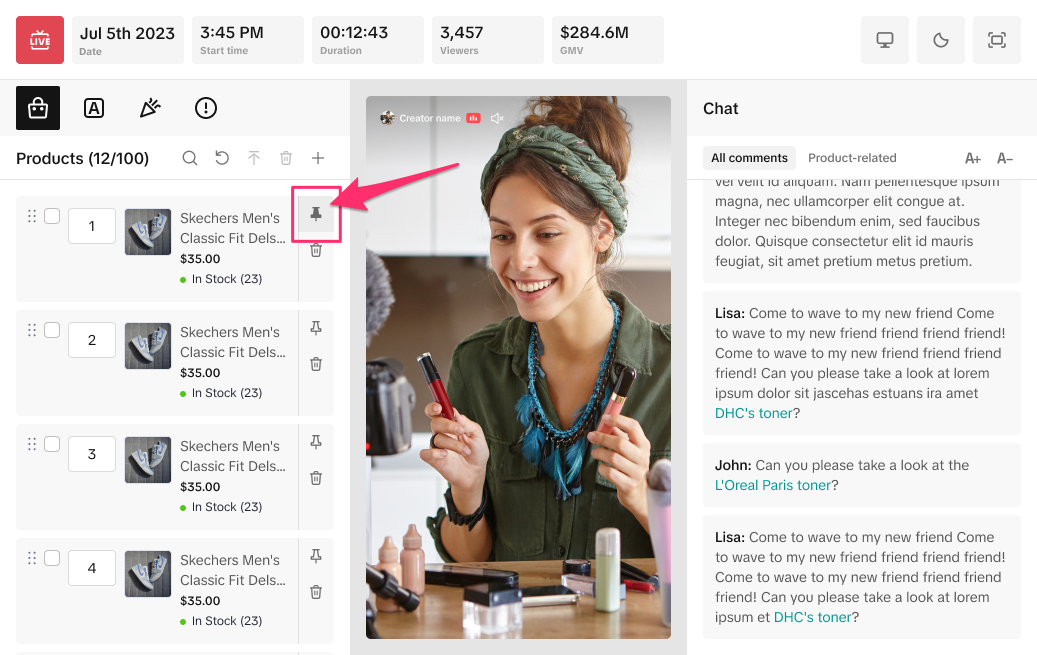
- Once you go LIVE, you will see the Pin button, which allows you to pin the product and make it visible to your viewers.
- In the left panel, navigate to the Violations tab to track any livestream violations.

- On the right panel, you can keep track of general comments and product-related comments. Note that you can also change the size of the font.
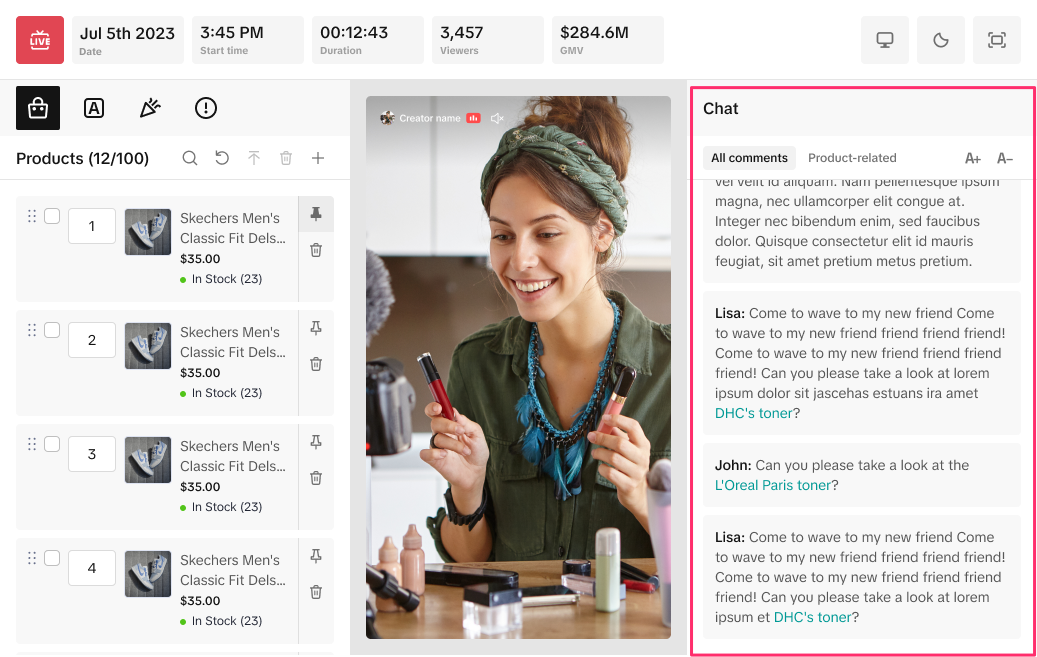
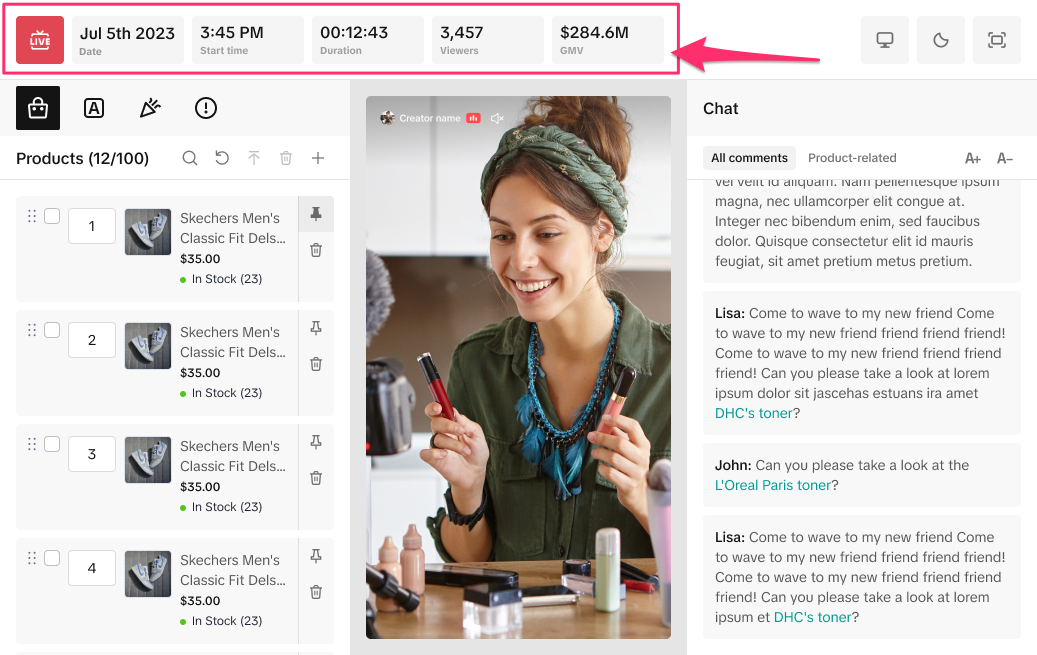
- On the top panel, you can track the date of the livestream, the start time, the duration, the number of viewers, and the GMV generated during the LIVE.
- At the top right of the panel, you can:
- Enter the advanced version of the LIVE Console. More details can be found here: [Seller]How to use LIVE Board to monitor LIVE Performance
- Switch between light and dark mode.
- Enter full-screen mode, as shown below.


Activity & Order management Feed
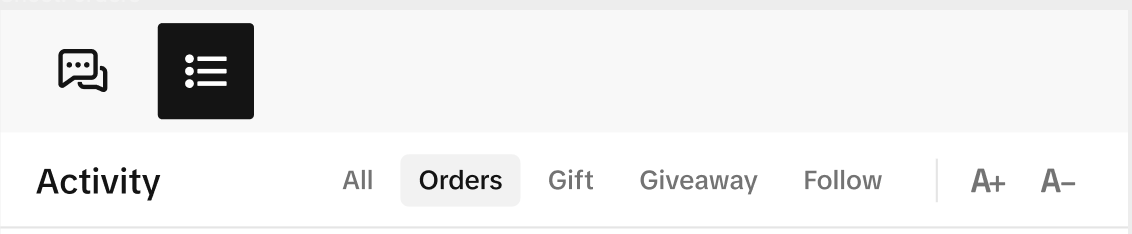
In the Activity Feed, you can keep tabs on important activities from your viewers, such as new orders, new followers, and gifts. Engage with your viewers real-time by acknowledging and responding to these activities.- Within the console, click the icon next to the chat icon on the right panel to view the Activity Feed. Here, you'll see gifts, follows, orders and activity related to your giveaways.
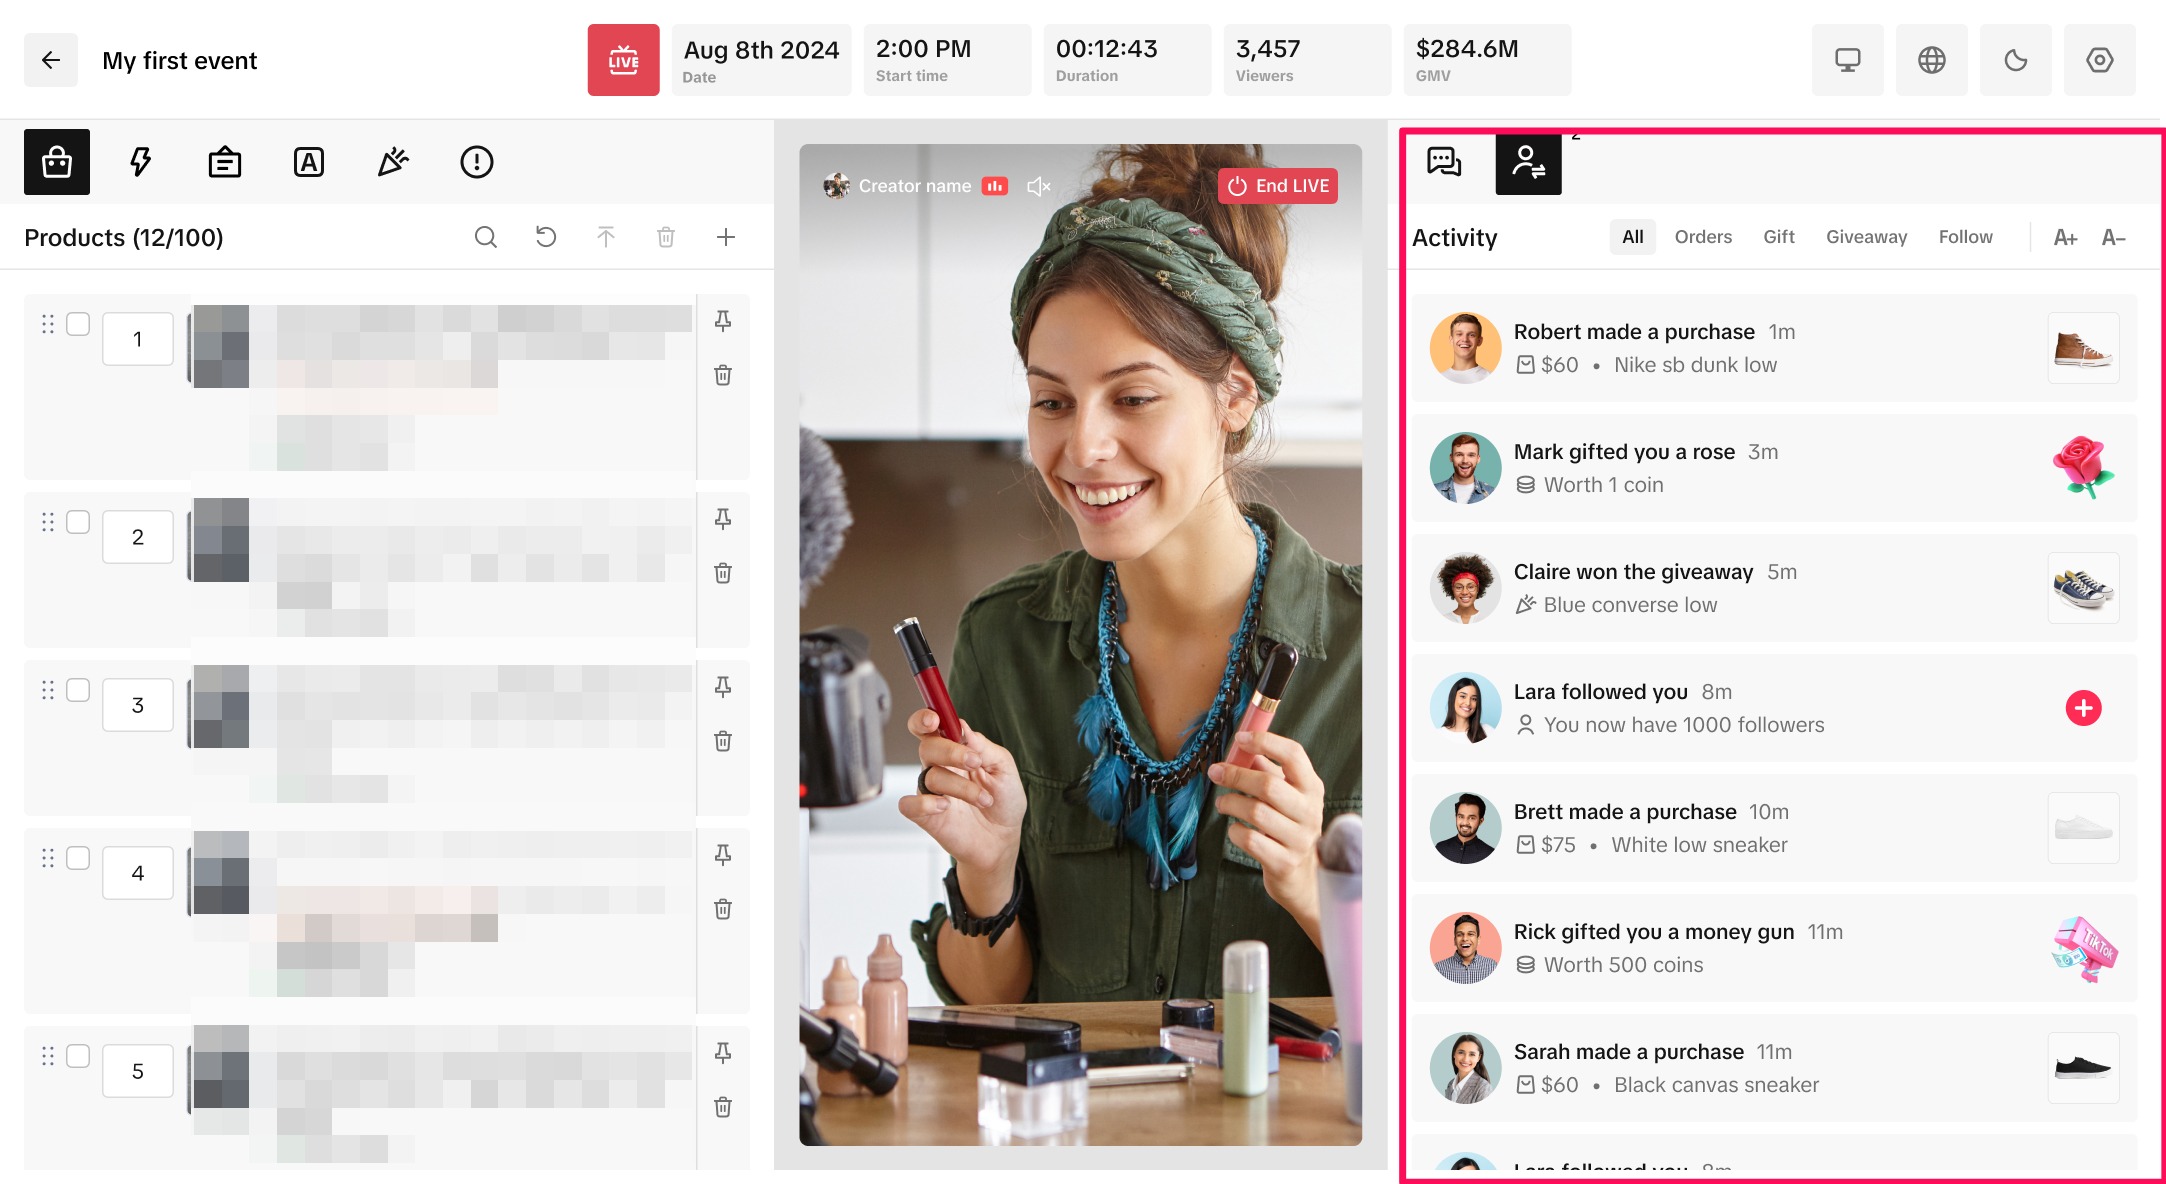
- You can filter the Activity Feed to highlight Orders, Gifts, Giveaway, and Follow activities, as well as make the font larger or smaller for easier legibility.
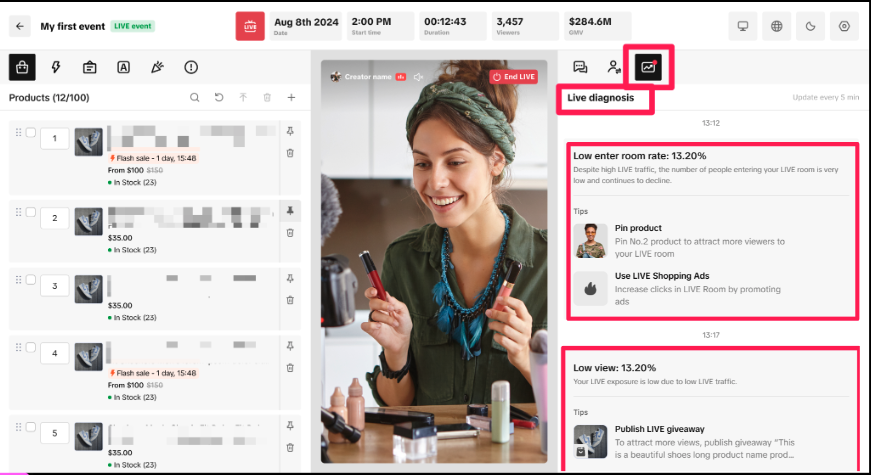
Monitor your Event with LIVE Diagnosis
During your event, in the LIVE Diagnosis tab, you’ll receive suggestions on how you can optimize your session’s performance in real-time. For example, if a drop in traffic to your event is detected, you’ll receive an alert and actionable steps to take to improve your performance.Launching a LIVE Giveaway in LIVE Console
Once you're live, launch your scheduled LIVE Giveaway to encourage engagement from your viewers. You can also create a new giveaway while live.Launching a Flash Sale in LIVE Console
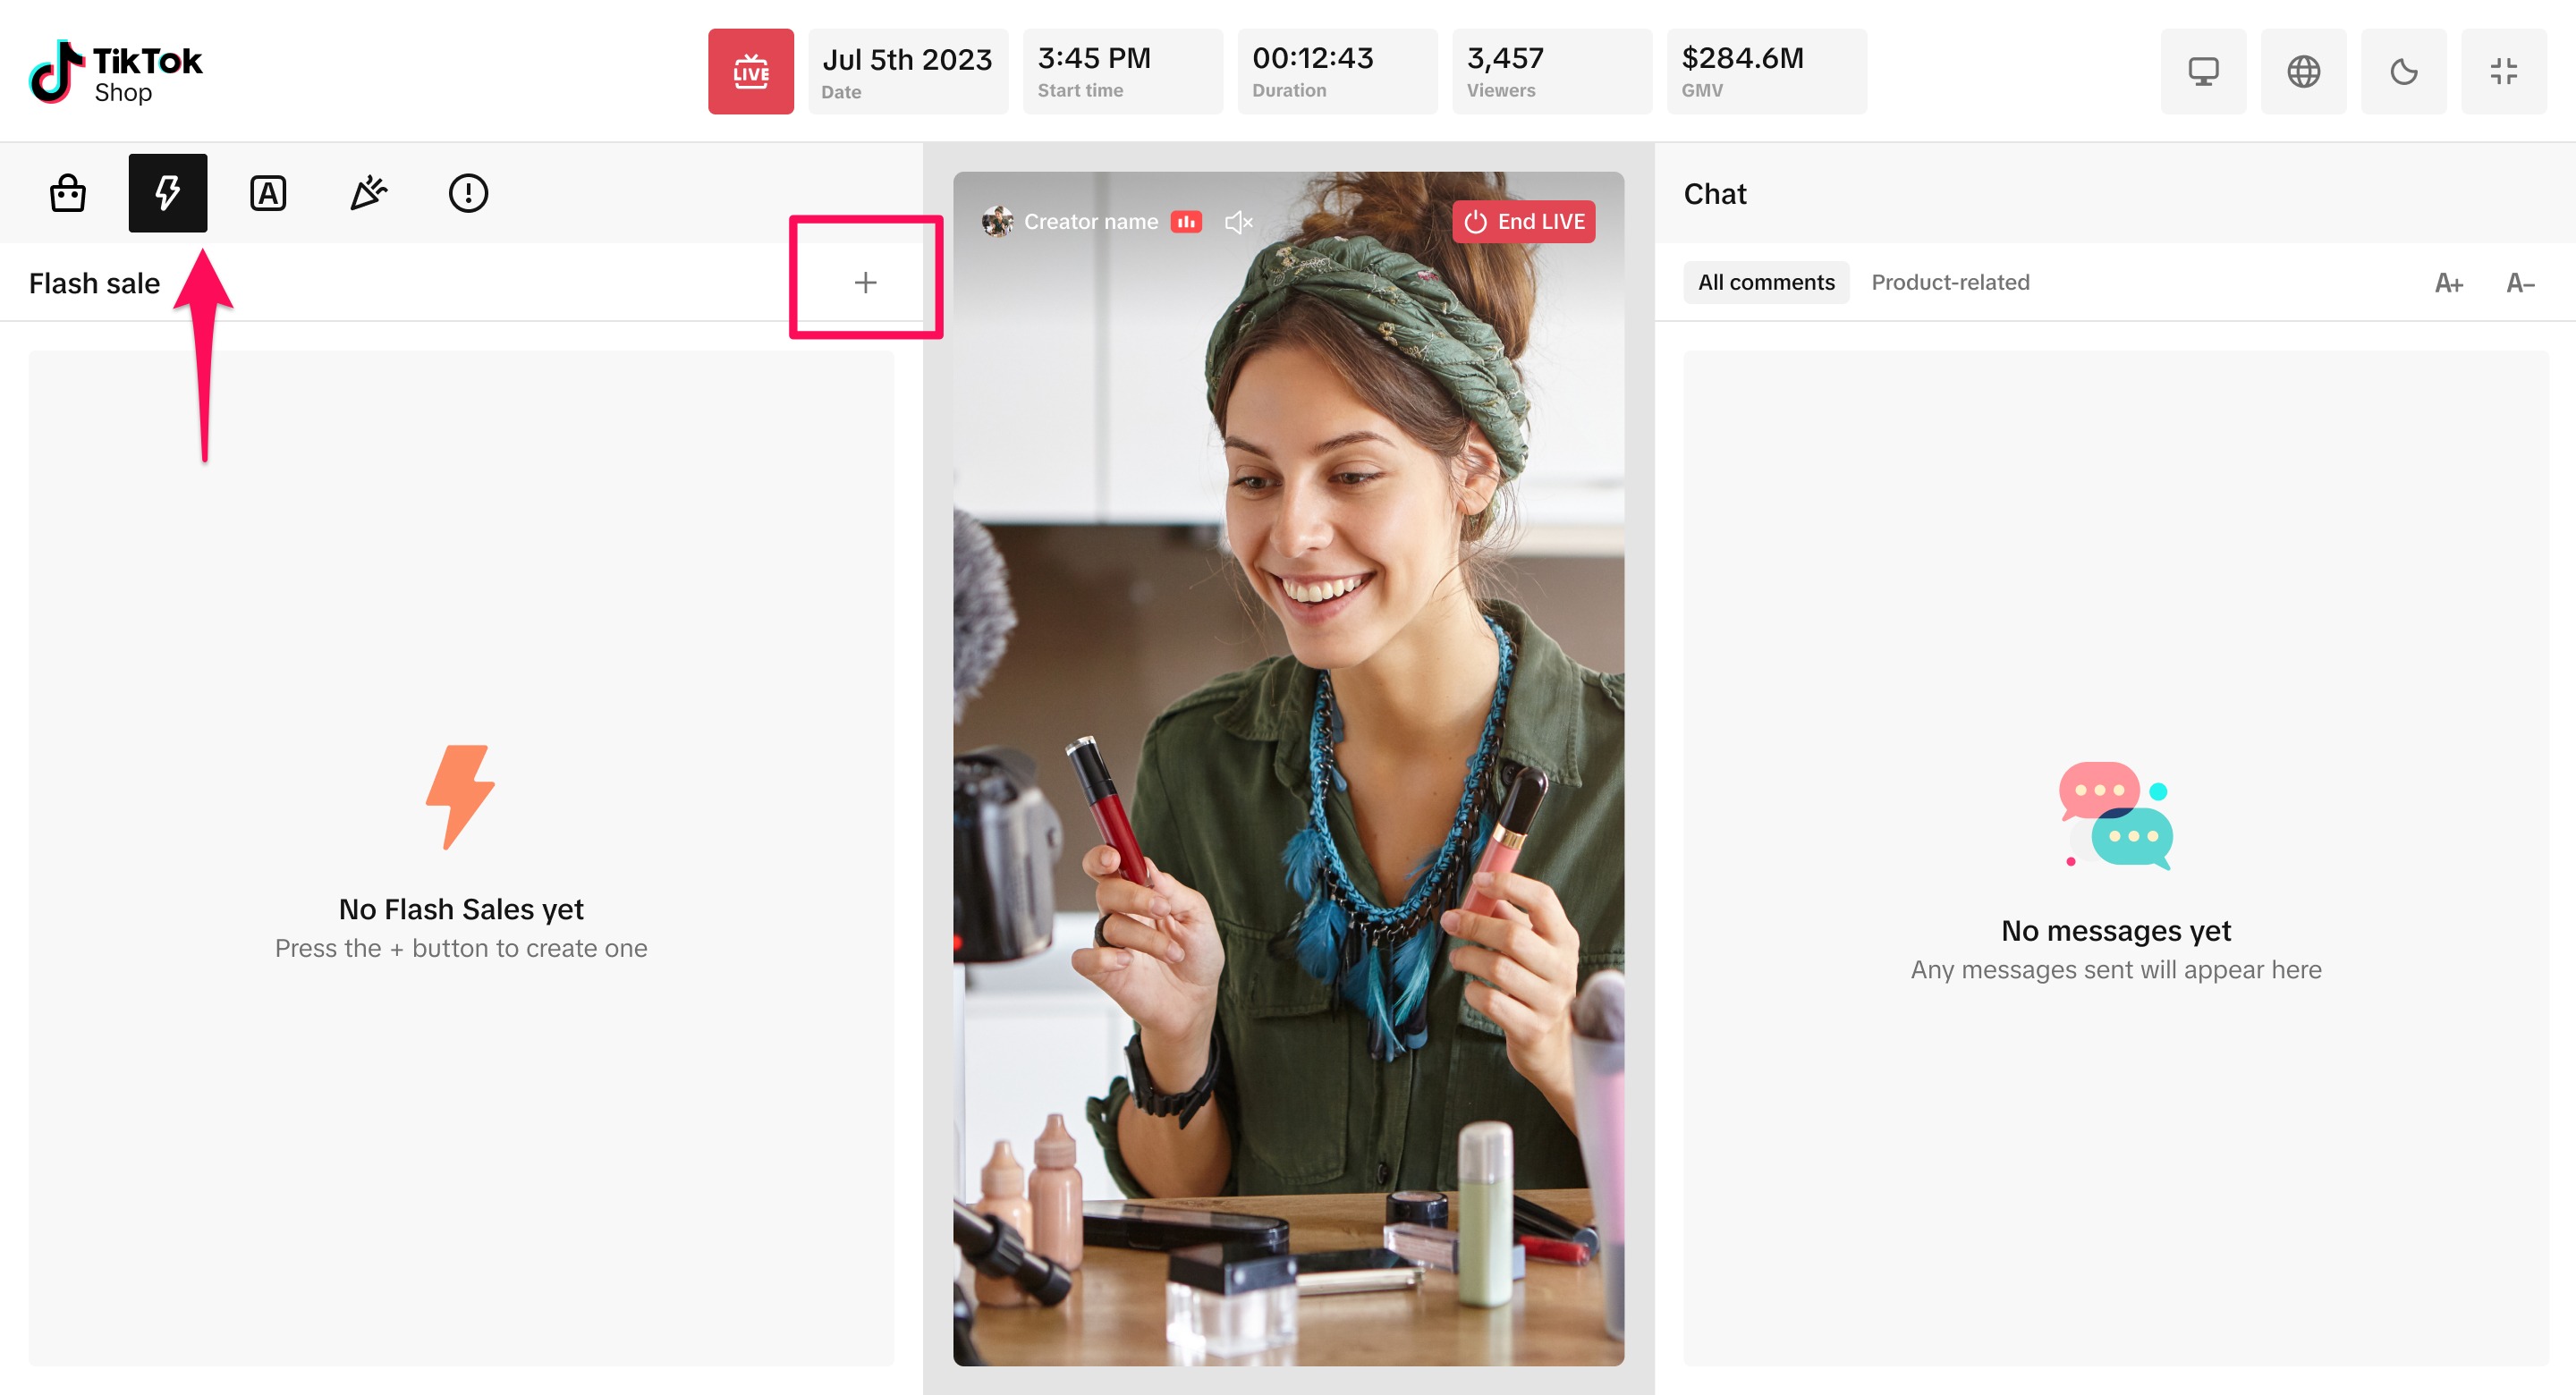
If you're a creator with your own inventory or a seller has allocated you Exclusive Inventory for Flash Sales, you can now set up and deploy Flash Sales in LIVE console. For a more detailed overview, along with information on setting up Exclusive Inventory in Flash Sales, check out the dedicated Feature Guide here.- Within the console, navigate to the lightning bolt icon and select the + button
- Next, select the product you'd like to include, along with the settings for the Flash Sale.
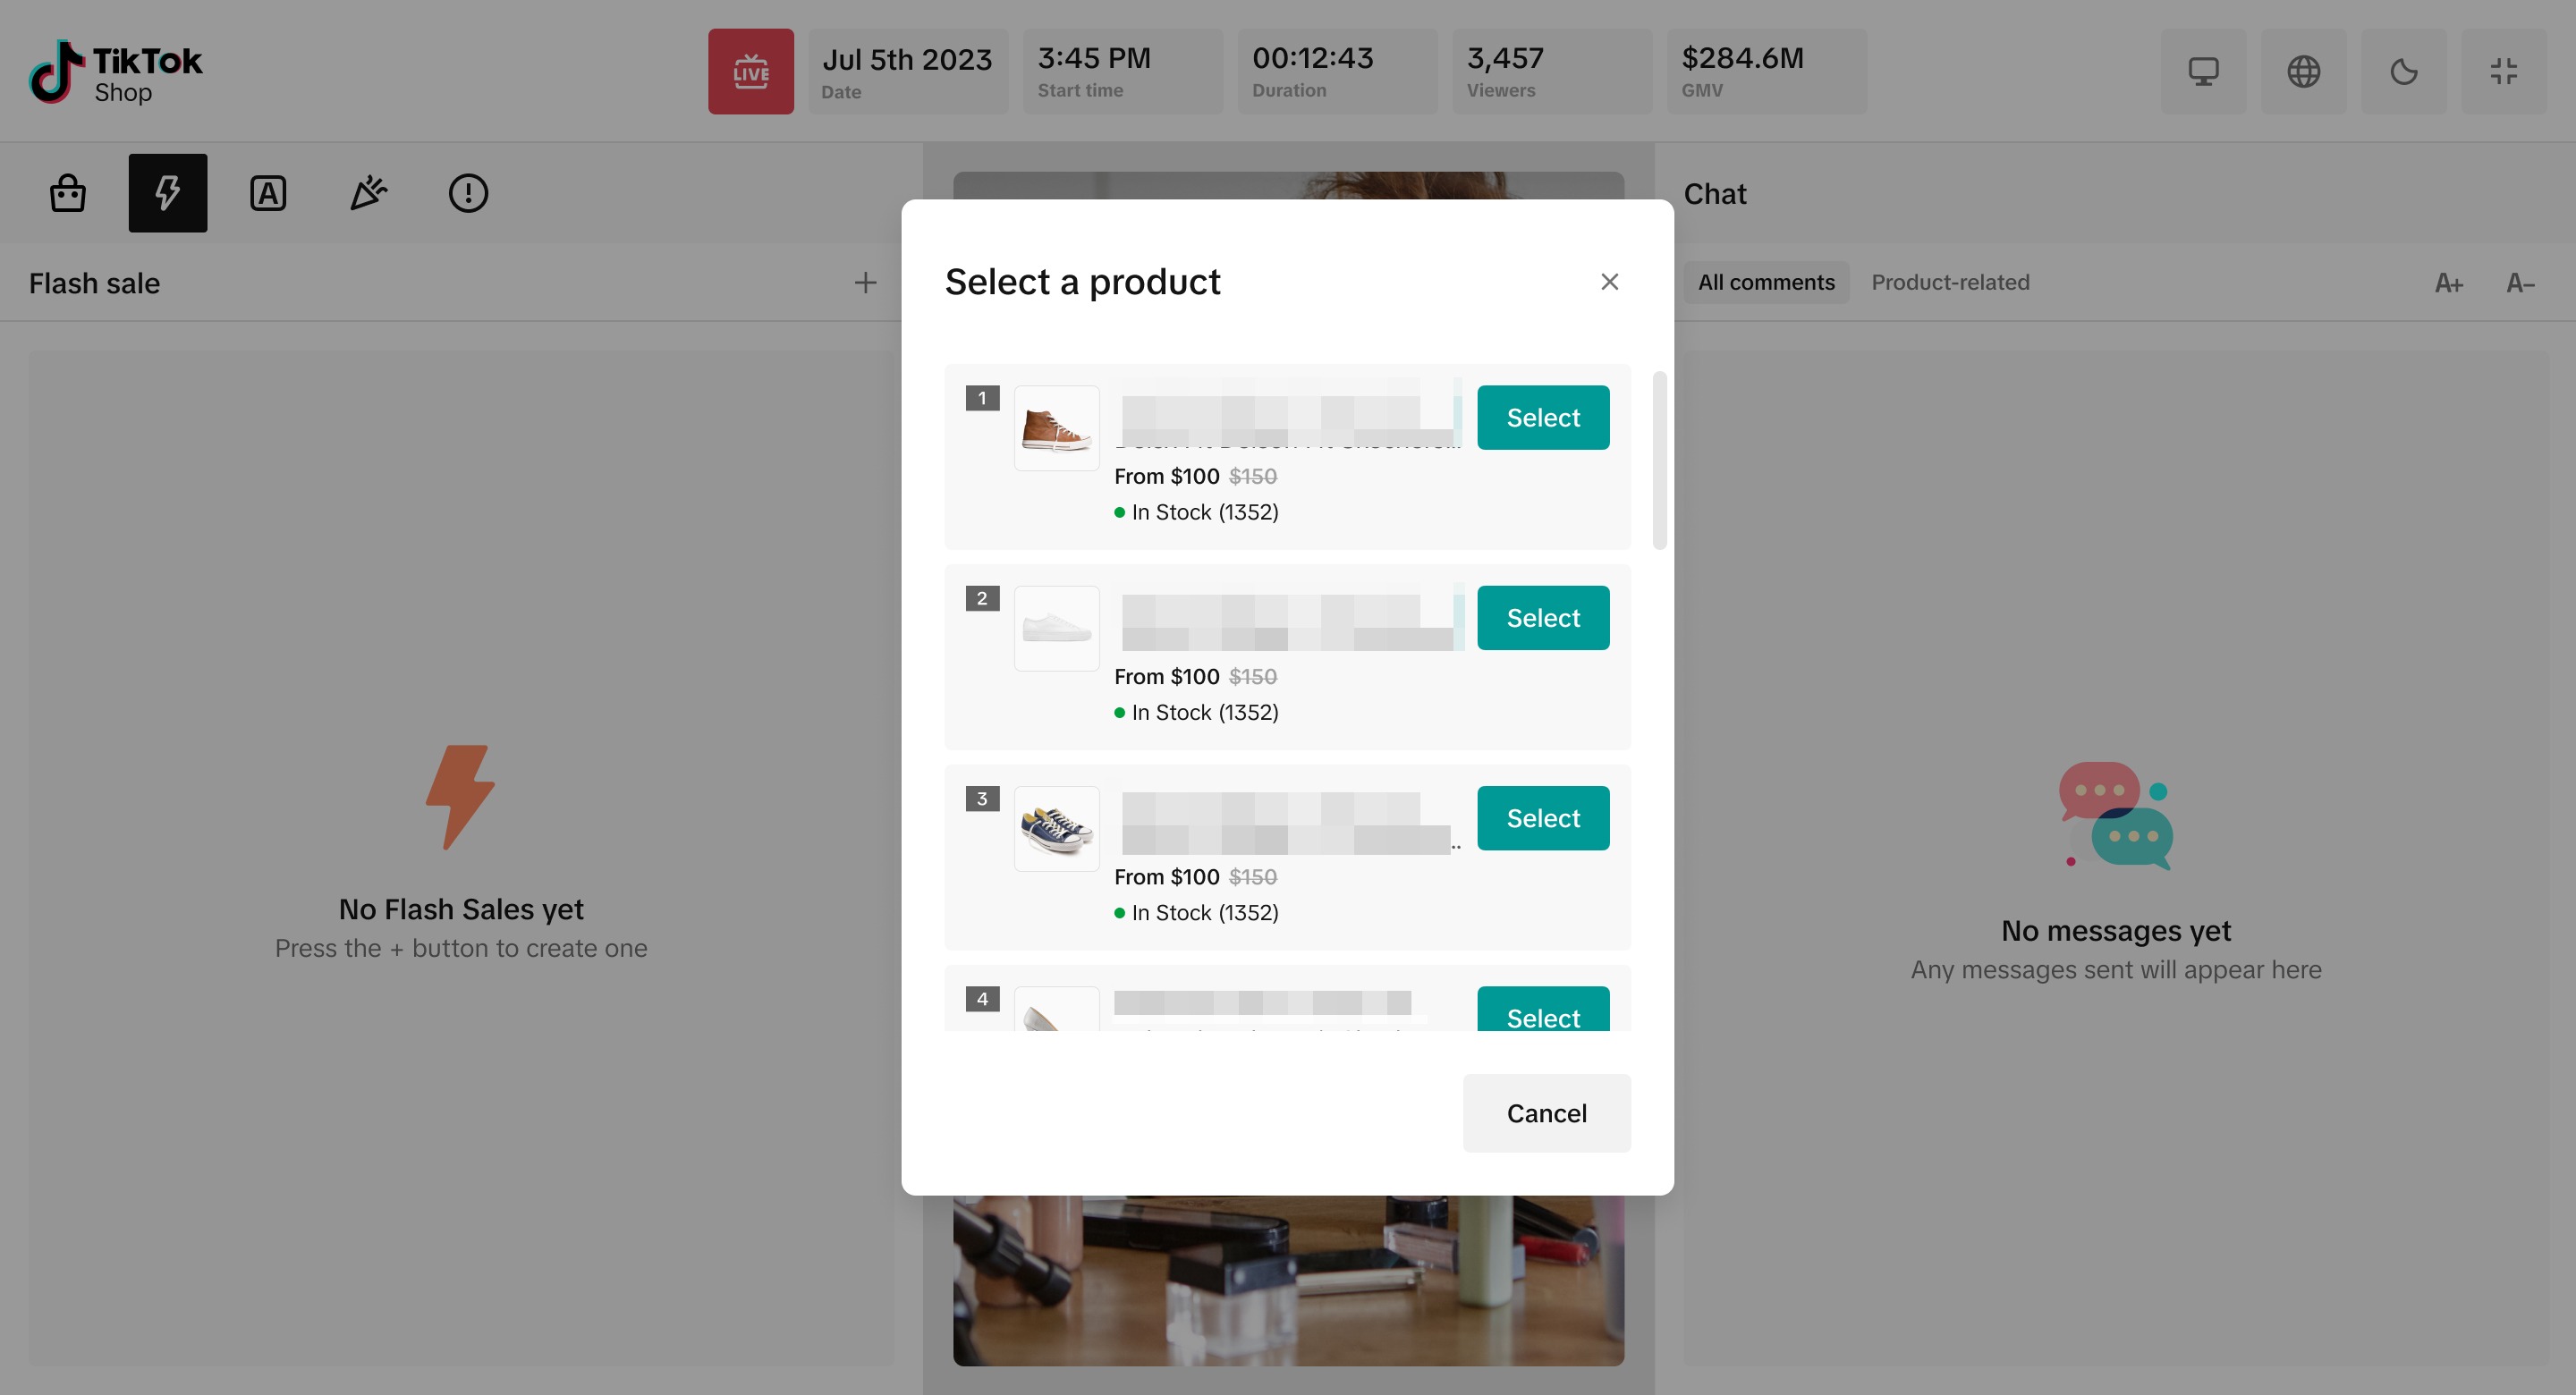
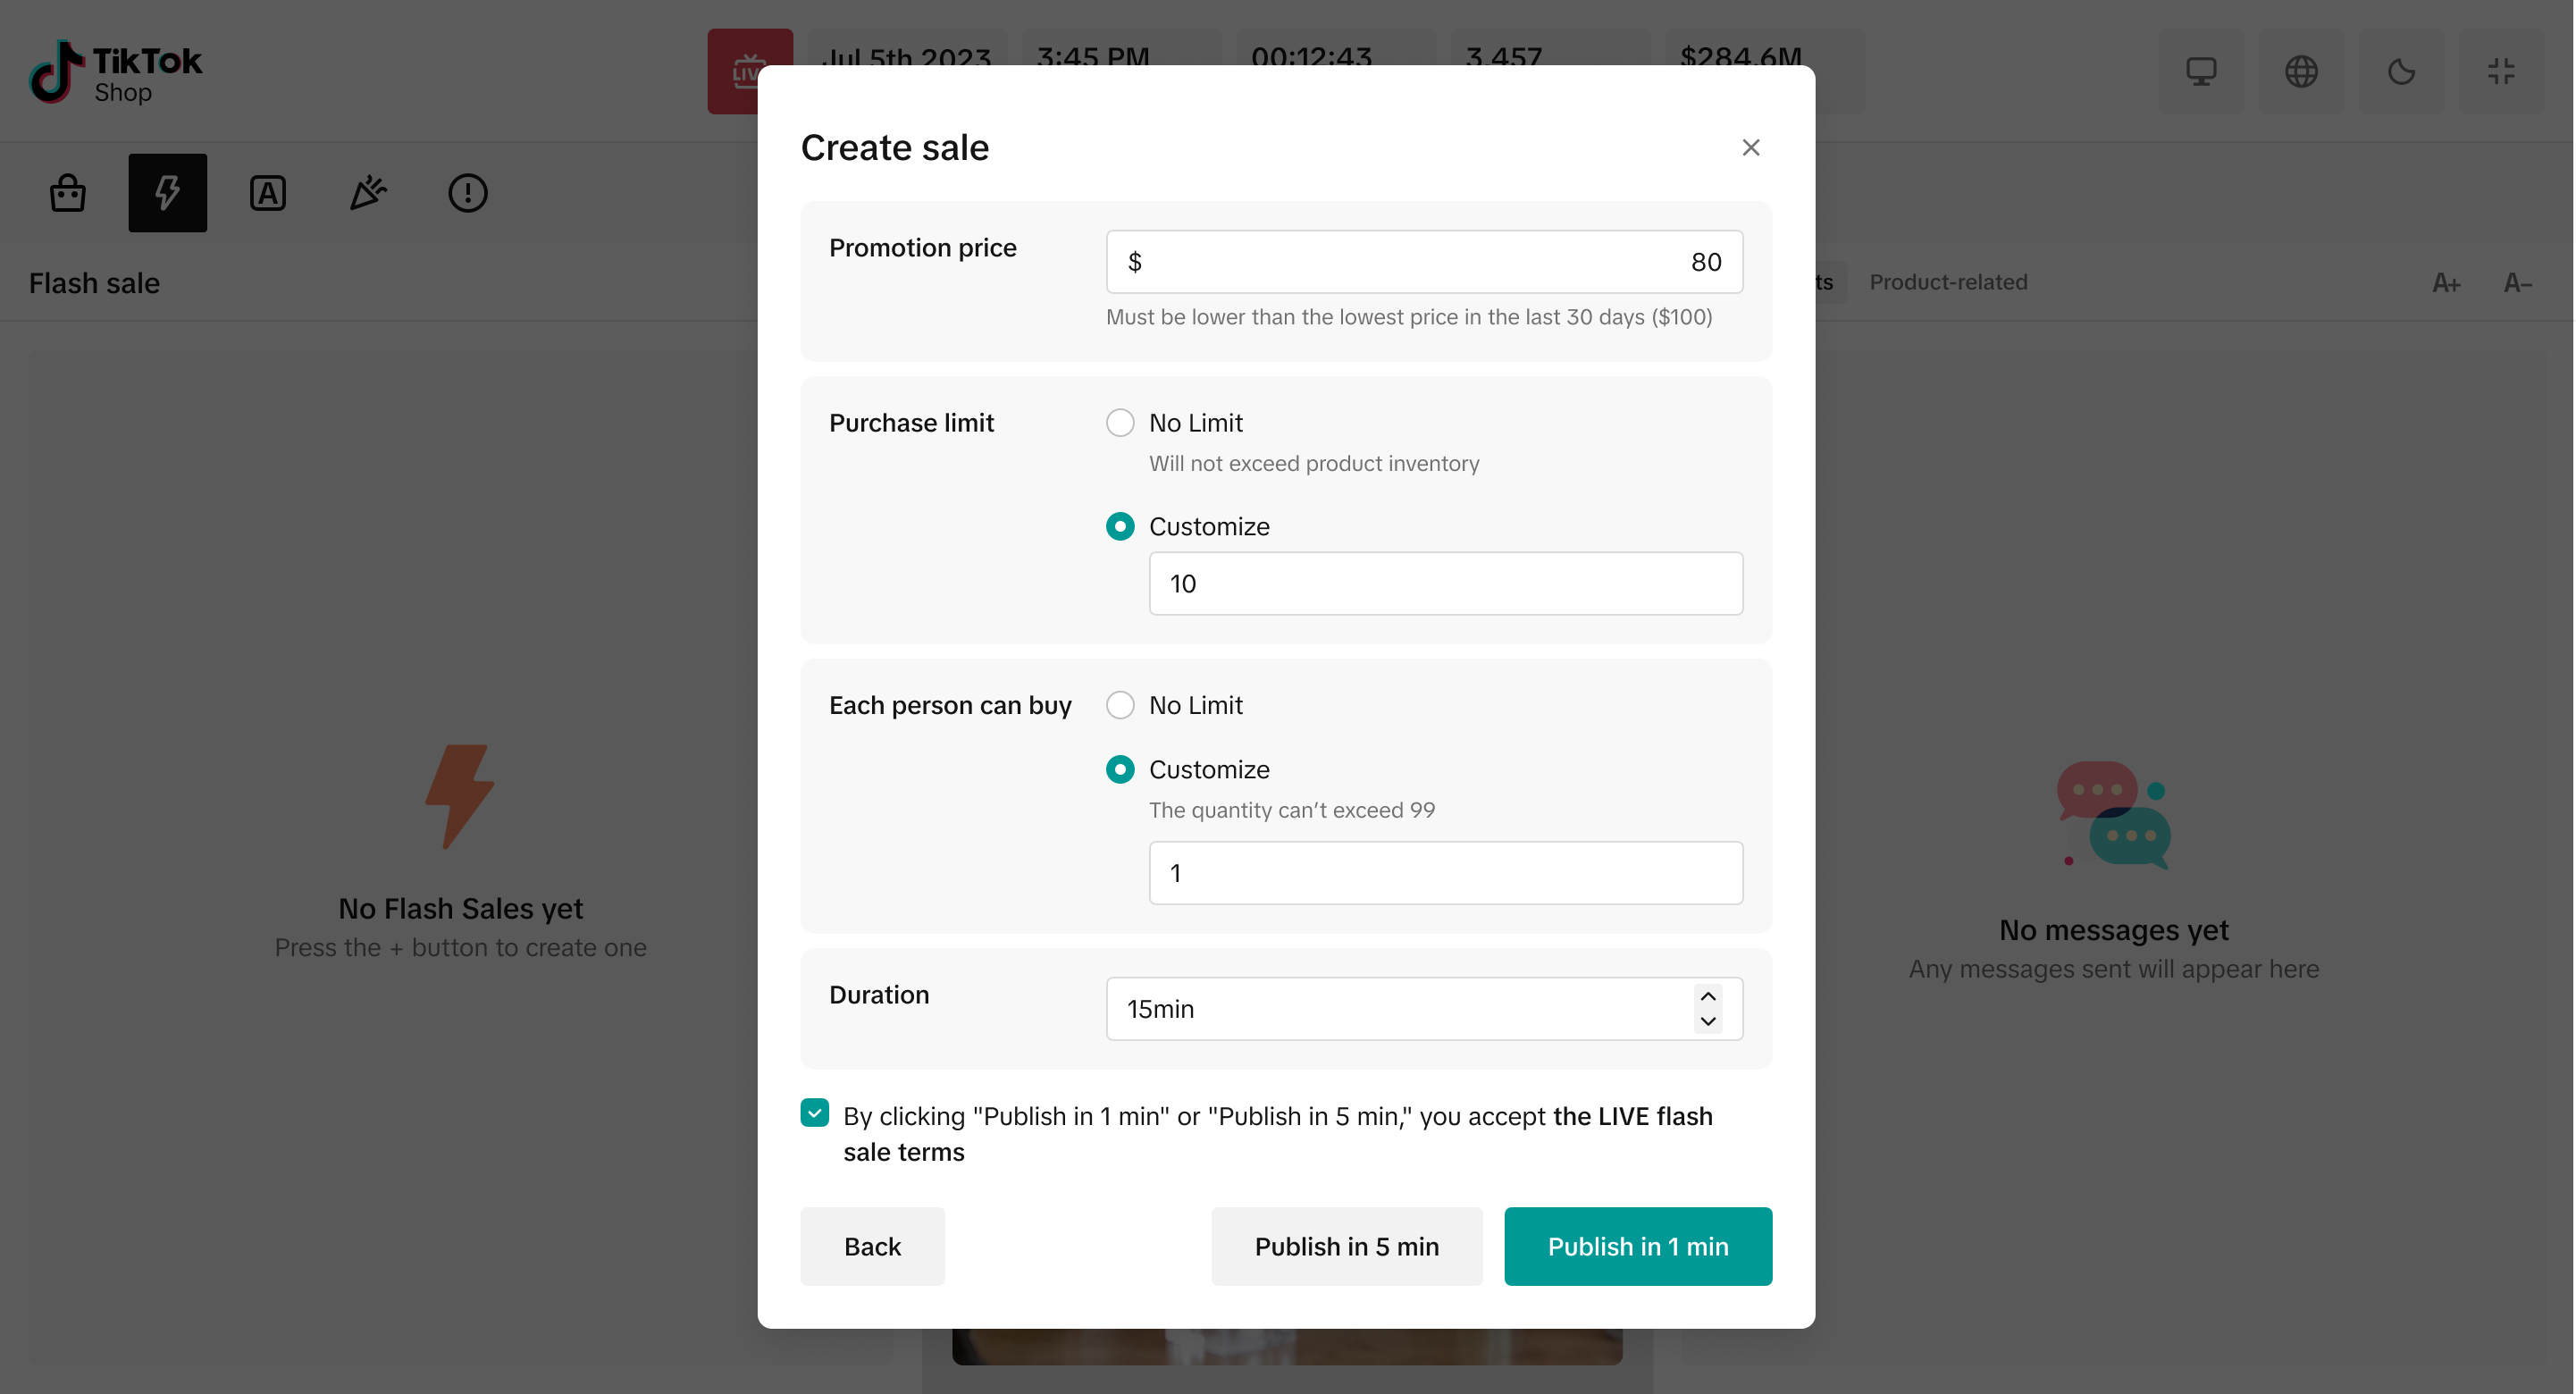
- Promotion Price: The product's discounted price, which must be lower than the lowest price in the last 30 days.
- Purchase limit: The amount of the product's inventory that will be allocated to the Flash Sale.
- Each person can buy: Limits that you can set regarding how many items an individual viewer can purchase.
- Duration: How long the Flash Sale will last, at minimum 5 minutes.
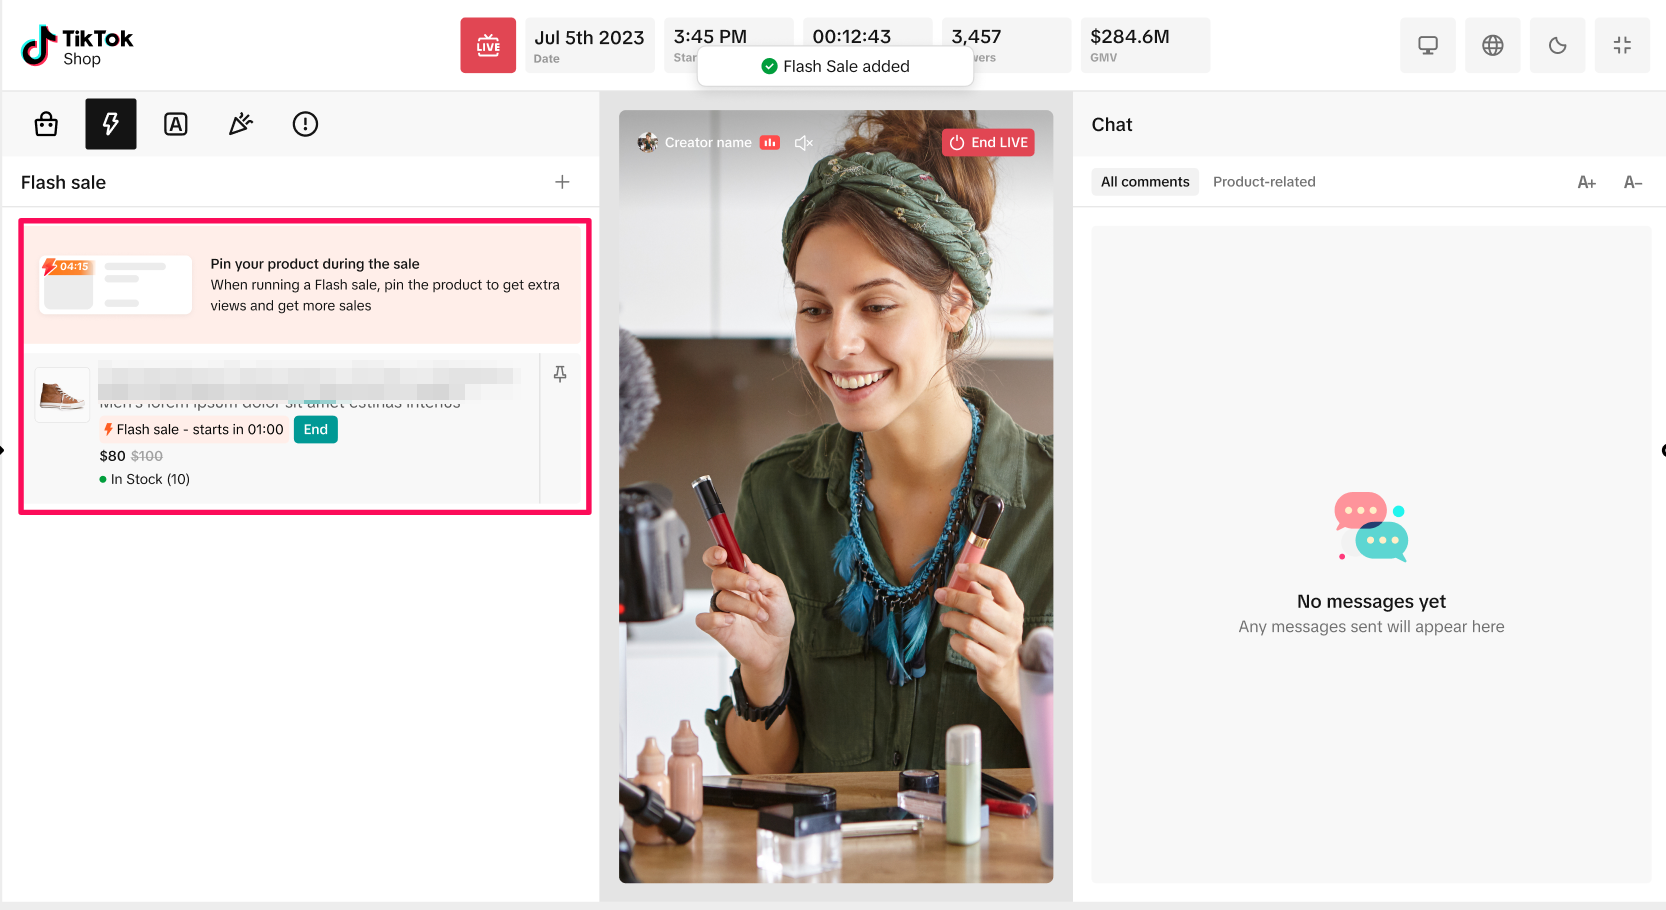
- Once you hit Publish in 1 min, the Flash Sale will appear in the console under the Flash Sale tab, along with a reminder to pin the product to attract viewers' attention.
Exclusive inventory for Flash Sale
When a seller allocates you exclusive inventory, you can create even more excitement with LIVE Flash Sale which can be set up in advance in LIVE Console.Note: Keep in mind that in order to access this feature, you'll need a Collab Invite from a seller, and that seller will need to allocate you exclusive inventory to sell in your LIVE session. Step 1: Within the LIVE Console, navigate to the Product Listing slide and select the shopping bag icon. Click Add exclusive stock.
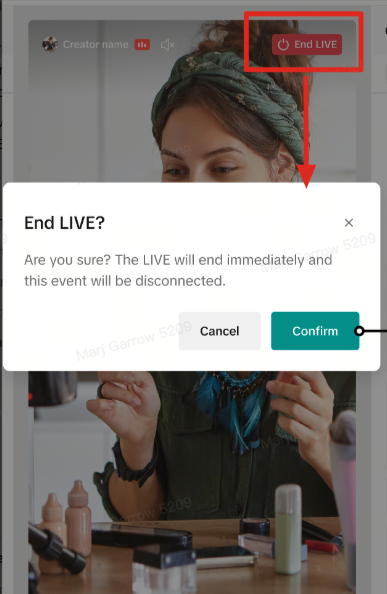
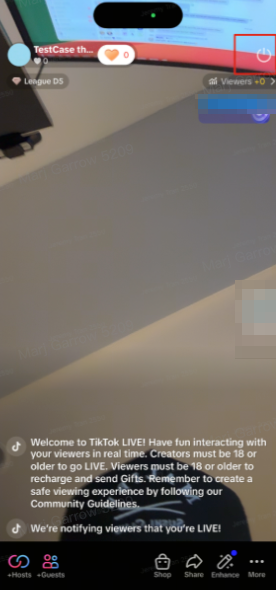
Ending your Event
When it's time to finish your event, you can either end your stream on mobile or within the console. Click End Live within the console or tap the power button on mobile.After your LIVE Event
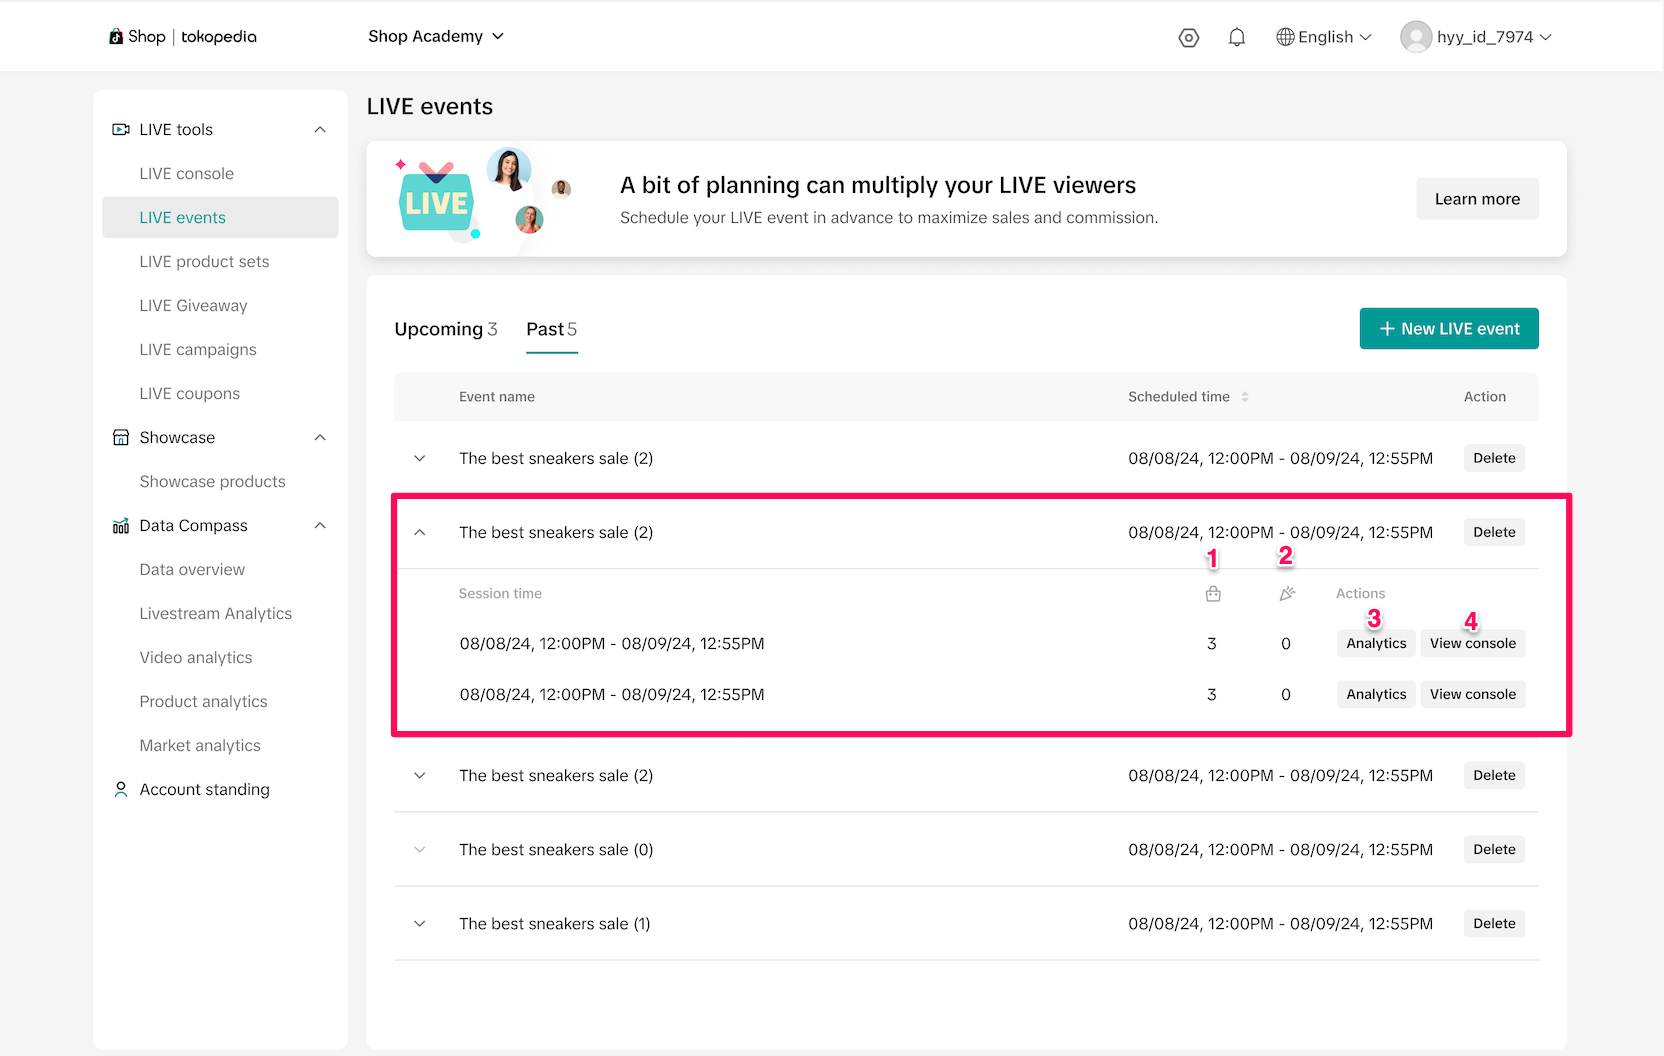
You can access Past Events within the LIVE Events tab for a list of all events. If your LIVE Event had multiple sessions over the course of the event, each session will be broken out beneath the main Event. You can view granular details for each session, including:- Number of products featured in the session
- Number of LIVE Giveaways featured in the session
- Analytics: Clicking Analytics will take you to the Livestream Analytics for that session to view detailed performance
- View Console: Clicking View Console will open up that session's specific console, where you can view past giveaways and winners, and replay or download the session and session comments. Note that you can't make any edits to a past session or its settings.
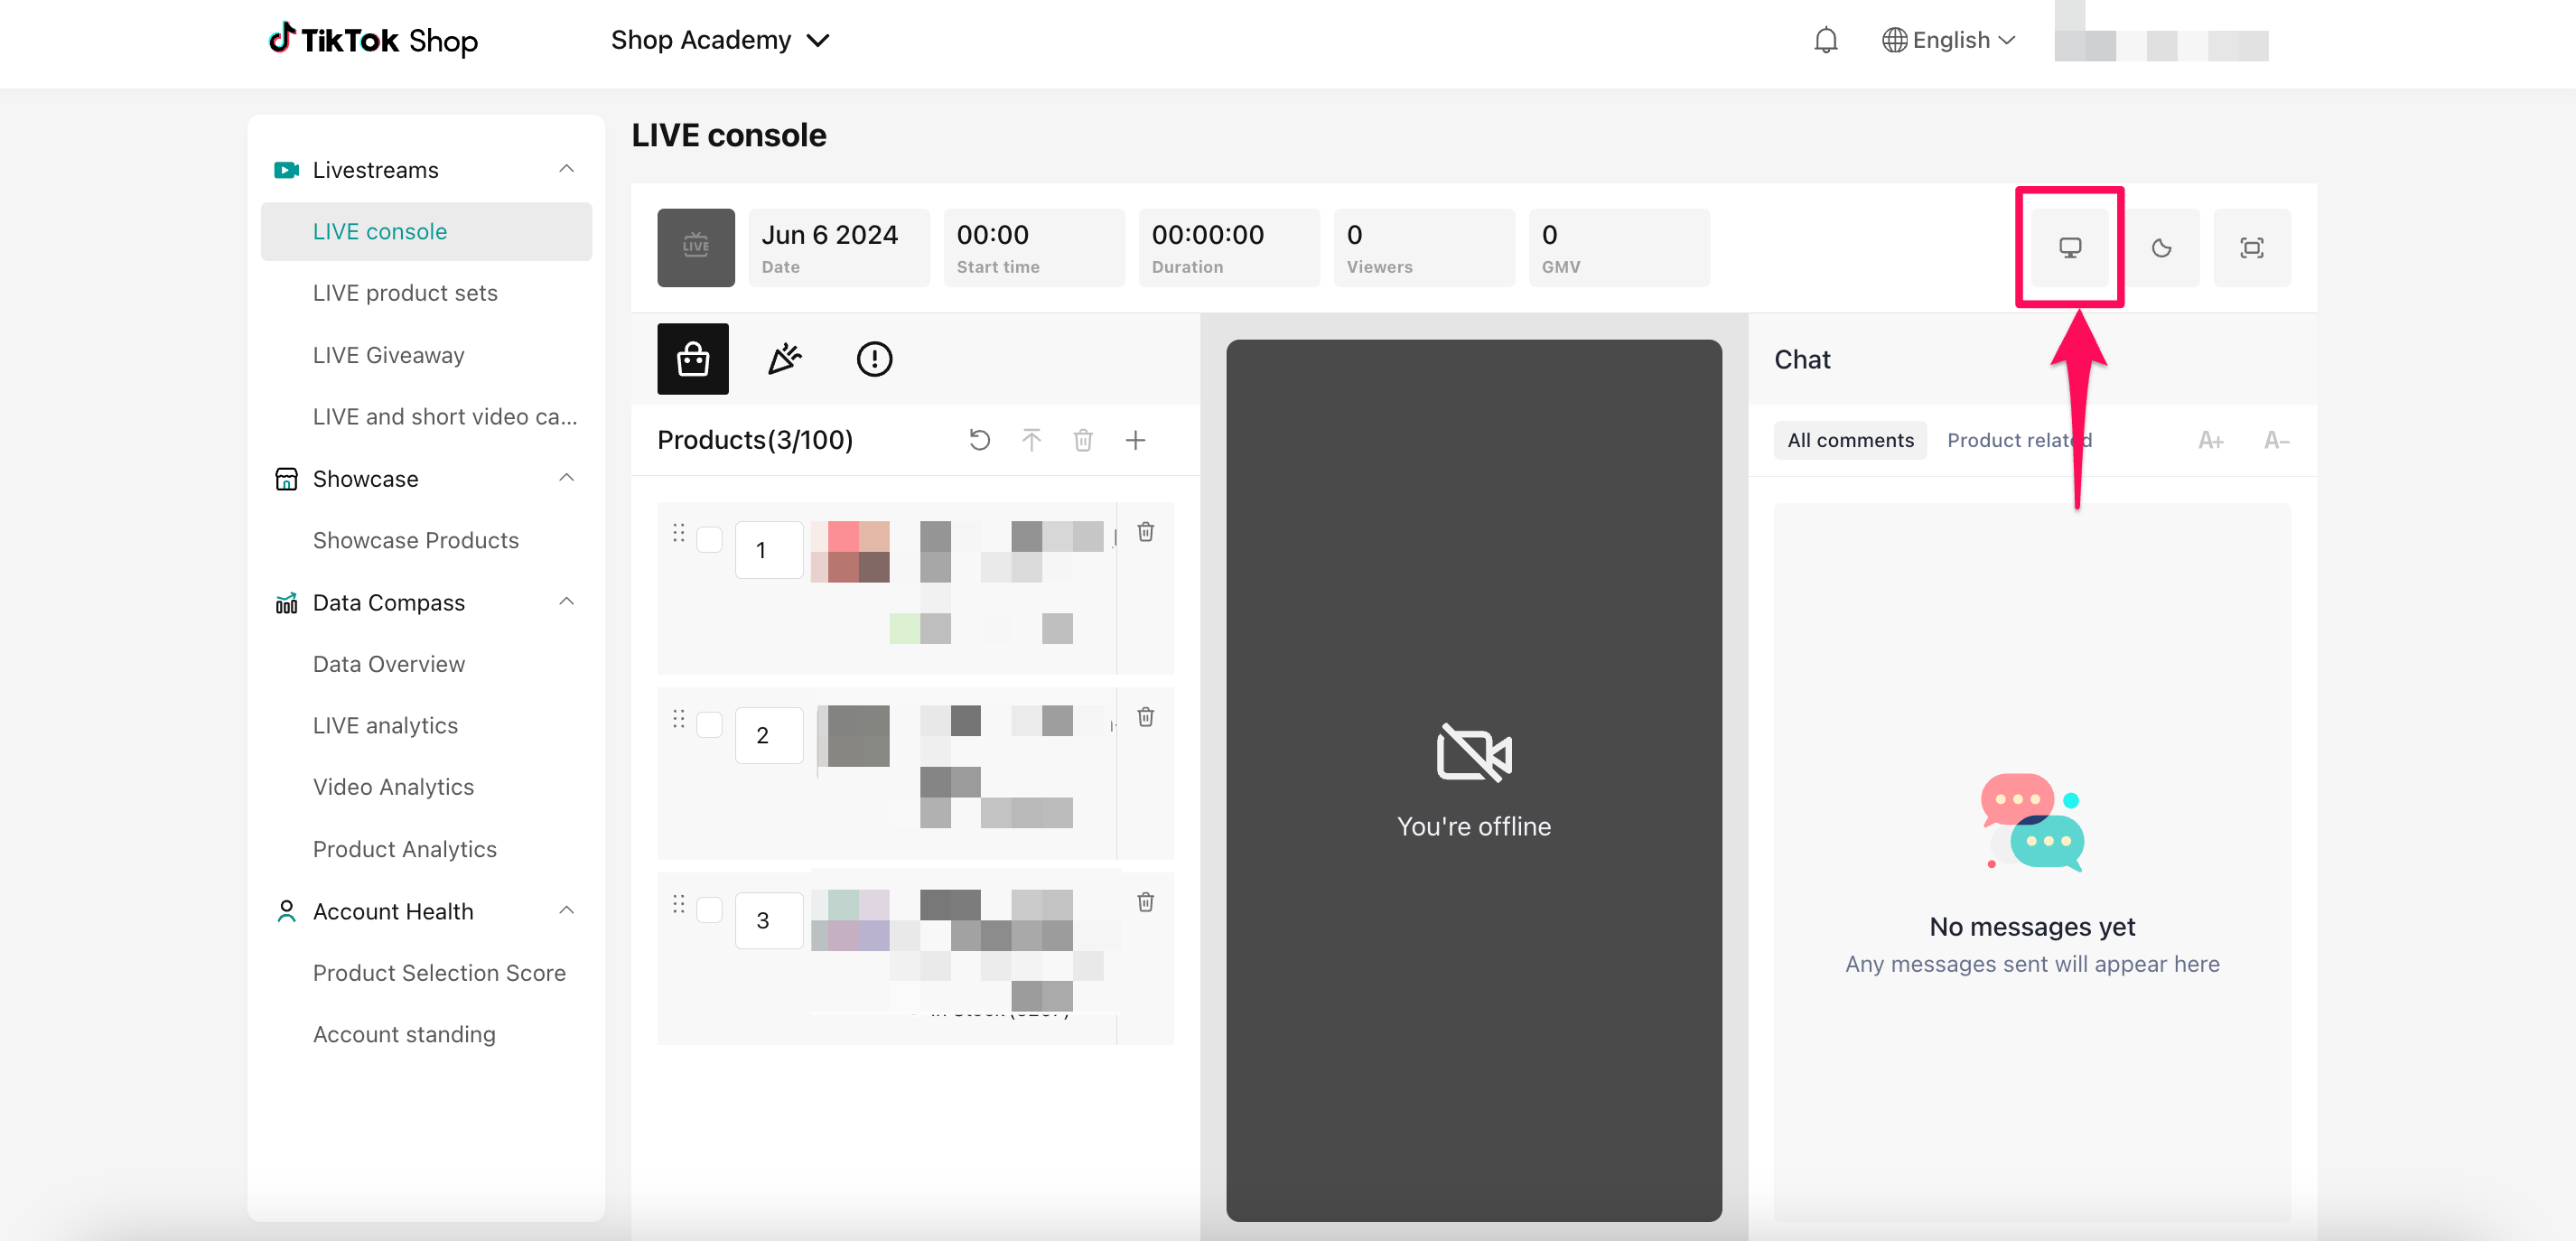
Analyze your performance in LIVE Dashboard
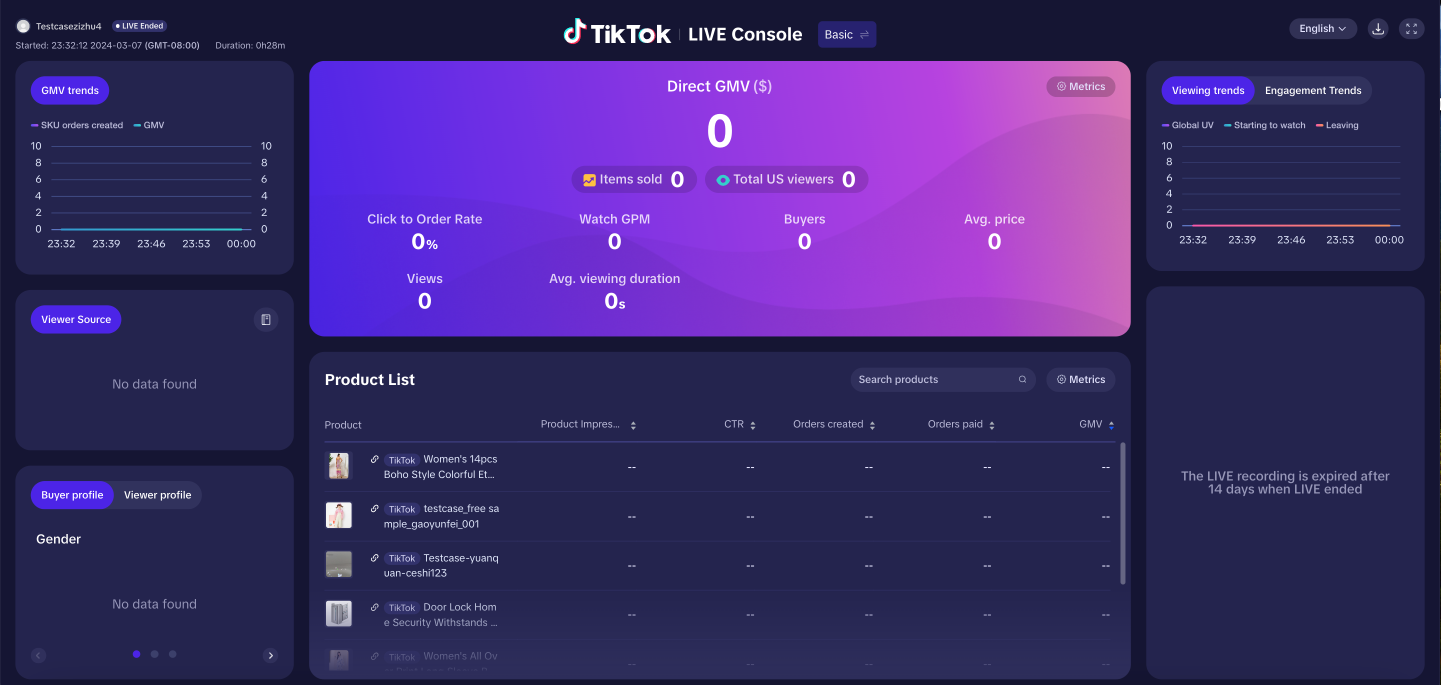
After your LIVE is complete, click the highlighted desktop monitor icon to access LIVE Dashboard or navigate to Data Compass > Livestream Analytics. Click on Details of the livestream that you want to recap. In the detail page, click on View Dashboard to be directed to the LIVE Recap dashboard.- Basic Dashboard View provides a simple view of key performance metrics, such as GMV, Viewing and Engagement Trends, and Buyer and Viewer Profiles.
- Product-level performance is also available in this view. You can easily access metric definitions, customize the metrics you want to display, and download the dashboard for offline viewing. LIVE recordings can also be found here and expire after 14 days.

- Product-level performance is also available in this view. You can easily access metric definitions, customize the metrics you want to display, and download the dashboard for offline viewing. LIVE recordings can also be found here and expire after 14 days.
- Advanced Dashboard provides enhanced performance metrics for a deeper dive into your session. In addition to GMV, Viewing and Engagement Trends, you can also view Traffic and Transactions performance. Specific LIVE clips from the stream are also highlighted, so you can take a look at your actual behavior during specific points of the session.
Lastly, review comments you received during the stream to see what type of engagement you received to help you conduct sentiment analysis and understand the perception of your stream to users throughout the session.