

Add products to your shop via bulk listing
01/21/2026
Summary
1. How do sellers add multiple products to their TikTok Shop using bulk listing, and what are the key steps involved?
- Sellers access bulk listing via Desktop in Seller Center under Products > Add Products or Manage Products > Bulk Action. They download category-specific templates, fill required fields without altering template structure, and upload spreadsheets for error checking before publishing.
- Multiple templates can be downloaded for different product categories; each SKU must be listed in its own row with mandatory variation columns for products with variants. After upload, sellers correct errors via an online editor or error report before publishing.
2. What are the important product listing policies and restrictions sellers must be aware of when adding products to TikTok Shop?
- All products must comply with TikTok Shop’s Prohibited and Restricted Products Policies. Restricted category listings require sellers to apply for category permissions; products remain unpublished until approval is granted.
- Sellers must use TikTok’s official Excel templates for bulk uploads; non-compliant templates or altered templates cause upload failures.
3. How should sellers handle product variations and images when listing products in bulk?
- Variants must share the same product name and package dimensions; Variation 1 column is mandatory, Variation 2 optional for two-tier variants. Each variant (SKU) requires a separate row with unique variant values.
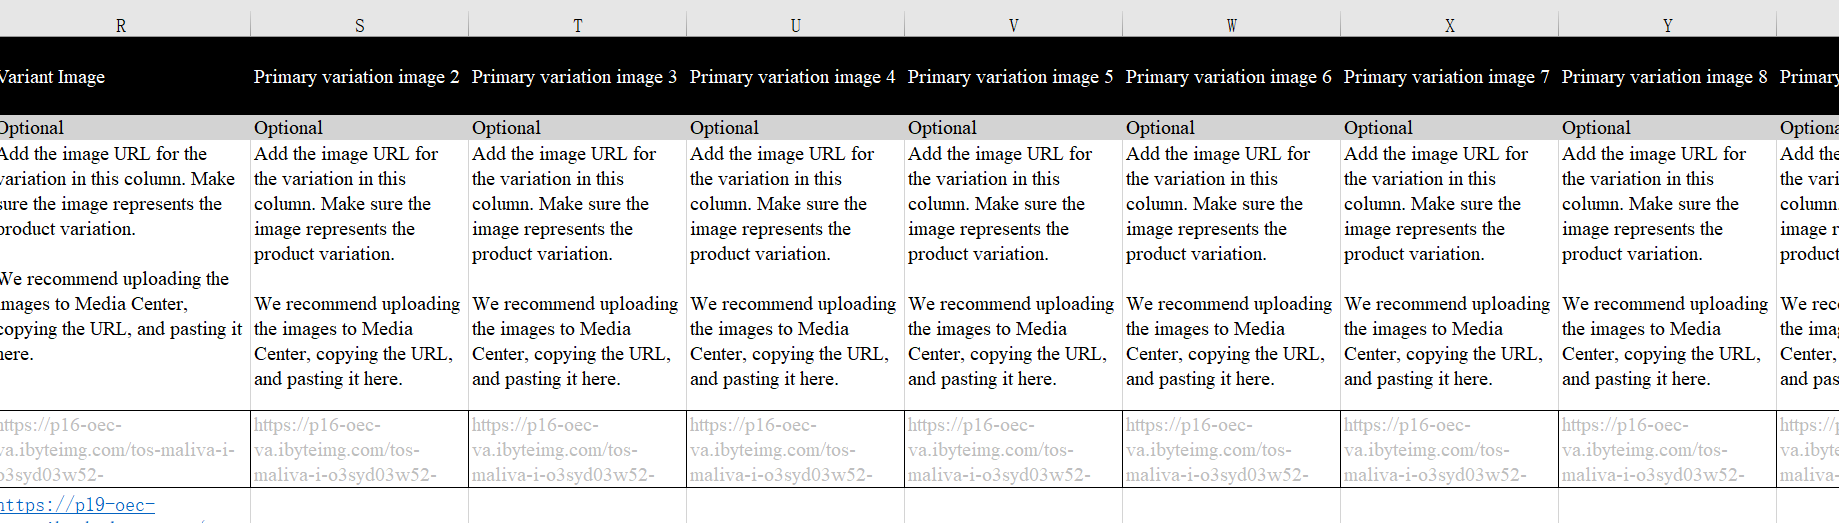
- Sellers can upload up to 9 images per variant using image URLs, enhancing product presentation and buyer confidence.
4. What best practices and tips should sellers follow to optimize their product listings on TikTok Shop?
- Use clear, unique product names (recommended 25-80 characters) structured as [Brand] + [Details] + [Scope] + [Type] + [Features]. Product descriptions should highlight selling points in short paragraphs under 250 characters.
- Upload accurate package weight and dimensions for shipping cost estimation; use strike-through pricing to highlight discounts and boost conversions. Brand authorization affects brand visibility on product pages.
5. How can sellers troubleshoot common bulk listing errors and manage their product uploads effectively?
- After uploading, the system pre-checks for errors; sellers must fix highlighted errors in the online editor or download failure reports, correct the template, and re-upload. Duplicate templates require renaming before re-upload.
- Sellers can upload multiple spreadsheets sequentially for different categories and monitor listing status on the Manage Products page, where products move from ‘Reviewing’ to ‘Live’ after approval.
Introduction to adding products to your shop
Once you're in TikTok Shop, the first step to starting your business is posting your products. Clear and unique content attracts customer interest and helps them quickly discover and choose products. TikTok Shop currently supports both single-product and batch-product uploads, and can display up to 1,000 products online. With TikTok Shop, there are multiple ways for you to upload products via: Desktop, Seller Center App, Bulk listing, Quick Listing tools, and API. Below, is a high-level overview of listing products by bulk (multiple products).Keep in mind that all products must comply with the following TikTok Shop policies:

How to add products to your shop via bulk listing
Access the bulk listing
feature.Important: Please note that the Bulk Listings feature is only available on Desktop at this time.There are multiple ways you can access the bulk listing feature once you login to Seller Center.
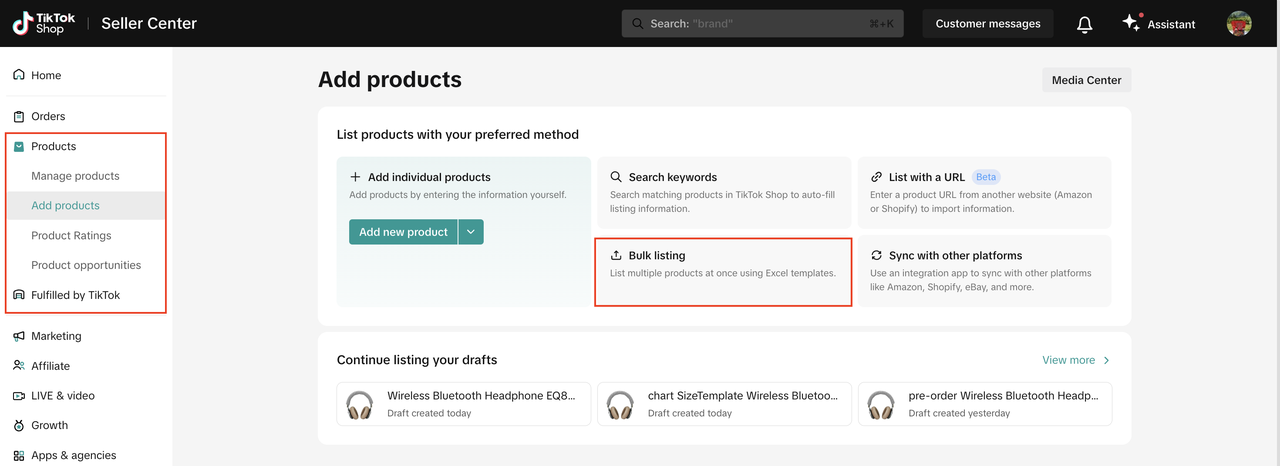
- Click on Products on the left hand-side navigation bar and click on Add Products to launch the product listings page. You will find the Bulk listing option.
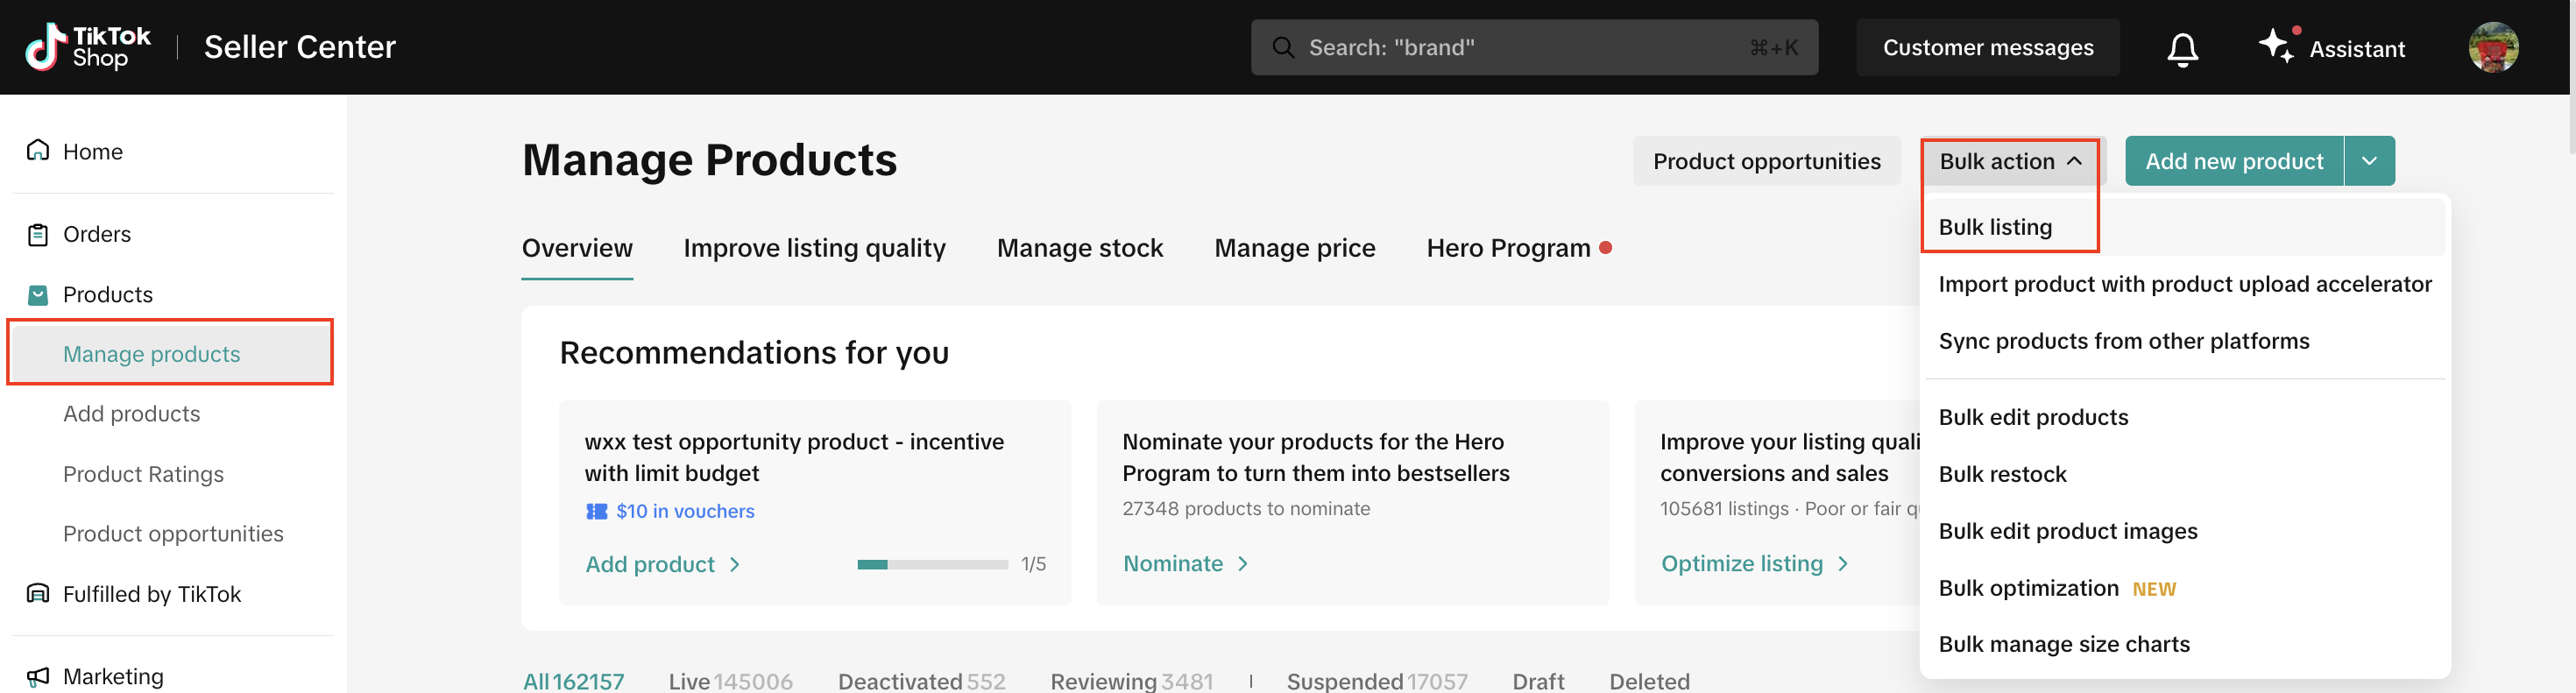
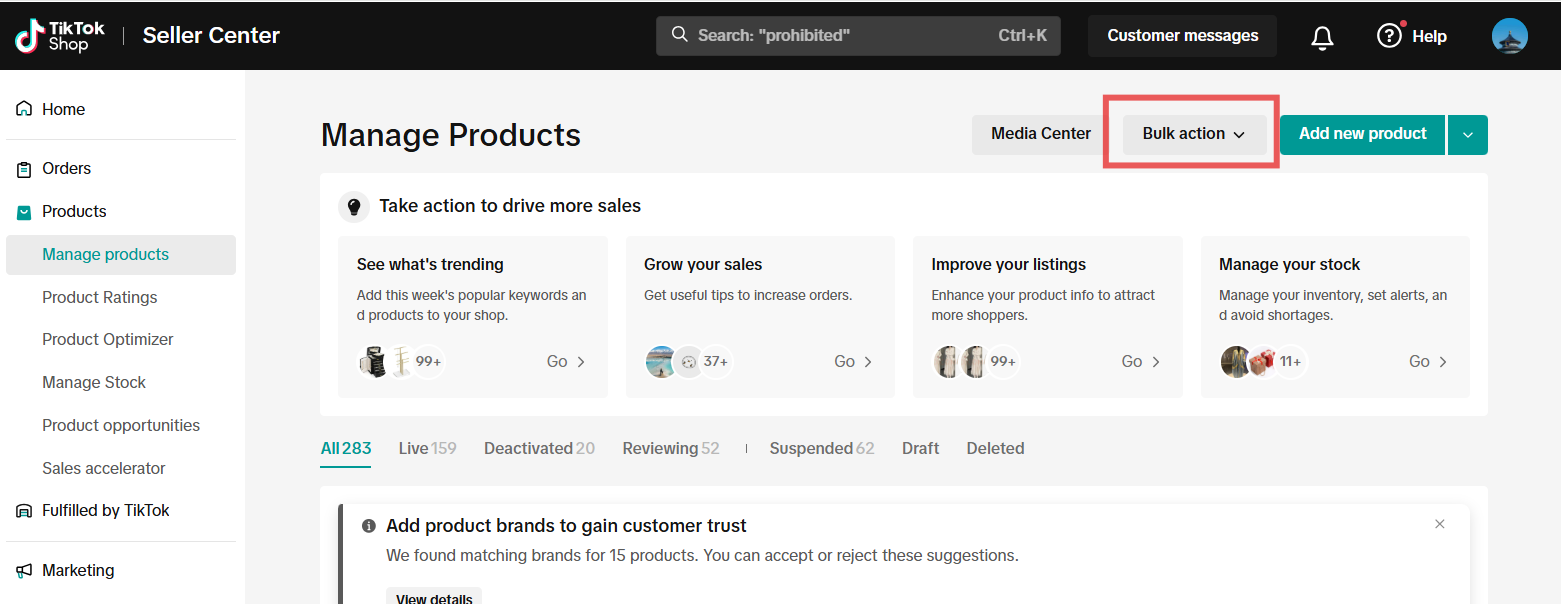
- You can also navigate to Products > Manage Products page, click the Bulk Action button and choose Bulk listing from the dropdown.
Download a bulk listing template or multiple templates.
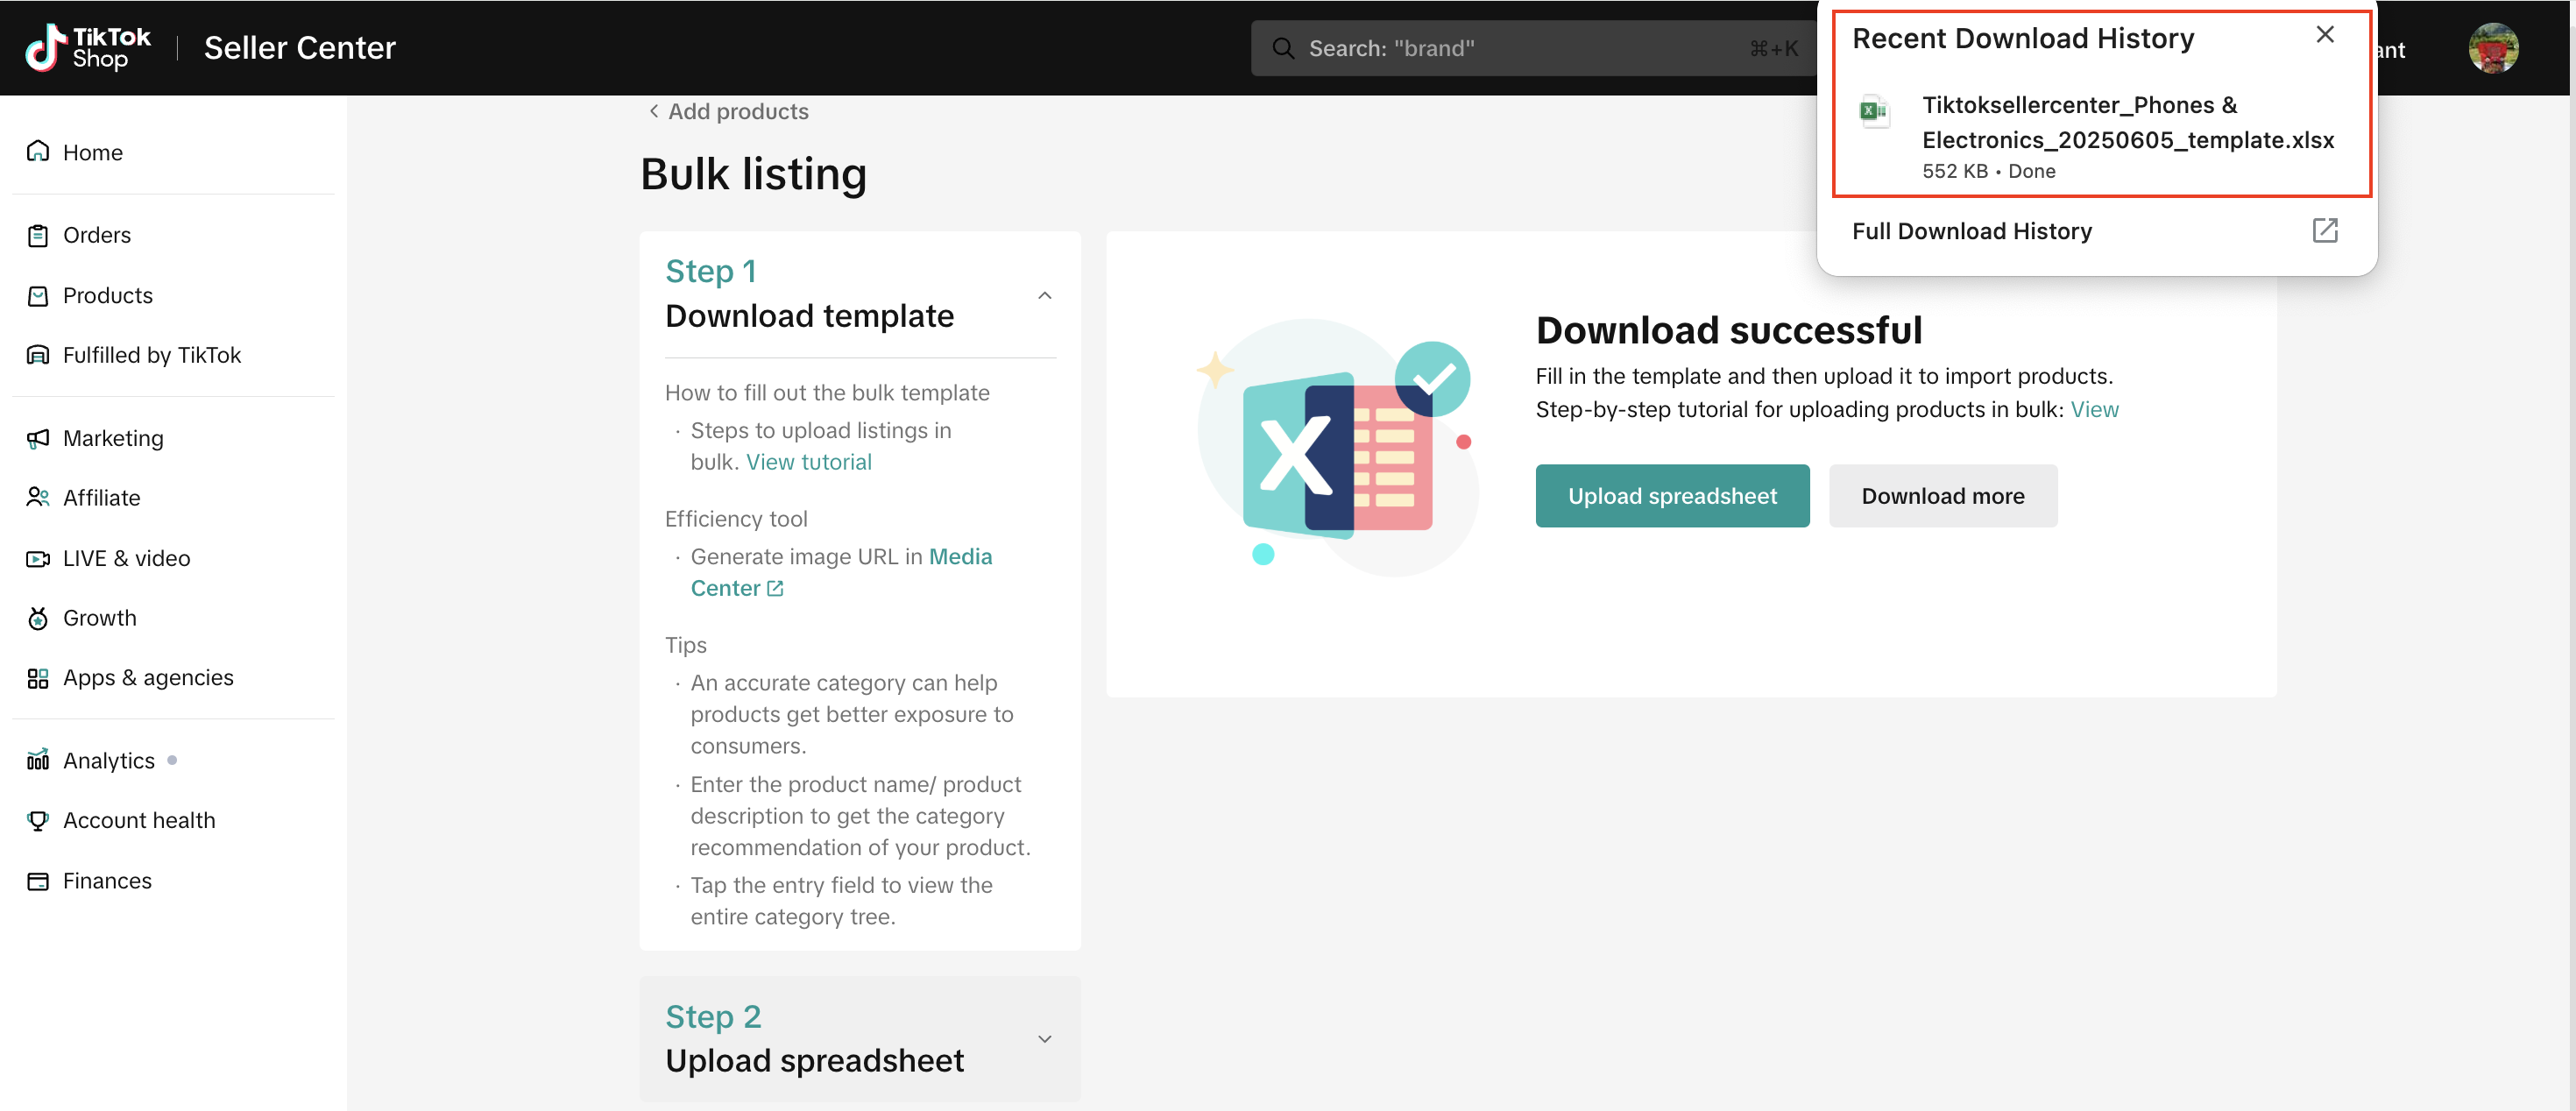
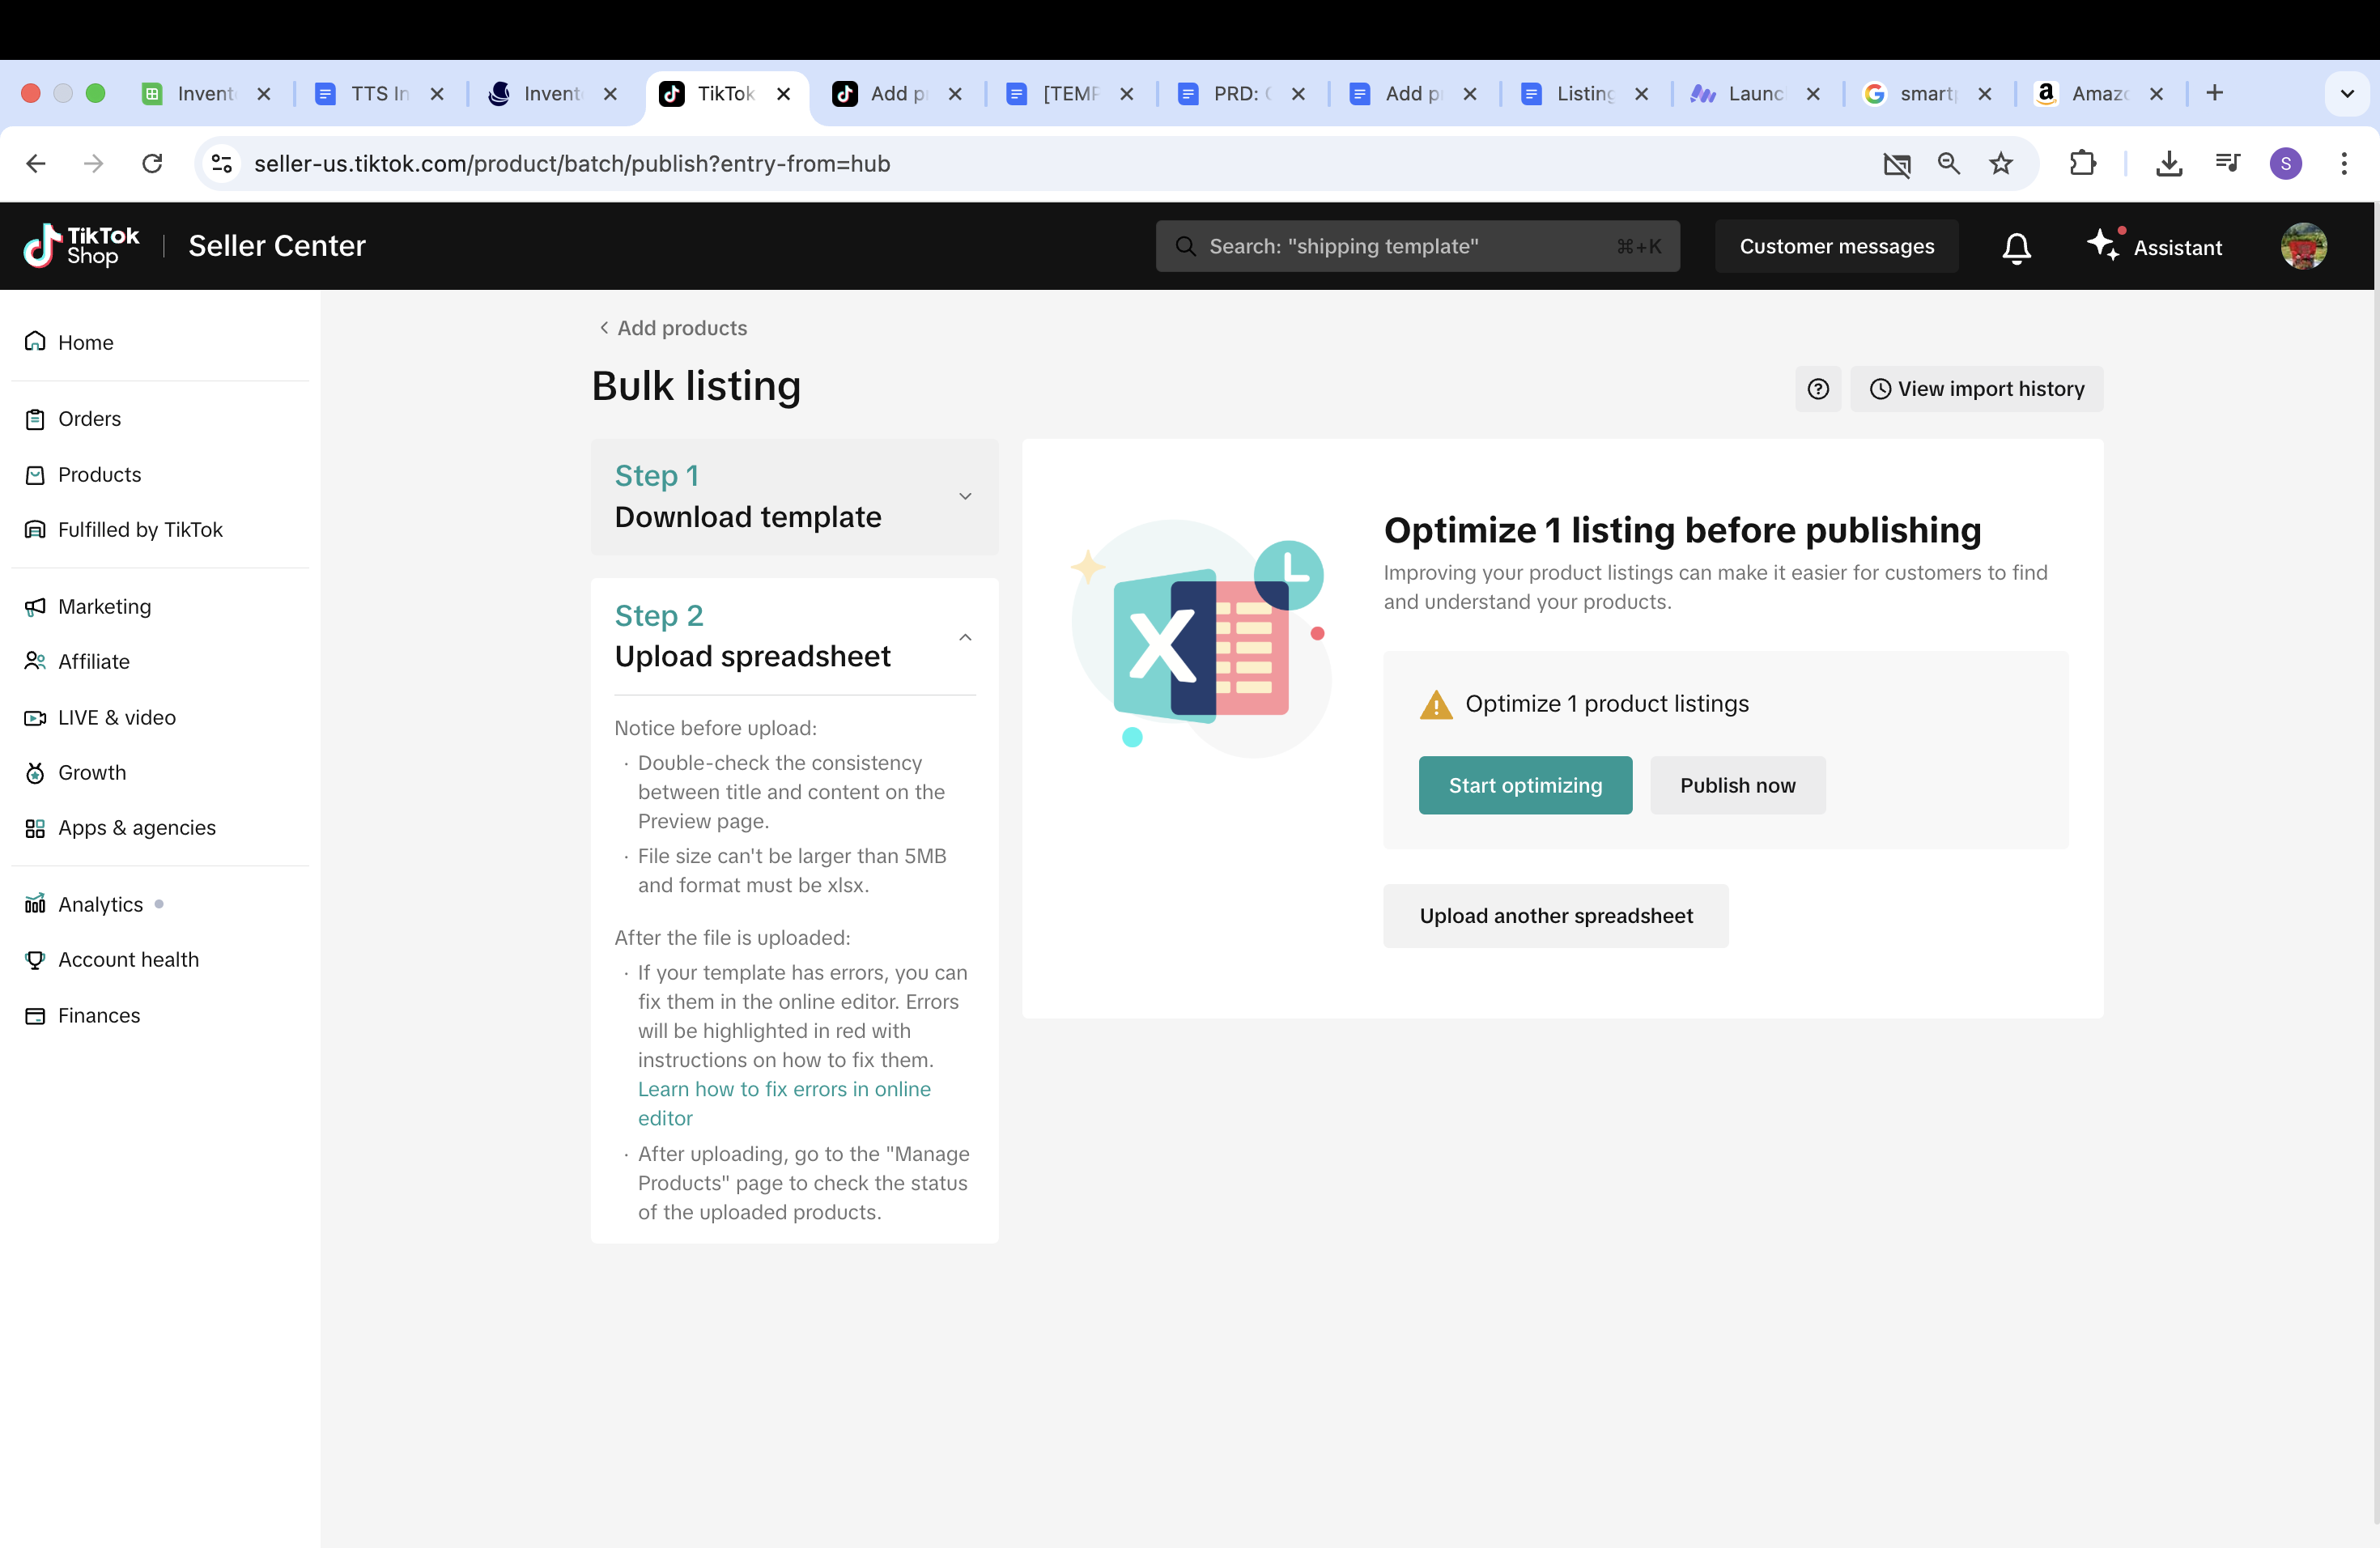
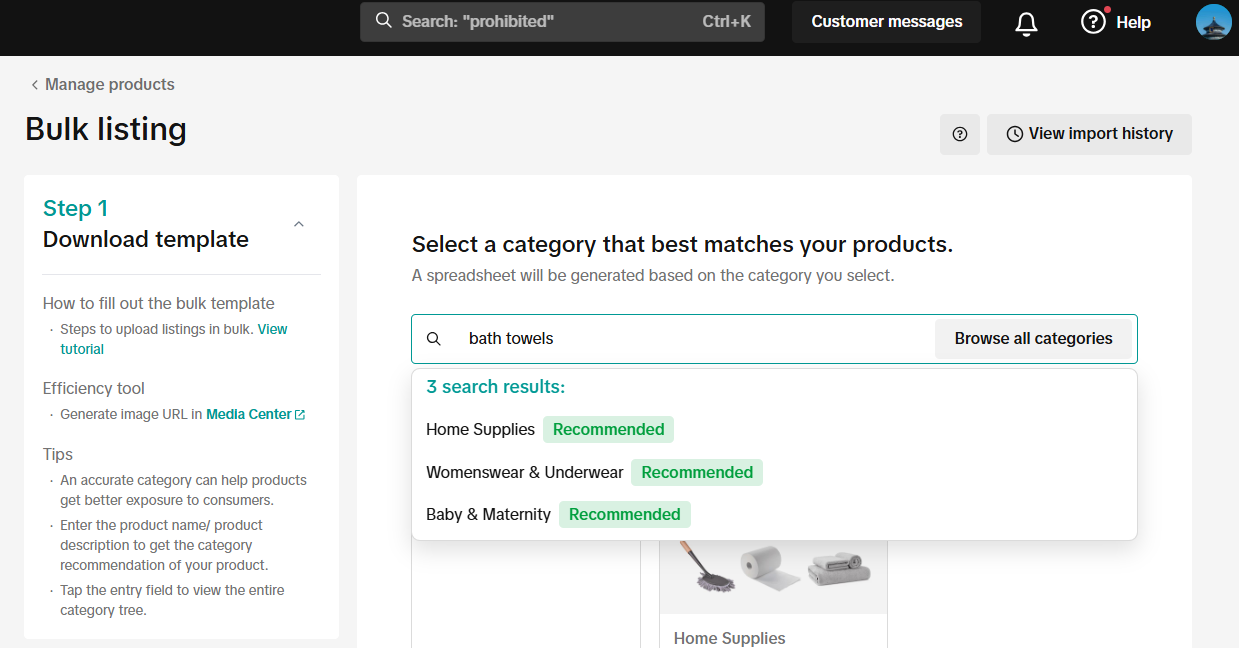
Once you click on the Bulk Listing option through either of the above paths, you will reach the page below where you can download and upload the bulk template. Step 1 is to download the template.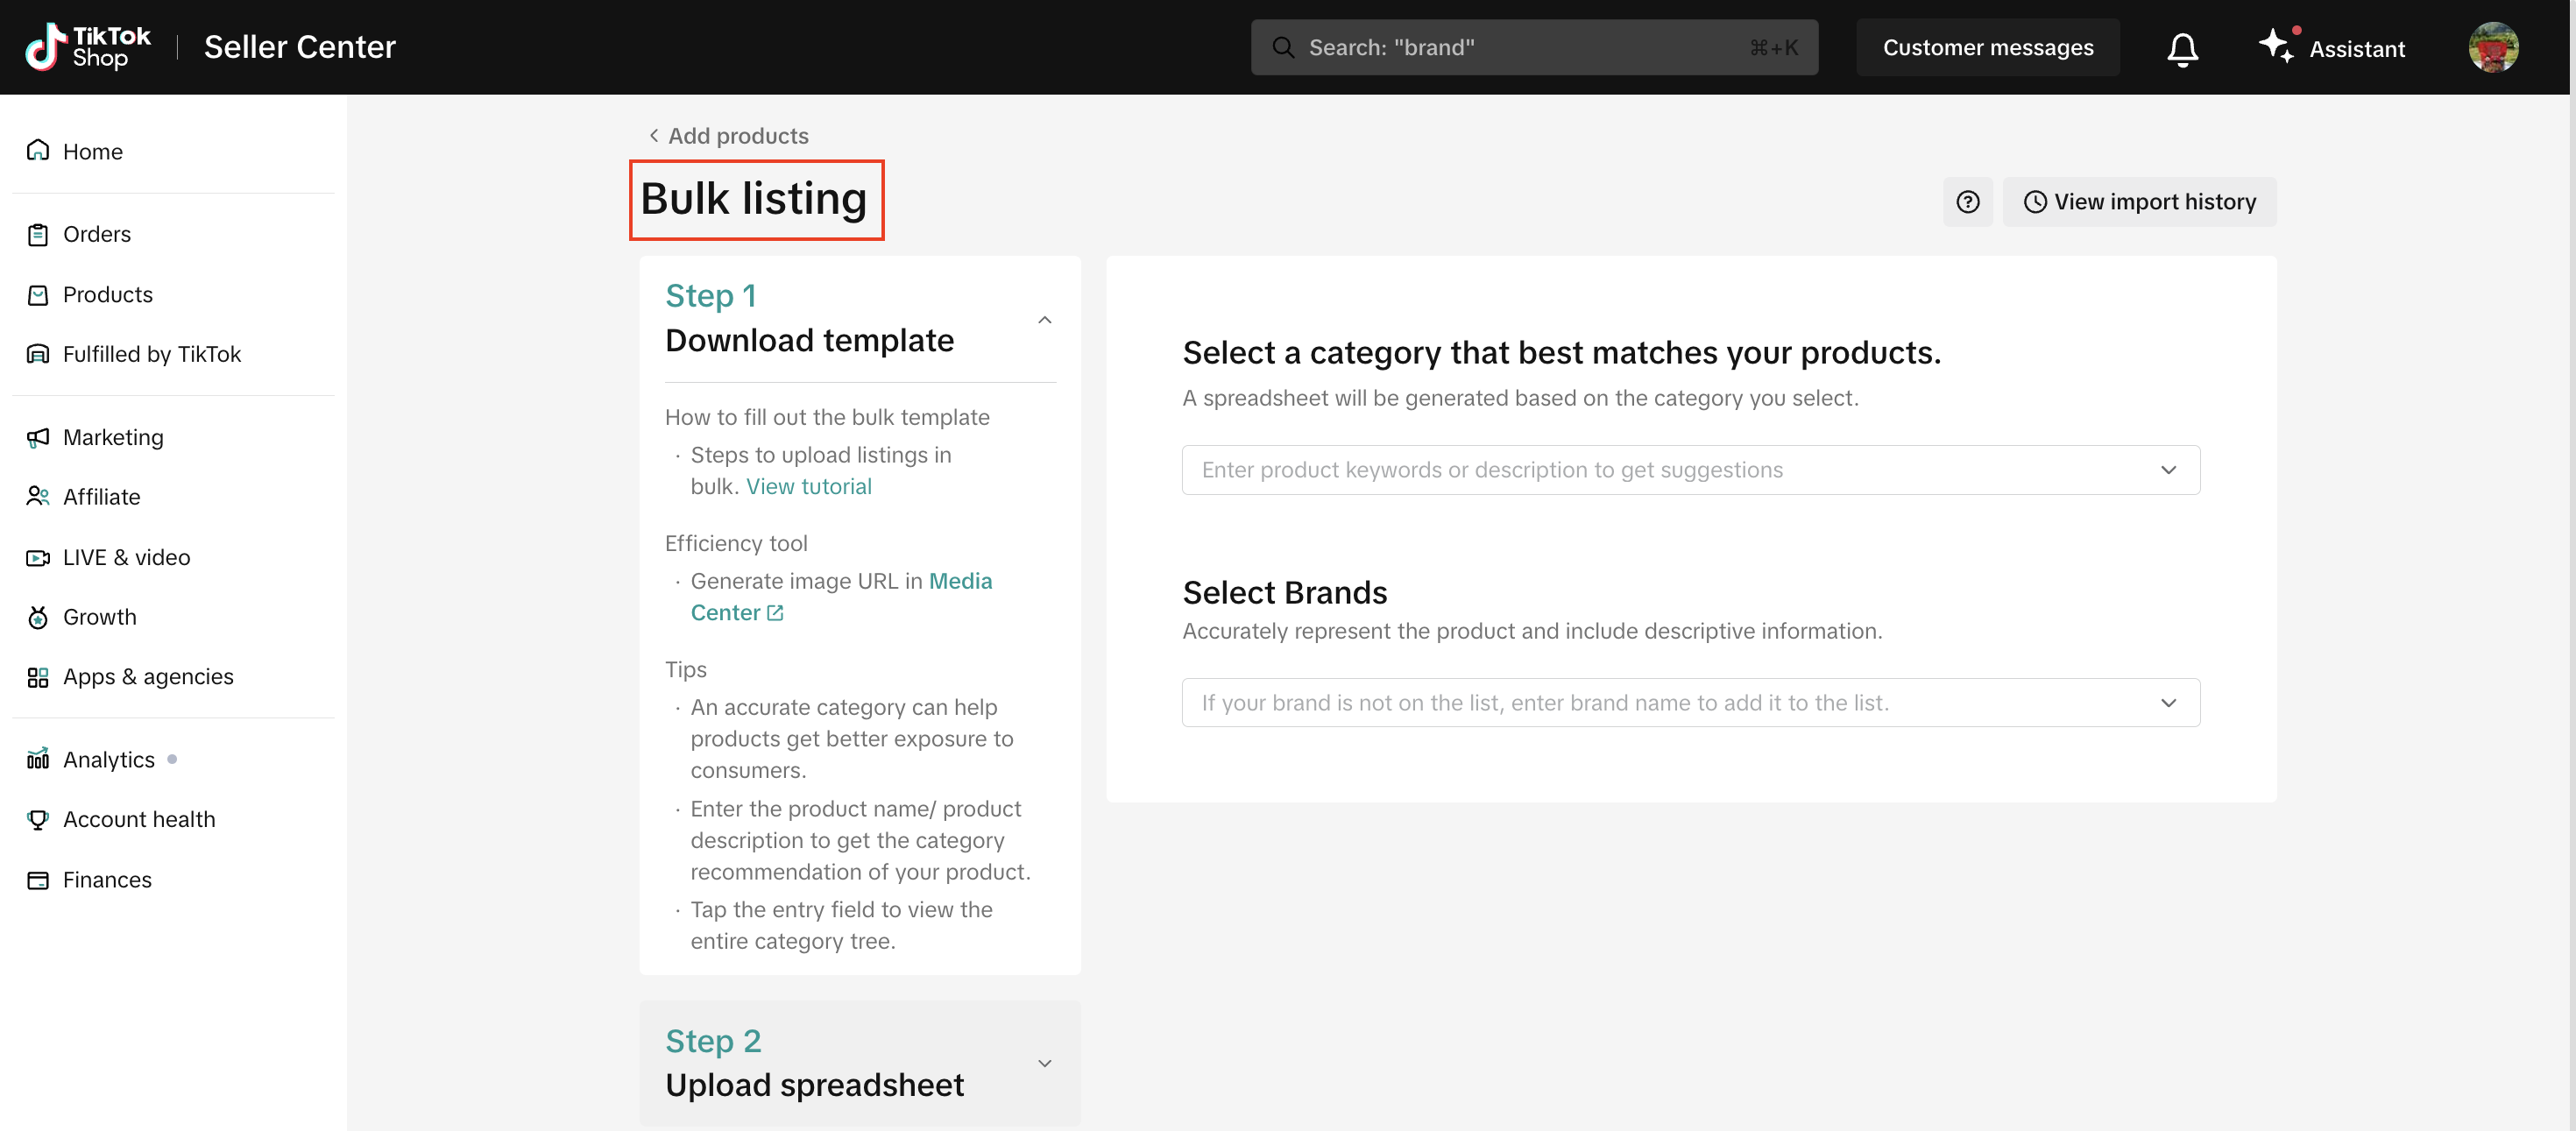
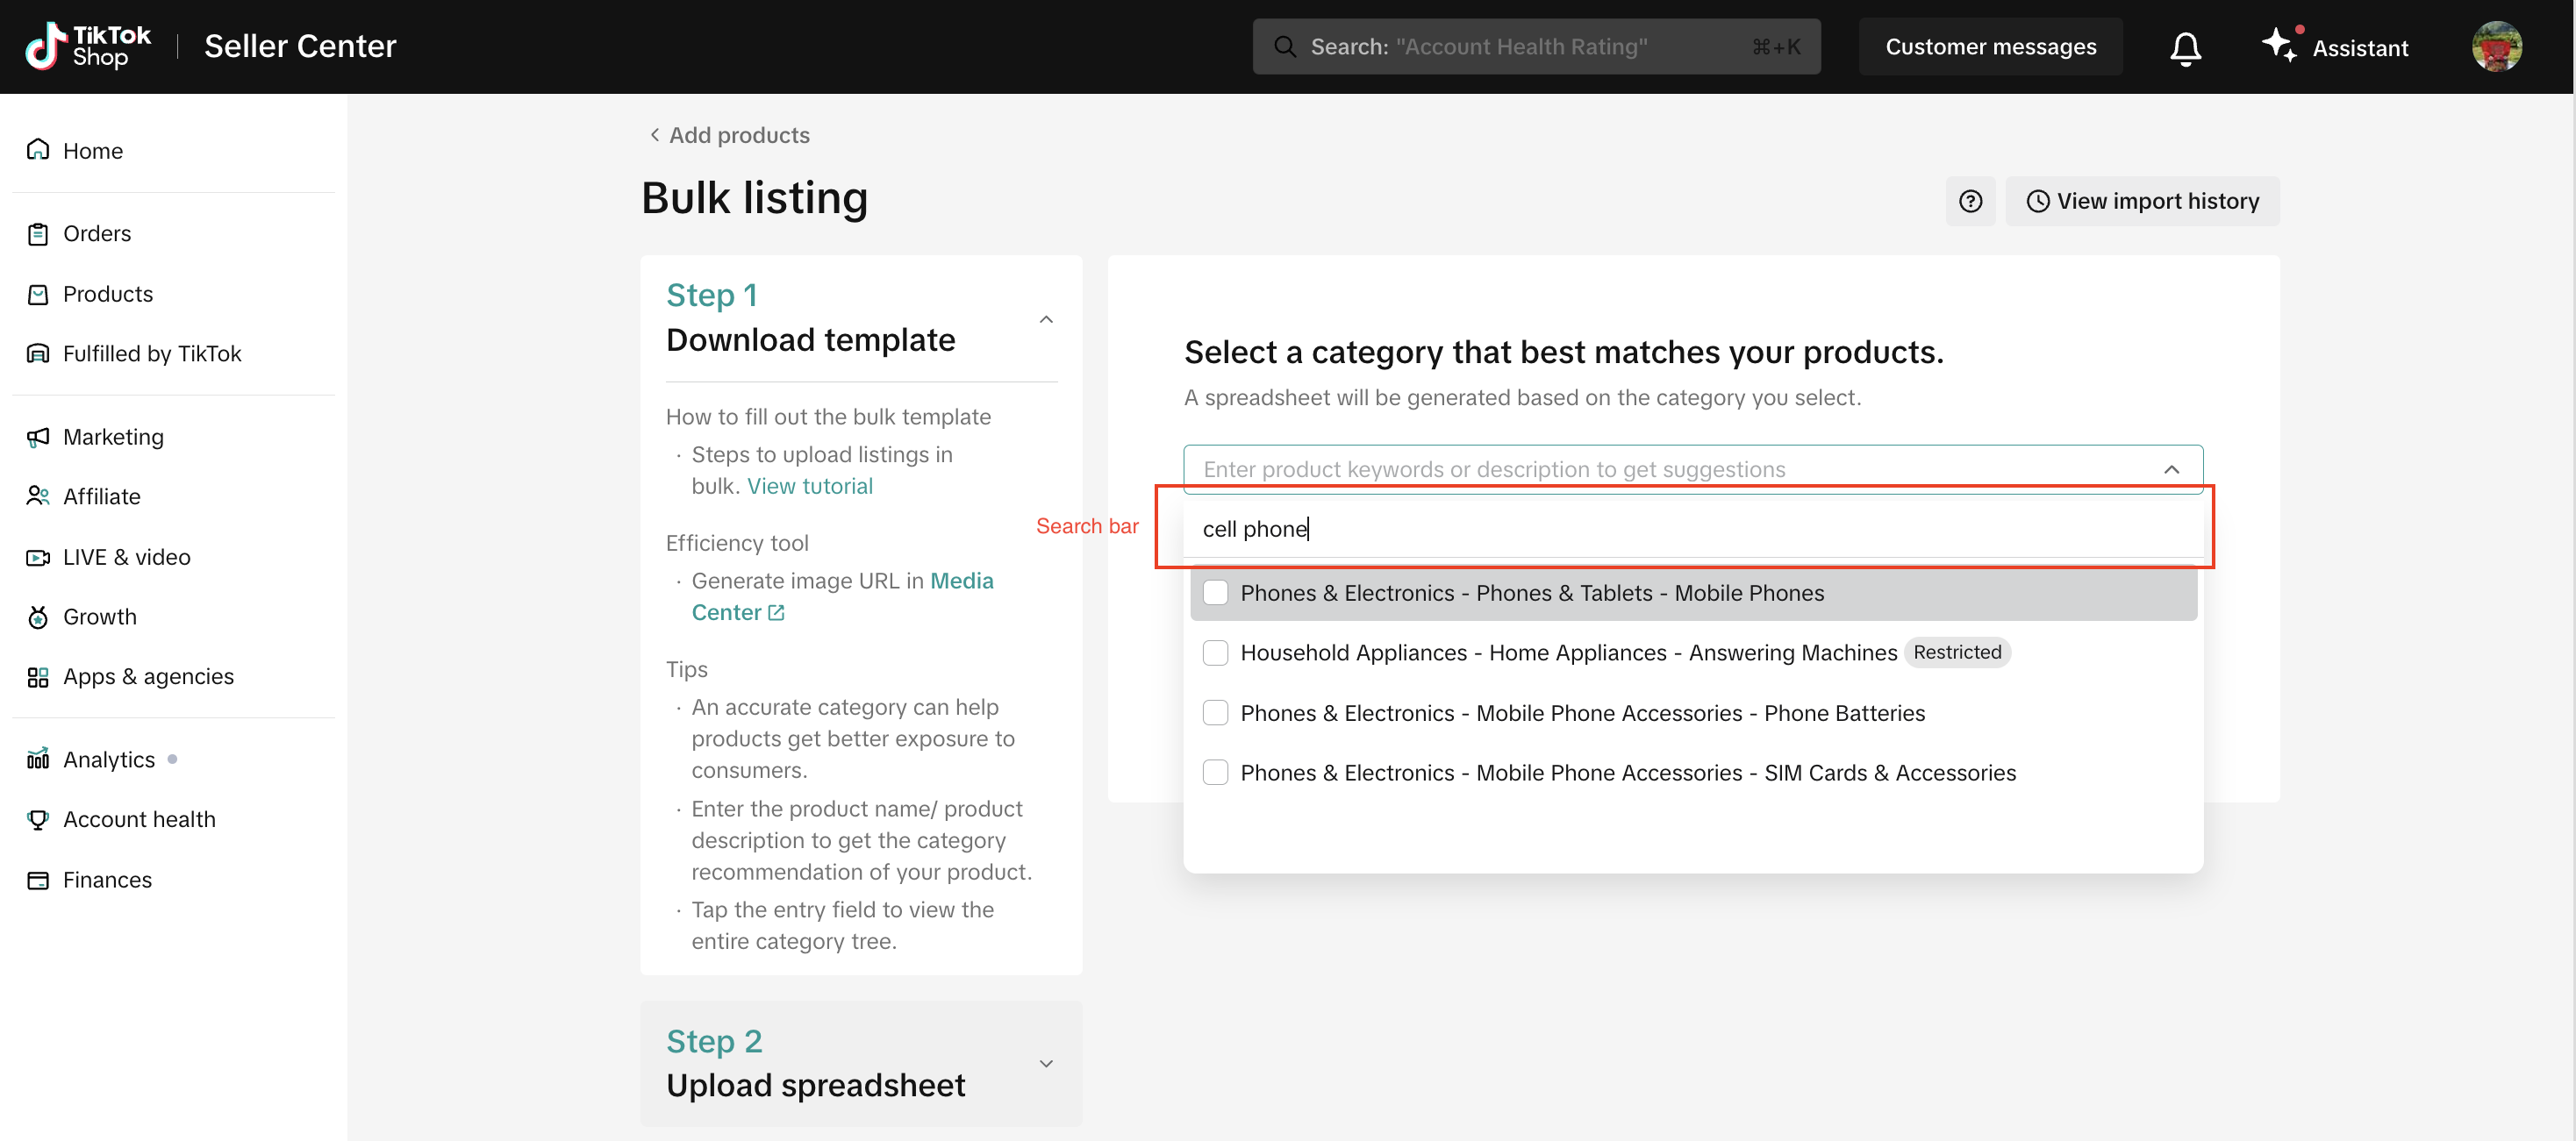
- Searching for the product on the search bar. When you type in your product name, the tool provides you with helpful suggestions based on what category could best fit & describe your product. Choose the appropriate category path to list your product within that category.
- Selecting the product from the category list. When you click on the 🔽 arrow, you will need to manually navigate the categories related to your product and click on the category path that best fits and describes your product.

If you want to bulk list products that do not fall into the same category, include relevant categories via either of the below options, so you can select a template to download for each product category. This is further explained in section 1.2.1.
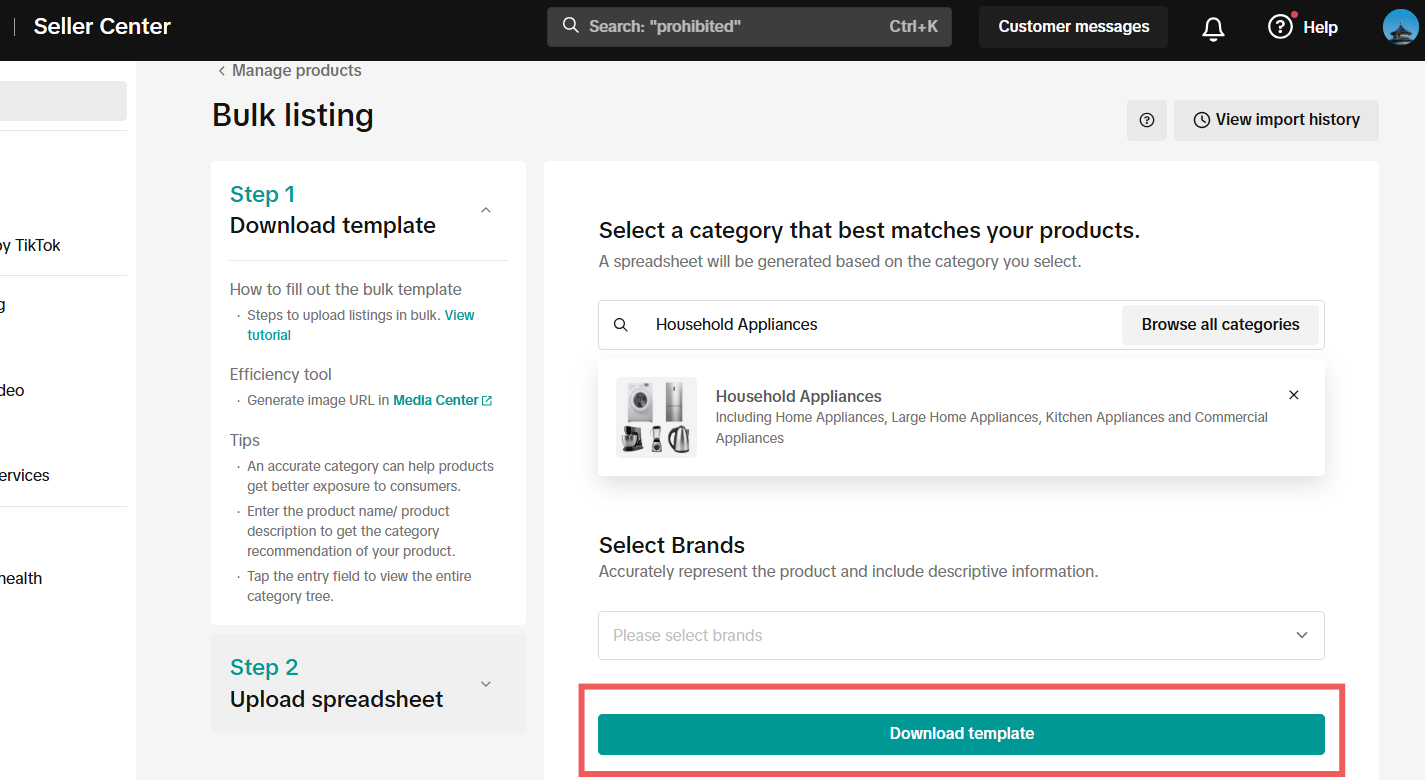
Once you have chosen the category or categories for your products, select the product's brand (optional field) or select 'No brand' from the dropdown, and click on the Download template button. The page also shows you the category template you have chosen and the number of templates you are downloading.

Download multiple templates if you are bulk listing products in more than one top-level category.
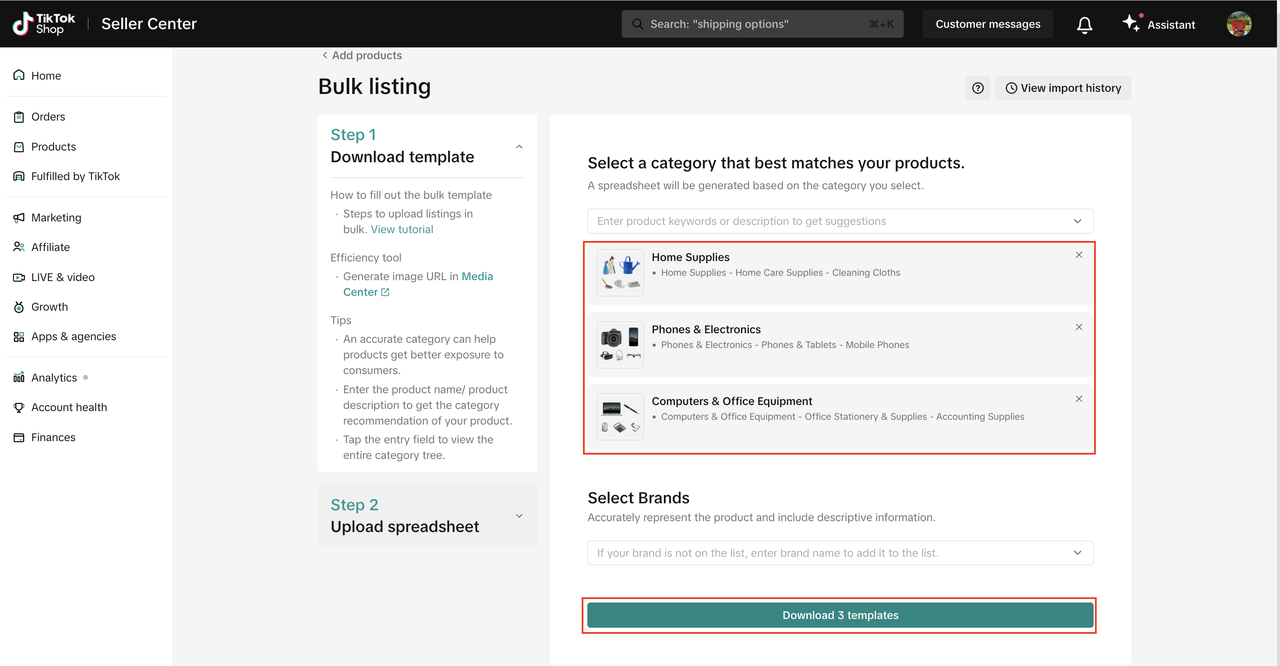
If you are bulk listing products that do not fall in the same category, you will need to download a template for each category. This way, you can list your products faster and more efficiently.Search or select multiple products and click on the checkbox next to each category the product falls into. Once you have made your selections, you can see the chosen categories and the number of templates you will download on the page. You can also further add or remove templates here.In this example, you are downloading 3 templates. 1 for each category:
- Home Supplies > Home Care Supplies > Cleaning Cloths
- Phones & Electronics > Phones & Tablets > Mobile Phones
- Computers & Office Equipment > Office Stationery & Supplies > Accounting Supplies
Fill in your template
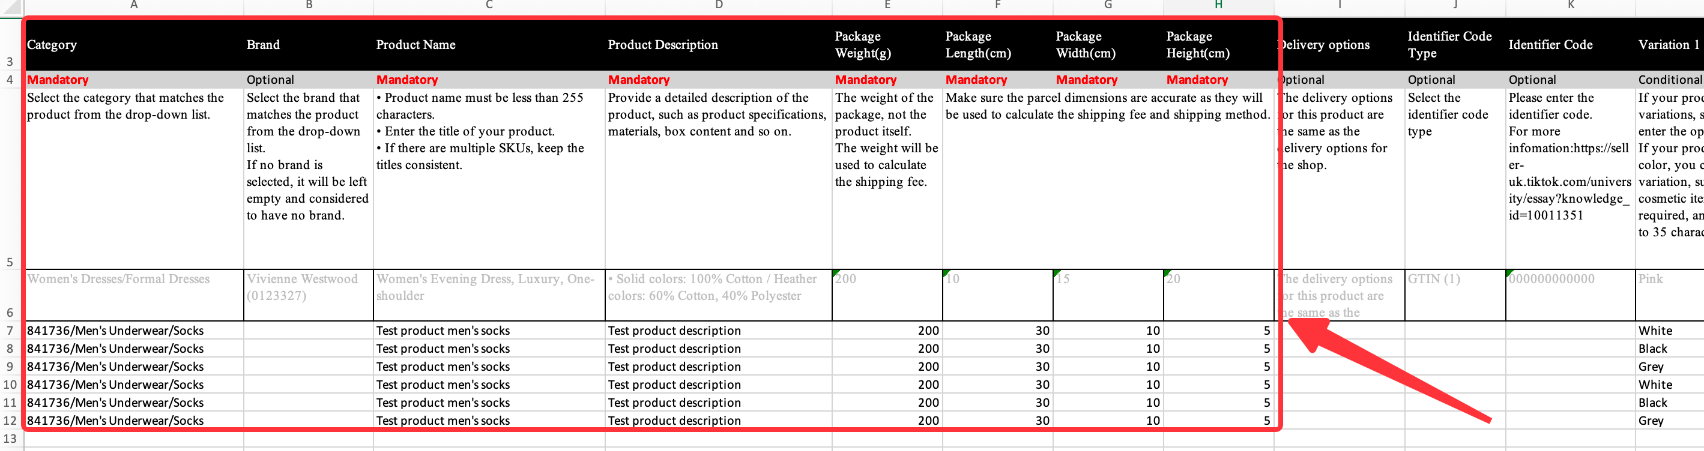
Be sure to follow the descriptions in the template and fill in all the required fields outlined with a red border. It is important to fill out these fields to successfully list your products.Important:
- Do not add or delete any rows or columns to the template. This will cause your upload to fail.
- If you need to add a product that is not within this template's category, download a new template for the product's category in the Download bulk listing template page.
- Each row in this table represents a SKU. Make sure to fill in all details by scrolling to the right-end of the file.
Upload your spreadsheet
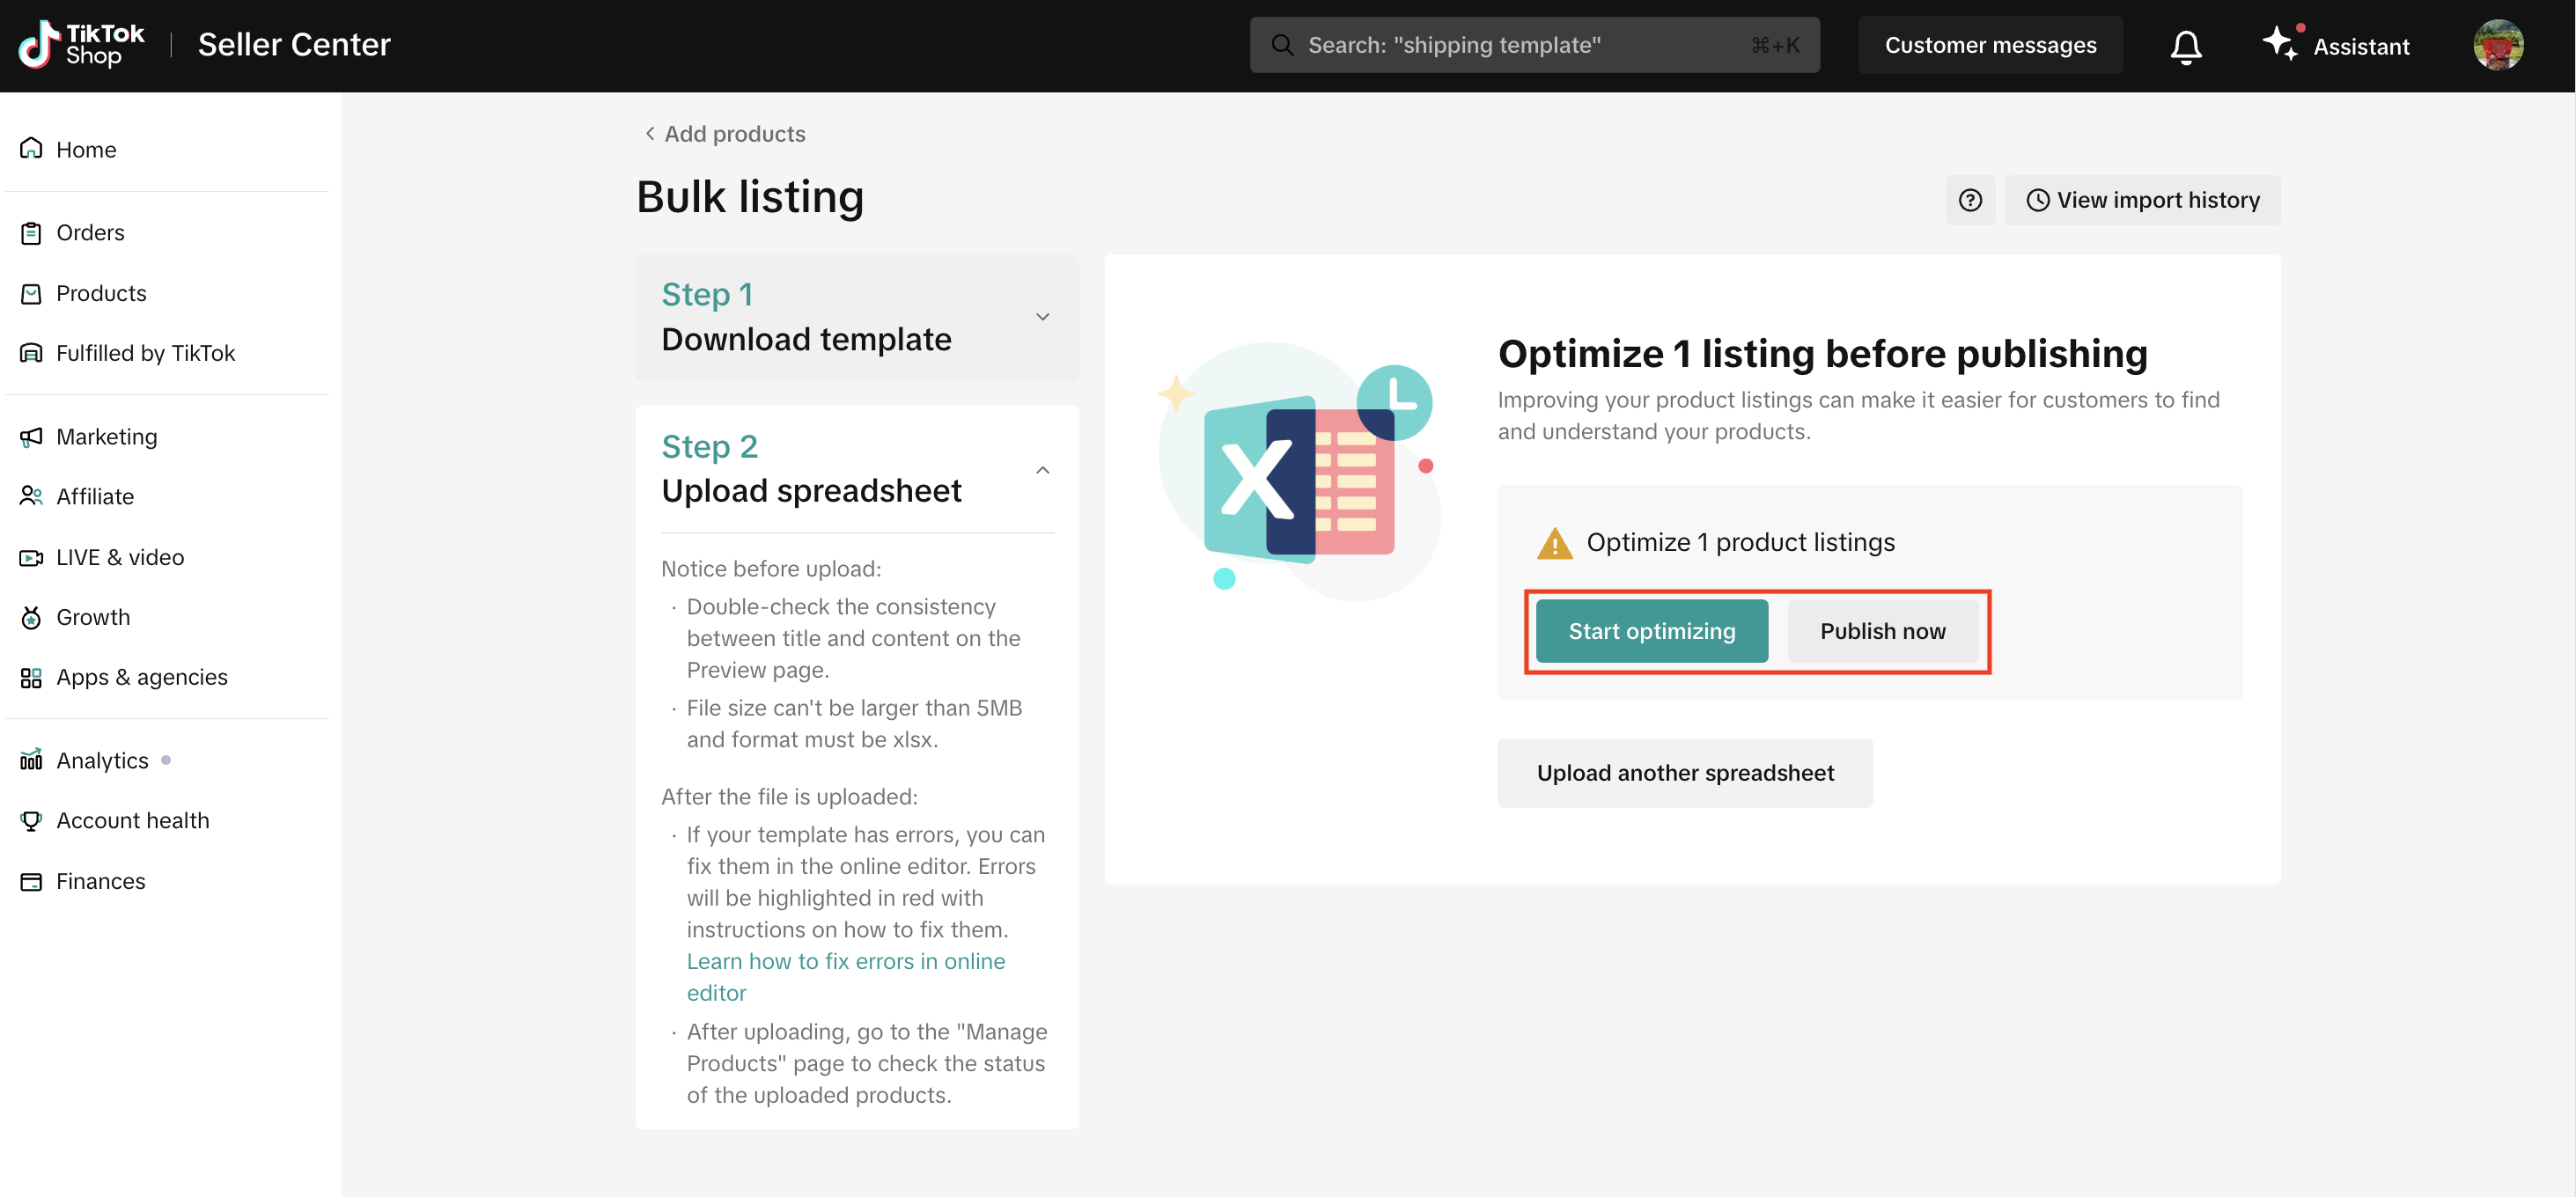
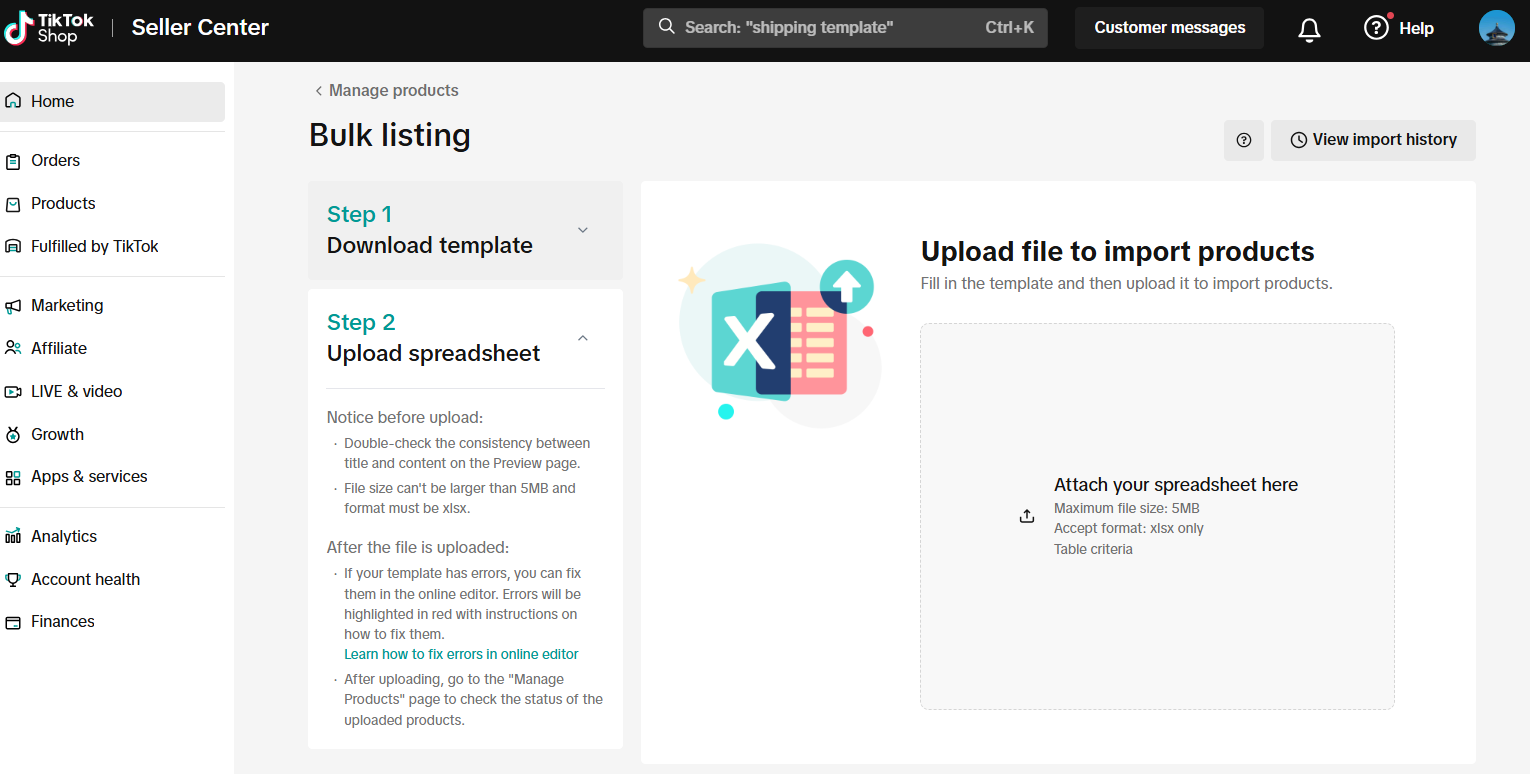
Back to the same Bulk listing page, click on Step 2: Upload spreadsheet section. Upload your spreadsheet in the 'Attach your spreadsheet here' section. Once you have selected the correct file, click Import.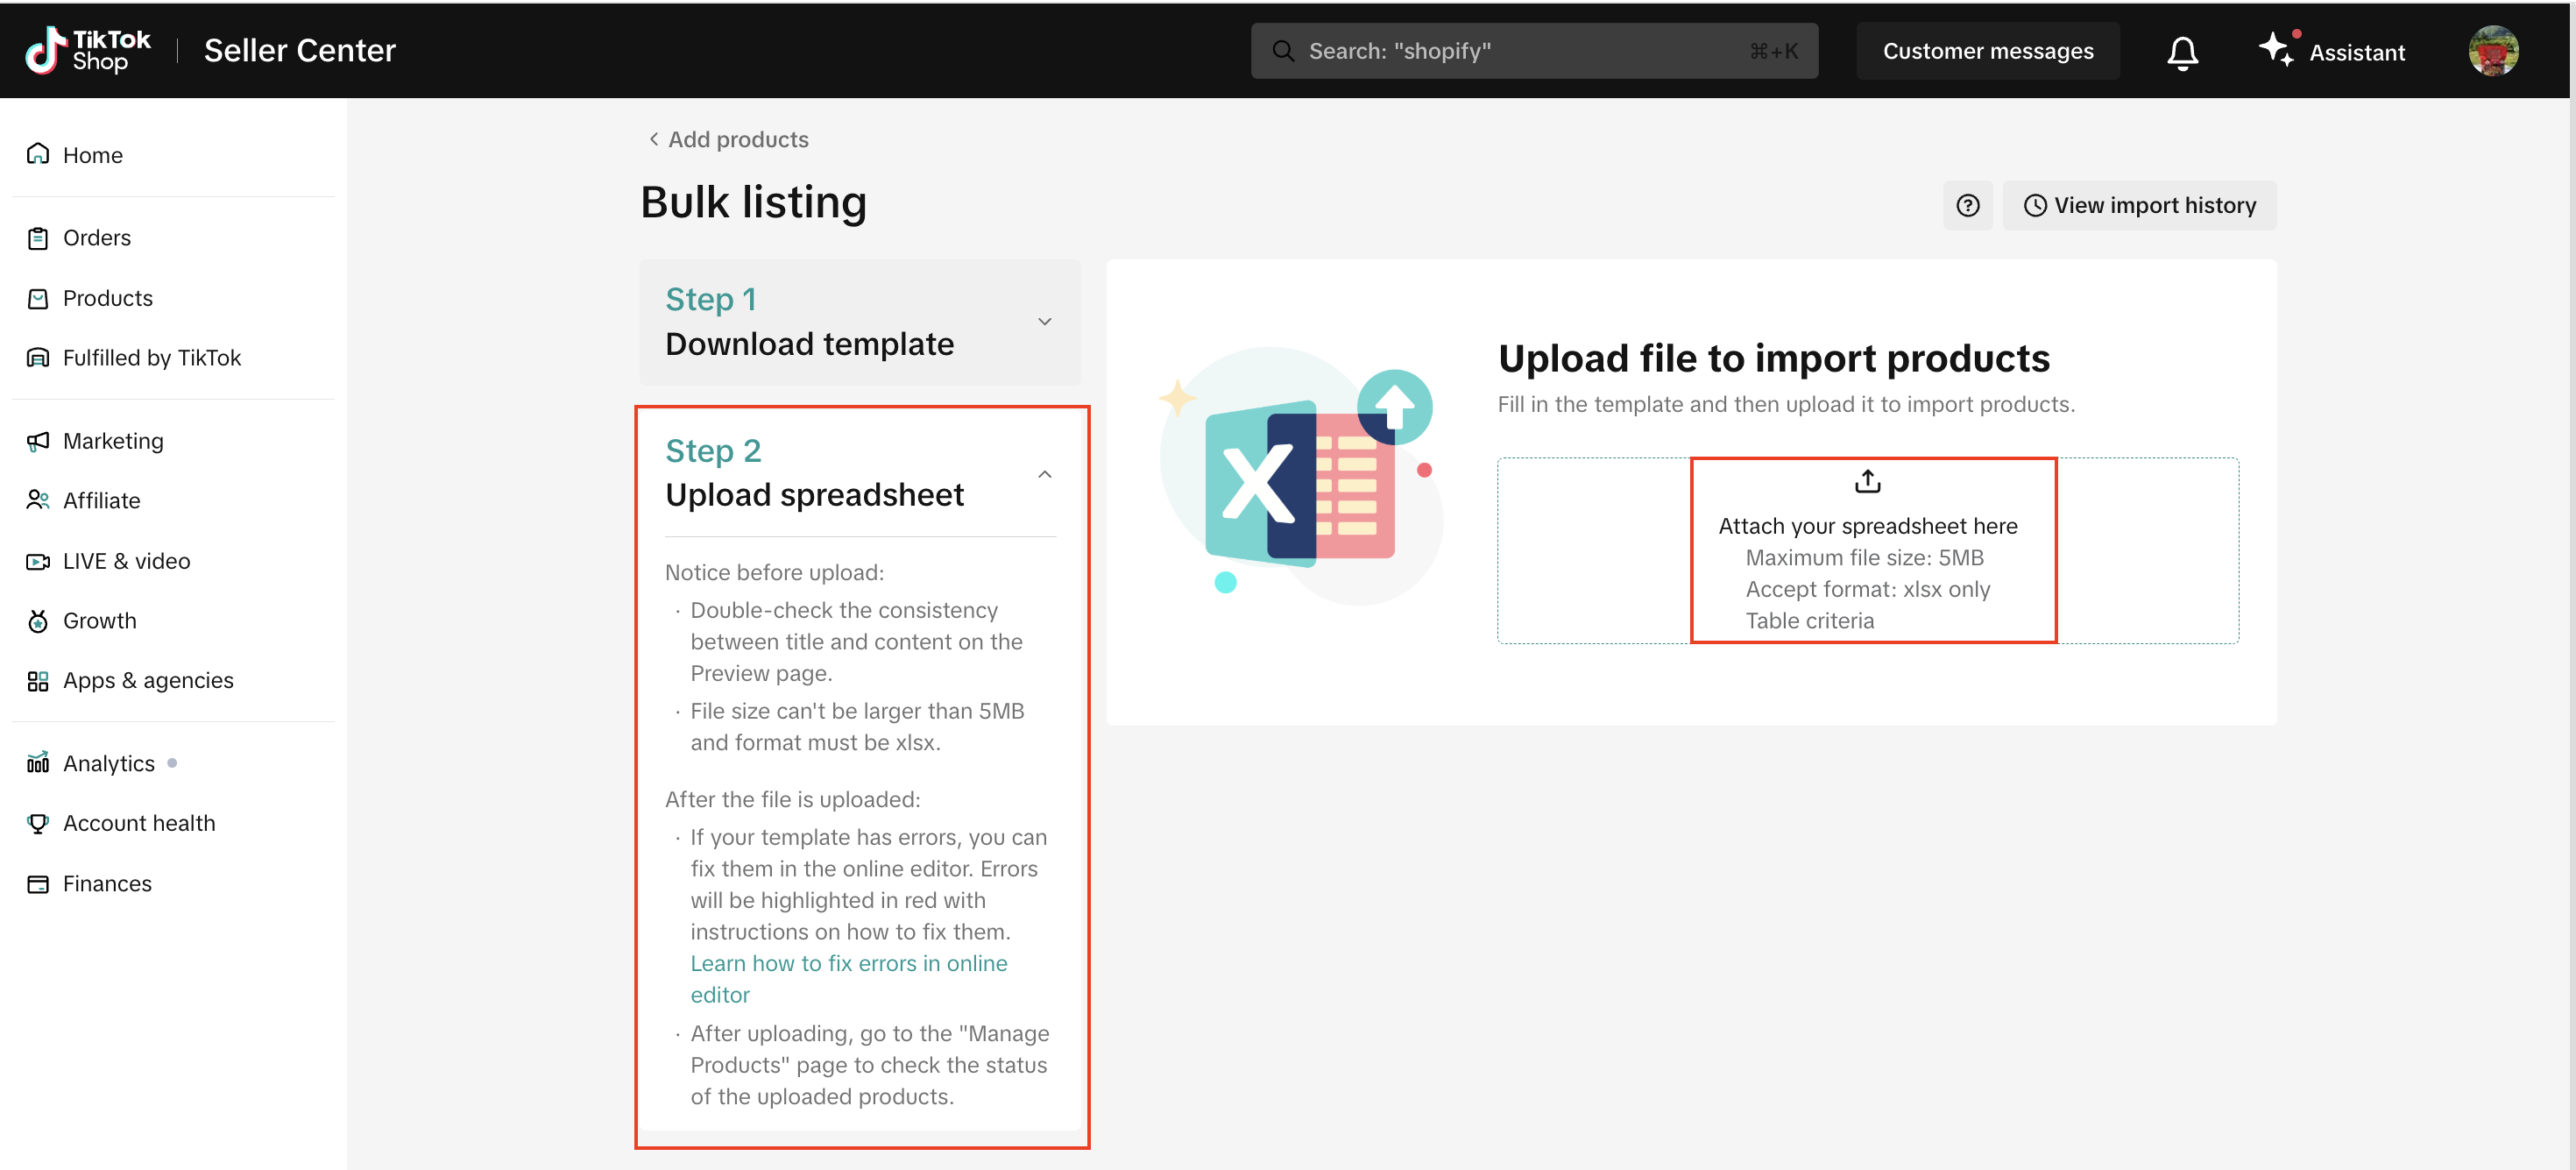

- For successful statuses: Task finished and all SKUs uploaded successfully after you click on Publish.

- For failed statuses: One or more SKUs did not upload successfully. If any of your products failed to upload, the online editor will automatically appear, and highlight the error fields with a red box and an error message.
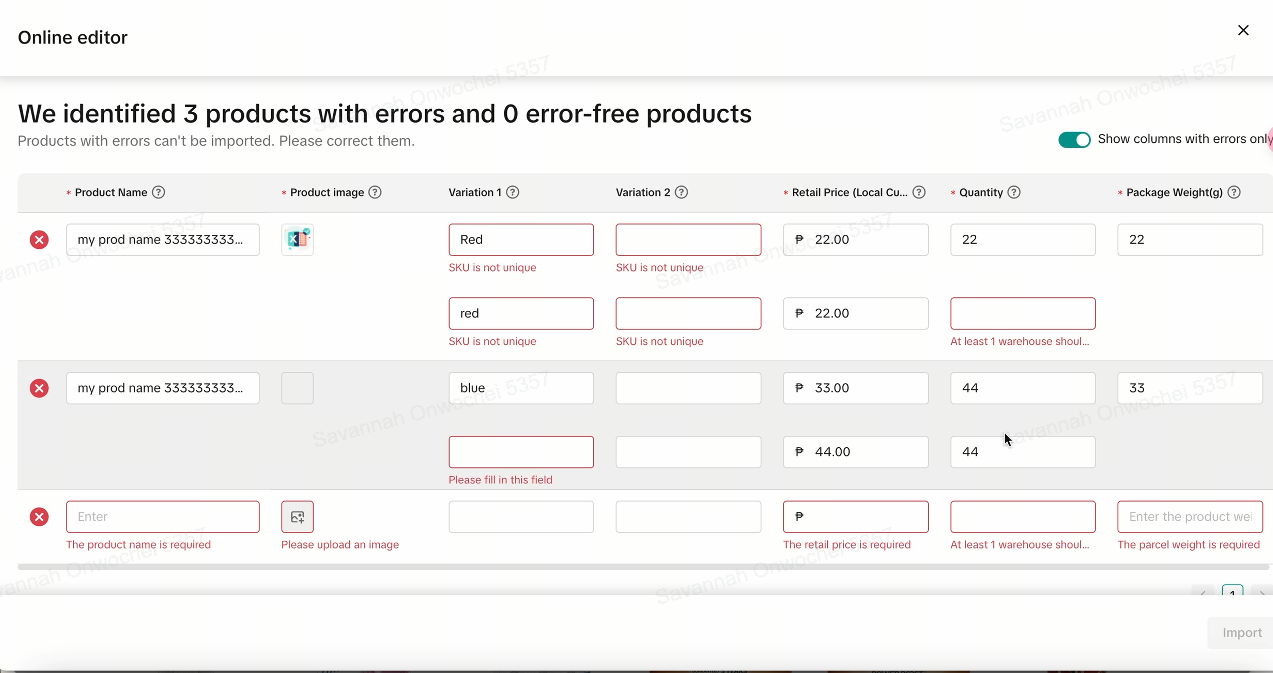
- Here is a small demo of the online editor:
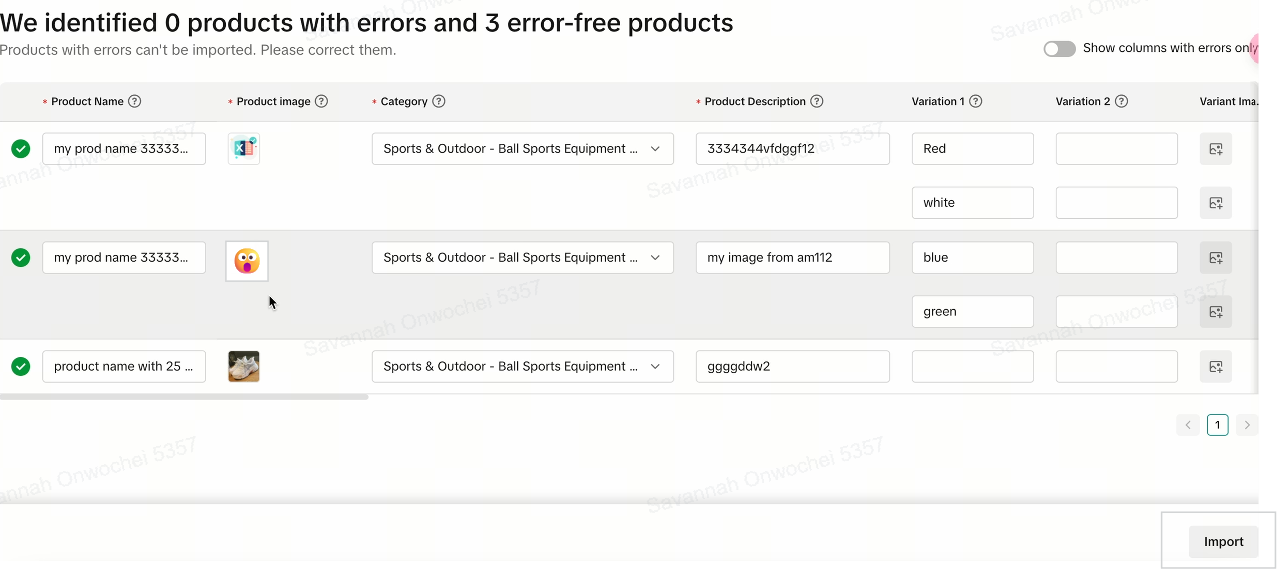
- In the online editor, make corrections for each error of your products. Once all errors for a product (or SKU) are correct, the red 'X' on the left will become a green checkmark. Click 'Import'.
- Note: You must correct all the errors associated with at least one product before you can begin importing.
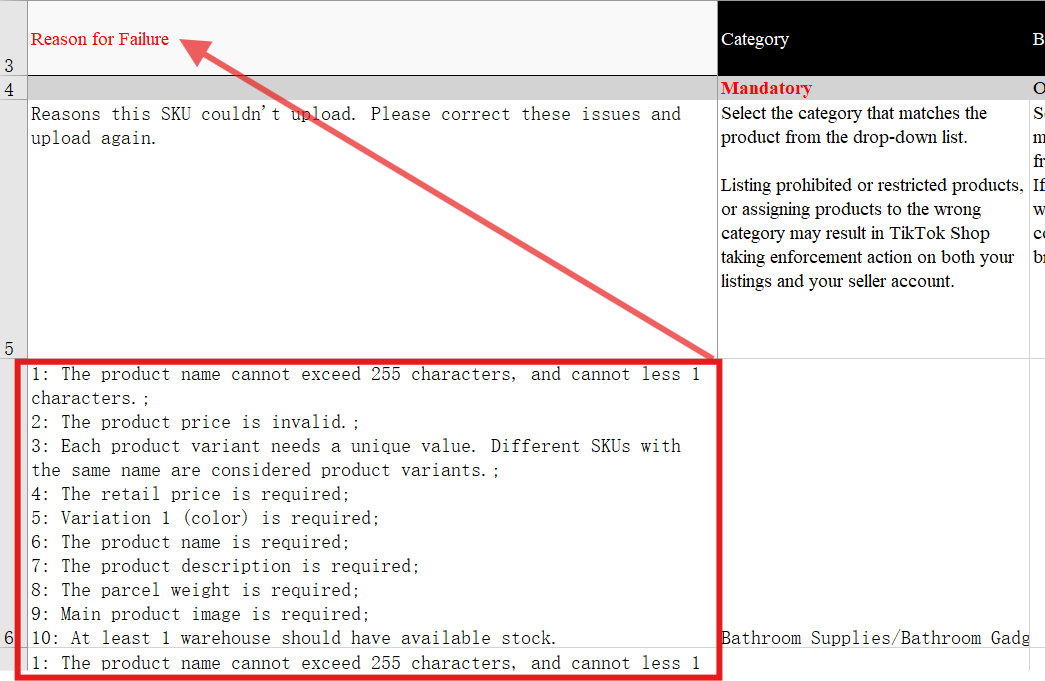
- If you continue to import without correcting the errors for all of your products, you will have the option to download fail reasons to see the error details of the remaining products. Click Download fail reasons in the section with a red 'X'.
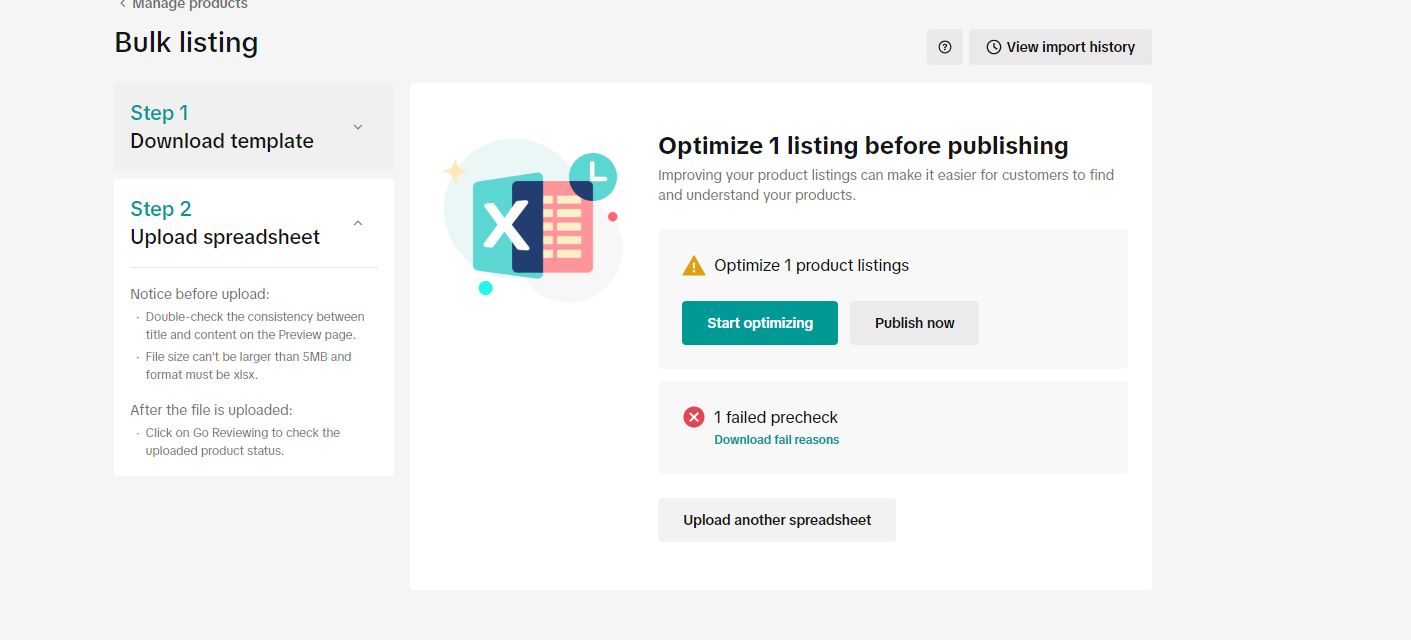
- Open the document to view the failure reason(s) — they will be displayed in the first column titled 'Reason for Failure'. Apply the necessary corrections to the template and upload it again.
- You can only use the TikTok Shop excel template for bulk listings.
- Duplicate templates can only be uploaded once. If you would like to use the template again, change the file name in order to re-upload.
- Failed entries include only failed products. Products that have been uploaded successfully do not need to be uploaded again.
- In online editor, you can use the 'Show errors only' toggle to view all fields for a specific prodcut/SKU.
- If you do not correct all errors using Online editor, you will have to correct the remaining errors by downloading the error report and re-uploading the corrected excel template
Upload multiple spreadsheets
Once you have filled in each category template, upload the spreadsheet one-by-one to successfully list all your bulk products. All other steps outlined in section 1.4 will also apply here.Review your imported listings on the Manage Products page
Once you have published your products successfully, visit the Manage Products page to view your listing status. It will be on the 'Reviewing' tab initially, before it changes to 'Live'.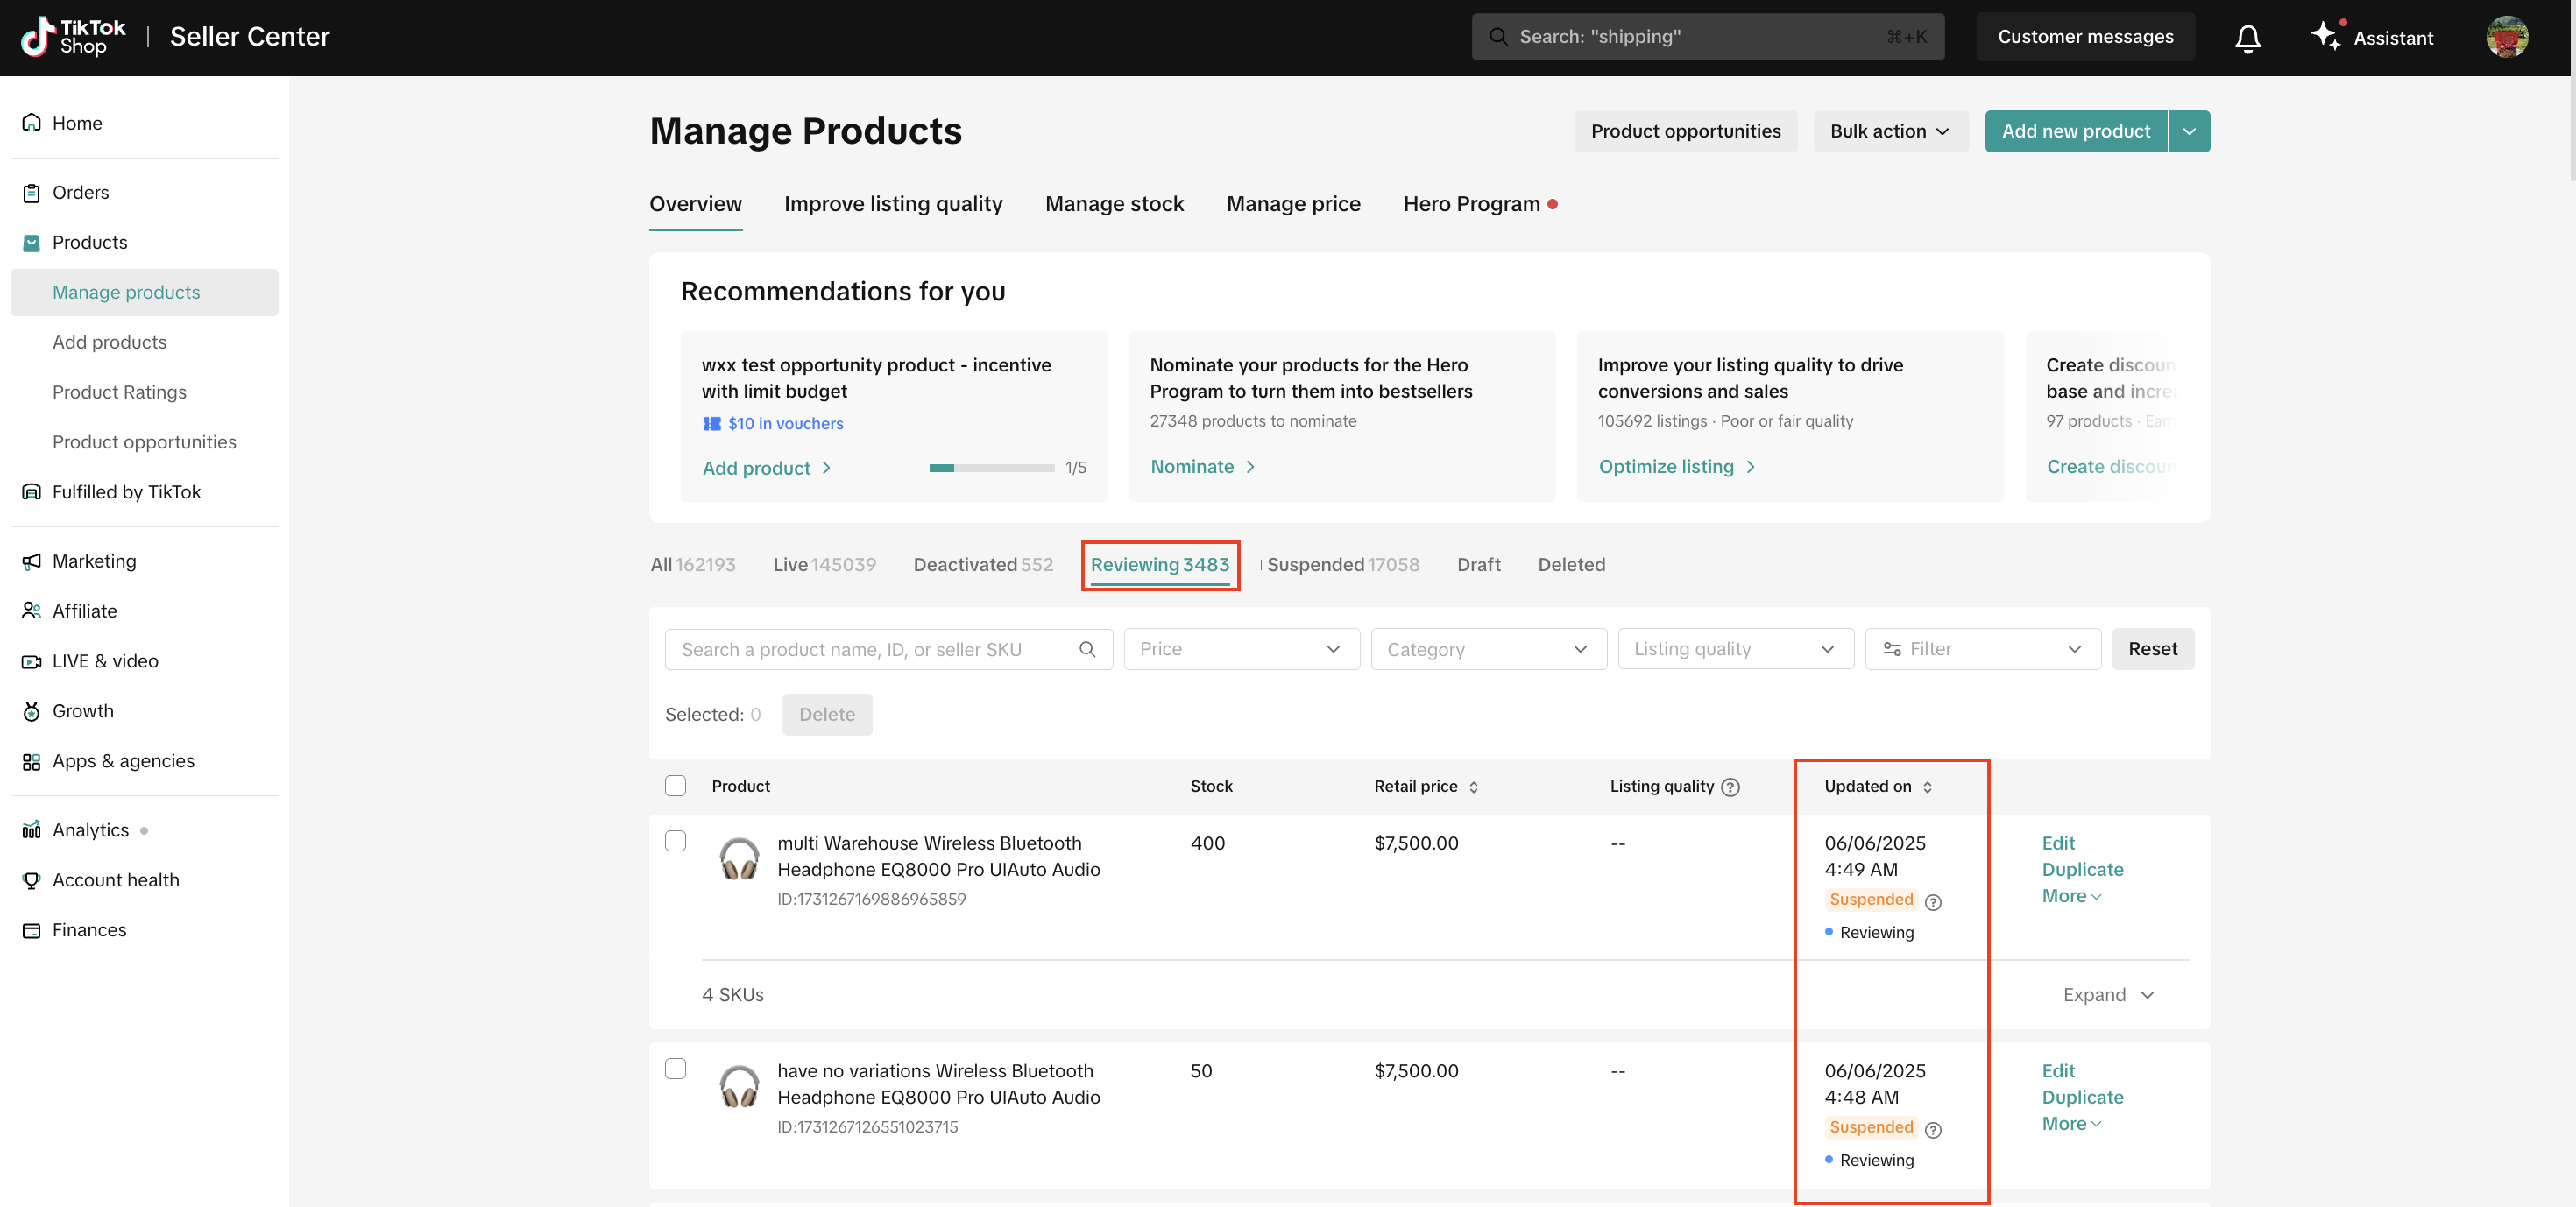
Restricted categories
If you are listing products in categories that are restricted for your shop currently, you have to apply for category permissions. You can still download and upload product listings in restricted categories before being approved. But know that the listings will not be live until you have applied for permissions and have received approval. You can view the status on the Manage products page.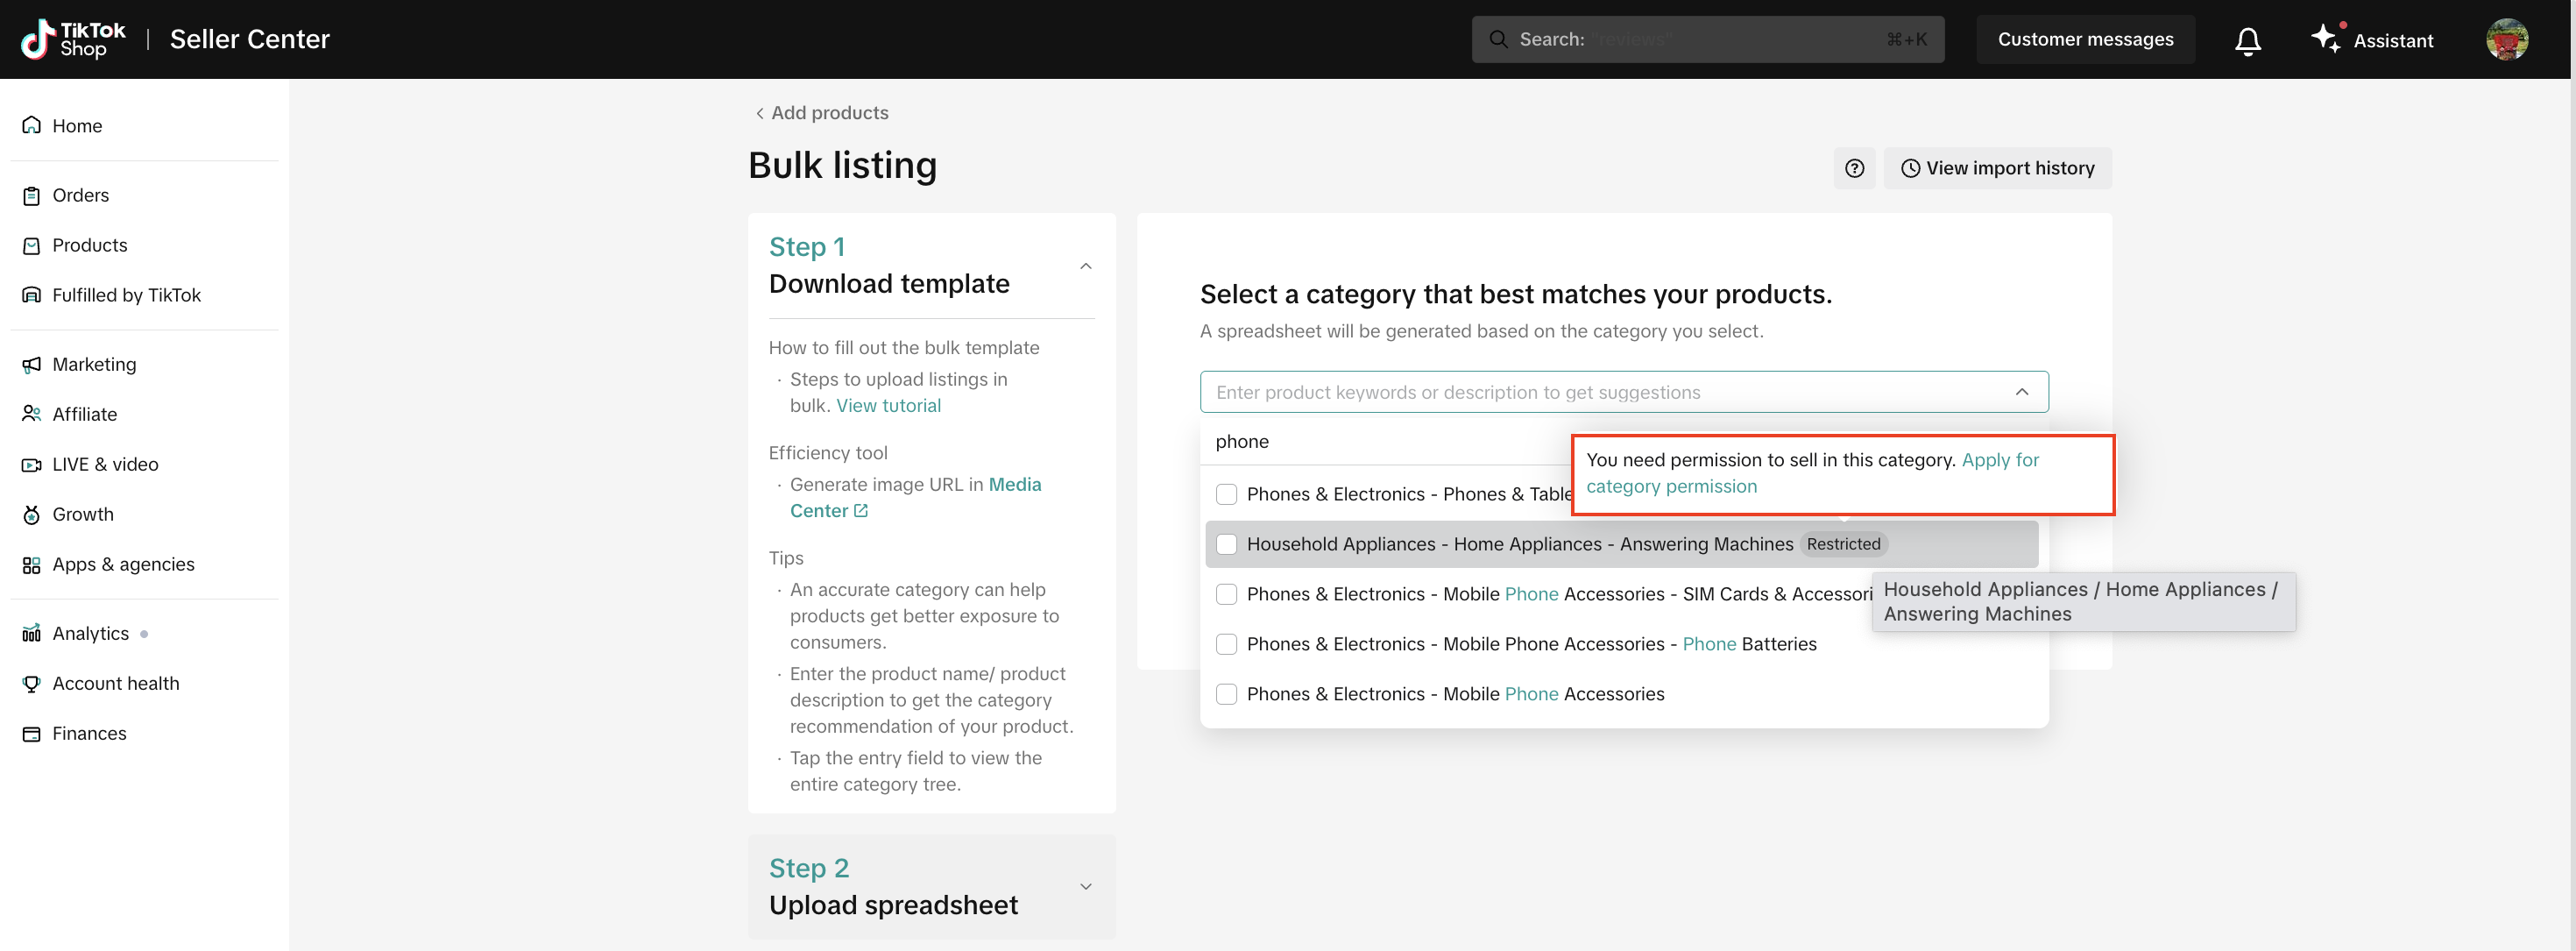

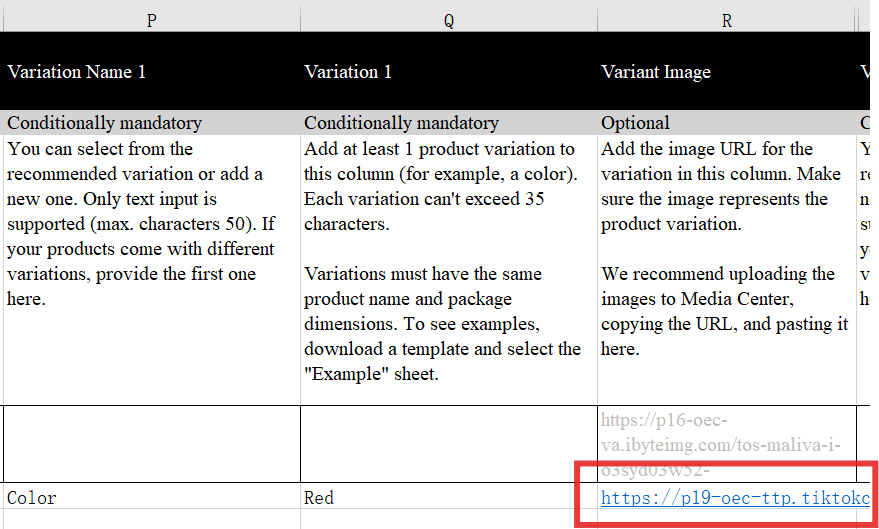
Upload products with different variations
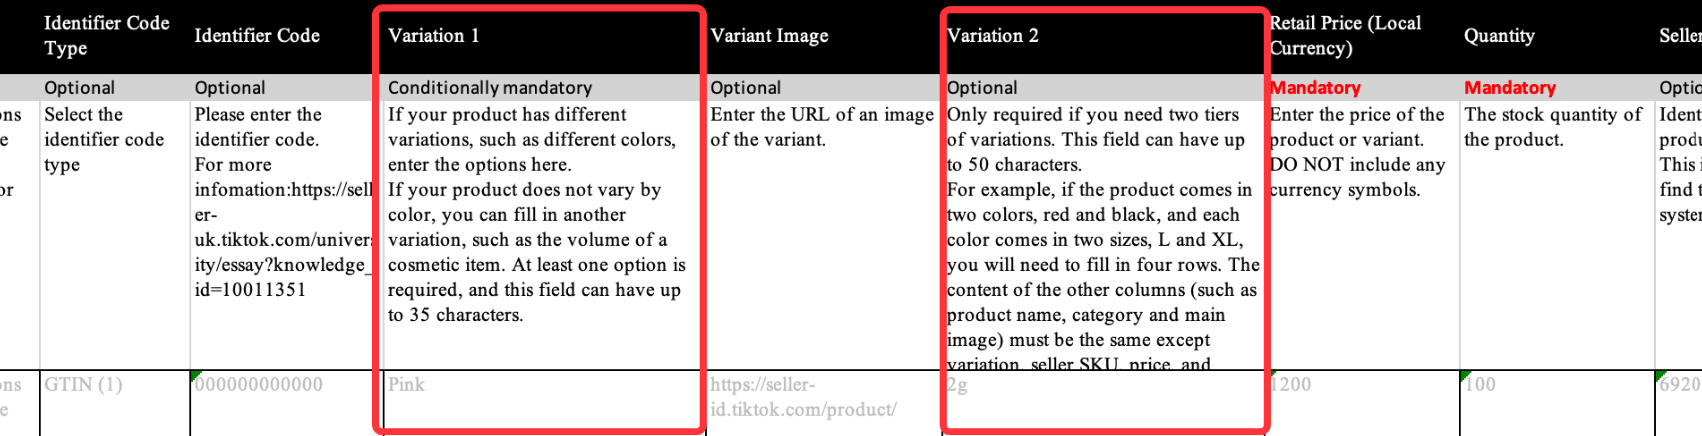
If you're uploading a product that has different variants (such as colors, sizes, etc.), please refer to the following tips to help fill out the template. Note that products must share the same product name and package dimensions to be grouped as variants. A single product can have up to 100 SKUs.Variation 1 column is mandatory
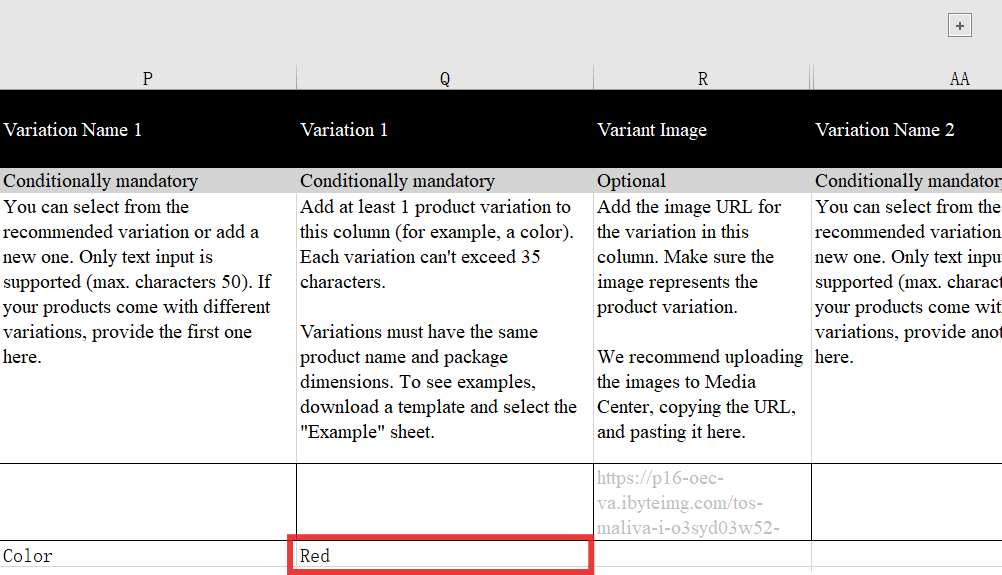
to fill inColumn Variation 1 is mandatory for multiple product variations. You must enter the names of different variants in a new row (e.g. if your variation is color, list your colors "white", "black", "grey", etc.).
Column Variation 2 is only required if you need two tiers of variations, such as colors and sizes. In this instance, your Variation 1 column will be regarded as color and the Variation 2 column as size by default
Same product's variation values must be different.
Each SKU must have its own row
For example, if the product comes in 3 different colors, there will be 3 SKUs, with each SKU in a separate row. If the product comes in 3 different colors and 2 different sizes, there will be a total of 6 SKUs (3 colours multiplied by 2 sizes), with each SKU in a separate row.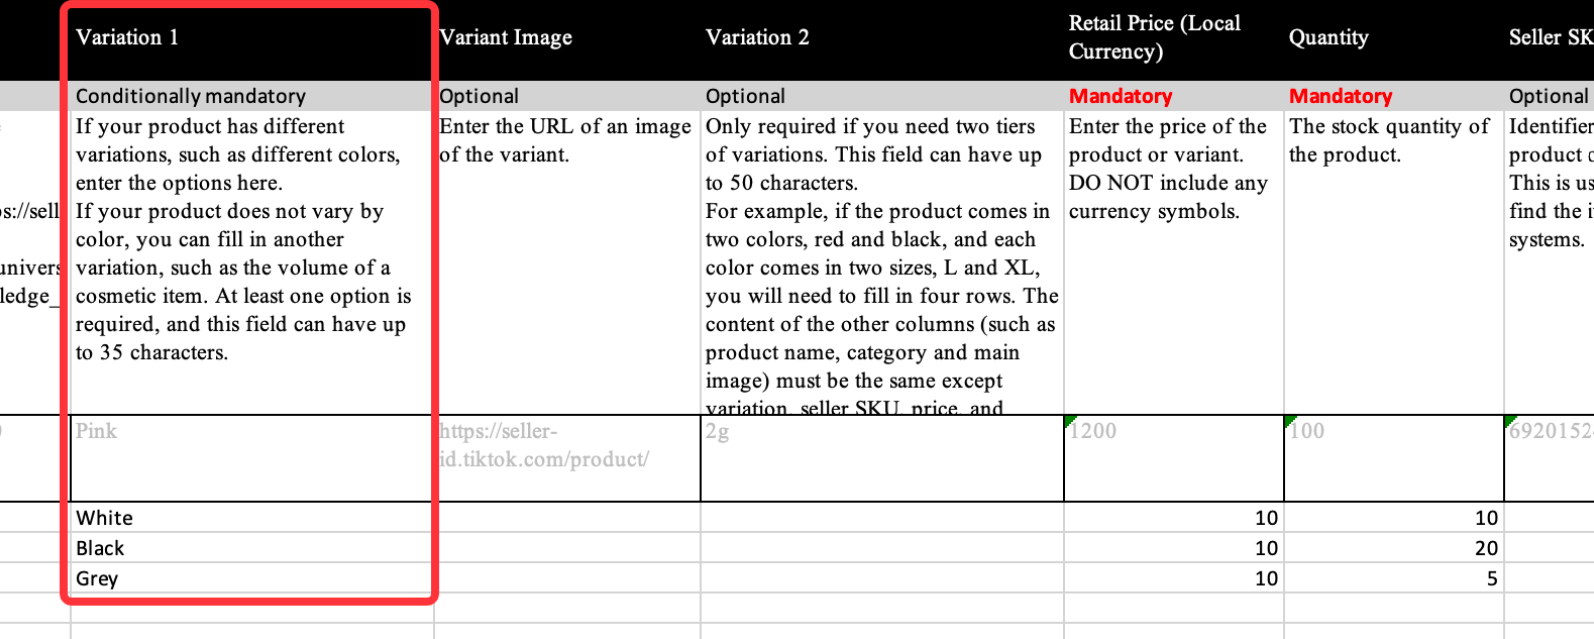
Product information must be kept the same
Make sure the product information is the same, with the exception of variant information, retail price, quantity, and seller SKU.If product information differs, TikTok Shop cannot consider those items as different variants of the same product.

Frequently Asked Questions (FAQs)
Q: Can I use a non-TikTok excel template to bulk list?
A: No. To use the bulk listing and bulk edit tools, you must download and complete the TikTok template. Other excel templates will not work.Q: What categories will the template include? What is a leaf-level category?
A: Your downloaded template will only include the final or leaf level product category chosen on the page starting June, 2025. You will no longer be able to download 1 template with all categories. This is to help you list the products faster and more efficiently.Example of a leaf-category: If you are listing a mobile phone within the 'Phones & Electronics' category, the top-level category here is "Phones & Electronics'. The final or leaf-level category could be 'Mobile phones'. When you download the template, you will only be able to add products under this category path - Phones & Electronics > Phones & Tablets > Mobile Phones. Any other leaf level category will require a new download.If you want to bulk list products that do not fall into the same category, include relevant categories via either of the below options, so you can select a template to download for each product category. This is further explained in section 1.2.1.
Q: What best practices should I follow when adding products?
A: Here are a few quick tips to help you complete the brand, product name, product description, weight with package, and package dimensions sub-sections:- Brand: For branded products, you’ll need to upload related certificates as proof that you or your corporation is the Trademark Owner, a 1st Level Authorized Seller (authorized distributor), or a 2nd Level Authorized Seller (appointed reseller).
- If you've submitted brand qualifications, the word Authorized should be displayed under the brand, and buyers will see the brand on the product details page.
- If you haven't submitted brand qualifications, the word Unauthorized will be displayed under the brand, and it will not be shown to buyers.
- Product name
- Product description
- Strike-through pricing
- Log in to Seller Center on desktop and click 'Products' and click 'Bulk Action' and then click 'Bulk Listing'
- In the search bar, type in product keywords and either select your product category from the recommendations or click 'Browse all categories'.
- Once you've selected your product category, click 'Download template' to obtain your excel template.
- Find the 'List price' column and enter in the list price for the SKUs you wish to enable strikethrough pricing.

- Complete the excel form and return to Bulk listing. Click 'Step 2 Upload spreadsheet' and follow the instructions on this page to begin uploading your completed excel sheet.
- Log in to Seller Center on desktop and click 'Products' and click 'Manage Products'
- Find the product you wish to add (or edit) strikethrough pricing and click 'Edit' in the far right column.
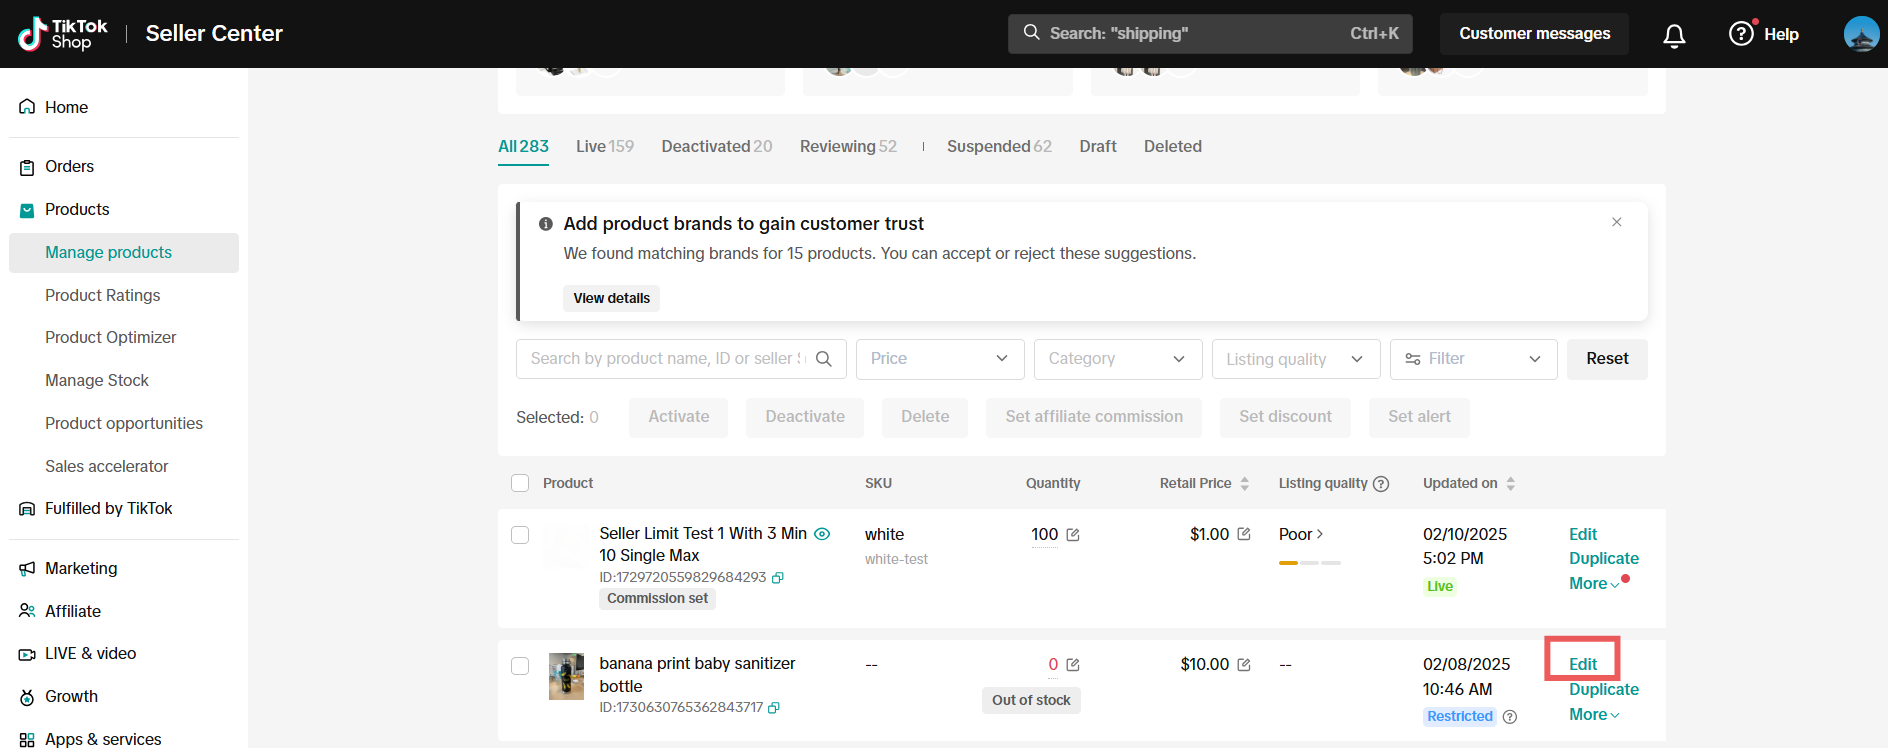
- In the List price* column, enter the price you would like to have visibly struck out to customers (ie list price is not the selling price of your product). List price is the suggested retail price of a new product as provided by a manufacturer, supplier or seller.
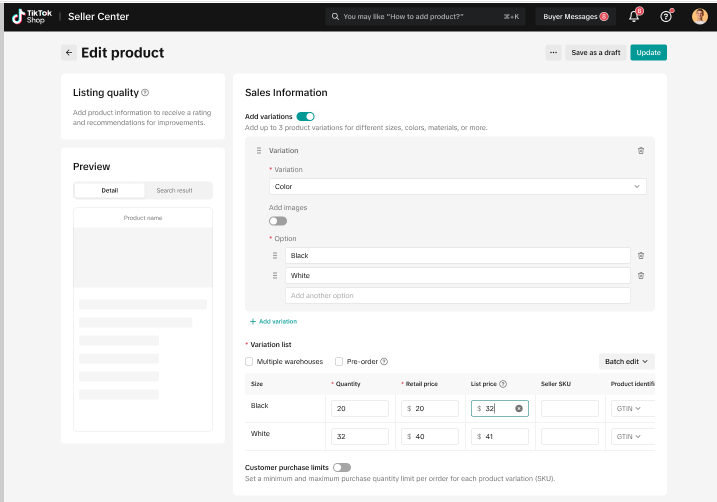
- Once finished, click 'Update' in the top right corner. All list prices will undergo verification before it can be accepted and publicly displayed for customers. You can view the verification status of your products on the Manage Products page. Validated list prices will become available as a strikethrough price on the PDP.
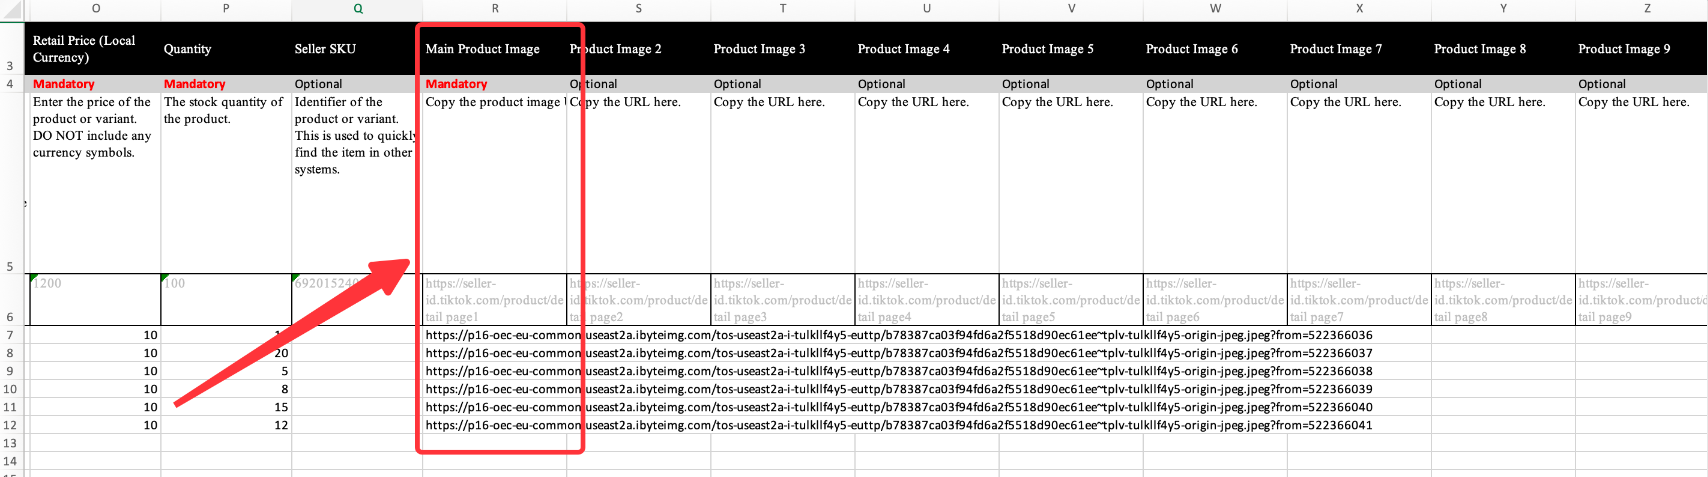
- Adding product variants and variant images: For each product variant, sellers can now display up to 9 images for each variant. Effective product presentation is critical to attract and inform buyers in order to drive sales. Adding multiple images to your product variants gives shoppers a complete view of your products and helps increase buyers' confidence in your products, leading to higher sales and fewer returns.
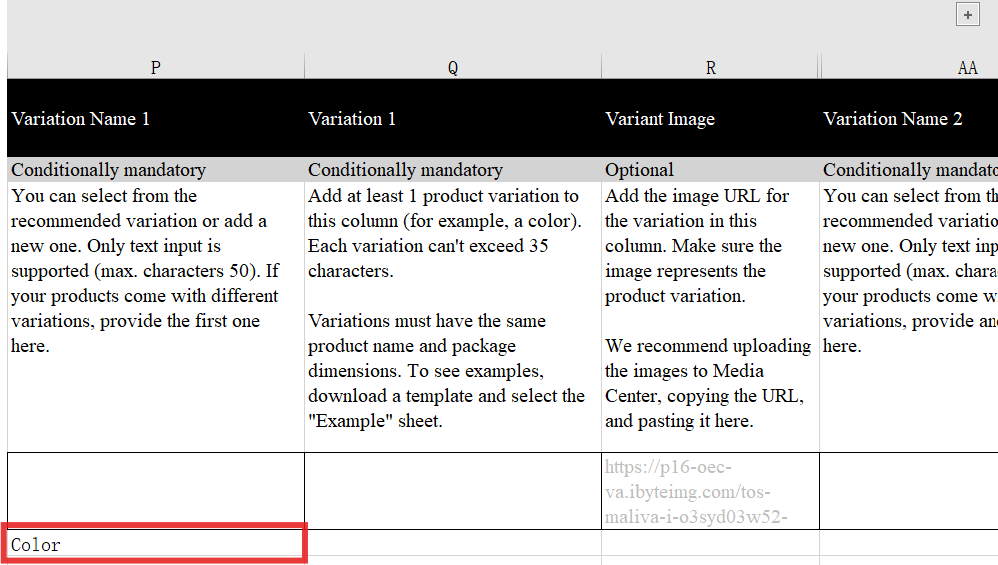
- In Variation 1 section, enter in the descriptor (e.g. specific color or specific size) of the variation chosen in Variation Name 1.
- For Variant Image section, add in the URL link of the first image
- To add more images, click the + button to expand additional sections for you to upload URLs for each image.

- Weight with Package
This section estimates the cost of shipping to a customer and can help you decide whether to join a free shipping promotion or other campaign. The allowable weight is 1 - 220 pounds.
Weight with package is calculated using the following formula: Weight with Package = Package weight + wrapping (e.g., box, bubble, or wood packing).
- Package Dimensions [height, width, and length (in)]
Q: What are product identifier codes?
A: Product identifier codes are part of a system of unique identifiers called GTINs (Global Trade Item Numbers). The most common GTINs used are Universal Product Codes (UPCs), International Standard Book Numbers (ISBNs), and European Article Numbers (EANs). The product identifier code you fill in should be registered with the GS1 database.For some categories, you may be required to associate your products with industry-standard product identifiers to create new product pages and offer listings on TikTok Shop.
Q: How do I find a product identifier code?
A: GTIN, UPC, ISBNs, or EANs can be found above or below the barcode on the packaging or cover of your product. GTIN-14s appear on the shipping container.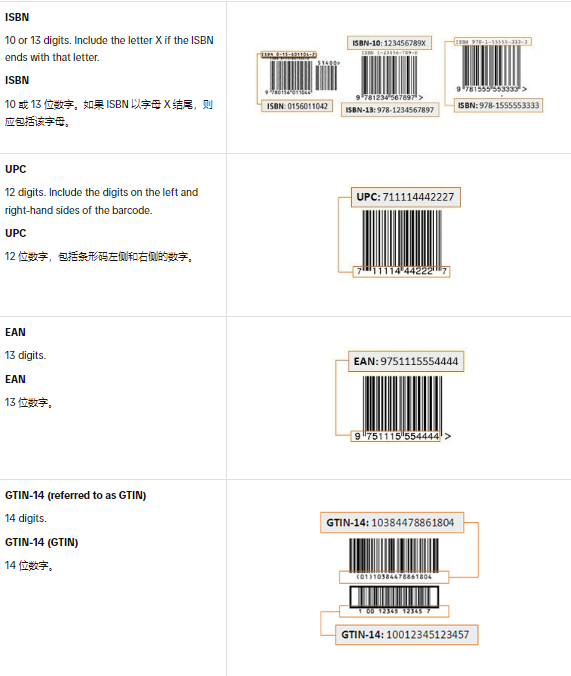
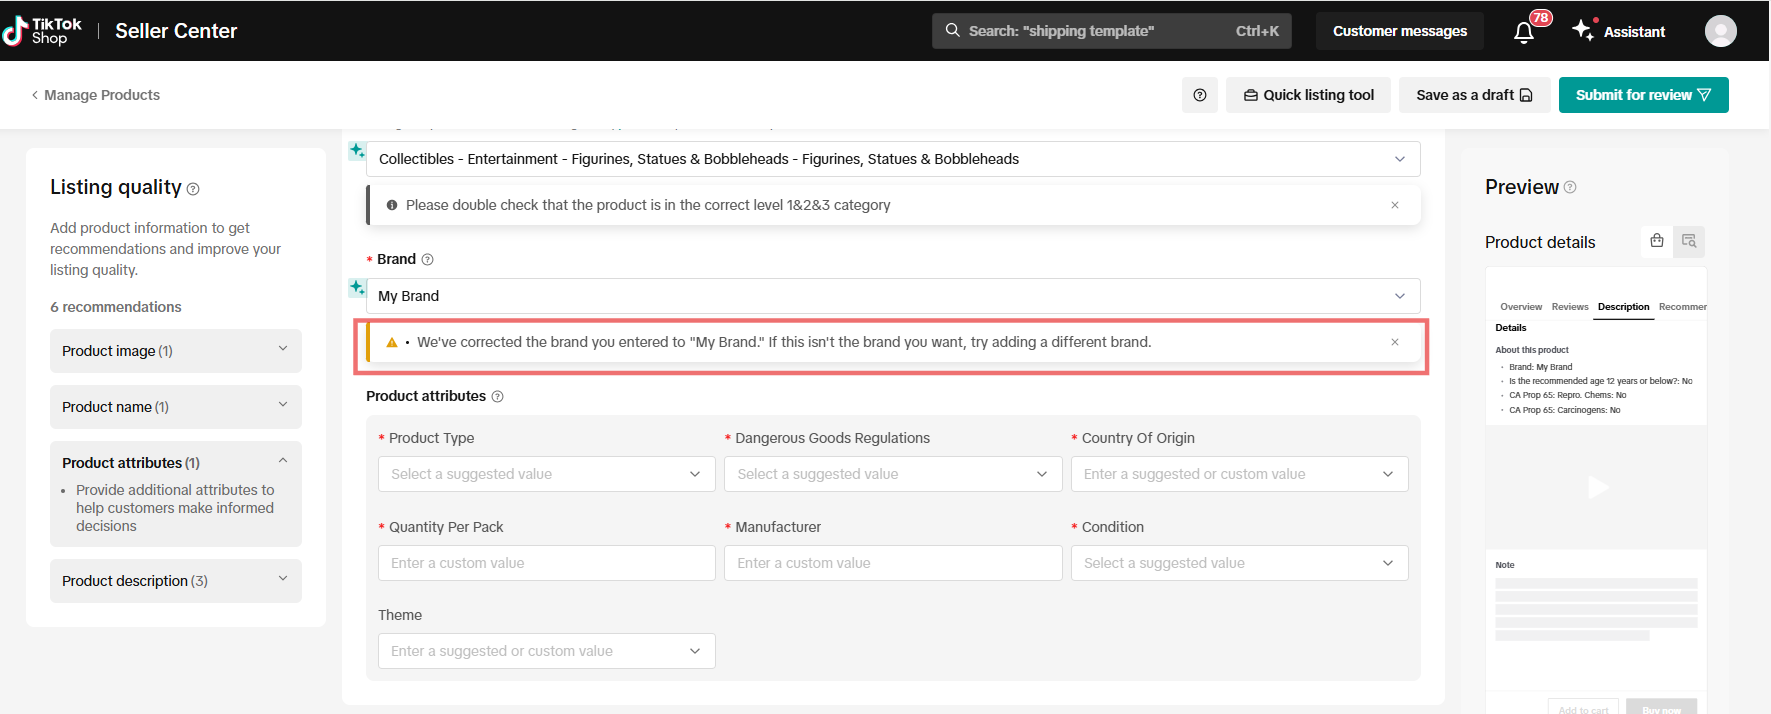
Q: My brand is not appearing as an option. How do I enter my brand?
A: If the brand name does not exist in the brand library, you can take the following steps:- Click on the brand dropdown menu and click the Add a new brand name button at the bottom
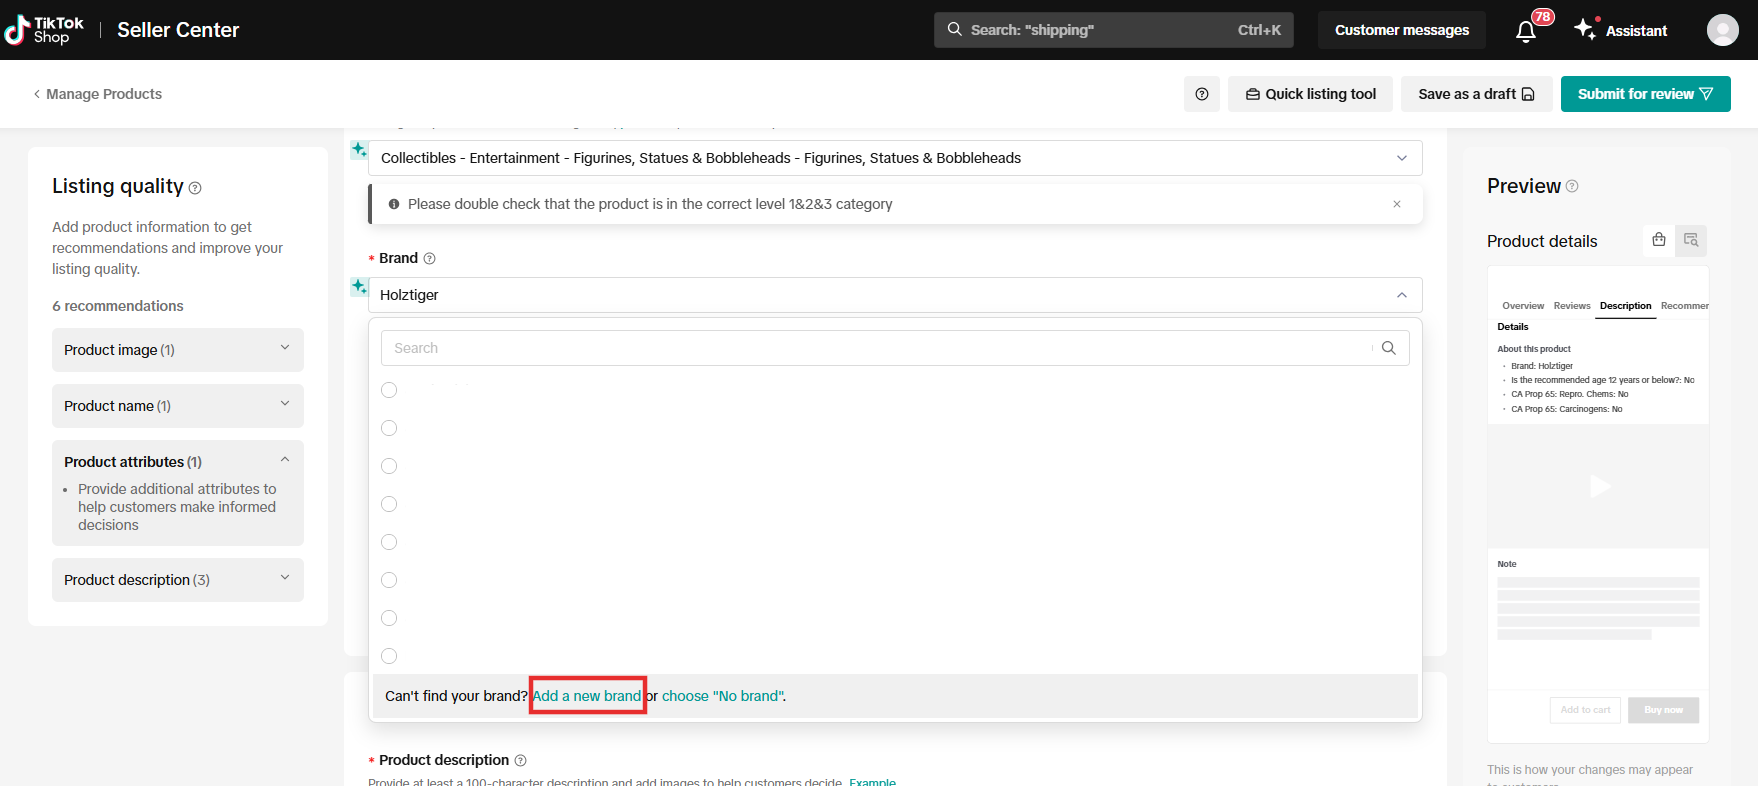
- Fill in your brand name in the field and click Add
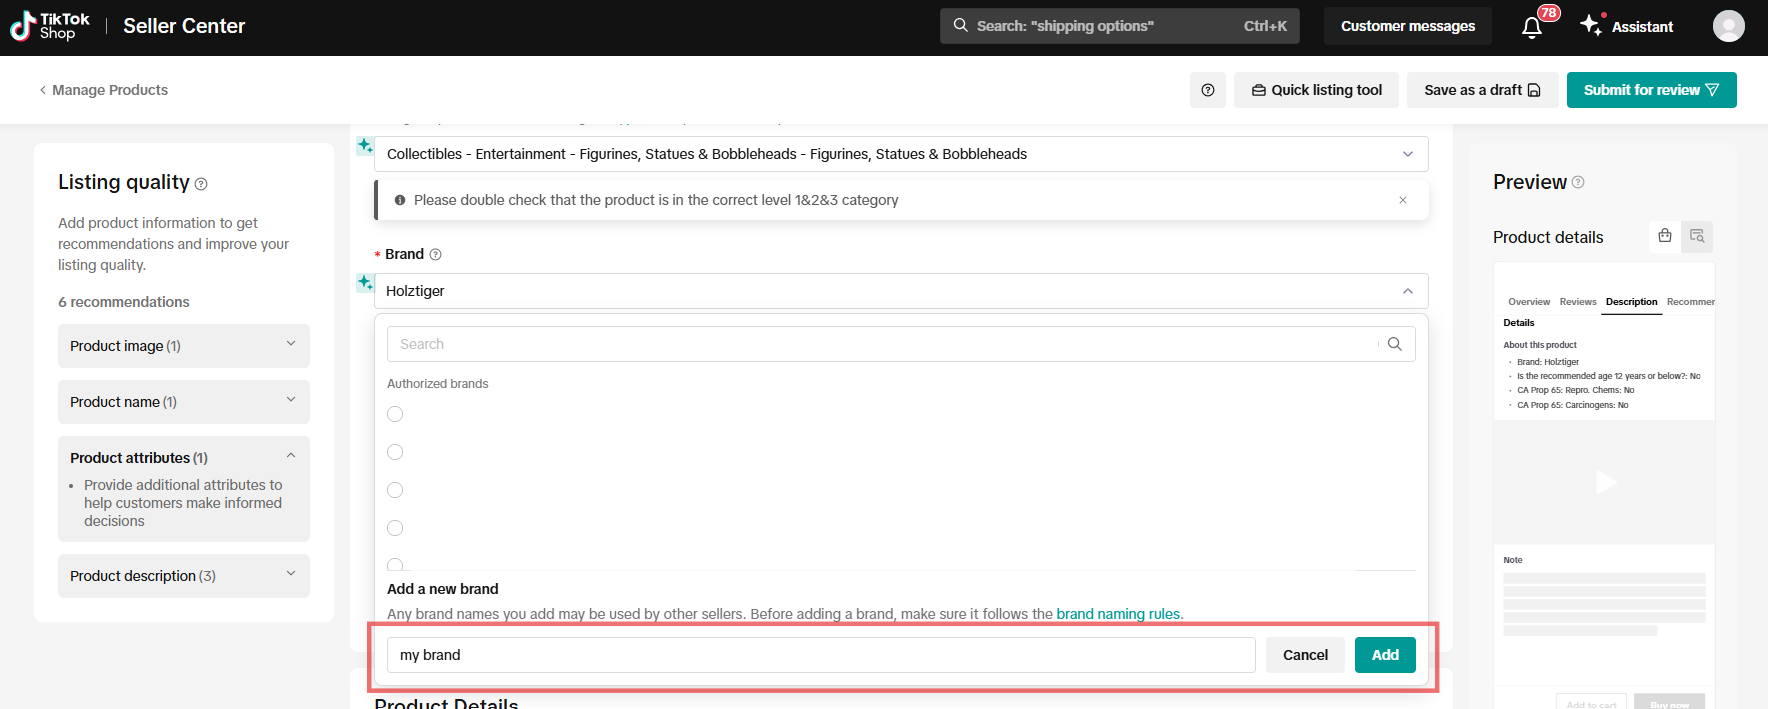
- Review confirmation that your brand was added to this listing
Q: How do I select the right category?
A: If you're unsure about which category to select for your product, you can try searching with keywords for suitable recommendations.
Q: What is an image URL?
A: An image URL is a web address that specifies the location of an image, and must link directly to the image. It typically ends with or includes a file extension that indicates the image format, such as .jpg or .png.Q: How can I get the image URL?
A: You can obtain the image URL in two ways:- For images stored on your computer: You can use the Media Center on Seller Center to upload product images. After uploading, you can copy the image URL directly. To learn more, please visit our guide on the Product Media Center.

- For online images:
- Right-click on the image
- Select Copy image address/URL/location in your browser
- Paste the URL where needed such as the Image fields in template
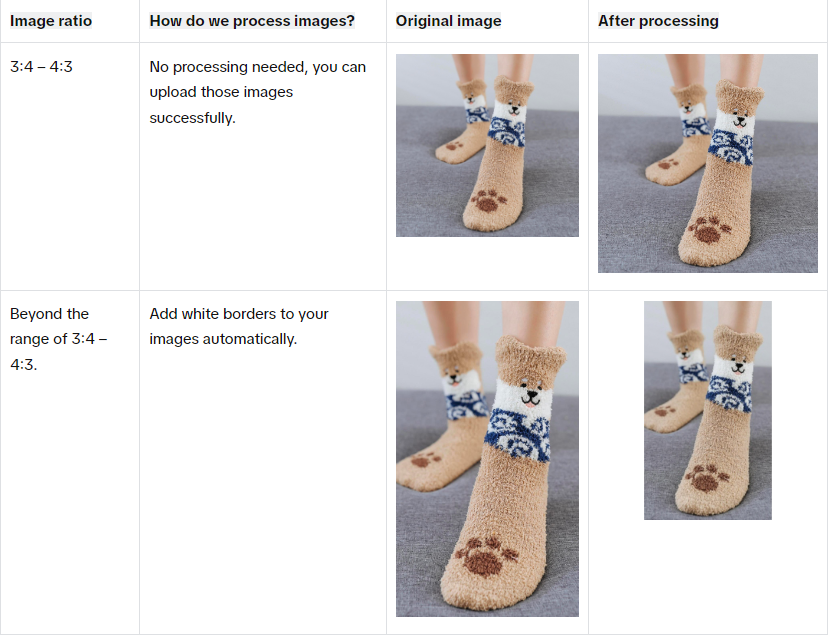
Q: My image aspect ratio isn't 1:1, what should I do?
A: While we recommend uploading 1:1 images, if your image aspect ratio falls between 3:4 and 4:3, you should still be able to successfully upload it.However, if your image aspect ratio doesn't fall within the 3:4 to 4:3 range and you decide to utilize this Excel listing tool, we'll automatically add white borders to your images, adjusting them to a 1:1 aspect ratio for user-friendly display.
Q: Is it possible to upload multiple products in one file?
A: Yes, you can upload multiple products in one file, but please make sure the file size doesn't exceed 5 MB.Q: Why can I not see any affiliate-related fields in the bulk template?
A: Starting Aug 5, 2025, affiliate commissions can no longer be edited using the bulk template. To manage your commissions, please go to the Affiliate center. Learn more here. If you are uploading an old template with the affiliate commission fields, the data will not be consumed by our system.You may also be interested in
2025 BFCM TikTok Shop Readiness Guide
The holiday shopping rush is your single biggest opportunity to increase sales & grow your brand on…

List with a URL
Note: This feature is currently in beta to a limited set of pre-selected sellers. Introduction: Wh…

Made-to-Order (MTO)
Introduction: What is Made-to-Order (MTO)? Made-to-order is a new listing option available for eligi…

Applying for Category Permission
Introduction Some product categories on TikTok Shop are restricted and require sellers to apply for…

TikTok for Shopify - Product Listing Upgrade
Overview: With this new listing update, sellers will have the same product listing experience whethe…
How to Use Size Chart Tool & Guidance
Introduction to our Size Chart Tool With the Size Chart tool, you can now update key sizing informat…

Edit products in your shop
Introduction to editing products in your shop Maintaining accurate and appealing product listings is…

Luxury Resale Products and Uploading Certificates of Authent…
What are Luxury Resale Products? Luxury Resale products are luxury items, including pre-owned luxury…

TikTok for Shopify: Promotions Sync
Overview: Shopify sellers can sync Promotions/Discounts except Free Shipping on Shopify directly to…

How to List Dangerous Goods
Overview When creating a new product listing, TikTok Shop may identify your product as a potential D…